Close
0%
0%

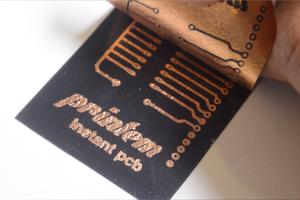
Toner Transfer with Kapton

Kapton tape on printer paper makes for super easy and effective pcb trace transfers.

Similar projects worth following
I have used just about every method for making toner transfer PCBs with mixed results when it hit me one day: I use Kapton tape on my printers heated bed, why not give it a try as a toner transfer medium? Short story short, it works beautifully, costs just about nothing and is just one in a series of maker/hacker projects in my book, the Makerspace Workbench.

Stop buying expensive toner transfer paper and instead make custom transfer sheets with Kapton tape! This project is one of many I have written into my latest book, The Makerspace Workbench. Enjoy!

  • 1 × Wide kapton tape Should be wider than your pcb
  • 1 × Printer paper
  • 1 × Laser printer
  • 1 × Masking tape To hold your transfer in place when you put it in the heat press
  • 1 × Etchant Whichever type your prefer

  • 1
    Step 1

    Export your board image from your PCB software in black & white and a minimum of 300DPI. Print a test copy of the REVERSE image of your pcb traces onto a blank sheet of paper. This will serve as a template for positioning your Kapton tape.

  • 2
    Step 2

    On the same sheet of paper place tape over the printed image of your traces so that it is completely covered. If you have to use more than one piece of tape, make sure that there isn't any gap between the strips. You can see in one of my images that I have a small gap. This can be corrected later with a permanent marker.

  • 3
    Step 3

    Put the paper back in your printer and re-print the image. Verify that the image has printed properly onto the Kapton and carefully cut around the outline.

View all 9 instructions

Enjoy this project?

Share

Discussions

Similar Projects

Does this project spark your interest?

Become a member to follow this project and never miss any updates