Close
0%
0%

5 Color 3D Printer

This project will entail finish rebuilding the RepStrap, and the design behind a 5 color extrusion method.

Similar projects worth following

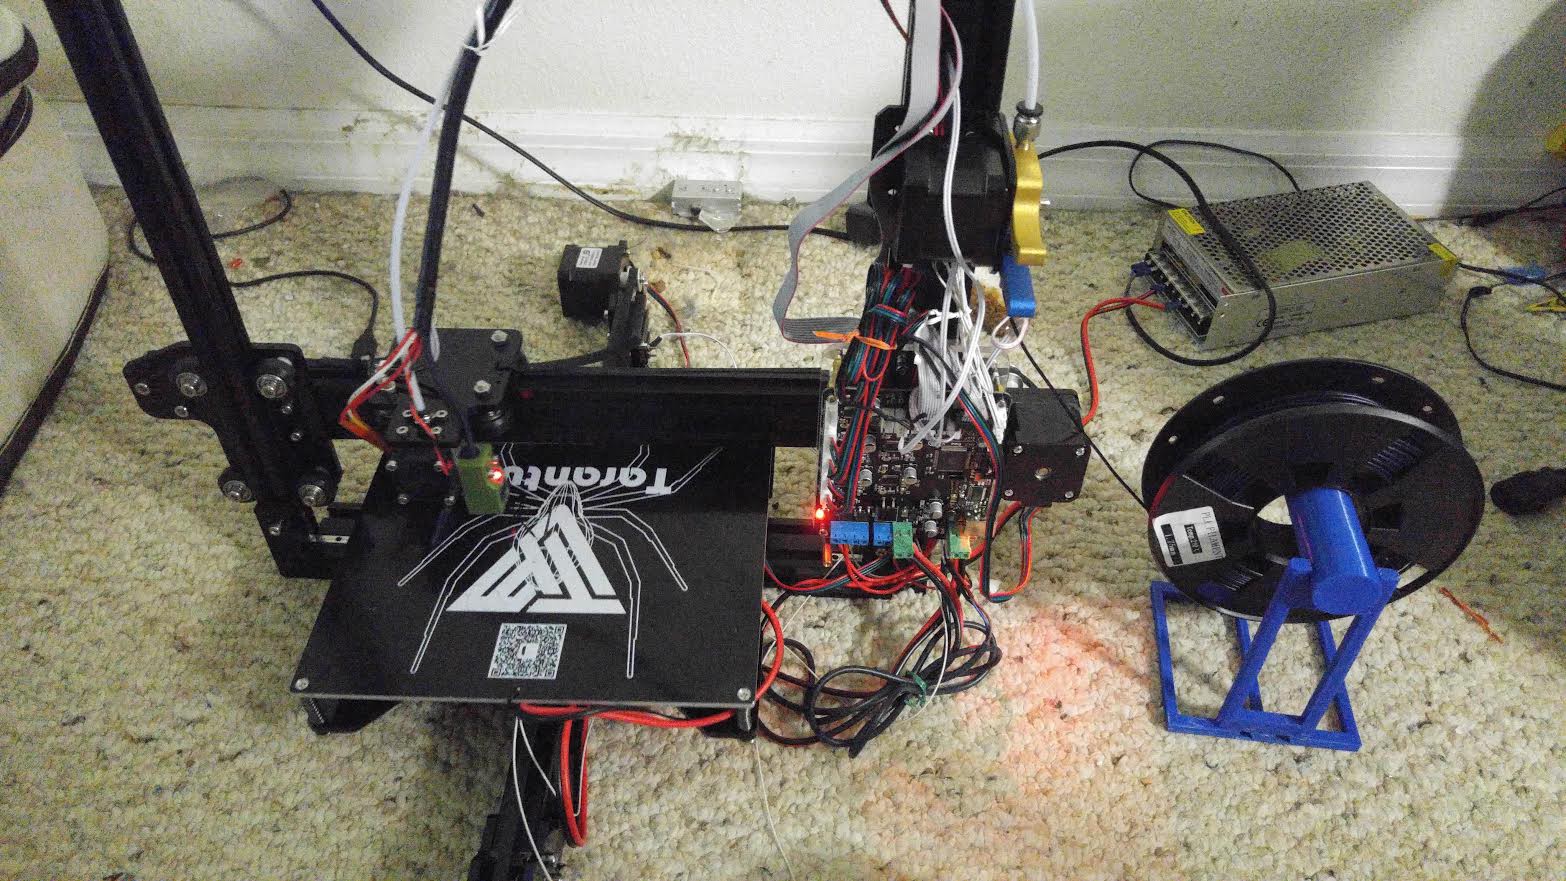
The point of this project is to make a CMYK compatible 3D print method that only uses one filament to extrude with dyes. That way we can replace the current method of using 3 filaments. This will reduce the physical footprint, lower power usage, and lower wasted filament.

  • 1 × i3 clone (Tarantula autoleveling bed) Test the individual servos while controlling both motors in sync
  • 10 × Plastic dyes (starting with sharpies and highlighters)
  • 2 × Diamond Hot end
  • 5 × Parasitic pumps
  • 1 × Filaments to test (white, ivory, transluscent and transparent)

  • Time to prep for the first tests

    Krinkleneck04/06/2016 at 17:21 1 comment

    While I am in new need of a bigger spool holder, that I am now printing, I have begun to prep for tests. Since this will all be done on the diamond head I will have to make a 3d conversion model once it arrives.

    As for the ink, I will start with known good references. Sharpie/highlighter ink is a good starting point. I know both of them have a reputation for coloring plastics, and I know they are easy to get a hold of. So, they will be my first test subjects before I move on to more expensive and exotic plastic dyes.

    http://hackaday.com/2014/05/08/coloring-3d-prints-with-sharpies/

    Now, there are problems I am anticipating. I am anticipating layering problems and clogs, but these can be combated. The clogs can be combated by using a surface only policy. What this means is that only the outside surfaces will be colored. That will save both ink and prevent clogs by having fresh unchanged plastic pushed through for most of the print.

    As for the layering problems I will have to balance ink types and mixture ratios. That's all I can do for that.

  • Time to prep for the first tests

    Krinkleneck04/06/2016 at 17:18 0 comments

    While I am in new need of a bigger spool holder, that I am now printing, I have begun to prep for tests. Since this will all be done on the diamond head I will have to make a 3d conversion model once it arrives.

    As for the ink, I will start with known good references. Sharpie/highlighter ink is a good starting point. I know both of them have a reputation for coloring plastics, and I know they are easy to get a hold of. So, they will be my first test subjects before I move on to more expensive and exotic plastic dyes.

    http://hackaday.com/2014/05/08/coloring-3d-prints-with-sharpies/

  • Well, I might just figure this out

    Krinkleneck04/23/2015 at 03:22 0 comments

    As of today I just found something that astonished me. Someone just solved the contamination problem (kind of). This might just be a reduction of that mixing chamber size, and extrusion size. That way a perfect mix isn't necessary because the amount going out is so small that you wouldn't be able to notice an imperfect mix, part count can be dramatically dropped, and it might just be as simple as screwing in injection chambers for the individual inks. I will have to order the part when it becomes available, but until it becomes available I have to focus on things that I can work with (I have a reflow oven to finish, and a tablet to order and learn from). I am ecstatic that this might come to a quick close, but I am not sure until I'm sure. I will post a proposed sketch on how this would all work. That way if someone can jump on this while I'm busy they have all the info that they need.

    Here is what I am referring too. https://reprap.me

    It's the diamond printer, and if done properly, not only will you be able to do multiple colors, but you will also be able to do multiple filaments. So, fingers crossed that this all works and doesn't back fire like all my other previous designs from failure, or being outside of my build reach.

  • How dare you like this project!

    Krinkleneck01/17/2015 at 05:29 0 comments

    I can't believe you people!!!! Having faith in me!!! You guys have been following more and more. Well, with the Ara project actually releasing to specific consumers, my other project is on hold. I have to study their design a little closer, and that gives me time to actually build tests for mixing stations. I am thinking about doing a piston seal like for cars to eject the colored plastic. I will post up the design and results.

  • Contamination Problems

    Krinkleneck10/11/2014 at 10:59 0 comments

    The more I piece together the mental image and try to figure out how certain things work I realize how much I have to abandon. So, I am settling and testing a one plastic system where you introduce color with pigments. I am starting out with newer liquid thermoplastic pigmentation technologies.

    One of the main problems that I am trying to solve in this project is a suitable mixing chamber. I have tried some techniques that I have seen work "in theory", but during recent testing with has brought to light a few points. First these had a design that the same volumes and metrics of fluids would be introduced continuously, and two all fluids in solution were either the same or perfectly accounted for. Since I knew that the viscosity was going to be different and that any pigmentation was going to be extremely strong I just wanted to test a large scale mixing platform. I used a nozzle that came with a inserted helical structure that broke and reversed directions frequently.

    I began by picking up food coloring because it had close to the proper viscosity and it worked as a proper pigmentation. I then tried to emulate a close approximation of melted plastic with powder and water (I needed something that could emulate this for a little bit of time). I then proceeded to load up a syringe and the mixing chamber with uncolored semi solid and put dyes on top and in the mixing chamber.

    I noticed two significant problems. Firstly, the dyes pushed to the top of the mixing chamber separating out from the other viscous fluid and leaked out. This might attributable to how the system wasn't properly sealed and the dye and fluid had some place to go other than through the system. The other thing that has shown up even when I inject the dye into the mixing chamber to prevent back flow, this problem remains. The other thing is that when I push the fluids through the apparatus I get contamination from the dye and fluid clinging to the surface. From the point of dye insertion to the end of the mixing chamber where the fluid gets pushed out like an extruder it's contaminated. All the colors blend from levels that should be isolated from each other, and at every bend the length of the contamination increased by 1/3 of its previous length.. Subsequent mixture would then pick this dye up and be contaminated.

    I need a new mixing chamber that will mix in proper amount, maintain the plastic in a fluid state to mix properly, push to the extruder, push all of the mixture out without leaving significant contamination, do it in a timely fashion, and rinse and repeat. I have a few test models I need to build. I just need to figure out how to build them with tight enough tolerances to make this work. I already have located possible usable pigmentation, but I need to finish the build. I will check in with any further failures or successes.

  • Simplification

    Krinkleneck07/26/2014 at 06:05 1 comment

    I'm not working on this project, and I am not working of this project for more than the reason of my other project taking precedence. But, I am still doing this project do to the need of this project. I have thought about the feasibility of what I have described, and while this project is possible, it's not practical in its current form.   No matter how much I keep playing the concept through my head it rings of impracticability.  While the need for a 5 color 3D printer is a necessity, the way that I have thought of getting there is ridiculous to put it bluntly.  The amount of components and the functions of each of those components  is too much for too little.  So, from now on that idea to the build is going to be scrapped.  The standards will also change.  I want you to think about this for a second and tell me what you think of this system compared to what I am proposing to replace this concept.

    ORIGINAL

    You have 5+ filaments that are fed in and controlled with their own servos that have to be individually and maintained on untested customly made control circuitry.  You have to use and purchase all of these large rolls of filaments that take up lots of space.  Also, there be will a need to buy different quantities of different reels because a reel has to be individually used and some reels also function to do nothing but filler.  All filaments also have to individually wired to those individual pieces and make custom components for each filament that consume circuit space.  There also needs to be more separate pieces for any custom filaments that don't work with color.  No mounting system can be chained between filament reels because they are different colors.  This doesn't even begin to include the uses of speciality filaments that dissolve or get specific properties.

    Then you have to appropriately mix the filaments into a chamber that get the right color at the right time.  You have to control the individual rates of each filament to get the right color achieved.  You also have to monitor the amount of each filament that you have.  

    That is the jist of the original concept

    New Concept

    You have ONE filament.  All the color is injected via an ink or dye in a mixture chamber.  That means the only timing you have to keep track of is in the mixture chamber and you can keep a fixed interval on your one filament.  Since it is only one filament the amount of print head real estate is reduced.  You also will only have to buy one filament and you can chain them together to have more filament that is used.  You will be able to get the color in with ink cartridges.  The ink will be generic, and the cartridges will be simple to use.  All the mechanical will be at least less than half the total mechanical the other system will be.  You will also be able to have separate speciality filaments.  The ink injection system will be the same regardless of it being 3-5 colors.  

    No matter how many times I frame this up in my mind, I still think my original theory of methodology is slightly ridiculous.  On one hand they would both work, but on the other hand the original concept would be significantly more complicated.  There are more moving parts, parts to buy, things to synchronise, higher levels of prediction and monitoring, and storage and design are bonkers.  When I get back onto this, everything will get an overhaul.

  • End Stops Created but DODGY

    Krinkleneck06/12/2014 at 01:50 0 comments

    If the picture isn't a bit of how I felt when assemlbing these little tricksters than the explanation will.  The entire build except for one piece went smoothly.  Some parts were no longer being sold so I had to improvise with better newer components.  The 3 pin power connector on the other hand was the problem of these gen 7 end stops.  I didn't notice at the time of making the circuits, but the holes were too small for the leads.  I had to remove each individual lead from the connector and hammer them back in one by one because drilling would have eliminated the pad entirely.  That was 40 minutes of pressing, hammering and straightening. When I make these again I'm editing the print beforehand to compensate.  Next up improvised realignment of the frame, and finishing the programing of the main board.

  • Vector Image

    Krinkleneck03/20/2014 at 10:33 0 comments

    Just added a simple decal design option for 5 color compliance.  The way I see it is I will need one when this is finished to let people know which printers are 5 color compliant.  Which means now I can define what it means to be able to print in 5 colors.

    • it has to have the ability to take up to 5 filaments at once
    • each filament should have the ability to be activated and retraced individually
    • it should have the ability to run all filaments at once
    • one or more filaments should be able to fill all interior spaces that can not be seen but make the shape solid and structurally sound
    • specialty filaments must be put in a separate nozzle unless needed for design

    All of these basic rules that I am setting up will help me accomplish the design.  It should also help any further builds along 5 color printers.  Any rules that you think that I have missed would make for a good message.

  • Rebuilding Components Printer

    Krinkleneck03/18/2014 at 17:10 0 comments

    Making old 3D printer a gen7 electronics compatible rig.  I will be ordering these components sometime within a week.  I will have to do some digging because the parts specified are a bit less notable.  This printer will be the main stay in making the components and framework for the 5 color print head of the next printer.

View all 9 project logs

Enjoy this project?

Share

Discussions

Trevor Moseley wrote 07/30/2021 at 20:57 point

Diamond printer uses a single large head to mix 5 different filaments. Not quite what I thought you were doing, not as good as your direction. I actually had a similar idea to yours back in 2013. I discovered that standard PLA uses a specific type of dye that is also available for ink jet printer refilling (these refills were best when doing PCB manufacture). I actually have a full set of 100ml bottles of RGB and black inks made with the dye. I was thinking that small stepper + syringe, each connected to PTFE small bore tube, 1 per colour. A modified hot end head with 5 copper tubes into head. PTFE onto tube. Lots of problems, would inks dry up and clog with heat. Even if you got that working, STL does not support colour, no slicer supports colour. Suddenly becomes much more complex.

  Are you sure? yes | no

Jasmine Brackett wrote 05/20/2014 at 18:18 point
Interesting project. Have you had a chance to do anything on it recently? It would be great to see some work in progress pics.

  Are you sure? yes | no

Krinkleneck wrote 06/13/2014 at 09:52 point
Sorry a response took so long. I have been doing stuff lately, but finishing the semester had me a bit preoccupied. I have been busy rebuilding the old printer so I can begin working on the new one. Work is going to slow back down to a crawl because my other project is in the competition. I hope that I am not overly aggravating you with my frequency, but that's all I can do at the moment.

  Are you sure? yes | no

Jasmine Brackett wrote 06/13/2014 at 17:17 point
Don't apologise. I'm interested in seeing how you achieve the 5 color printing and wanted to let you know. I'm glad to hear you have entered THP. I'll go check it out now.

  Are you sure? yes | no

Similar Projects

Does this project spark your interest?

Become a member to follow this project and never miss any updates