Embedded systems are fun to play with, but installation of the OS can be a real pain. In my case the OS was not a big problem (I'm using a plain, old, boring PC hardware, after all), but as usual, the devil lurks in the details. In my case none of the monitors I have at home was able to display the video signal from the board (23" Dell LCD went just blank, while 17" LCD at least showed a message about unsupported video mode.) The only device that worked properly was a projector. Being a lazy brat as I am, I decided to not to stand at the projector holding the keyboard in one hand and the board in the other, and hack the entire process without touching the target board at all. Enter VirtualBox, a full PC system in a small window on the monitor.
The advantage of using virtualized environment is that I can use a system that is very similar to my target environment from the comfort of my desk, without a need to touch the target board until the software is ready to use. This also allows to do most of the time-consuming tasks, like compilation of big software packages (gnuradio in my case) on a fast machine, avoiding the pain of cross-compilation if the target OS is different than the one I have on my computer.
The disadvantages of this approach arise mostly from the fact that the emulated system is not identical to the one on which the software will be running.
The system I decided to use is Fedora 20, however most of the steps are OS-agnostic and the process can be applied to pretty much any PC operating system. I will also assume that the reader has VirtualBox installed and is familiar with basic operations, like creation of a virtual machine or booting and working with VMs.
The machine that we'll create should be as similar to the target system as possible. This includes width of the CPU word (32/64 bit) and amount of RAM. If the virtual machine does not support some of the peripherals we have on the board, the lowest common denominator should be used (e.g. use basic VGA graphics mode instead of higher-end accelerated graphics that would be used on the target board.) VM-specific drivers must not be installed in the system, as they may cause big problems in the target environment.
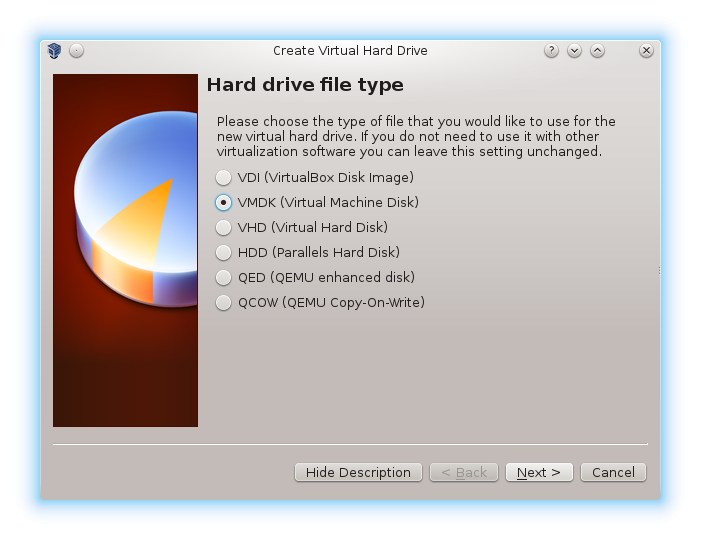
The goal of the process is to end up with a bootable disk, from which the embedded system can boot. While other virtual environments, like KVM, allow to use raw block devices with the virtual machines, VirtualBox gives no such option. The workaround I used was to create the virtual disk in file and then convert to raw image. For easiest conversion, the disk should be saved in .vmdk or VirtualBox' native .vdi format.
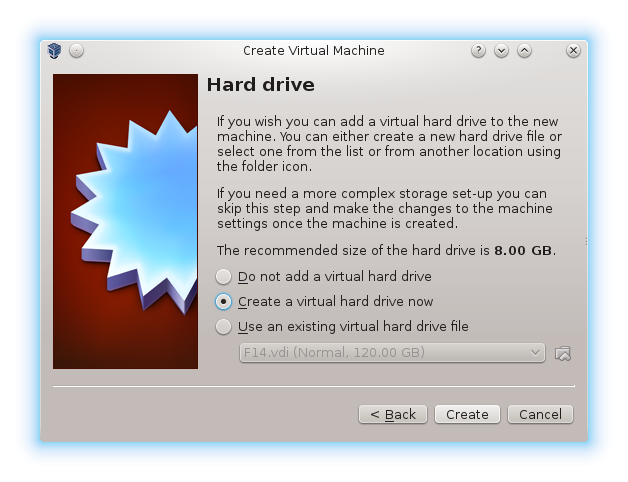
The interesting part of VM creation starts when the VM creator asks about the hard drive. For out system a new virtual hard drive should be created.
As mentioned above, the image should be stored in .vmdk or .vdi format. I will be using Qemu image converter, therefore I'm choosing .vmdk.
No need to save disk space by dynamically allocating storage, the disk should have fixed size. All modern file systems can deal with big files, so there is no need to split the image into small chunks.

Here comes the tricky part. Disk manufacturers like to brag about size. For each marketing department, the bigger number they can can print on the label, the better. Probably everybody knows that the mega, giga and terra multipliers used to describe disk capacities are decimal (mega is 10^6, giga - 10^9, etc.) For this reason International Electrotechnical Commission (IEC) came up with new set of symbols denoting binary multipliers (Mi for 2^20, Gi for 2^30, etc), however they are still not very popular and VirtualBox sticks to the old terminology, using binary meanings for the prefixes. This means that the 8GB disk image that you create for your virtual machine will be too big on your 8GB flash drive. In my case I had to create 7.4GB virtual disk to make it fit on a 8GB flash disk. The actual size of the disk in bytes will appear if you hold the mouse cursor over the disk size text field (the one with text "7.4 GB"). You should pay attention to the name of the file and directory where the image will be saved. This will save a lot of time when you will have to find the file for conversion. Don't forget about such silly detail as creating the image on a disk with enough space. The directory can be changed by clicking on the folder icon on the right side of the file name field.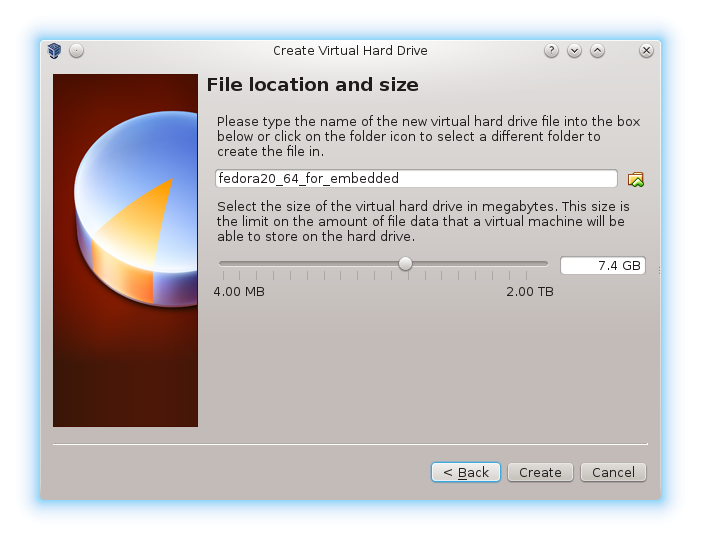
After hitting Create button the file with disk image will be created and after a short time our new virtual machine will be ready to use.
Since the installation process is different for each operating system and distribution, and the final image should be tuned to application (e.g. headless system most likely will not need GUI packages, like window manager or GUI tools), I will skip description of this step.
After the system is installed and ready to go, it's time for the last operaiton: preparation of the boot disk for our embedded system. This is a two-stage process: first, we have to convert the virtual disk to a raw image and then the raw image has to be written to the target disk.
The conversion process looks slightly different depending on the image format chosen. For VMDK disk you'll have to use qemi-img tool from Qemu package:
qemu-img convert -f vmdk fedora20_64_for_embedded.vmdk -O raw fedora20_64_for_embedded.img
With disk in VDI format you'll have to use VirtualBox' disk cloning tool:
VBoxManage clonehd fedora20_64_for_embedded.vdi fedora20_64_for_embedded.img --format raw
I tested only conversion using qemu-img. Conversion command for VDI image is based on the advice from OpenStack manual.
The last operation that we have to do is to transfer the image to the destination disk.
YOU SHOULD PAY VERY CAREFUL ATTENTION TO WHICH DEVICE YOU WRITE THE IMAGE, SINCE IF YOU CHOOSE INCORRECT DISK, YOU MAY LOOSE ALL YOUR DATA!
I work with Linux, so I'll use dd to write image. If you have different OS on your computer, feel free to use any tool for writing raw disk images that you are comfortable with.
My flash disk is registered as /dev/sdi and I instructed dd to copy data in 10240000 bytes chunks
dd if=fedora20_64_for_embedded.img of=/dev/sdi bs=10240000
At this point we're ready to go. If you use a hard drive, just connect it to the motherboard and proceed as usual. For USB flash disks you should choose to boot from USB hard drive.
Good luck and happy hacking!
Discussions
Become a Hackaday.io Member
Create an account to leave a comment. Already have an account? Log In.