Close
0%
0%

C64 LCD display

a LCD display, connected to the expansion port of the C64

Similar projects worth following
This project shows you how you can connect a LCD display to the expansion port of your C64 and show some text on it. Instead of a display, you can use it to control other things as well, like robots etc. You can buy the PCB at Tindie. It is only the PCB, you need to buy the ICs and the display elsewhere, but you can get it at eBay.

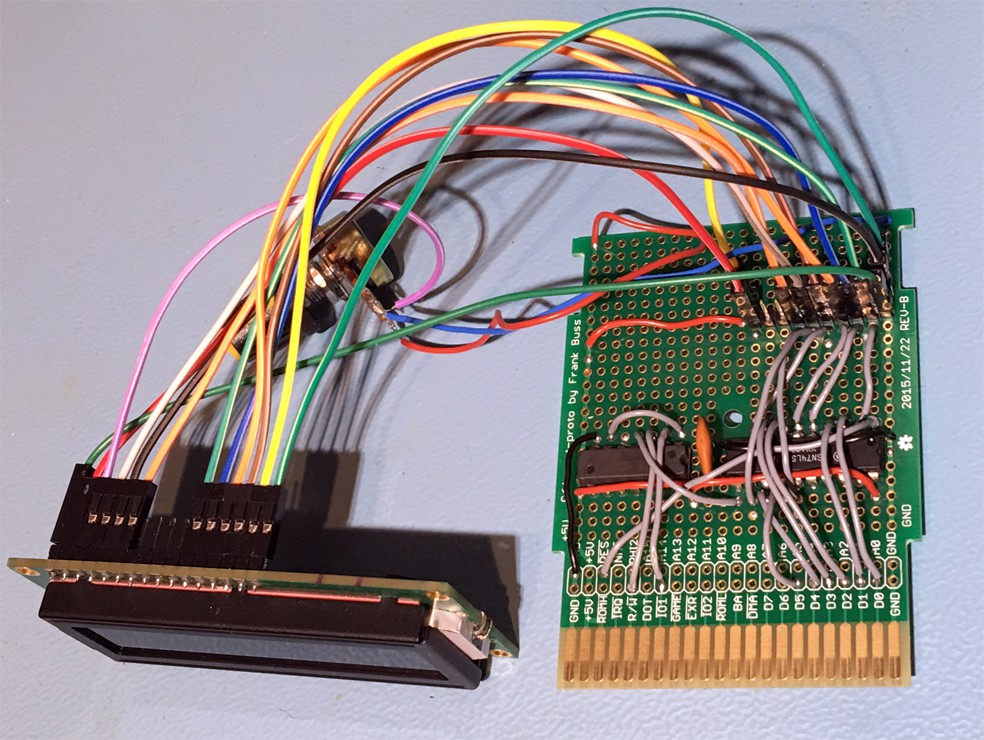
I saw a video from The 8-Bit Guy, where he demonstrated a LCD display on the user port of the C64. But it can be done on the expansion port as well. This project shows how to do this, with my C64 cart-proto board.

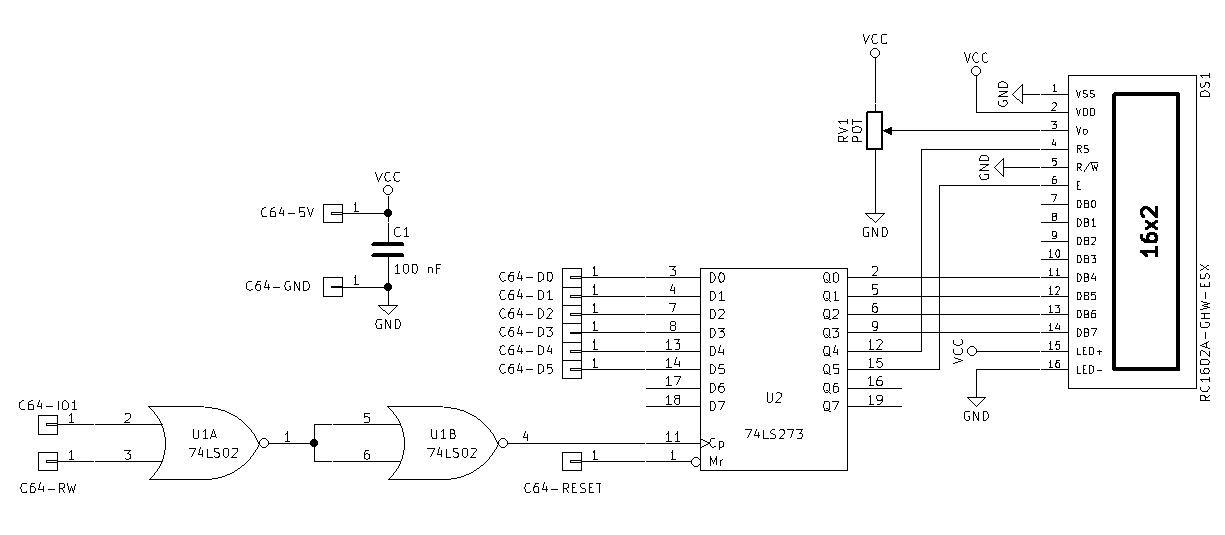
Unlike the user port of the C64, it is more difficult to use the expansion port, because you don't have a stable parallel output, but the data bus of the 6510 is routed to the pins of this port, which changes all the time when data is written to the RAM etc. But fortunately there are other signals like IO1, which goes low whenever you read or write something to $DE00-$DEFF. Together with a latch, you can save the byte that is written to it, so that you have 8 extra stable parallel out signals. I do this with some NOR gates, see the project log for details. This can be easily enhanced, e.g. use the IO2 signal for $DF00-$DFFF for a second latch, so that you then have 16 output signals. Or latch it on read with some more gates for some input signals.

license.txt

project license (BSD style: do whatever you want with it, but don't remove this file or my name)

plain - 1.08 kB - 06/04/2017 at 18:42

Download

lcd-test.prg

compiled C64 program

prg - 1.62 kB - 06/04/2017 at 18:31

Download

lcd-test.c

C test program for cc65 for the C64

x-csrc - 2.62 kB - 06/04/2017 at 18:30

Download

arduino-test.c

low-level Arduino test script for a 1602A display

x-csrc - 2.21 kB - 06/04/2017 at 18:30

Download

View all 7 components

  • construction and testing

    Frank Buss06/04/2017 at 18:28 0 comments

    First I wrote an Arduino script to test the display (a 1602A display, 16 characters, 2 lines, as you can get cheap on eBay), but without any display library, to make it easier to port to the C64, see the file arduino-test.c. Then I used a NOR gate and a 8 bit latch and soldered it to my cart-proto board, as you can see in this circuit diagram:

    You can download the Gerber files for the board from here and e.g. buy boards from Electrow or any other PCB manufacturer. The finished test setup with display looks like this:

    Then I ported the program to a C program for cc65 for the C64, see the file lcd-test.c. Instructions how to compile it are at the top. The compiled program is lcd-test.prg, which I copied to a SD-card and the load from a SD2IEC drive to my C64. The result:

    Some interesting notes: if you use a "poke" command from BASIC, then a "STA($14),y" is executed, which results curiously in two impulses on the IO1 line:

    But if you use a "STA $DE00", then only one impulse is generated:

    To allow to use the hardware from BASIC, too, I used the NOR gate to qualify the IO1 impulse with the RW impulse: only when both impulses are low, the 74LS273 latches the new values from the data bus of the C64 with the rising edge on the clock input.

View project log

Enjoy this project?

Share

Discussions

Barkfin wrote 12/10/2019 at 17:08 point

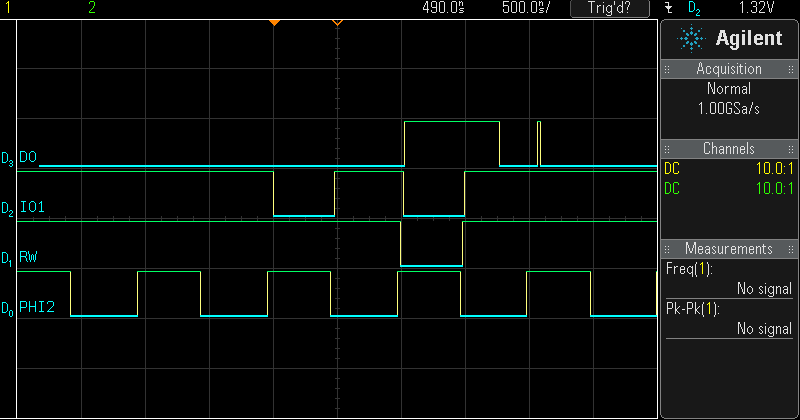
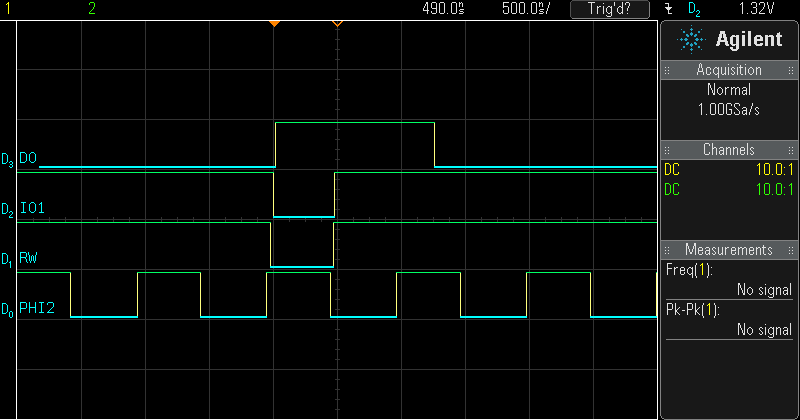
Hi Frank your oscilloscope shows 74LS02 "NOR" device combining IO1 "and" RW for latch enable of the 74LS273. However your schematic [NOT (IO1 NOR RW)] is actually IO1 "or" RW. It would be a slightly different configuration of that NOR device to make logical "and". I think your wiring might be a "NAND" device instead of "NOR".

  Are you sure? yes | no

Frank Buss wrote 11/08/2021 at 11:31 point

You are right, it is effectively a NAND gate.

  Are you sure? yes | no

Similar Projects

Does this project spark your interest?

Become a member to follow this project and never miss any updates