Close
0%
0%

FarmBot - Open-Source CNC Farming

FarmBot is an open-source CNC farming machine and software package built for small scale, hyper local, DIY food production.

Similar projects worth following
FarmBot is an open-source CNC farming machine and software package designed for small-scale precision food production. Similar to 3D printers and CNC milling machines, FarmBot hardware employs linear guides in the X, Y, and Z directions. This allows for tooling such as seed injectors, watering nozzles, sensors, and weed removal tools to be precisely positioned and used on the plants and soil.

FarmBot is controlled by an Arduino/RAMPS stack and an internet connected Raspberry Pi 2. The hardware is designed to be simple, scalable, hackable, and easily produced.

Using the web application, the user can graphically design their farm or garden to their desired specifications and synchronize the numerical control code with the hardware. Other features include storing and manipulating data maps, a decision support system to facilitate data driven design, access to an open plant data repository, and real-time control and logging.

    About the Project

    I hope for FarmBot to become more than an idea, more than a hack, more than a product. I hope for it to become a thriving community of individuals and businesses that develop, share, and distribute the technology - much like how the RepRap project has done for 3D printing.

    As you read through my entry on Hackaday, you'll notice that I link to several places: FarmBot.io, and FarmBot.cc. FarmBot.io is my brand new company that develops and is planning on distributing FarmBot hardware kits and software services. FarmBot.cc is the free-form community wiki and forum where anyone can get involved and share ideas. You can read the announcement of the new company here, and learn about why it is important to distinguish it from the community as a whole. I hope you check it out and enjoy what we're doing :)

    Thanks!

    - Rory

    Open is at our Core

    FarmBot is 100% open-source. We document everything we do on our dedicated hardware documentation and software documentation hubs, as well as on the community wiki. All of our code lives with permissive licenses on GitHub. We openly welcome feedback, replications, modifications, and questions. To facilitate collaboration, we've setup a community forum for anyone to get involved in the discussion, as well as dedicated hardware and software support forums.

    Not Just Open-Source, Useful-Source

    We believe that great documentation is the the key to building a community of hackers who continue to build upon this technology. While being open-source means making our source files and ideas free for others to use and modify, we don't believe this is enough. At the FarmBot Project, we're going one step further than open-source, we're going useful-source.

    This means that in addition to sharing the source files, we're also sharing detailed assembly instructions, bills of materials, troubleshooting tips, past iterations, and our design intentions from the entire FarmBot journey. We're striving to design beautiful hardware that is reproducible with common tools and processes; built from low cost and readily available materials and components; and easily assembled and hacked. Our software is built to give users full control of their machine through and through. And we're even committed to operating our company with transparency and open company values at the forefront.

    With all of this effort, we hope that thousands of individuals and business can learn how to use, hack, redistribute, and even monetize FarmBot just like us, ultimately pushing the technology forward and making it more accessible to the masses.

    Mission and Vision Driven

    The FarmBot Project vision is to:

    Create an open and accessible technology aiding everyone to grow food and to grow food for everyone.

    In order to achieve this vision, our mission is to:

    Grow a community that produces free and open-source hardware plans, software, data, and documentation enabling everyone to build and operate a farming machine.

    Hardware Overview

    FarmBot is a CNC machine that uses special tools and software to grow plants. Our first device, FarmBot Genesis, is an outdoor XYZ machine that can scale from a planting area as small as one square meter, to as large as 20 square meters. It is estimated to cost between $1,500 and $4,000 depening on the size of the installation.
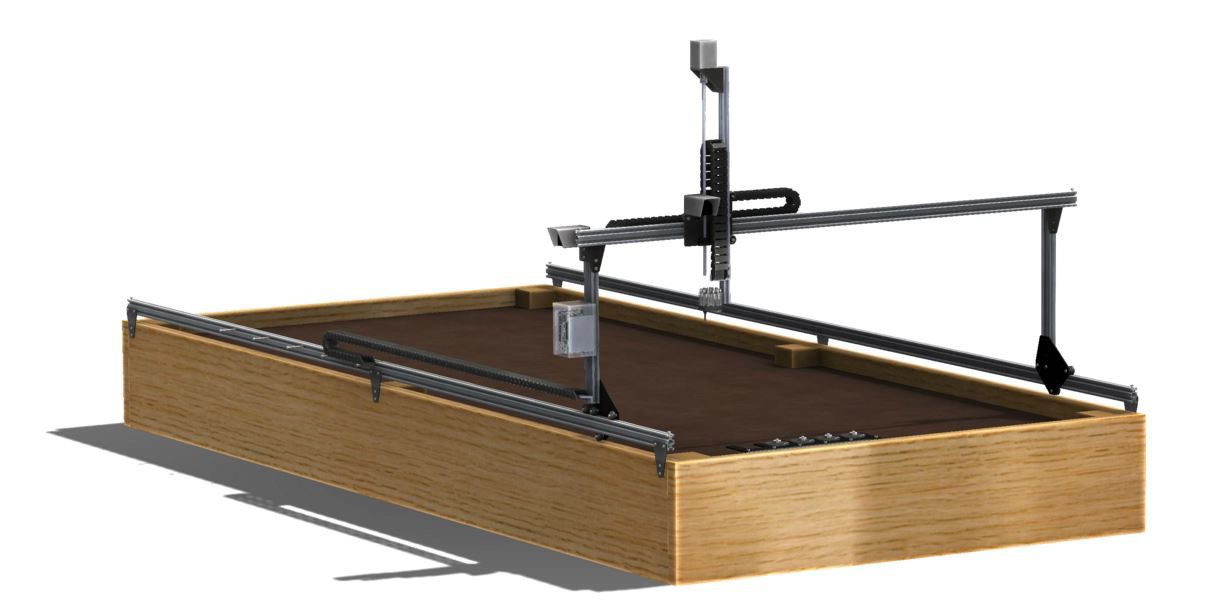
    Core Components

    We've chosen the following core components and materials for their utility within the FarmBot design, excellent corrosion resistance, general availability, ease of manufacturability, and relative low cost.

    • V-slot aluminum extrusions and V-wheels are from OpenBuilds. These act as FarmBot's primary structural component and linear guide mechanism. These extrusions are high quality, easily cut to length with just a hacksaw, and have a completely open-source design.
    • Custom designed 5mm thick plates are used to connect the extrusions, wheels, and other components together throughout FarmBot's structure. These plates can be made from sheet aluminum, stainless steel, or even plastics. They can be manufactured...
    Read more »

    • 1 × For the most up-to-date BOM, see our documentation hub: http://farmbot-genesis.readme.io
    • 4 × 20x40mm V-Slot Aluminum Extrusions Because FarmBot is scalable, you will have to calculate the total length of extrusions you need based on how large of a FarmBot you want to create. Available from OpenBuilds
    • 2 × 20x60mm V-Slot Aluminum Extrusions
    • 1 × 20x20mm V-Slot Aluminum Extrusion
    • 1 × Set of 5mm Thick Water Jet Cut Aluminum Plates The DXF drawing for all of the plates can be found in the manufacturing files section of each log.

    View all 33 components

    • Watch the FarmBot Launch Teaser Trailer!

      Rory Aronson06/01/2016 at 23:08 0 comments

      We’re gearing up for our big launch in July and wanted to send out a little tease of what’s to come. Check out the FarmBot Teaser Trailer:

    • FarmBot Q&A with AgFunder

      Rory Aronson06/01/2016 at 23:08 0 comments

      Check out this FarmBot Q&A with Edible Manhattan, Food Loves Tech, and AgFunder! The original article can be found on AgFunder here, and it is copied below.


      Editor’s Note: Suzanne Zuppello is a journalist with food magazine Edible Manhattan, and has been writing about food tech in advance of the Food Loves Tech conference next month.

      Rory Aronson wants you to steal his idea. Seriously. In founding FarmBot, he decided none of his ideas would be proprietary. Everything he and his team design and all of the information they gather is yours for the taking. It’s that strategy that keeps the FarmBot team constantly innovating and reacting to new ideas and feedback to make the best, automated farmer for your backyard.

      Want to learn more about FarmBot? They’ll be in New York City June 10-12 for Food Loves Tech.

      Suzanne Zuppello: FarmBot sounds like the title of a George Lucas film. Is it as sci-fi as it sounds?

      Rory Aronson: Sort of. After graduating with a degree in mechanical engineering, I decided I wanted to reinvent the way food is grown in order to adapt to the growing use of technology in people’s lives. When I thought about rebuilding the agricultural process, a robot is what I pictured. It is quite literally a robotic device that someone can control through their smartphone or laptop. It’s simple enough to use in your home but sophisticated enough to adapt to a larger scale.

      SZ: You say anyone can use FarmBot—but I imagine some knowledge or skill is requiring before diving into building a backyard farm.

      RA: Not necessarily. A person decides what they want to grow, and FarmBot will do the rest. It can plant seeds and systematically water them based on how old the plant is, how it’s growing and what the local weather is. Much like having a 3D printer in your home and deciding what you want to make, you can decide what you want to grow to your own specs and FarmBot will do it. It transitions the control of the system one may have to the consumer. For instance, if you want to grow spinach in Manhattan or kale in the tropics, FarmBot can gather this data in order to grow the plant.

      SZ: But where is FarmBot gathering it’s information from?

      RA: We’ve created a non-profit database called OpenFarm that’s linked to FarmBot. Through this, people can upload growing guides for trees, herbs, flowers, mushrooms — any agricultural product. It’s like a recipe book for farmers. Anyone with or without a FarmBot can use this data and learn how to garden. This data is also available to any agricultural technology through an open API.

      SZ: It’s an interesting business model to give information like that away for free.

      RA: My drive in establishing this company is not profit. Everyone eats, so everyone should have the ability to grow their own food, with a little help. By making our growing guides as well as the specs to build a FarmBot totally open sourced, we’re acknowledging that we think we’re doing it the best while still being open to improvements entirely. If someone can do it better than me, I welcome that because that will push our mission and technology forward.

      SZ: So I take it there’s no patent pending on FarmBot?

      RA: Not at all. I’m not worried about the lack of a patent. Proprietary products can allow for competitive advantage, but it’s my belief that it’s a cheater’s way out. My competitive advantage is that I’m the first to market and building a brand of trust that puts consumers first. I believe open sourced information is the way of the future. More companies are opening up about their practices and technology, in order to put the consumer first. I think people are going to respect the way we’re doing this rather than a competitor who takes everything from FarmBot and then makes it proprietary and doesn’t make it open.

      SZ: That’s an incredibly honest and valuable approach. Is the machine ready to ship?

      RA: Not yet. We’re still in R&D mode. There’s actually a prototype moving through my yard right now. I have cameras pointed on it and the plants to...

      Read more »

    • Is FarmBot Worth Replicating?

      Rory Aronson06/01/2016 at 23:07 0 comments

      FarmBot is 100% open-source, meaning that anyone with an internet connection can look at and download all of oursoftware, hardware plans, and documentation so that they can build and operate their own farming machine. But in reality, will people actually do this? Are the open resources we’ve created good enough for someone to build their own device? Is FarmBot worth replicating? Is being open-source a worthwhile cause? Up until just recently, we had a hunch that the answer to all these questions was a resounding yes, but we had no concrete evidence in the case of FarmBot. What we did have going for us was the fact that replication already happens with other open-source hardware and software projects. But still, it had yet to be proven with FarmBot.

      Today we can definitively say that the answer to all of those questions is indeed yes: people will replicate FarmBot, the open resources we’re developing are good enough, and being open-source is without a doubt a worthwhile cause. That’s because over the last few months we’ve been very excited to see and hear of four more FarmBots being built by people and teams outside of our core development group. These people independently came across our idea, our documentation, and our software; and then decided it was a great idea to build a FarmBot on their own, and went for it. Two of these other FarmBots are in the United States, and the other two are in Japan. Two are being built by individuals, while two are being built by companies small and large. Check it out here: https://farmbot.io/2016/04/30/is-farmbot-worth-replicating/

      This is a huge milestone for our team and The FarmBot Project at large, and we can’t wait to see the FarmBot community continue to grow. Want to build a FarmBot? Get started on our documentation hub. Want to buy a FarmBot? We’ll be accepting pre-orders in July. Sign up for email newsletter and you’ll be the first to know when they’re available!

    • A Huge Refactor

      Rory Aronson06/01/2016 at 23:06 0 comments

      About 8 months ago we decided to completely refactor the FarmBot web app. Today I’m please to announce that we’ve finally finished this system wide re-write and the results are a faster, more stable, more well-written/tested/documented and ready for the future version of the software that powers FarmBot. Here is a summary of the changes we’ve made:

      • Switch from a traditional multi-page web application to an SPA (single page application). This allows the web app to load “once” during a session and then not require any page reloads as the user navigates through the app. This makes the application faster to use because everything is loaded and there is not as much network lag or abrupt page refreshing.
      • Switch from Angular to React. We weren’t too happy with Angular and its performance with our specific application needs. We decided to switch to React because of its already large and quickly growing user base, as well as its relatively easy learning curve.
      • Switch from Foundation to Bootstrap. Foundation was proving to get in our way which required us to override it often and it wasn’t playing nicely with Angular. We decided on Bootstrap because of its ubiquity in the developer world and larger community of support. As it turns out, we’re not using very many of the components that Bootstrap gives us, so we may end up ditching it too for a purely custom solution or for something that provides things we want but could not feasibly build ourselves.
      • Switch from Meshblu to MQTT. While Meshblu communication got us up and running quickly in the early days, it began to cause trouble later on. Features we were using (such as logging) got removed, upstream changes for websocket support silently broke our systems, and we were at the mercy of a complicated corporate controlled codebase. Because MQTT is a widely adopted standard with many more simplified brokers out there, we decided to make the switch. Its been much easier to setup, debug, and maintain our systems now.
      • Modularization of the frontend, backend, and farmbot.js. Before we had one monolithic codebase called farmbot-web-app. It was difficult to maintain and programmers (especially newbies) had to get the entire thing working to be able to make small changes. For example, to change some css and see the changes in the development environment, one would need to get the entire database working too. Now we have three smaller repositories that handle specific functions. farmbot-web-app is just a backend system and API (the business logic). farmbot-web-frontend is the entire frontend which is compiled into a single javascript file via react magic. And farmbot-js which is a library enabling the frontend to communicate via MQTT with the FarmBot device.

      Phew! Lots of changes huh? That’s why it took about 8 months to do this huge refactor. But now, we have a better software system that will be able to grow with us into the future. Want to see the new app for yourself? Check it out atmy.farmbot.io or see the screenshots below. Note that a lot of features still don’t work, but the foundation is there :). Over the next few months we’re going to be laser focused on getting sequence building, regimen building, and the farm designer working so that we can demo those features at the time we launch later this year!

      FarmBot Web App April 3, 2016

      FarmBot Web App April 3, 2016 2

      FarmBot Web App April 3, 2016 6

      FarmBot Web App April 3, 2016 5

      FarmBot Web App April 3, 2016 4

      FarmBot Web App April 3, 2016 3

    • FarmBot Genesis V0.9 Documentation is now Complete!

      Rory Aronson06/01/2016 at 23:06 0 comments

      We just wrapped up the documentation for FarmBot Genesis V0.9! In this version we added interactive virtual tours each sub-assembly, more detailed assembly instructions and troubleshooting tips, ideas for FarmBot mods and hacks, docs for new tools, and tech specs for every component in FarmBot. These are our most detailed docs yet, and we can’t wait to see you use them to build your own FarmBot. If you have any questions or issues, drop us a line in our support forum. Best of luck!

      V0.9 docs

    • Exploring the Carbon Footprint of FarmBot

      Rory Aronson06/01/2016 at 23:05 0 comments

      People often want to know how much electricity FarmBot uses. Sometimes they’re wondering if FarmBot can be run on solar power (which it can be). Though more often they are actually searching for an answer to this (slightly more complicated) question: “What is the carbon footprint of owning and operating a FarmBot to produce vegetables compared to buying an equal amount of vegetables from the store?” In this post we’ll look in depth at this question from a theoretical perspective.

      The two types of emissions

      First let’s talk about carbon footprint calculations. In general, there are two types of carbon emissions associated with a product:

      1. The emissions generated from producing the product. These emissions come from mining, processing raw materials, manufacturing the components/product, and shipping it all to the consumer. These emissions are usually directly related to the embodied energy of the product, though depending on the source of the energy used in production, the total emissions can vary widely. For example: the aluminum used in FarmBot might be from Factory A which uses solar energy (zero emissions), or from Factory B which uses energy from coal. Because we don’t know every detail of the FarmBot supply chain, we don’t know exactly what sources of energy are used to produce a FarmBot. Instead, we will be using published averages for the calculation of these emissions.
      2. The emissions generated from using the product. FarmBot uses electricity to operate. The source of that electricity will determine how much CO2 is emitted to operate FarmBot. Because we don’t know if the consumer will be using coal based energy, that from natural gas, wind, solar, or some combination thereof, we will again be using published averages for electricity usage emissions.

      Sometimes a third emission is included which accounts for emissions generated after a product’s lifespan. For example, a building might cause more emissions if it needs to be demolished and taken to a landfill when it is time to be replaced. For this post, we are not going to be considering these post-lifespan emissions as FarmBot is a physically small device (compared to a building) and any emissions generated from recycling materials would be attributed to the new product, not FarmBot.

      Embodied Energy and the Emissions from Producing FarmBot

      In the table below we list the most prevalent materials used in FarmBot, their cumulative weight, and the expected kg of CO2 emitted due to their production. Keep in mind that these are only estimations meant to provide us with a ballpark idea of the emissions generated to produce a FarmBot.

      MaterialWeight (kg)kg of CO2/kg of materialkg of CO2
      Aluminum (extrusions, plates)9.58.2478.3
      Stainless Steel (hardware, bearings, driveshaft, leadscrew)1.46.158.6
      Plastic (drag chain, 3D prints, wheels, electronics housings, tubing, circuit boards)2.82.537.1
      Copper (electronics, wiing, motor windings)0.32.600.8
      Rubber (belts, wiring, gaskets)0.23.180.6
      TOTAL95.4 kg

      It is important to note that the numbers in the table above are calculating the CO2 emitted for the production of enough raw materials for a FarmBot (raw aluminum billets, raw plastic pellets, etc). Obviously FarmBot is not constructed from raw aluminum or raw plastic – it is constructed from aluminum extrusions and plates, 3D printed plastic parts, screws, wheels, belts, motors, and other non-raw components. In reality, the actual CO2 emitted to produce a FarmBot may be closer to 150kg (330lbs) than 100kg, though we can never truly know without exhaustive research and due diligence.

      Emissions from Using FarmBot

      In this table, we look at the emissions attributed to using FarmBot. While we could consider the emissions associated with the delivery of municipal water, acquiring seeds, and more, we are going to limit our scope to the most obvious emission source: electricity usage. Because we don’t know how a specific consumer’s electricity is produced (coal vs solar vs whatever) we’re going to...

      Read more »

    • Launching with One or Two Devices?

      Rory Aronson06/01/2016 at 23:05 0 comments

      For a while now we’ve been planning to launch on Kickstarter with two versions of FarmBot Genesis: a “standard” sized device measuring 1.5m wide, 3m long, and 0.75m tall; and an “XL” device measuring 3m wide, 6m long, and 1m tall. In fact, the most recent version of the hardware prototypes (V0.9) have been designed with larger plates and extrusions, and more V-wheels to help strengthen and stiffen the tracks, gantry, cross-slide, and z-axis for the larger sized form factor. The design intention is that one set of hardware components could be used to build either sized device, or any size in between – a scalable FarmBot. The only modifications would be the need for longer cabling, tubing, and belts; and extra extrusions and plates for the larger capacity.

      However, even with the latest prototypes, we have decided that we would rather launch with just one sized device – the “standard” sized FarmBot Genesis. Here are our reasons:

      • Simplicity – With two devices comes two kits, two sets of packaging, more components to order and have on stock (longer wiring harnesses, etc), two sets of assembly instructions, marketing two slightly different value propositions, and providing customer support for two devices. We’re a small team with limited resources. Adding a second version of our flagship device to our launch campaign and business operations will undoubtedly be more complex and difficult than launching with one device. We’d rather start small and “do it right”, than try to “do it all” and fail to do anything well.
      • Speed – A more simple product launch of just one device will allow us to launch sooner and ship devices faster. It is easy to fall into a trap of continuously adding features and making changes in lieu of shipping what you already have developed. Launching sooner will allow us to gain feedback quicker, build the FarmBot community and expand our team faster, and iterate more rapidly.
      • Engineering Reliability – While we think the design intention for a scalable device is good, it is only feasible to a certain extent. Right now, the FarmBot Genesis hardware scaled to the XL size does not appear to be reliable – there is still too much flex within the system, and other challenges begin to arise (such as thermal expansion) when the hardware is pushed to these scale limits. In order to solve these scale challenges, there need to be more serious modifications made to the design likely including a switch to larger motors, an A-frame style Gantry structure, and a different material choice for the tracks. Such modifications however would then make the smaller devices significantly overbuilt, pricier, and less functional. Ultimately, we think that a FarmBot the size of Genesis XL will need to be a completely separate design that lives up to its name, rather than trying to squeeze too much scale out of the slimmer standard design.

    • Why Great Documentation is Vital for Open-Source Projects

      Rory Aronson06/01/2016 at 23:04 0 comments

      Thank you to Hackaday for inviting me to speak at the Hackaday SuperConf!!

    • Our Final Round Video for the Hackaday Prize

      Rory Aronson10/26/2015 at 05:32 0 comments

    • The First Chard Seeds Are Emerging!

      Rory Aronson10/21/2015 at 03:13 0 comments

    View all 49 project logs

    • 1
      Step 1

      Dedicated Documentation Hubs

      Hey there! You're about to read our FarmBot build instructions here on Hackaday.io. While we have lots of details posted here, you can find the most up-to-date documentation for the latest hardware on our dedicated hardware documentation hub. In addition to the latest docs, you can also browse past versions of the hardware and ask questions in our support forum. Be sure to check it out!

      Furthermore, we also have a dedicated software documentation hub and support forum for software related issues.

    • 2
      Step 2

      Supporting Infrastructure

      FarmBot Tracks need to be attached to supporting infrastructure. Where you decide to install your FarmBot will determine how you setup your Tracks and therefor what supporting infrastructure you need. You might attach your track plates to 2x4 wood posts, aluminum extrusion posts, or to existing infrastructure such as a raised bed or greenhouse walls. The choice is up to you how you set this up.

      Be prepared

      If you recently ordered a FarmBot kit, you may want to begin building your supporting infrastructure while your FarmBot is in the mail. This way you'll be prepared for a faster assembly time when your package arrives.

      We'll go over two methods here for setting up supporting infrastructure: building a raised bed, and setting up extrusions as posts. Note: some photos and components may be out of date for V0.7 hardware.

      Build a Raised Bed

      6 hours

      This is the estimated time it will take to build a raised.

      STEP 1: ACQUIRE MATERIALS

      • Purchase some high quality wood from your local lumber yard. Preferably you will use thicker wood (1-2 inches thick) so that it does not warp easily. This is pretty important because your tracks will need to be very straight for FarmBot to work reliably, and your tracks will be directly attached to the raised bed. When soil becomes wet and when plants grow, this can cause tremendous force on the wood walls of the bed, forcing them outwards. Thicker wood, and extra posts is preferred. In this example, I used 2x12" nominal redwood, and 4x4" nominal wood posts spaced roughly every 5 feet, or one 1.5m extrusion length.
      • You'll also need to pick up some hardware for fastening your raised bed together. I selected 3/8" x 3" lag bolts, and some rustic looking washers.
      • Depending on your climate, you'll likely want to put some type of sealer, stain, or polyurethane on your wood to protect its color and water resistance. I chose Thompson's water sealer.

      STEP 2: DIG POST HOLES

      Setup your lumber roughly where your bed will be so that you may find out where to dig your post holes.

      Dig your post holes. A post hole digger and pick axe can help greatly.

      STEP 3: PREPARE YOUR MATERIALS

      Sand your wood to remove any weird markings and splinters.

      Stain your wood.

      Setup your lumber upside down on a flat surface. We'll drill holes and screw together our bed in this orientation and then flip it over and position it in our holes.

      STEP 4: ASSEMBLE YOUR RAISED BED

      Measure out and mark where your posts will be. Remember this must correspond to where you dug your post holes!

      Clamp your posts into place, making sure they are square with the bed sides.

      Mark locations where you will drill holes and fasten your boards to your posts. I used 2 lag bolts and washers per board/post interface.

      Don't let your bolts hit each other

      On your corner posts, make sure to stagger your bolts slightly so that the bolts coming in from one side of the corner do not hit the bolts coming in from the other side of the corner.

      Pre-drill the holes for your lag bolts.

      Use a ratcheting socket wrench to quickly screw in your lag bolts.

      Style counts

      If you are using fancy washers like me, orient them all in the same direction before tightening the lag bolt down. Remember, you are assembling your bed upside down, so plan for the washers to be flipped when the bed is installed.

      Notice how the corner bolts are staggered so that they do not hit each other, and the washers are oriented the same way.

      STEP 5: INSTALL YOUR RAISED BED

      • Once your bed is assembled, flip it over and position it in your holes. You may need to pull it out and dig out some of your holes a little more. Use a level to make sure the bed is level.
      • Fill it with a mix of soil and compost.

      Setup Extrusion Posts

      2 hours

      This is the estimated time it will take to setup extrusion posts.

      • Install short (100-500mm) vertical posts for one of the tracks. Attach or secure the posts however you like, though it is critical to ensure that the posts will not significantly move once installed. Space the posts for one track 1500mm apart, center to center, unless you are using shorter track extrusions, in which case space the posts that far apart. Ensure the posts are aligned properly and the same height. You may want to use a level to ensure this.
      • If you are setting up multiple track extrusions (more than 1500mm in total length), it is best to install the end posts first and tie a guide string in between these two posts to ensure your tracks are installed in a straight line.
      • Depending on the width of your FarmBot, space the second Track’s posts the appropriate distance away from the first Track’s. It is critical that the distance between the two Tracks is consistent, if it is not, there will be forces placed on the Gantry and Tracks as the Gantry moves across.
      • You can use shims or other spacers to better align track plates in case your posts are not perfect.
    • 3
      Step 3

      Assembly Preparation

      In order to shorten the time it takes for you to assemble your FarmBot hardware, follow these preliminary steps.

      15 minutes

      This is the estimated time it will take for assembly preparation.

      Organize your Parts

      When you first open up your FarmBot hardware package, pull out all of the component bags so that you develop a full idea for what's included, and so that you can place them on a table or the floor in locations that make sense to you.For many, grouping parts by type helps with locating them quickly later on. For example: place all your screws in one area, all your plates in another, all your electronics in another, etc.

      We'll make it right

      If anything is missing or damaged from your box of components, let us know right away. We'll ship out replacement parts as soon as we can.

      Pre-assemble your V-Wheels

      Each V-Wheel actually consists of four components:

      • One polycarbonate v-wheel
      • Two 16mm x 5mm x 5mm stainless steel, rubber sealed ball bearings
      • One stainless steel precision shim that fits between the two bearings, inside the wheel

      Pre-assembling all your v-wheels at once will save you assembly time later on. To do so, first press one bearing into the polycarbonate wheel.

      Make sure everything is straight

      It can be easy to accidentally press in a bearing crooked. Try your best to avoid this as you could damage a wheel this way.

      The sound of success

      If all goes well, you should here a satisfying 'pop' each time a bearing fits into the wheel.

      Then insert the precision shim such that it is resting on the first bearing on the inside of the wheel. Try to position the shim in the center of wheel.

      Then press in the second bearing.

      Shimmy the shim

      If your second bearing doesn't seem to fit all the way into the wheel, its probably because the shim is misaligned. Use a small screwdriver to push the shim into the center of the wheel, and then push the bearing in the rest of the way.

    View all 9 instructions

    Enjoy this project?

    Share

    Discussions

    seokingchd wrote 05/15/2021 at 04:41 point

    Looking for real http://www.purugupta.in at chandigarh escort service here.

      Are you sure? yes | no

    seokingchd wrote 05/15/2021 at 04:40 point

    Looking for real [url=http://www.purugupta.in]chandigarh escort service[/url] here.

      Are you sure? yes | no

    seokingchd wrote 05/15/2021 at 04:40 point

    Looking for real <a href="http://www.purugupta.in">chandigarh escort service</a> here.

      Are you sure? yes | no

    alexmonnn wrote 10/31/2019 at 13:44 point

    have you considered adding a reservoir for the seeds that's attached to the arm? Also, adding a head with more than one tool that spins in between them might be a good idea. Other than that, it looks awesome. Stuff like this could revolutionize the farming industry. 

      Are you sure? yes | no

    ryanhall8 wrote 11/27/2017 at 08:46 point

    A cool open-source CNC farming machine and software package for small-scale precision food production!

    json formatter 

      Are you sure? yes | no

    T800 wrote 08/02/2017 at 15:19 point

    Excited to give this a go.  Thanks for making this Open Source.  Had a gift card to use up so I ordered the FarmBot bundle from OpenBuilds ...rest from BOM.   Can't wait to learn more about home farming.

      Are you sure? yes | no

    z26 wrote 02/11/2017 at 22:23 point

    This is a bit pointless given the small area, but using the software with a parallel cable manipulator could be interesting.  Something like this 

      Are you sure? yes | no

    George I Fomitchev wrote 08/12/2016 at 12:15 point

    very smart!)

      Are you sure? yes | no

    silvio biasiol wrote 04/14/2016 at 21:01 point

    That's one of the coolest projects that I've ever seen! Amazing! Bravi!!!

      Are you sure? yes | no

    vikrant.jagtap wrote 01/19/2016 at 08:37 point

    Hey Team - I stumbled upon this project accidentally and it is something i have in my mind too. I was wondering how this can be made applicable to a large farm of 1 acre to start with. My dad has grapes vineyard on which I work on weekends. Spraying is a one of the biggest activity and would love to make this farmbot applicable there. With electro-static spraying added to farmbot, it can do wonders in grapes farming. 

    Thanks,

      Are you sure? yes | no

    rory wrote 11/25/2015 at 18:08 point

    @Mike Maluk yea, that would be awesome! Please post a link to your build log here once you get it going!

      Are you sure? yes | no

    Mike Maluk wrote 11/25/2015 at 21:40 point

    Will do, thanks!

      Are you sure? yes | no

    Mike Maluk wrote 11/23/2015 at 06:07 point

    I'm looking to build a smaller farmbot, or I suppose it'd be a gardenbot, for indoor growing. Would it be all right to post a build log on hackaday? Just wanted to send a line out before I start posting builds of others ideas! Thanks!

      Are you sure? yes | no

    Garrett Herschleb wrote 09/09/2014 at 18:33 point
    This is a great concept and a great start. Here are some suggestions that would help make it useful:

    1. Make the database and bot region independent. Growing season in Duluth is not the growing season in Phoenix. Concentrate on environmental conditions such as daily temps, humidity, rain fall, and sunlight rather than months of the year. Months of the year may be calculated for a specific region, or better yet, by sensors on the farm bot.
    2. Address the soil. If the bot tries to follow the same fertilizer formula in all places, you'll have some people singing its praises and most others cursing the poor results. Fertilizers cannot fully address the problem. Soil Ph differs wildly in different regions of the world, as do so many other critical factors. Farm bot would have to have either serious soil testing capability, ability to mix soil in a raised bed from a recipe, or preferably both is a critical ingredient for success.
    3. Address the issue of pests and fungus. Anybody buying this bot won't do so to save on their grocery bill since the expense of the system is far more than a few trips to the grocery store. Therefore this must have strong organic capabilities, and the ability to address the pest problem without pesticides. This has many dimensions, but one key capability is to be able to work with and around bird netting.
    4. Add the ability to warm the local air in case of unexpected freezes.

    5. Learn more from expert home gardeners. The "Grow Your Green" YouTube channel is a great place to start (I'm not affiliated with that channel, I just find it's a good source of home gardening info).

      Are you sure? yes | no

    Rory Aronson wrote 09/09/2014 at 22:30 point
    Garrett,

    Thanks for the thoughtful feedback and support! We're focusing heavily on the "Big Data" side of things and will be using both onboard sensors, geographic location, growing preferences, weather forecasting, and soil properties to determine how exactly to grow each plant optimally with the given conditions. Check out our sister project, OpenFarm that will provide us with the "Growing Instructions" for each plant based on the specific factors:

    http://kck.st/1yBHkVG

      Are you sure? yes | no

    Similar Projects

    Does this project spark your interest?

    Become a member to follow this project and never miss any updates