Close
0%
0%

Targeting Laser for Laser Cutter

3D printed holder for two line and one point laser allowing targeting and focusing of laser cutter head.

Similar projects worth following
Our laser cutter lacked an in line targeting laser. Using just a side mounted laser pointer does not work as the dot would move with the change in distance between the head and the material. Two line lasers produce a targeting cross that does not move as they intersect in a vertical line just at the position of the main laser. An additional point laser allows adjusting the focus height as its dot moves along the diagonal and hits the targeting cross exactly when the laser head has the right distance to the material.

The laser modules are just pressed in. The holder itself is just pressed on the laser head. The "hole" in the holder needs to be a few tens of a milimeter smaller to provide enough friction for the laser to stay in place. The lenses of the lasers need to be glued in place to not be shaken loose by the movement of the laser head.

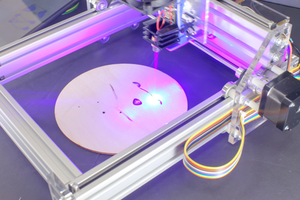
Be aware that these cheap laser modules only have a very limited range of depth in which they focus the beam properly. Keep them sharp in the focus point and don't worry too much about everything else.

The focus point can be adjusted by sliding the holder up and down. Focus the laser conventionally and then slide the holder to the height in which the point lasers hits the center of the cross.

The position of the lasers cannot be adjusted and the precision of targeting cross relies on the precision of the holder itself. You need to adjust the angle of the line lasers, though. They should go through the focus point no matter of their angle. Drive the target far out of the focus and do a test shot with the laser. Then adjust the line lasers to hit the spot. This should result in the targeting cross being on spot for all heights - assuming your laser cutter is properly aligned.

x-openscad - 775.00 bytes - 07/02/2017 at 19:37

Download

  • Maintenance Required!

    Florian Festi10/14/2018 at 08:20 0 comments

    The targeting laser stopped working. While the point laser was still kinda operational the cross had just disappeared. It took me a while to bring myself to look into the issue. Turns out the line lasers are covered in soot. The point laser has its lens deeper in the housing to it is a bit better protected. Luckily everything can be wiped away easily with a wet paper towel and/or cotton bud - probably because we mainly cut wood. If you are cutting a lot of acrylic things may look differently.

    Anyway. After cleaning the targeting laser was working just fine. People cutting a lot of plastics may want to consider some acrylic covers covers for the lasers that can be cleaned more easily or even be replaced after being fogged up with acrylic vapor. But for now I am content with the laser and will leave it as is.

  • Stay focused!

    Florian Festi10/09/2017 at 16:42 0 comments

    For now I always thought of the targeting laser as a convenience. It made setting the focus much easier and helped placing the parts on material - especially if it is already pretty cut up.

    But just yesterday I found out about a different way of using it. If you cut crooked material (typically plywood) the focus may be perfectly fine where you start cutting but may be off else where. With a bit of experience you can see that the focus is off even without the targeting laser. But you can not see so easily in which direction (although you might know from trying to place the sheet reasonably flat). I also did never try to change the height to refocus. Traditionally this requires putting an acrylic puck on the work piece and adjust the distance to the laser head. But the danger of accidentally moving the material around and messing up the part is much to high for this to be practical. But with the targeting laser you can just hit the <Pause> button, adjust the table height without even opening the door and then resume with the cut.

    Yes, this is not feasible for a cut where the head moves between different areas a lot. But I often cut many smaller pieces and the head stays in an area cutting one pieces after the other. So this little trick can be used to improve the quality of the cut and to prevent parts not being fully cut through.

  • Double sided tape to the rescue

    Florian Festi09/26/2017 at 18:46 0 comments

    OK, just pressing it on the laser head was a bit optimistic. The anodized aluminium and the PLA are both pretty slippery. Things might have worked better if I had made the hole a bit (few tenth of a millimeter) smaller to have a bit more pressure. Anyway, it fell off. So I put double sided tape underneath. Let's see if that is enough.

  • Fixing lenses in place

    Florian Festi07/12/2017 at 20:23 0 comments

    As expected the lenses of the laser modules did not stay in place. To focus the lasers to the surface of the to be cut material the lens holders need to be screwed out as much as possible. This allows rocking the lenses back and forth. To fix that I now glued them in place with medium strength bolt adhesive I had at hand. Weak adhesive would probably be better as one side of the thread is only plastic. But any other glue would probably also do.

    Other than the loose lenses the overall design has worked very well. Many users have praised the new targeting laser. There is really nothing left to do so I declare the project done.

View all 4 project logs

Enjoy this project?

Share

Discussions

Similar Projects

Does this project spark your interest?

Become a member to follow this project and never miss any updates