 MOST
MOSTArduino open-source microcontrollers are well known in sensor applications for scientific equipment and for controlling RepRap 3D printers. Recently low-cost open-source gas metal arc weld (GMAW) RepRap 3D printers have been developed.The entry-level welders used have minimal controls and therefore lack any real-time measurement of welder voltage or current. The preliminary work on process optimization of GMAW3D printers requires a low-cost sensor and data logger system to measure welder current and voltage.This paper reports on the development of a low-cost open-source power measurement sensor system based on Arduino architecture.The sensor system was designed, built, and tested with two entry-level MIG welders.The full bill of materials and open source designs are provided. Voltage and current were measured while making stepwise adjustments to the manual voltage setting on the welder. Three conditions were tested while welding with steel and aluminum wire on steel substrates to assess the role of electrode material, shield gas, and welding velocity. The results showed that the open source sensor circuit performed as designed and could be constructed for <$100 in components representing a significant potential value through lateral scaling and replication in the 3D printing community.
For more information, visit here
Download paper here.
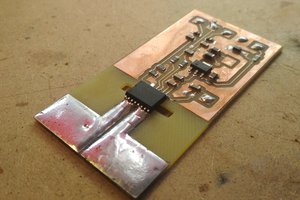
SCHEMATICS
Circuit Board Layout: Top and Bottom

Circuit Board Layout: Bottom Only

Circuit Board Layout: Top Only

Arduino Data Acquisition CodeArduino
>b class="btn btn-primary btn-xs copy-code istooltip" data-container="body" data-trigger="hover" title="" data-original-title="Copy the code" style="color: rgb(255, 255, 255); font-style: inherit; font-variant: inherit; font-weight: bold; font-stretch: inherit; font-size: 0.7em; line-height: 1.5; font-family: inherit; overflow: visible; vertical-align: middle; touch-action: manipulation; background: rgb(32, 142, 219); border-width: 0px; border-style: initial; border-color: initial; white-space: nowrap; padding-right: 5px; padding-left: 5px; border-radius: 3px 0px 0px 3px; user-select: none; position: relative; float: left;">
#define NUM_AVG 250
void setup() {
Serial.begin(115200);
}
void loop() {
double vin = 0;
double iin = 0;
for(int a=0; a<NUM_AVG; a++) {
vin = vin + analogRead(1);
iin = iin + analogRead(2);
}
vin = vin / NUM_AVG;
iin = iin / NUM_AVG;
vin = vin * 5 / 1024;
iin = iin * 5 / 1024;
double i = -1.022 * iin * iin + 52.08 * iin + 0.0024;
double v = 10.48407 * vin;
Serial.print(v);
Serial.print('\t');
Serial.println(i);
}
 numero_trey
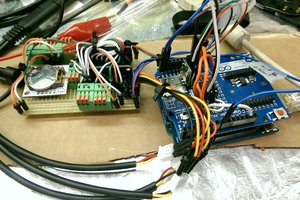
 kevarek