 slantconcepts
-
11Attach Forearm to Upperarm
- Use a spare servo horn to rotate the Upperarm upper servo armature fully counter-clockwise.
- Snap the Forearm onto the Upperarm by starting the servo armature in the hole on the Servo Horn side of the forearm. Then twist and press the forearm onto the rotation Nub. Forearm should rotate freely.
- Position the Forearm in its lowest position relative to the Upperarm.
- Attach and secure a servo horn in the depression on the Forearm.
![]()
![]()
![]()
![]()
-
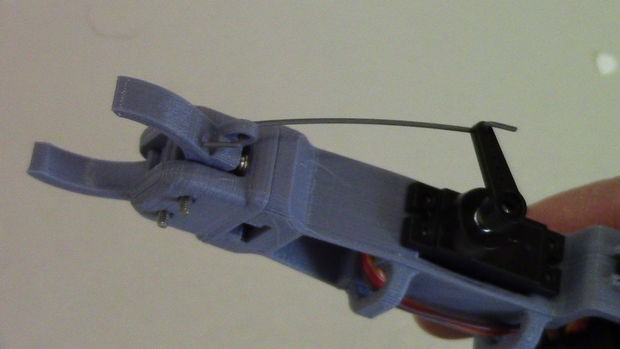
12Connection Gripper Actuation Servo
- Use a spare servo horn to rotate the Gripper Servo, in the Forearm, fully clockwise.
- Remove the horn and insert the Gripper actuation wire into the second hole from the end of the horn. Note: Insert the wire from the inside side of the Servo Horn.
- Insert the other end of the Gripper Actuation Wire into the hole of the Actuated Gripper Finger. Note Come in from the top of the finger.
- Attach the horn so that it holds the gripper open.
- Secure horn with Horn Mounting Screw.
![]()
![]()
![]()
![]()
![]()
-
13Organize Servo Wires
- Feed the wire from the gripper servo through the organizing loops on the Upperarm.
- Ensure that all wires feed underneath the Upperarm and out the back of the Shoulder toward the circuit area of the Base.
![]()
![]()
-
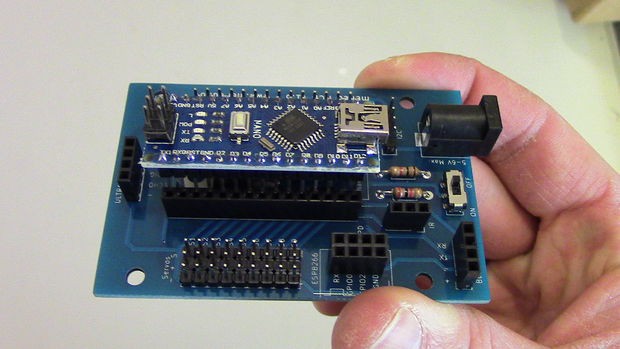
14Insert Nano Into PCB
Insert the Arduino Nano into the location in the center of the Meped Board so that is USB port points towards the switch on the Meped Board. Ensure all pin enter the headers on the board.
![]()
![]()
-
15Attach Board to Base
Attach the Meped Board to the Base using the 4 Arduino mounting screws. Ensure that the switch of the Meped Board is at the Rear of the Base, with the power port facing out.
![]()
![]()
-
16Connect Servos to Board
Plug in the servos according to the diagram. Note: To determine which lead goes to which servo compare lengths of the leads. The shortest is the Gripper, then Elbow, then Shoulder. The longest lead belongs to the Base.
![]()
![]()
![]()
![]()
-
17Flash the Arduino
Download the LittleArm2c_Sketch.ino from the Downloads Page of the LittleArm site and upload to the Arduino Nano using the Arduino IDE
Note: If you purchased the arduino as part of a kit from LittleArm, then it is already loaded with the Arduino code and you may skip this step.
![]()
-
18Plug in the Bluetooth Module
Insert the Bluetooth module into the headers on the Meped Board labeled “Bluetooth.” Make sure the pins align according the Table below.
Note: You will not be able to upload the code to the Arduino if the bluetooth module is plugged in. So be sure to perform this step after the Arduino has been flashed.
![]()
![]()
-
19Download Apps
Download Windows Software
- Go to www.littlearmrobot.com
- Navigate to Resource→Downloads
- Click on the button “Download Latest Windows Software Package.” A Zip folder will automatically start to download.
- Extract all files from the Zip folder.
- Ensure that your Littlearm is connected to your Computer by USB. Note: Software will no run unless Littlearm is connected.
- Click on the .EXE file in the extracted folder. Name will be similar to “Littlearm_GUI_V#.#.exe”
- The Application should open and you may begin using the Littlearm.
- Note: On the first connection it is recommended that you leave the Littlearm unpowered until you successfully connect the software. This can prevent accidental jumps and reactions of the arm.
![]()
Download Android App
- Go to www.littlearmrobot.com
- Navigate to Resource→Downloads
- Click in the button “Download Android App.”
- Download the application from the Google Play store to your Android Device.
![]()
You must pair the your device with the Bluetooth module (password: 1234) before you can connect the app. The app will close if the bluetooth connection is not available.
Here is a video for using the bluetooth app of the LittleArm.
-
20Plug in and Use
Plug in the Power Supply and start using.
Enjoy the LittleArm, your own desktop robot arm
![]()
LittleArm 2C: 3D Printed Robot Arm
A Fully 3D Printed Arduino Robot Arm for STEM Education


Discussions
Become a Hackaday.io Member
Create an account to leave a comment. Already have an account? Log In.