Close
0%
0%

BioBird

"tweet tweet," goes the UAV.

Similar projects worth following
The aim of our project is to design a biomimetic UAV that glides and looks like a bird.

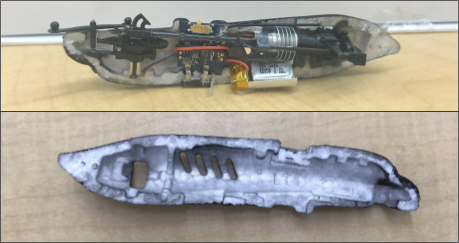
The purpose of this project was to transform Bionic Bird’s flight controls from driver-controlled to autonomous. Although not all goals were achieved, there were significant findings related to data gathering and electrical configurations. It was found that acceleration data is the most promising in terms of controlling basic wing and tail movement of a robotic bird. A basic algorithm has been designed to utilize two out of the three IMU axes for wing and tail control.

  • 1 × Avitron Bionic Bird
  • 1 × Adafruit Pro Trinket 3.3V
  • 1 × LiPoly Backpack
  • 1 × TinyCircuits 9-Axis IMU
  • 1 × PNP Transistor

View all 8 components

  • End of Year Update

    TJ BioBird05/31/2018 at 00:12 0 comments

    After testing of our IMU and microcontroller, the next step in our project was controlling the Bionic Bird's motors with our Adafruit Trinket. We ran into problems with this as the motor was not receiving enough voltage to run, which we resolved with the addition of a PNP transistor. Our LCD for displaying IMU values also had problems, so we switched to using an external microcontroller with Serial capability to read the values from the Trinket and display them on a computer. With our time constraints, we were unable to get the bird tested back together; however, we have found how to reverse engineer the Bionic Bird to control its motors with our own microcontroller and sensor system which can be further developed. Future research should focus on finding the optimal relationship between the change in acceleration given by the IMU to the necessary change in motor power/velocity for the UAV to maintain flight. 

  • 4/5/18 Update

    TJ BioBird04/06/2018 at 02:54 0 comments

    We are now in the testing phase of the electronics that will allow the previously driver-controlled Bionic Bird to fly autonomously. We are currently using a 3.3v Trinket Pro by Adafruit as our microcontroller. Soldered on, is a Tiny Circuits 9-Axis IMU. The benefit of this specific model is its extremely lightweight, which is just 1 gram. This allows us to minimize the weight of the bird, allowing for a smoother flight. We have also purchased and attached a LiPoly Backpack for the Trinket, which allows us to give power to the microcontroller and IMU with a battery. We are also able to charge the battery by plugging the USB port to a laptop while the battery is still attached.

    Unfortunately, the Trinket does not have a "Serial Console" capability. Thus, for testing purposes only, we have wired a LCD display to output the IMU’s values for further programming and testing.

    After testing, we plan on replacing the Bionic Bird current microcontroller with the Trinket, LiPoly backpack, and IMU to allow for autonomous flight.

  • 2/5/18 Update

    TJ BioBird02/05/2018 at 16:19 0 comments

    Since we received our Bionic Bird, we have been testing out the flight inside the robotics lab and outside. We practiced using the bionic bird app that came with the drone to control the bird's flight, from going up and down to making sharp turns. After flying the drone, we decided to open it up to see how the inside mechanisms work. We carefully separated the body of the drone down the middle after removing the wings and tail. We then used the controller app on our phones to control the drone and see how the different parts move in response to control the drone's flight. We are working on getting another microcontroller and some sensors that we will use in the drone's autonomous flight.

  • 12/4/17 Update

    TJ BioBird12/04/2017 at 16:23 0 comments

    Today we received our Bionic Bird kit that comes with one Bionic Bird, replacement wings, and a charging egg. We are looking at either mimicking the design of the Bionic Bird or adding our own components such as a video camera to the model. For now, we are testing the flight capabilities of  the Bionic Bird.

  • 11/2/17 Update

    TJ BioBird11/02/2017 at 17:31 0 comments

    After conducting research into existing bird UAVs, we have decided to focus on the micro technology of the existing Bionic Bird's structure and electronics. We have also looked into various carbon fibers to decrease the empty weight of BioBird. Below, are our envisioned dimensions and circuits of the bird UAV. The cross-sectional diagram displays the locations and relative sizes of BioBird's inner body structure. The total length will be 10 inches, height 3 inches, and total wingspan 19 inches. For the electronics, we will be using the Adafruit Trinket to combat the issue of size restraints.

View all 5 project logs

  • 1
    Dissect Avitron Bionic Bird

    Using a precision knife, cut along the seam of the styrofoam body. Be careful to avoid cutting the wires on the electronics and motors. Once the cut has been made all the way around, the body will separate into two halves, one of which has the microcontroller, battery, and motors and one that is only styrofoam. 

  • 2
    Replace Microcontroller

    The next step is removing the blue microcontroller board from the system. Use a soldering iron to remove the motors and battery from the original microcontroller pins. Next, solder or use a breadboard to connect the motors to an external microcontroller such as the Adafruit Trinket. The motors should be connected to a PNP transistor to receive enough power, then to a digital output pin and ground. Next, the battery can be attached with the Adafruit battery backpack for the Pro Trinket. 

  • 3
    Attach IMU

    Solder an IMU to the microcontroller. If using the 9-Axis IMU from TinyShield, the VCC, SDA, SCL, and GND pins must be all connected to the microcontroller.

View all 5 instructions

Enjoy this project?

Share

Discussions

Similar Projects

Does this project spark your interest?

Become a member to follow this project and never miss any updates