Close
0%
0%

Teen Groot

I am Groot

Similar projects worth following
We got to see a teen version of Groot at the end of Guardians of the Galaxy Volume 2.
This is a build of Teen Groot as a Halloween/Cosplay costume from screen grabs to completion.

The costume consists of:
- A spandex body suit
- Mechanics gloves with extended fingers
- Neoprene pipe insulation for the branches
- Higher density neoprene sheet for the bark panels

It also utilizes a lot of negative space by leaving much the spandex exposed, which helps greatly with keeping cool in the target environment of Florida.

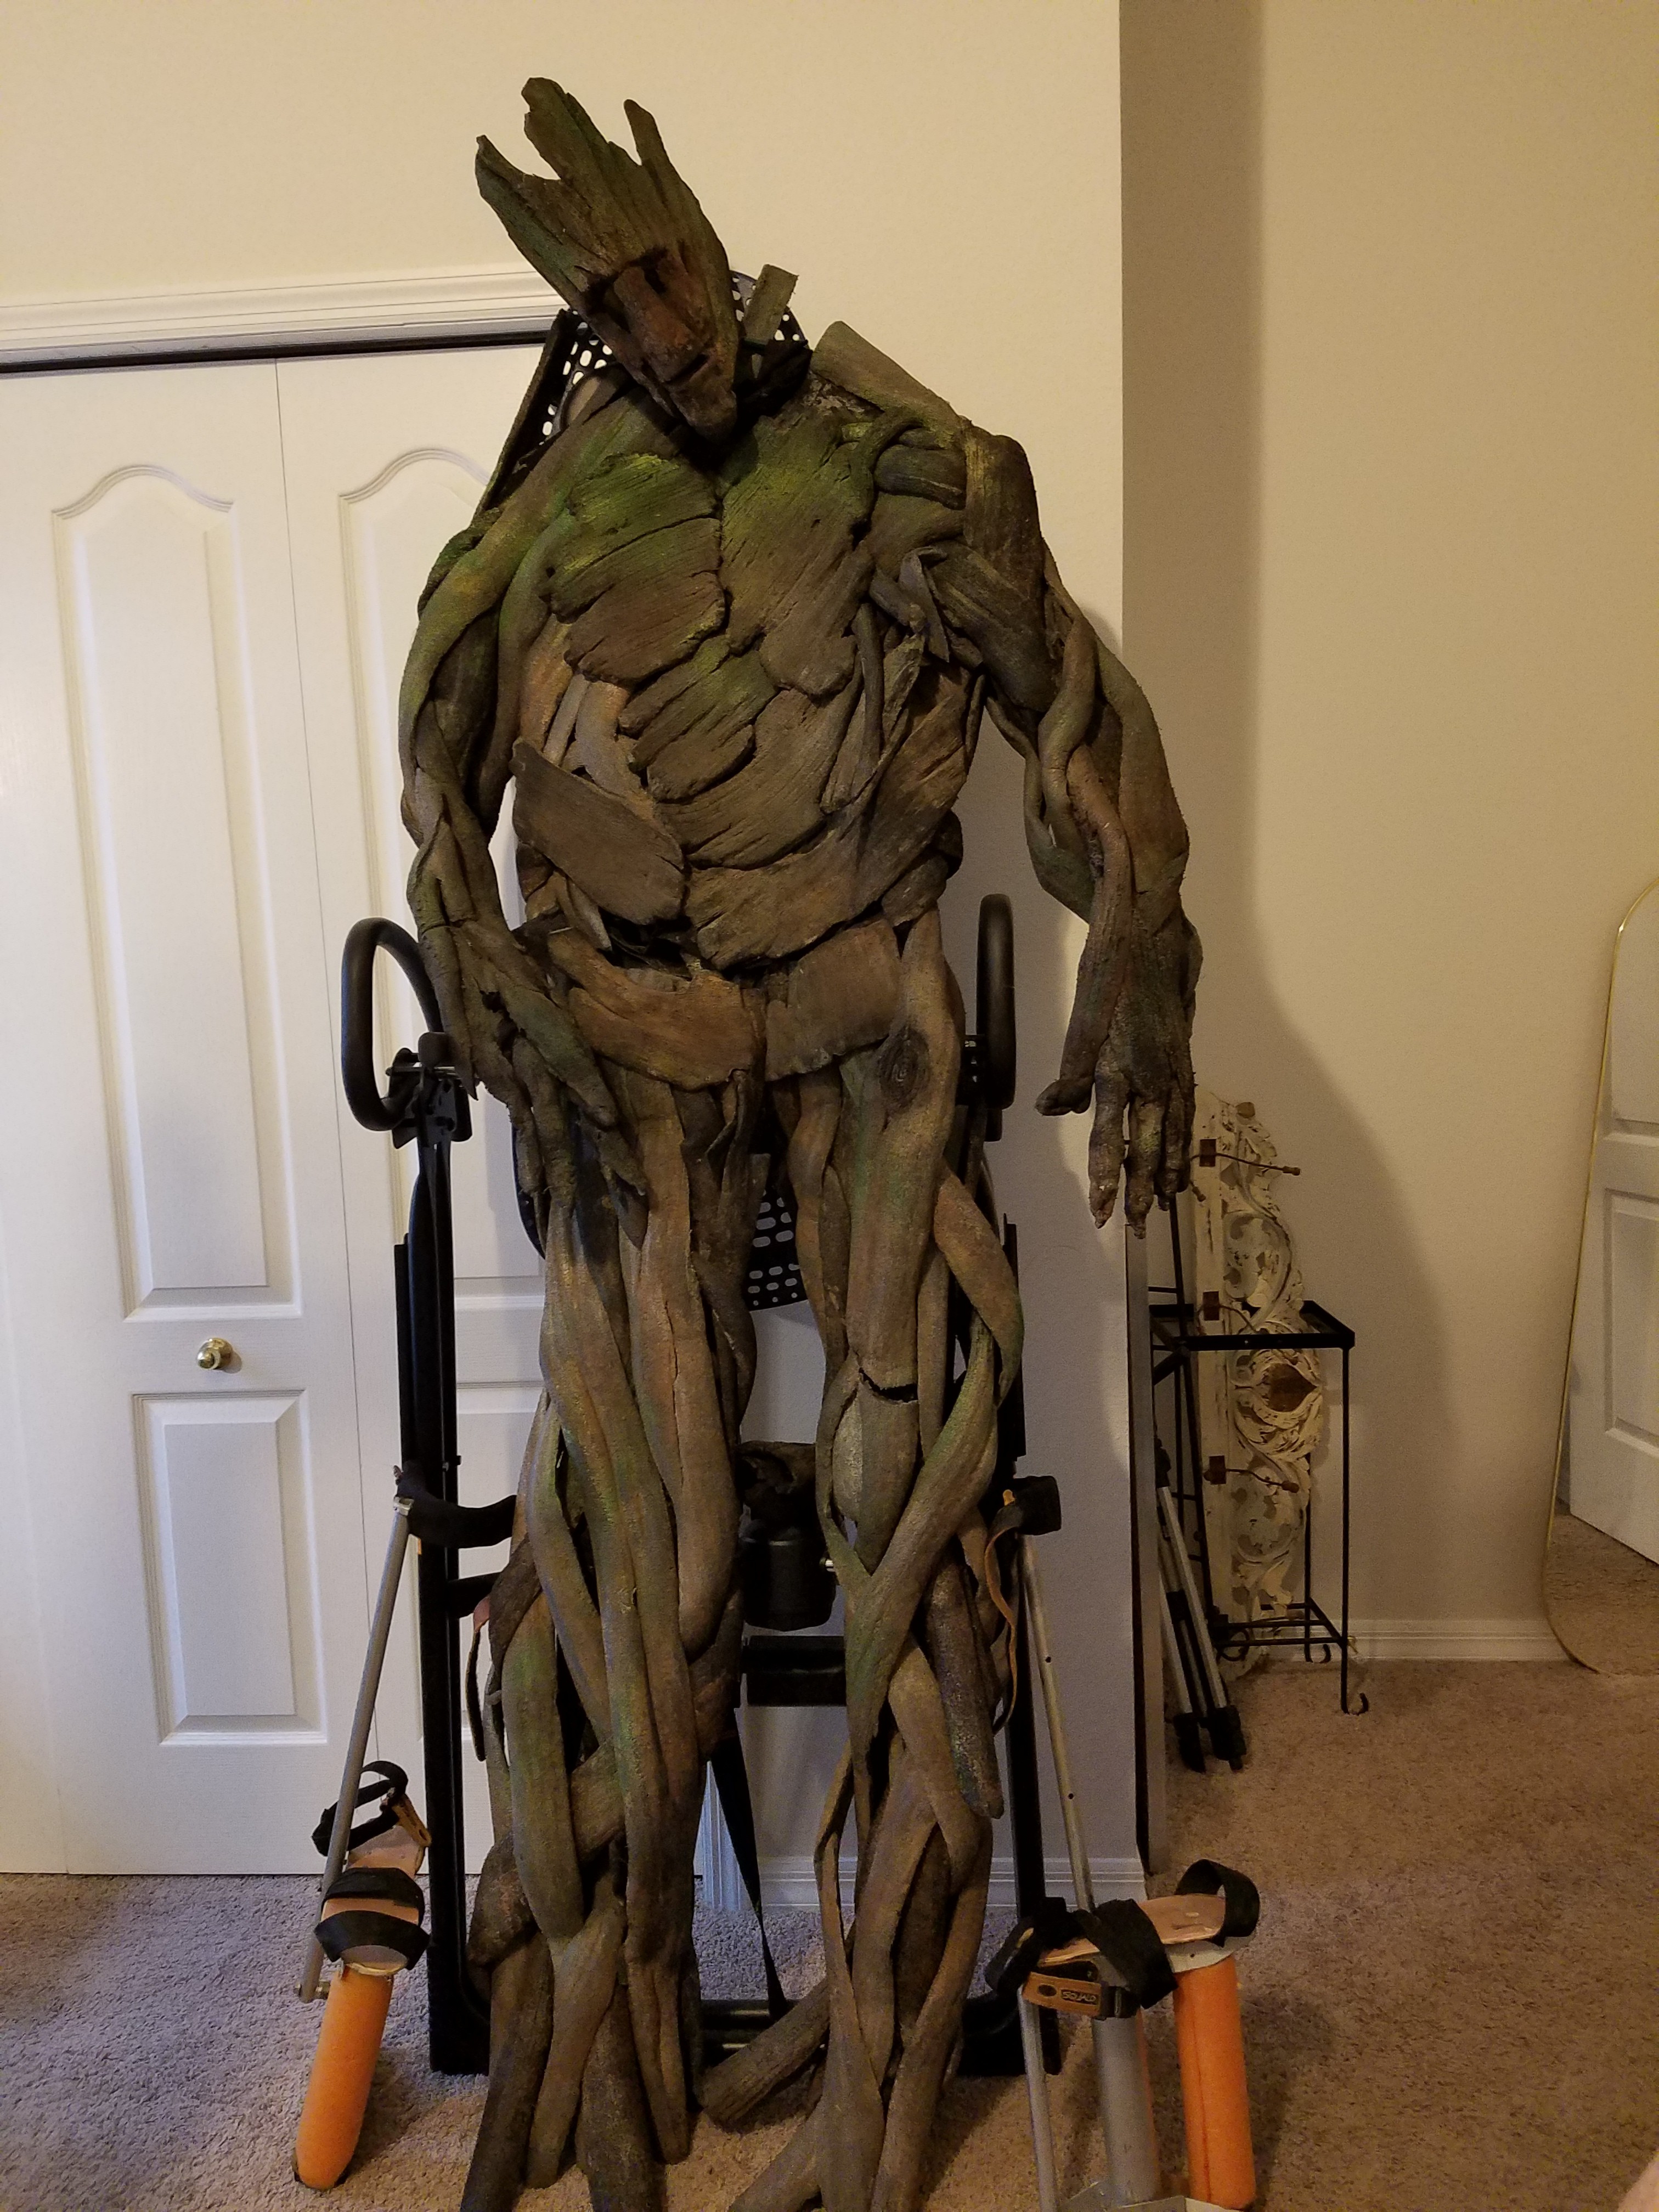
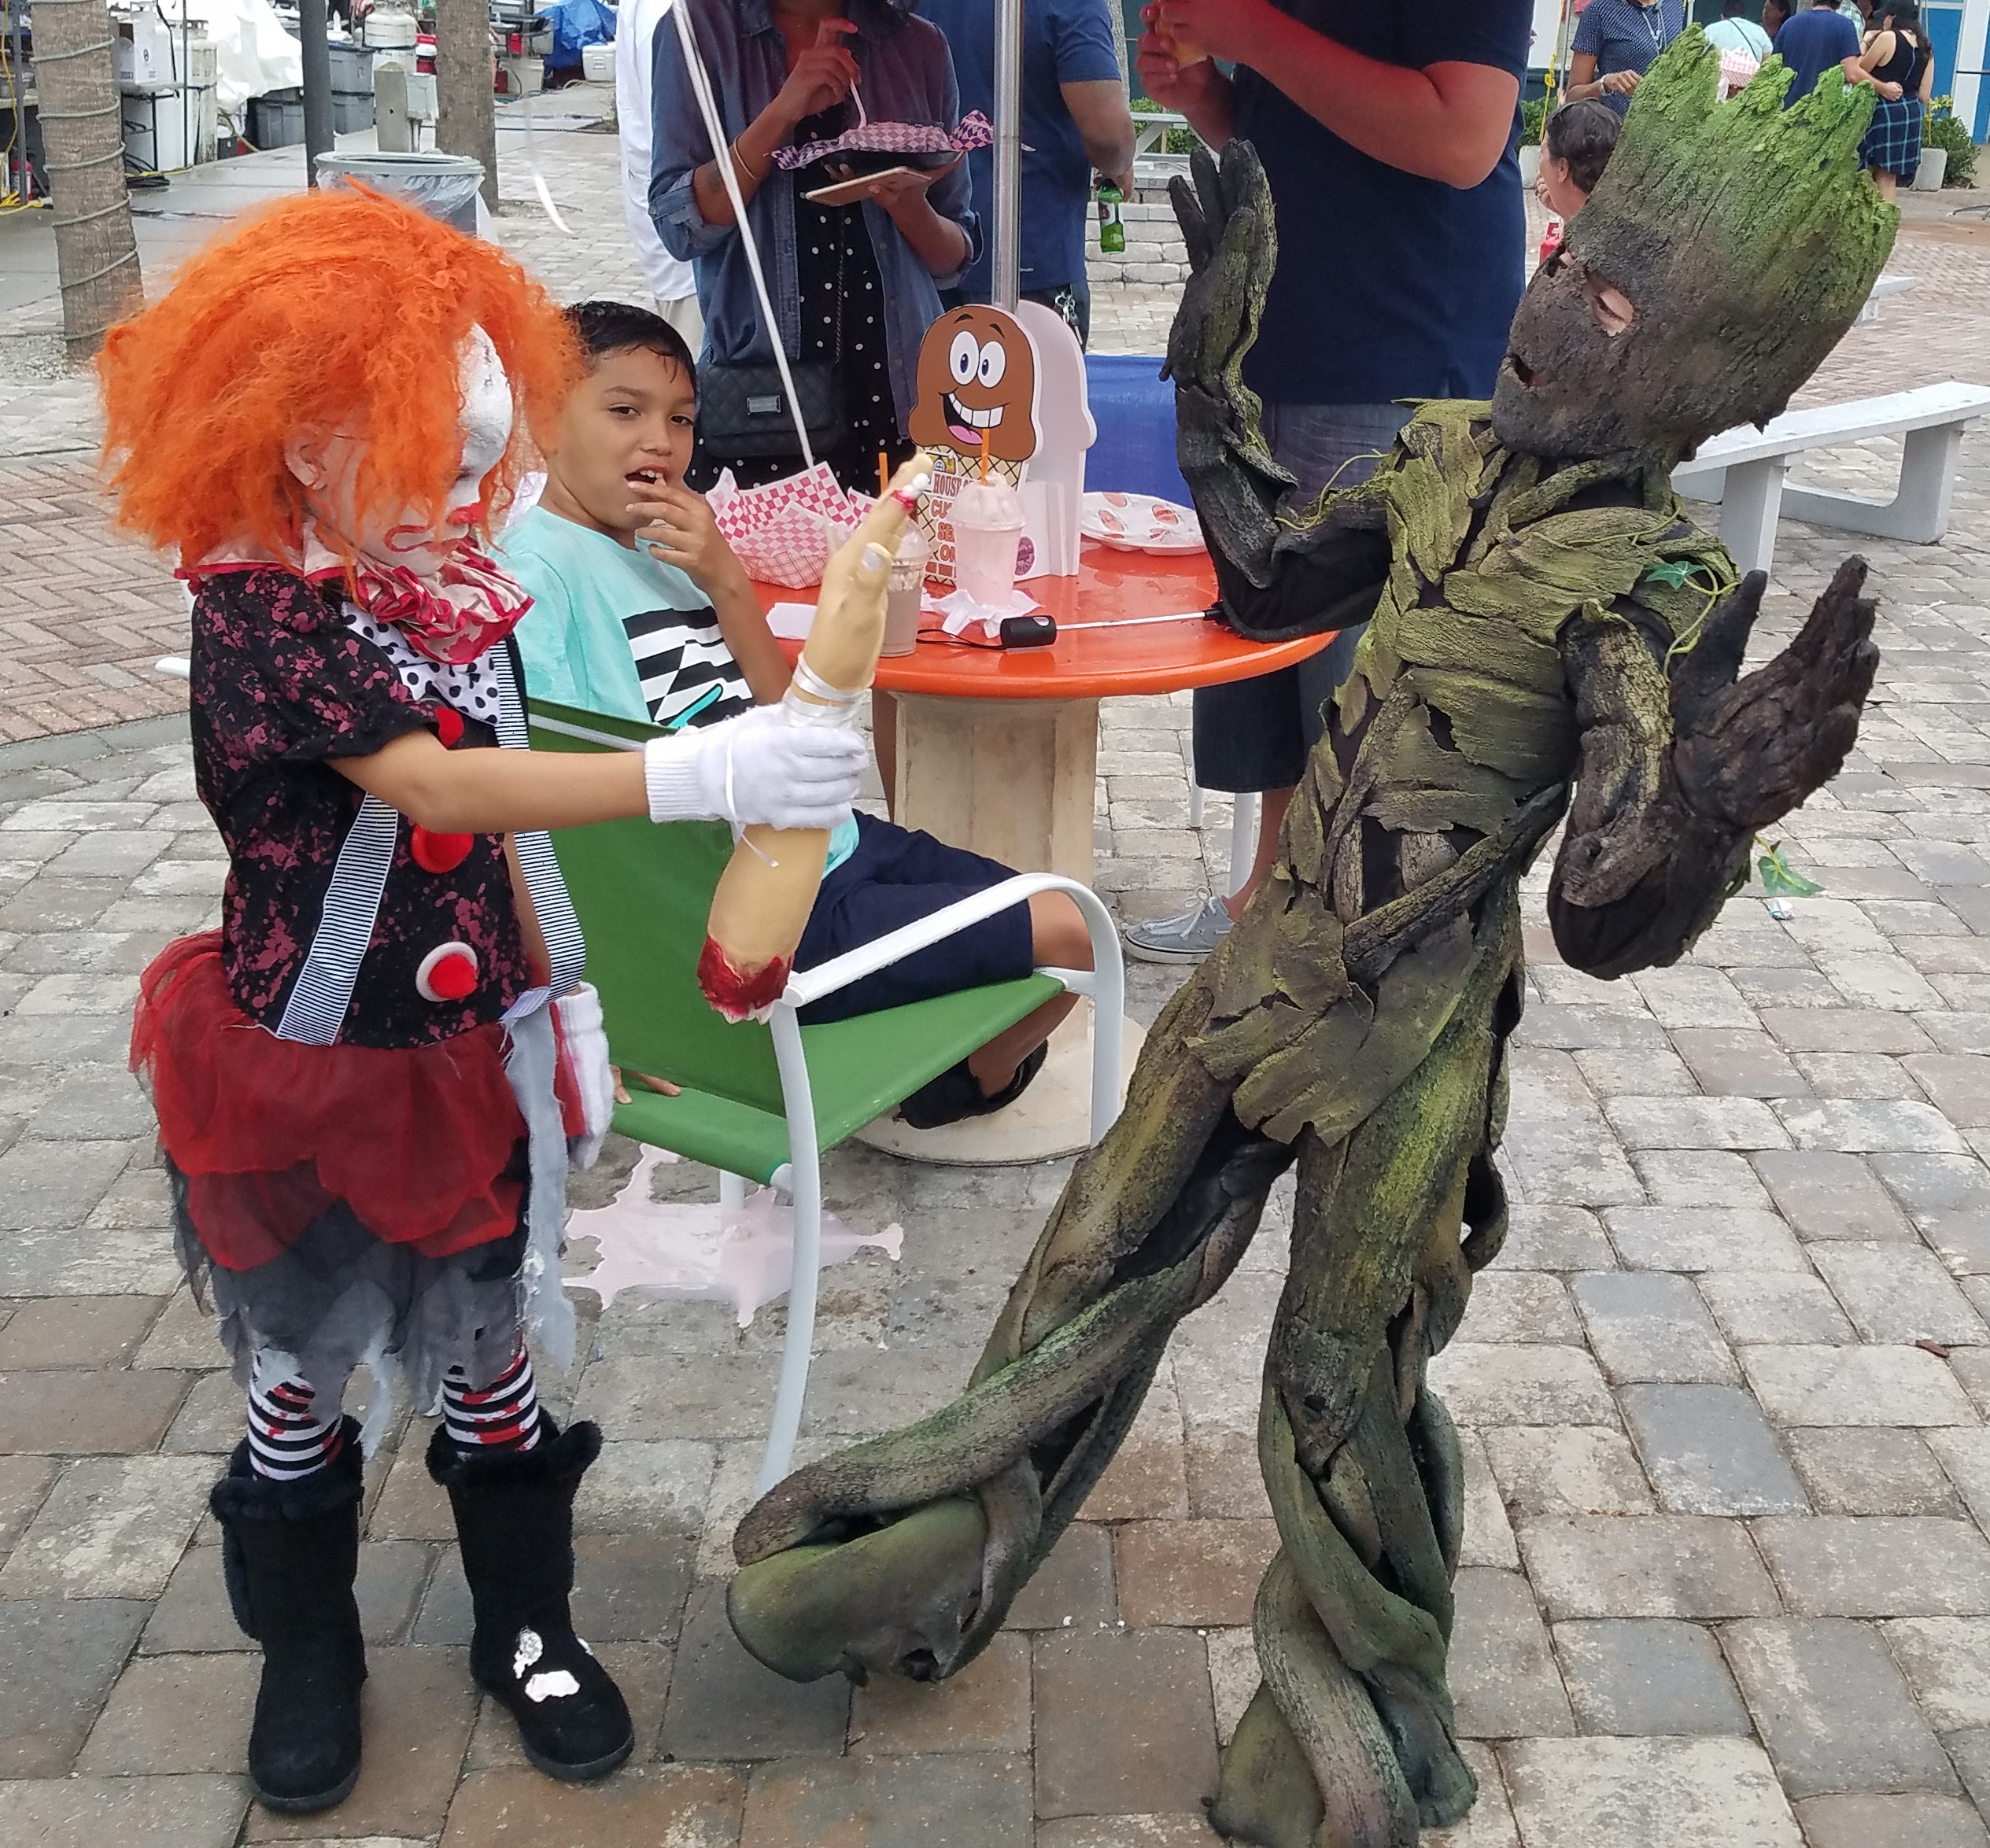
Before the original Guardians of the Galaxy even hit theaters, I had started building Groot as a cosplay costume based on screenshots of the many trailers going around.

I missed the opening date in theaters and then the project got stalled for over a year.  

What happened was I ended up getting off in the weeds with the desire to make him 'grow' like in the prison break scene.  This led to many experiments with pneumatic cylinders, scissor lifts, winches, and eventually to a new novel design for some lightweight articulated drywall stilts.  That design led to needing a 3D printer to fabricate some of the parts, and so the Arcus 3D M1 was born.  Needless to say I got a little distracted with that project.

I finally finished him up last October minus the extendable articulated stilts.  He got some regular articulated stilts instead, but the results were still awesome.


It's a Groot suit riot...

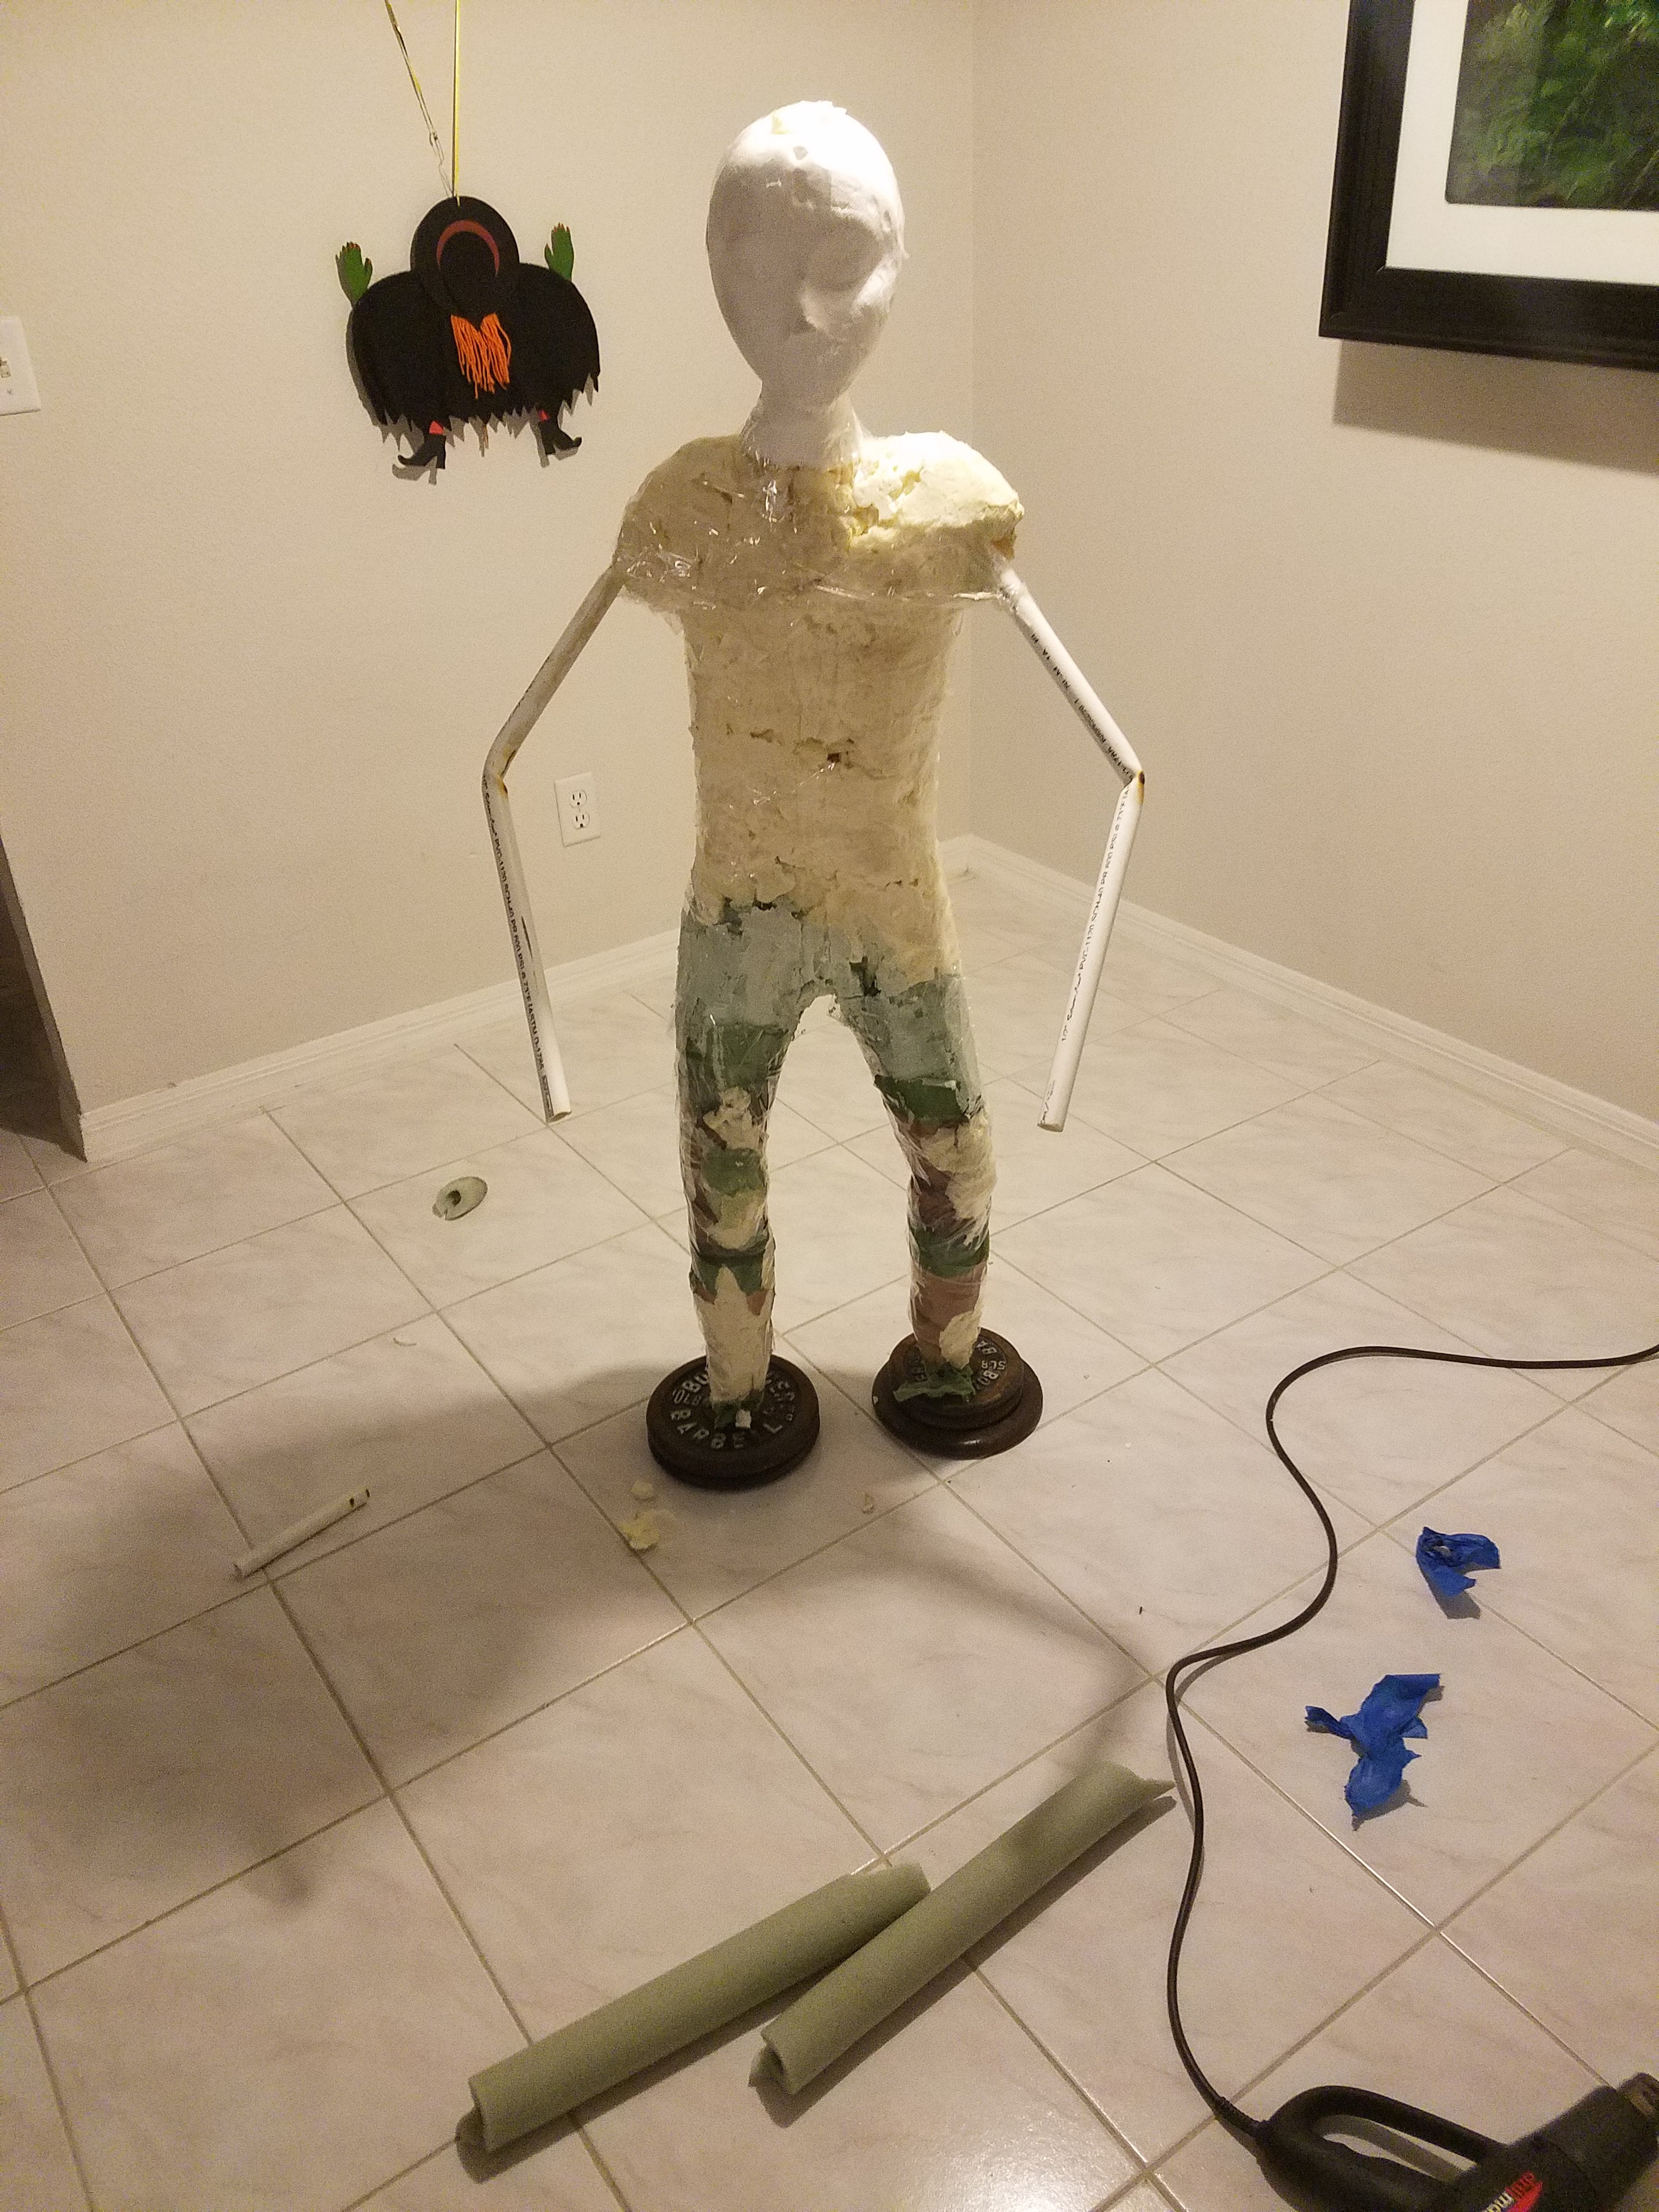
Taking that experience and doing it again, documenting the build this time, in a pint sized version for my son.

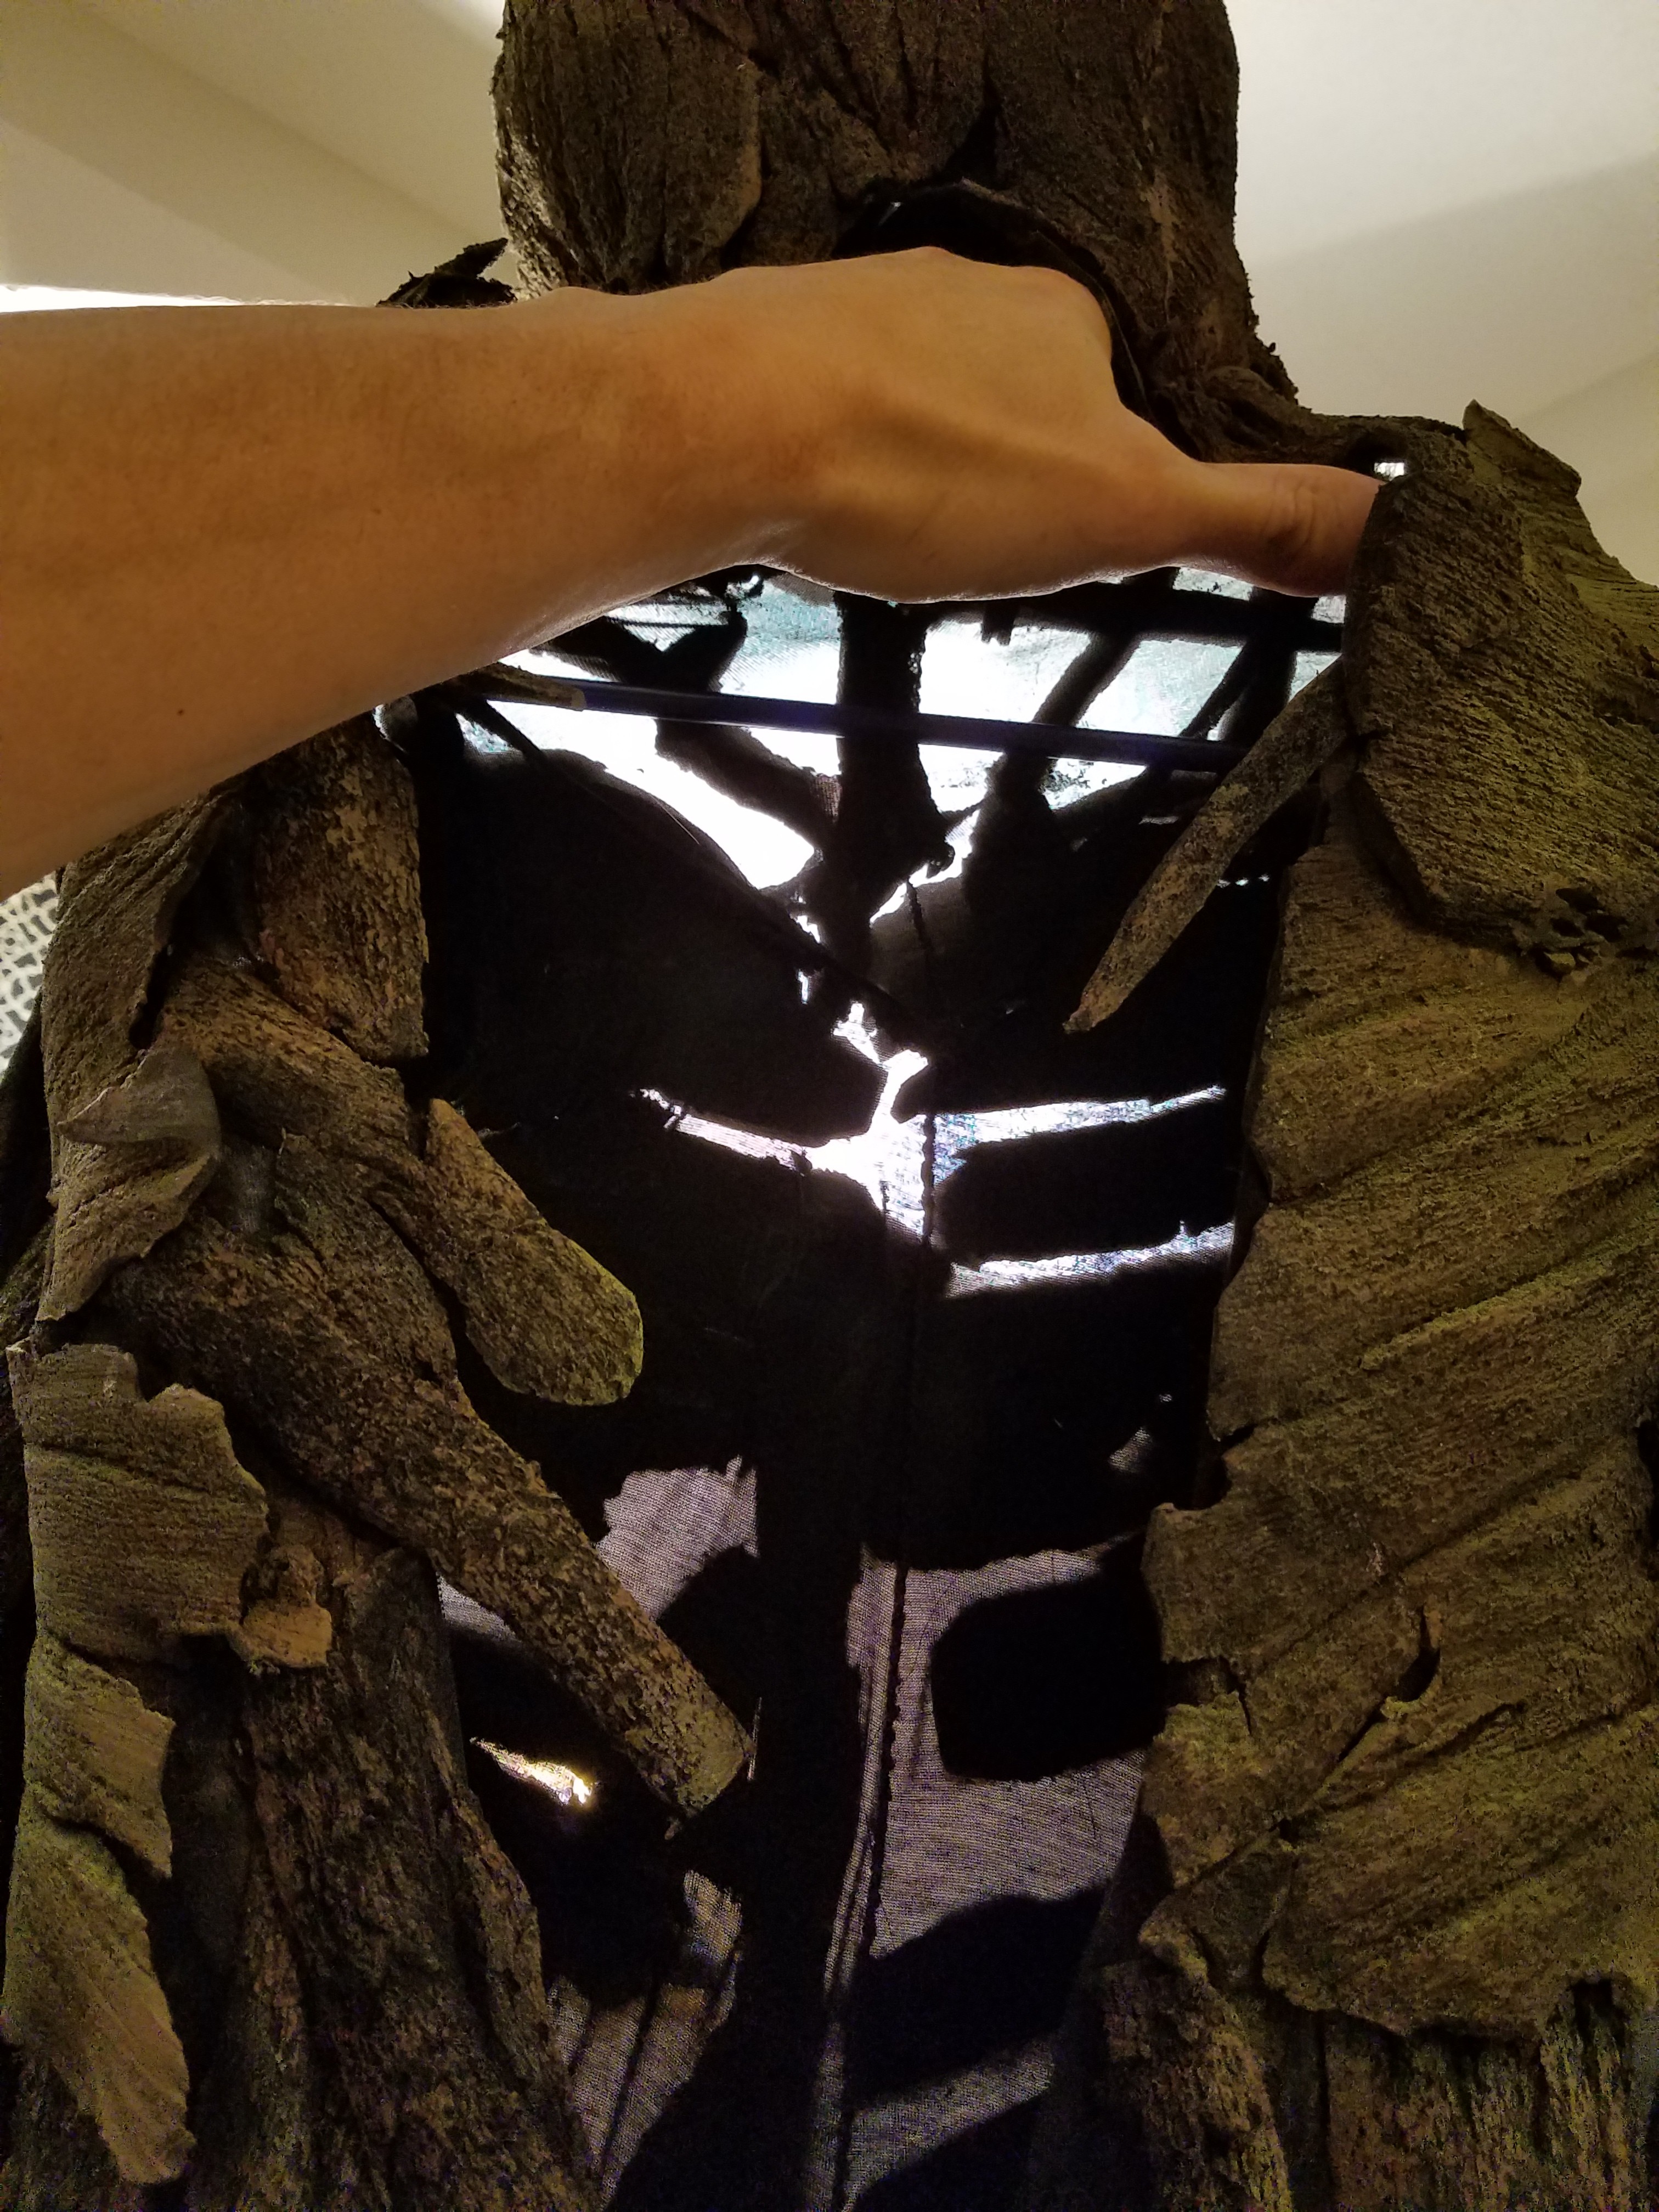
Like the first iteration, he will be built using a spandex full body suit as the base, neoprene sheet for any larger panels, and pipe insulation for the branches.  

I'm going to try to make the mask exceptionally flexible this time and see if I can get facial expressions to transfer through.  If that proves to be impossible, I do have some plans rolling around my brain for how to do servo amplification of facial features.  We'll see.

  • Servo amplification of facial features.

    Daren Schwenke10/30/2017 at 04:11 0 comments

    I was able to make the mask for this pretty soft and flexible, so for the short term I didn't need to implement amplification in the mouth and cheek area to get motion to transfer through.  It's still muted of course, but 'good enough' for Halloween.

    However, the eyebrow area could still use some help.

    So the plan is this.  I've said as much in comments, but time to make it a log.

    Use a conductive foam variable resistor or actual pressure sensor over the target movement area, with a matching servo moving the outer skin over the same area.  They are coupled in that the outer skin movement translates a bit to the inner.  The programming would simply aim to maintain the same resistance by moving the servo until that resistance is met.  Anything off of the target resistance would result in a correction of the outer skin in either direction to match.

    So you raise your eyebrow, which puts pressure on the sensor and decreases the resistance.  The servo reacts and pulls up on the outer eyebrow to raise the resistance back to what it was, relieving the pressure on the inner eyebrow sensor.  

    You lower your eyebrow and the resistance shoots up.  The servo reacts accordingly by letting go of the eyebrow and the resistance returns to the original.

    The baseline resistance reading is read on startup and movement in either direction is then tracked from there so it can be auto-calibrating.

    AKA.. Servo amplification of small facial movement.  Sounds good in theory..

    Problem is I have zero conductive foam left and I'm too cheap to spring for something I normally got for free back in the day when buying MOS/CMOS components.  :)  That and the conductive foam decays with age, and would be sensitive to moisture (aka, sweating would screw it up).

    So I'm currently figuring out what around the house I can use to make a suitable pressure sensitive capacitor instead and adapting my Teensy code for reading multiple channels of home-made capacitors.

    The real issue here is the target capacitance for an area the size of an eyebrow is about 5x lower than the designed capacitor size for that project so my Mylar dielectric won't cut it.  The pressure differential applied is also about 10x lower.  

    So I would need a dielectric at least 50x more effective to get a similar response, or I suppose I could just live with the noise of a 50x weaker signal...  Not yet.

    I have some pure white colorant for paint from back when I wanted to color urethane foam myself, otherwise known as titanium dioxide, in the garage.  Titanium dioxide as a dielectric is actually right in the range I would need... I have zero idea how or if it will be possible to make capacitors from paint colorant so... experimentation ensuing.

  • Generations

    Daren Schwenke10/29/2017 at 23:32 0 comments

    Teen Groot and I went for a walk at the local Carnival today.

    Still no makeup or latex holding anything down for the little man so you'll just have to imagine his eyes actually blending in.  :)

    It was nice and cool out for Florida at 68 degrees and the wind was blowing.  Still, we spent two hours out in the sun and never broke a sweat.  That's good enough for a whole day at a Con.

  • Pennywise gives Groot a hand.

    Daren Schwenke10/29/2017 at 06:18 0 comments

    We ran into Pennywise at Madeira beach today.

    Wow... what a perfectly creepy stare...

    Too bad I chopped off the red balloons.

  • Extendo fingers

    Daren Schwenke10/29/2017 at 01:46 0 comments

    The hands were made from a children's size pair of mechanic's gloves, in black.

    Yeah, they were kind of hard to find, but the tools section at Lowes had them.

    The fingers were extended to match Groot's huge hands with a bit of polycarbonate cut from a fluorescent light guard tube.  This gave us a rigid structure, but not too rigid as to present a risk of injury.  

    The results are actually usable for grabbing things. 

    We also did not attach them to the shirt at inside of the wrist, so his hands can be taken out of the gloves for things like eating.

  • Hiding the zipper.

    Daren Schwenke10/29/2017 at 01:11 0 comments

    To hide the zipper on the back, we attached vertical neoprene panels along one side of it, then made some more which crossed and fit into pockets.

  • Painting it.

    Daren Schwenke10/29/2017 at 00:32 0 comments

    I experimented with painting and found that using just primer worked the best.  It gave a nice flat finish and put a load of color on the neoprene with a very small amount of paint.  Use too much paint and the neoprene will start to get stiff and the paint will just flake off.  Use just a misting and it sticks and stays.

    So first I did a light coat of white clean metal primer.  Using white first was important.  When I tried to get to the target color without it, I couldn't without a load of paint.  Spray from a good distance, about twice as far as normal.  It doesn't take much at all to get to about the 50% target coverage.

    Then a somewhat random 25% coverage coat of rusty metal primer (reddish brown).

    Then it was finished off by spraying it from the top down with some lime green paint, then some darker green fluorescent paint.

    While it is still a little wet, you can randomly rub some of the areas which would see wear in the real world (if Groot was in the real world) to darken those areas.

    No pictures of this, sorry.  I may do a follow up video later and add it here.

  • Designing for Florida.

    Daren Schwenke10/29/2017 at 00:12 0 comments

    Neoprene is a good insulator.  This is a problem when the target environment is Florida.

    So about half of the suit actually has no neoprene on it, which exposes a good portion of his skin to the air.  

    You can see this pretty well when the suit is held up to the light.

    His inseam, the entire under arm area to the wrist, most of the shoulders, the top of the head, and a good portion of the chest are all exposed to the air for cooling.

    To keep this looking right and not to compromise the breathability of the spandex, you can't paint it.

    So after all the panels are attached and correct, you will need to tape off all the spandex areas before painting.

  • Neoprene wood.

    Daren Schwenke10/28/2017 at 23:52 0 comments

    A short how-to on making the neoprene wood I used for this project.

    Basically brush with a wire brush in a single direction.  

    This tears the neoprene in such a way that it looks like wood grain or if you keep going, bark.

  • Head and upper body.

    Daren Schwenke10/28/2017 at 03:12 0 comments

    Got to work carving the head and upper body.

    I started with polyethylene pipe insulation.  The poly insulation is about 1/8th the cost, but nothing sticks to it very well, it's very stiff, and it has a much larger open-cell structure.   The wire brush trick to make it look like wood also requires heating it afterwords to get it to look right.  I didn't like the results so I scrapped it all and started over with neoprene.

    Also ended up making panels from the softer neoprene pipe insulation for the head.

    Gluing it to the spandex gave it a stable base so it didn't immediately tear.  This allowed me to cut/sand it to shape nearly down to the fabric which gave the resulting mask really good flexibility.

    It seems I originally forgot to post the following video, so here it is.

  • Modeling a 9 year old is hard.

    Daren Schwenke10/28/2017 at 01:04 0 comments

    Needed to build the costume on my son, or something the same size as my son.

    Since I didn't think he would stand still for 40 hours, we made a mannequin of him.

    Stuck some PVC pipes in and filled a pair of his too small PJ's with moisture cure urethane foam, otherwise known as 'Great Stuff'.

    To make something big like this actually cure, you need to spritz it with water as you are filling.  Normally moisture cure urethane foam will only cure up to a thickness of about an inch.  Soak the PJ's in water and hang them from a hanger.  Start from the bottom, and every inch of thickness of foam give it a good spray with water.

    As it was just about cured but still a little soft (about 30 minutes) I beat it back into shape.

    Then we tore/cut off the fabric and carved it back down to match his size.  

    Sorry about consuming your wig head mommy.

    Wear a chemical respirator when working with large amounts of urethane foam.  The stuff doesn't smell, but you can become sensitized to the isocyanates they release, which will make you feel like you have the flu the next time you come in contact with the stuff.  Trust me. 

    Some arms where added, and the entire thing was coated in acrylic (shipping) tape to prevent the contact cement from sticking if it soaked through.

    Then on went the black spandex full body suit I had sewn earlier to fit him with a zipper down the back.  I wanted it to fit exactly right so I made one from a workout shirt, some women's tights, and a spandex tube for the head from an earlier project.  

    If the spandex suit fits too tightly, when you remove it from the model it will contract and the neoprene will tear off the spandex.

    Sadly I didn't get any photos or video of my son creeping around the house in it like a ninja.

View all 11 project logs

Enjoy this project?

Share

Discussions

darktyrone08 wrote 05/03/2021 at 20:57 point

hello is there a step by step tutorial I can get I wanna make this for my Halloween costume jw everything help have a great day bye now

  Are you sure? yes | no

mandi myers wrote 08/28/2019 at 18:57 point

How did you get the color on the foam pad and pipe... and the texture?  The legs and feet are all the piping also?  just making a version of this for my son and wanted some tips.  Thanks..it  is really amazing

  Are you sure? yes | no

mandi myers wrote 08/30/2019 at 13:38 point

I am new to this site, found your section on texture and paint.  How about your feet is that just the piping?  

  Are you sure? yes | no

Craig Hissett wrote 04/12/2018 at 11:12 point

I love it! My son is fascinated by baby groot. He'd love something like this.

  Are you sure? yes | no

Morning.Star wrote 03/28/2018 at 08:41 point

Have you thought about using CapSense?

https://playground.arduino.cc/Main/CapacitiveSensor?from=Main.CapSense

This is built into some AtMega chips, and echoed in software by the Arduino core. It relies on the area of contact with skin/pressure applied to it and is extremely reliable. Sweat wont affect it, and all you need is a strip of foil and a 10M resistor per contact to use it. The foil is best placed behind an insulator so can be applied to the inside of the mask and covered with cloth.

This is what I used for

https://hackaday.io/project/19920-cardware/log/54213-cardware-evolution

which is arranged as a bitwise array fed from a single port. As you can see that makes it easy to obtain differentials from it, the full leg video has several pairs of them.

It is also possible to sense bodyfields this way using transistors, and drive servos using only them too if you want to go low-tech. @Dr. Cockroach used that technique on his

https://hackaday.io/project/19048-the-cardboard-computer-io-is-my-name/log/59700-may-16-2017-servo-display-panel

driven by a BJT Astable ;-)

  Are you sure? yes | no

Daren Schwenke wrote 10/03/2018 at 07:09 point

I missed you posting this.  I'll have to take a look.  Thank you.

  Are you sure? yes | no

Morning.Star wrote 10/04/2018 at 07:16 point

:-)

  Are you sure? yes | no

Morning.Star wrote 10/04/2018 at 07:34 point

I had fun with CapSense, I'm going to revisit it myself for some wearable projects if things work out.

Keep me posted... ;-)

  Are you sure? yes | no

medeiros1 wrote 10/29/2017 at 08:42 point

Hi Daren, just to make sure the project is not misunderstood. The head I did is just an example of what you may do with the software. It is not limited to any kind of face movement or mechanics. It is of course not according to your idea to react on movements under the mask directly, but replaying complete pre-teached movement sequences according to MP3 files sequentially, initiated by a push button. As described, the initial idea was to use it as a ventriloquist like conversation with a puppet. I think the way you want to do it is a real challenge, since the sensor control electronics needs some special intelligence to sort out issues when the mask moves to a different position - means I could imagine, that you may have difficulties with calibration. Your idea is definitively a different class of complexity. 

Rolf

  Are you sure? yes | no

Daren Schwenke wrote 10/29/2017 at 16:50 point

I'm all out of pressure sensitive foam or I would have a working model.  That stuff goes fast around here and nothing I've bought lately has had any stuck to it's pins.  I made a capacitive sensor like it with a teensy, but it requires more force to work right than I will have here: https://hackaday.io/project/25561

  Are you sure? yes | no

davedarko wrote 10/29/2017 at 00:12 point

that looks awesome, congratulations!!!

  Are you sure? yes | no

Daren Schwenke wrote 10/29/2017 at 03:34 point

Thank you Dave, we worked hard on it.  

Unfortunately the arduino servo amplification of facial movement portion never made it into the costume in time for use for this Halloween season and I dare not risk implementing it now.  

I did plan for it though so there is enough room in the mask above the forehead to amplify six regions, later.

  Are you sure? yes | no

medeiros1 wrote 10/27/2017 at 05:08 point

Hello Daren,

if you plan to move the face according to sound, my project bechele.de could be interesting for you. It allows to move servos synchronous to sound (speech or music)

Its not limited to face movement only - this is just one application.

see: https://hackaday.io/project/27259-bechelede

Rolf

  Are you sure? yes | no

Daren Schwenke wrote 10/27/2017 at 05:26 point

Thanks, sounds like a Halloween skull project in a box.  :)  

I wanted to be able to do this without totally decoupling the inner and outer skin so I can do this in less thickness, so here is what I was thinking.  

Use a conductive foam variable resistor or actual pressure sensor over the target movement area, with a matching servo moving the outer skin over the same area.  They are coupled in that the outer skin movement translates a bit to the inner.  The program would simply aim to maintain the same resistance by moving the servo until that resistance is met.  Anything off the target resistance would result in a correction of the outer skin in either direction to match.

So you raise your eyebrow, putting pressure on the sensor and decreasing the resistance.  The servo pulls up on the outer eyebrow to raise the resistance back to what it was, relieving the inner pressure.  You lower your eyebrow and the resistance shoots up.  The servo reacts accordingly by letting go of the eyebrow and the resistance returns to the original.

For decoupled movement, you could similarly track a white dot on the tracked feature with an IR emitter/detector pair.

The baseline resistance/intensity reading is read on startup and movement in either direction is then tracked from there so it can be auto-calibrating.

AKA.. Servo amplification of small facial movement.  Sounds good in theory..

  Are you sure? yes | no

Similar Projects

Does this project spark your interest?

Become a member to follow this project and never miss any updates