Close
0%
0%

Vapsy++

Another vapor phase reflow oven - the successor of #vapsy.

Similar projects worth following
#vapsy was nice and all (it *did* solder the boards I threw into it) but had some serious drawbacks:
- small size (both board size and chamber height)
- hard to control
- dangerous when control didn't work as expected: it would expel galden at 230 °C

This is the attempt to do it right this time.

This is the successor of #vapsy and hopefully it will be better.

First things first, I need concepts for a lot of topics:

  • safety
  • chamber construction
  • heating
  • insulation
  • cooling
  • sensors
  • control
  • user interface
  • pcb handling

First of all: safety. After not being too surprised about boiling galden being spilled by #vapsy I will try to keep safety in mind during all stages.

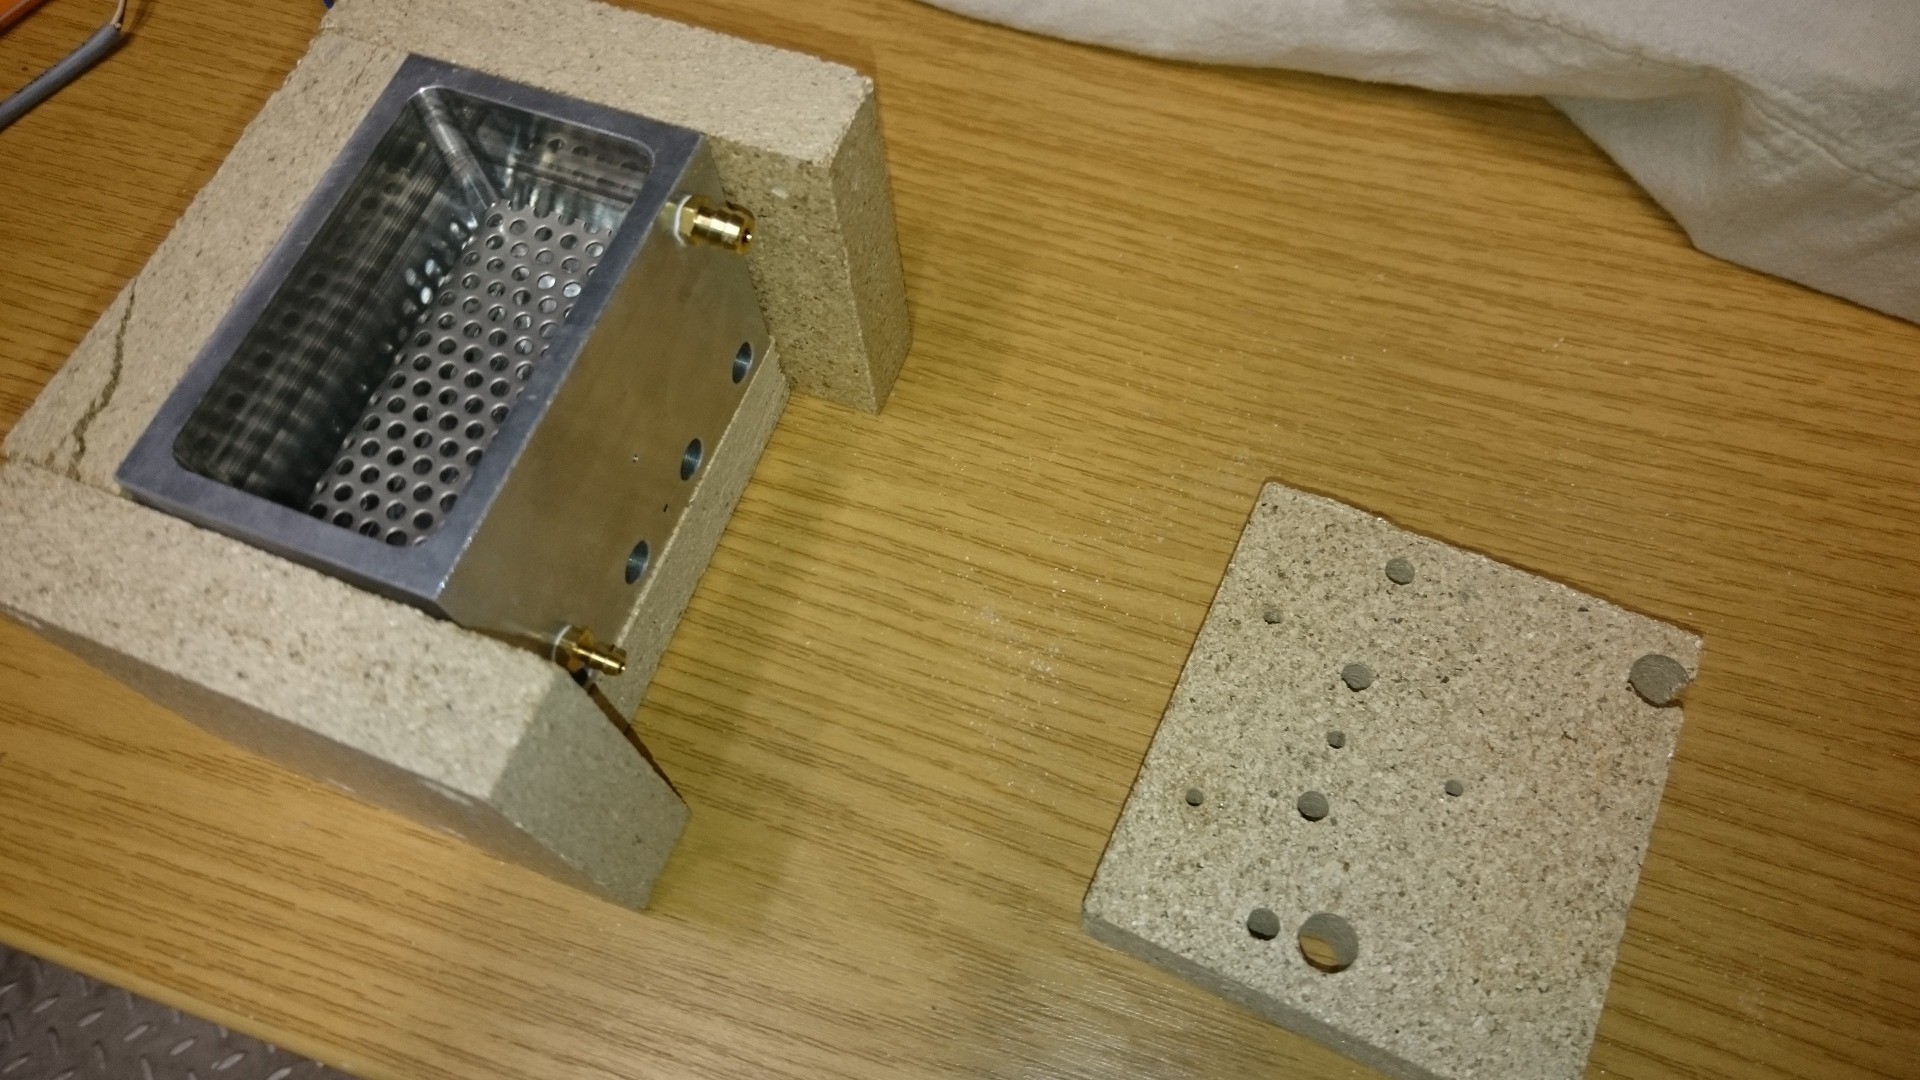
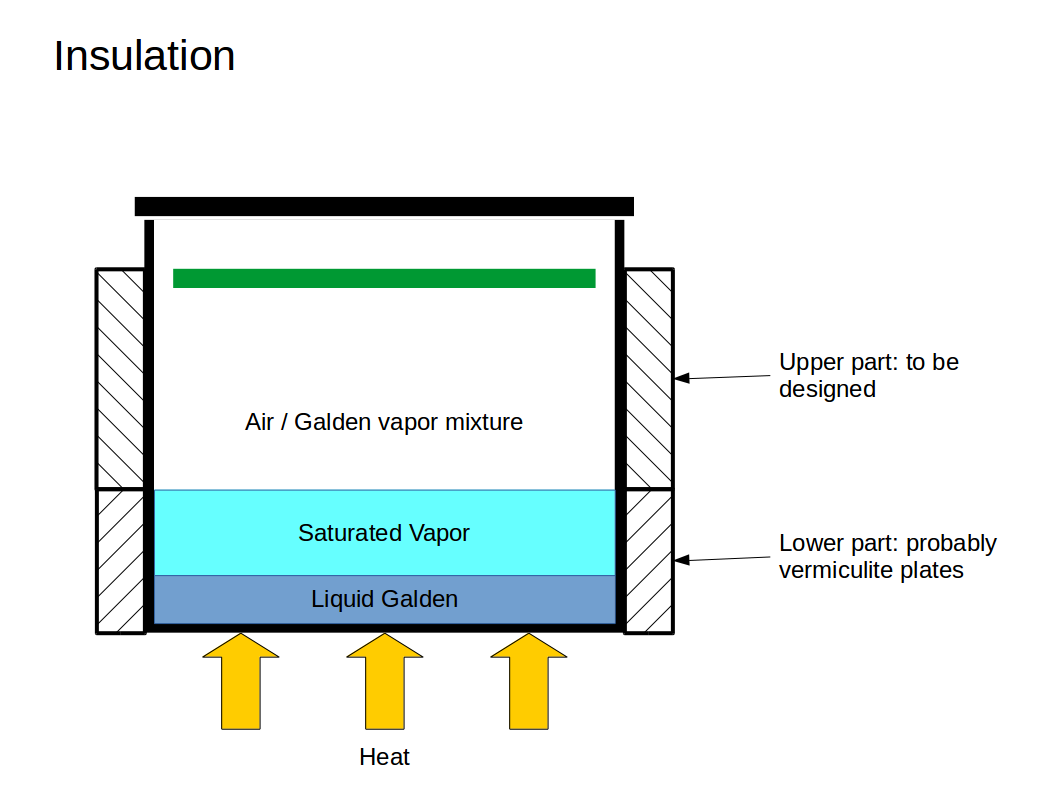
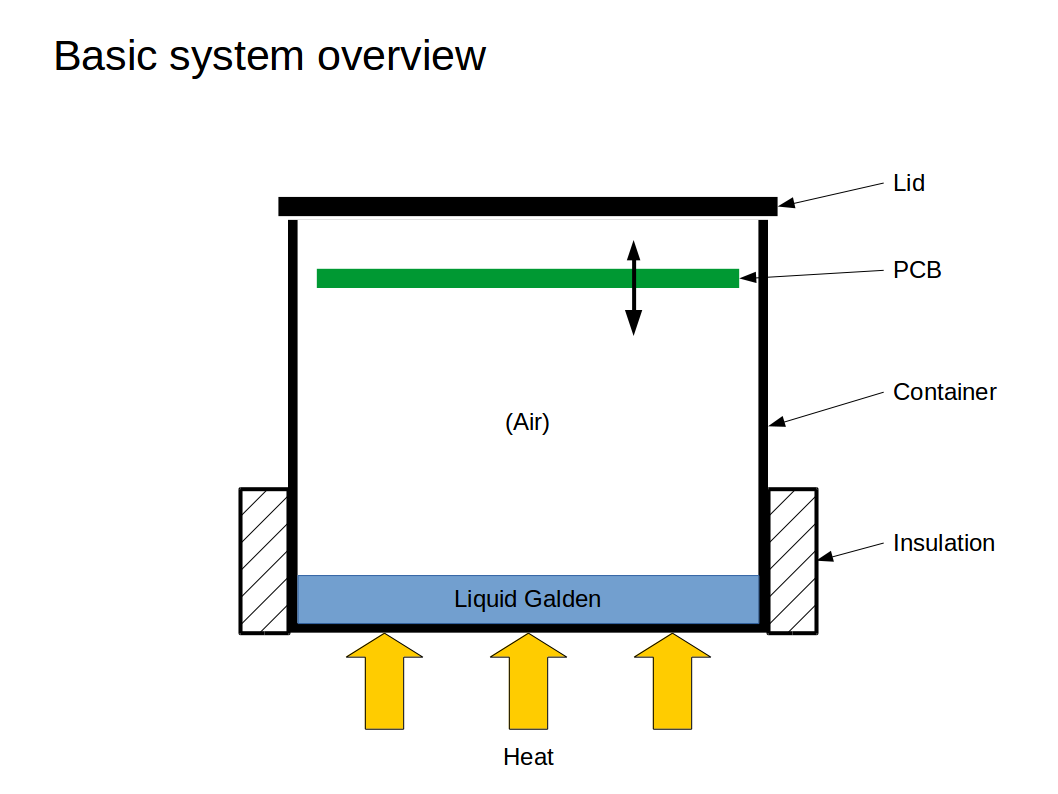
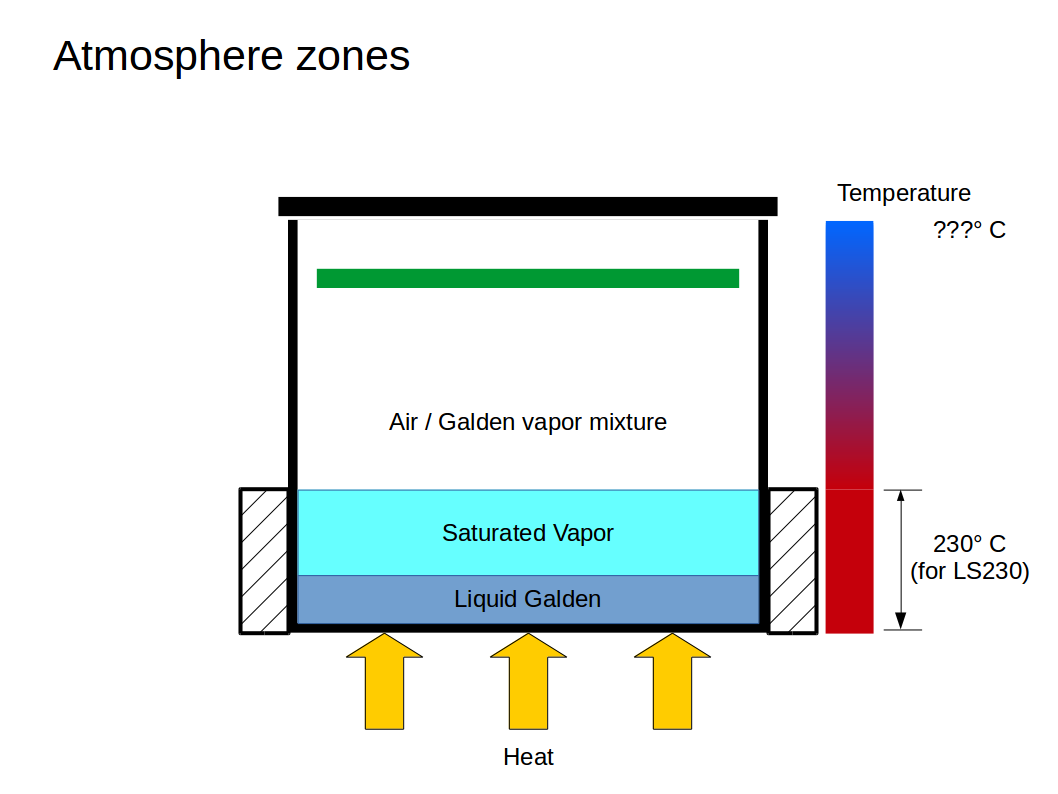
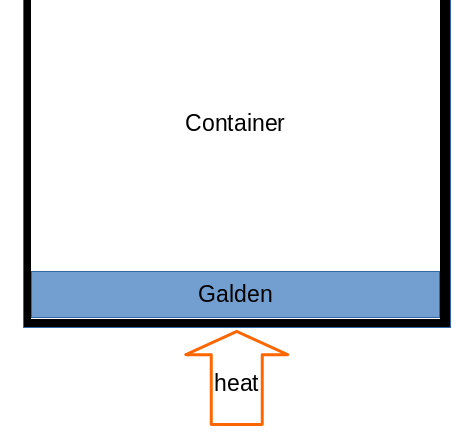
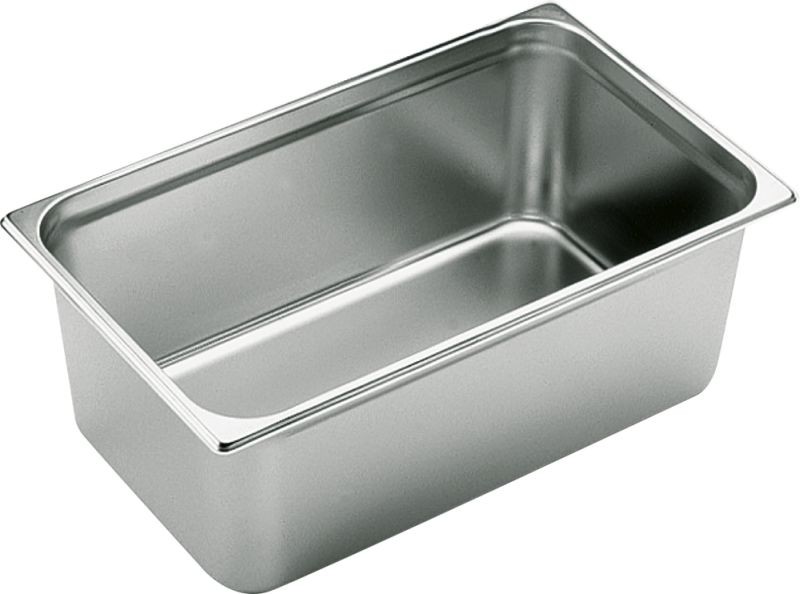
Chamber "construction" was quite an effort in the previous model: a milled aluminum block. The raw part was found in a drawer and already had holes for heaters, so I built the oven around it. Now a mill is not in sight and the raw block for the size of oven I have in mind will most probably not fit in any normal drawer. Something else will have to serve as a base. The chamber should be high in order to have three zones: liquid at the bottom, saturated vapor above that and a vapor/air mix with decreasing vapor content on top. 

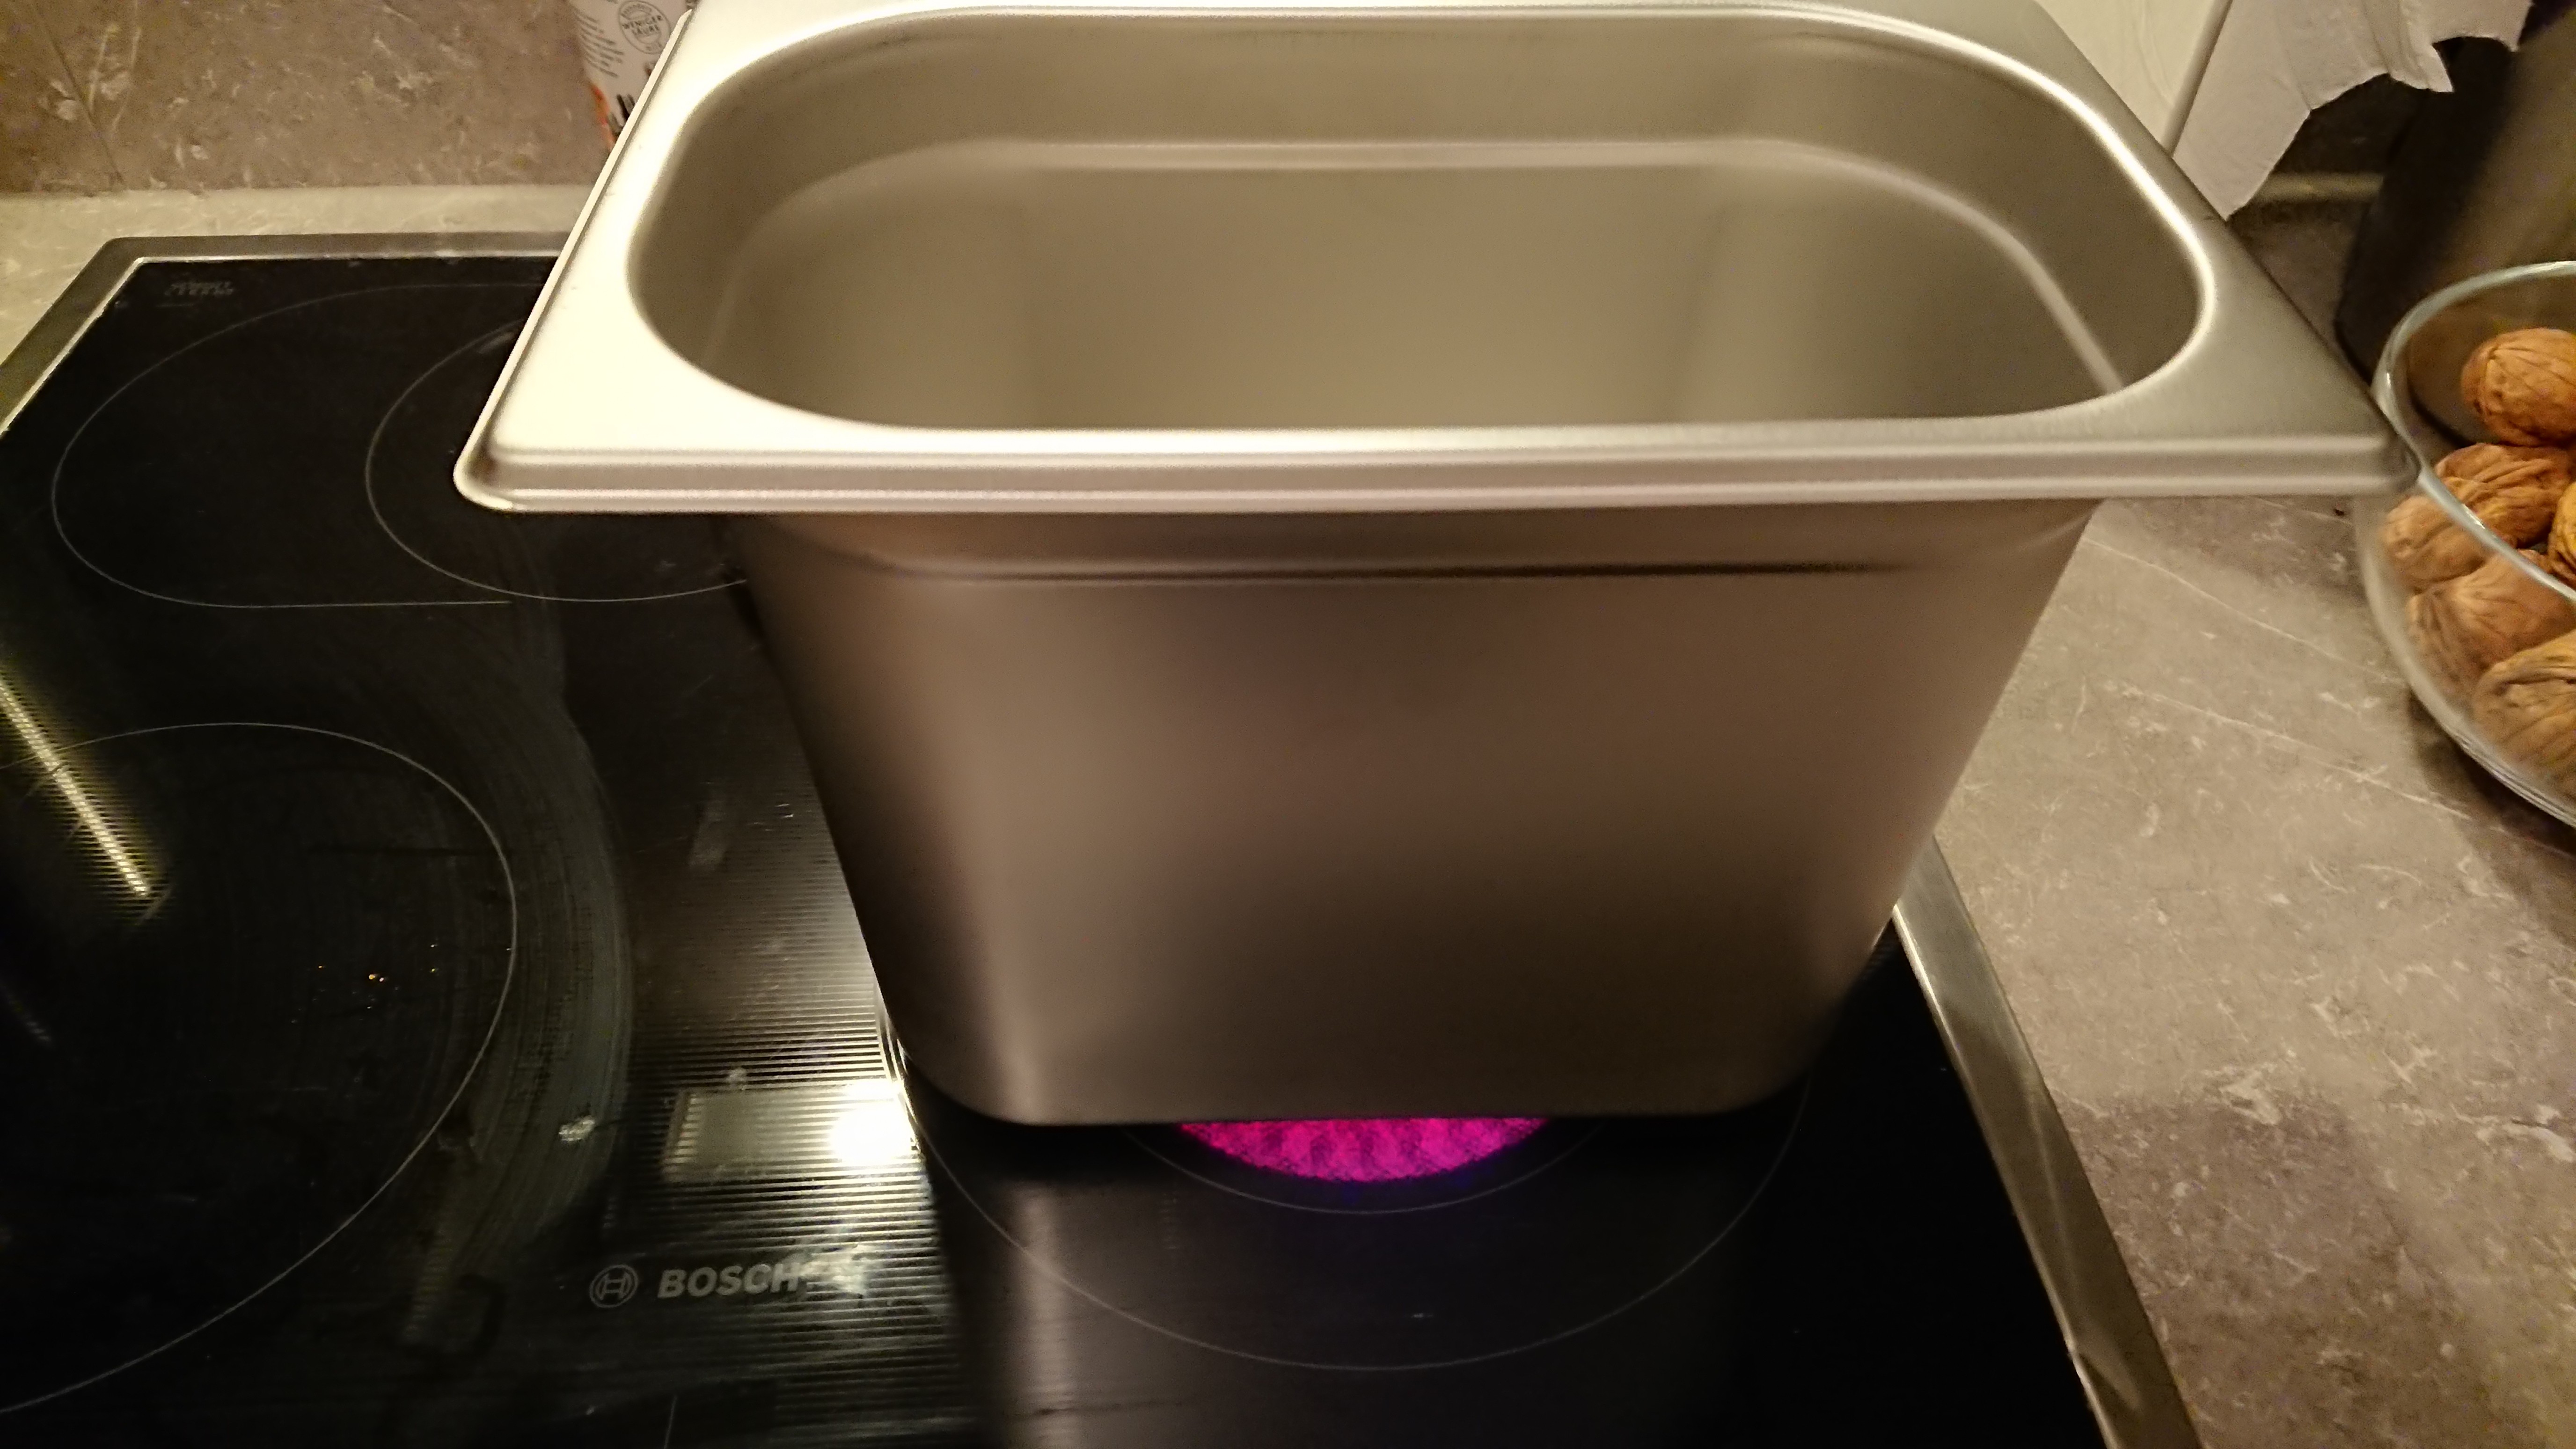
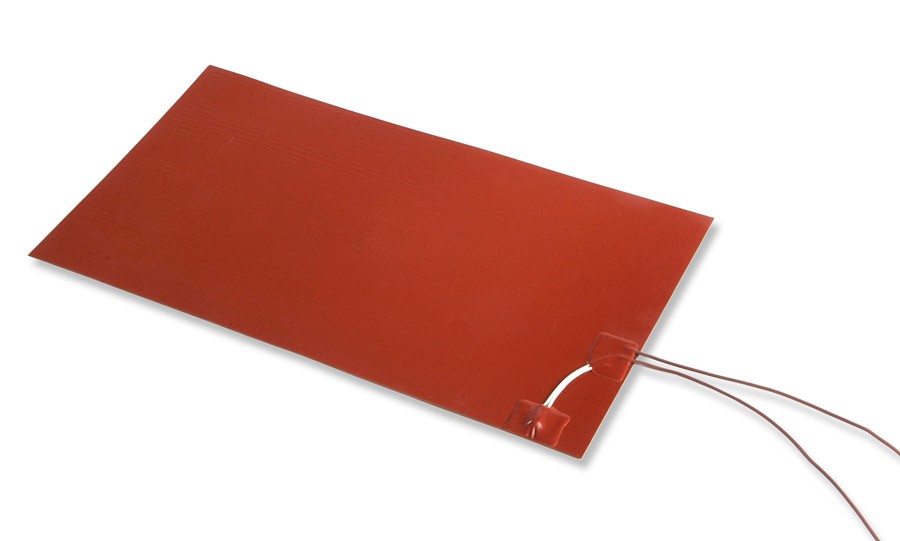
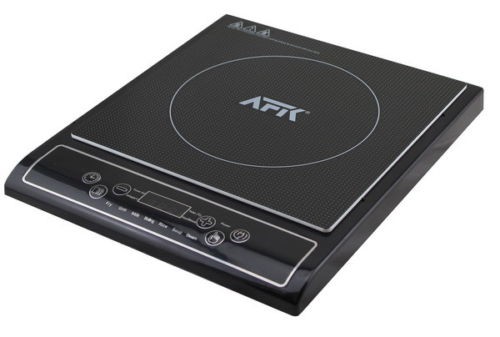
Heating is closely coupled with chamber construction since low thermal resistance is desired between the heater (however that may look) and the chamber's bottom. The heater(s) can be immersed in galden, which would require a sufficient liquid level. That's probably pretty expensive. Heating from outside can be done with halogen bulbs, a flat heating pad, a stove, a hot air gun - the list of possibilities is long.

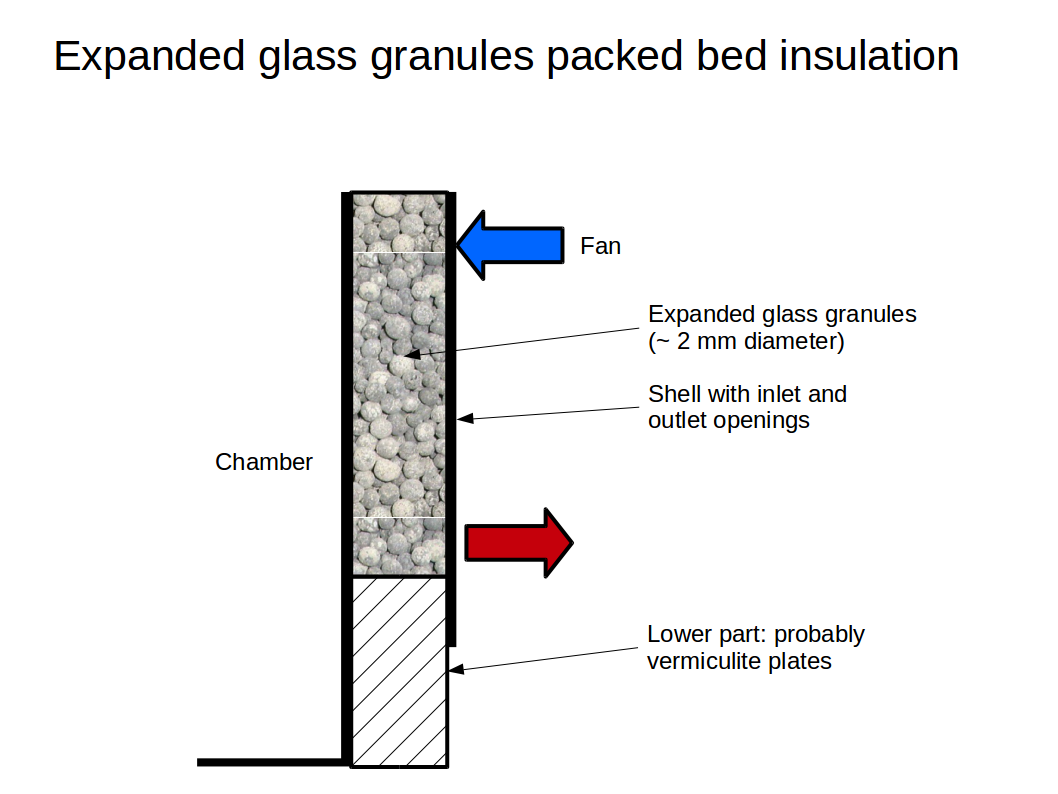
Insulation: Again closely coupled with chamber construction. Insulating a round chamber will call for something more flexible than stiff plates. A rectangular chamber, though, can be insulated with easy to cut (and cheap) vermiculite plates. A solid insulation is not even necessary and might even get in the way: I could build an outer shell around the chamber and fill it with some granular insulation (think expanded glass granules) that can later be cooled with air - maybe an interesting option.

Cooling: When the reflow profile comes to its end it goes down to room temperature again, and the time at reflow temperature shouldn't exceed certain limits. Good insulation will extend the time needed to get out of the reflow zone, so cooling will be an issue.

Sensors: Most sensors will be temperature sensors. I've made good experience with thermocouples and I'll probably stick with them. Maybe even make my own since I have some professional thermocouples to compare them with. Thermocouple wire is cheap.

Control: Should be as simple as possible, but not simpler. A simpler control system is easier implement and check for errors and safety issues. Safety measures must work without a computer attached.

User interface: Not sure yet. touch screen, computer or web interface would be ok.

PCB handling: To get a board into vapsy, I had to grab it with tweezers or whatnot and insert it into the chamber from above. The improved version will have a better way, either from the side or some kind of mechanism to lower boards into the chamber.

  • Some thermophysical properties of Galden LS 230

    Christoph12/28/2017 at 22:40 0 comments

    Solvay, the manufacturer of Galden LS 230, publishes the thermophysical properties of that substance at 1 bar and/or 25 °C. That's not even close to the temperature it's actually put to good use at - that would be 230 °C or even more during vaporization. 

    Here's what we get at 1 bar / 25 °C:

    • Normal boiling point: 230 °C
    • Density: 1820 kg/m³
    • Kinematic viscosity: 4.4 cSt = 4.4 x 10⁻6 m²/s
    • vapor pressure: 3.4 torr = 453.3 Pa
    • specific heat: 973 J/kgK
    • heat of vaporization at boiling point: 63 kJ/kg
    • thermal conductivity: 0.07 W/mK
    • coefficient of expansion: 0.0011 1/K
    • surface tension: 20 dyne/cm = 0.02 N/m
    • average molecular weight: 1020 a.m.u, so molar mass: 1.02 kg/mol
    • some more I don't expect to need:
      • dieletric strength
      • dielectric constant
      • volume resistivity

    Vapor density

    I was able to find a plot of vapor density over temperature for Galden HS 260 (this is a different type than I'll be using) in a solvay presentation somewhere in the depths of the internet:

    It's a crappy plot, but helped my anyway.

    For this Galden type we can ballpark the vapor density at 260 °C (assuming 1 bar here) to be somwhere between 24 and 30 kg/m³. Galden HS260 has an average molecular weight of 1210 a.m.u, or a molar mass of 1.21 kg/m³. Applying the ideal gas law

    (where p: pressure; M: molar mass; R: gas constant; T: temperature)

    yields 27.3 kg/m³ at 260 °C. That's within the range I identified in that plot up there, so I guess it's ok to just apply the ideal gas law to Galden to figure out the vapor density (this is not necessarily a given). For the LS 230 grade, the result is 24.4 kg/³ at 230 °C. For comparision, air has a density of about 0.7 kg/m³ at that temperature.

    The higher density of galden vapor has the effect that galden vapor released into the space above boiling galden will not violently escape like water vapor in your kitchen, but will tend to stay close to the surface. Some of it will mix with air and the air's galden content will decrease as we move upwards from the surface.

    To conclude: Galden vapor is heavy, and it's probably ok to use the ideal gas law for it.

    Specific heat, heat of vaporization and thermal conductivity

    Specific heat will probably rise with temperature, as it does for many common substances. I'll assume it to be more or less constant for now.

    Heat of vaporization is only needed at atmoshperic pressure, or pretty close to that. No need to get into that in more detail.

    Thermal conductivity...my gut feeling is that it won't change a lot between 25 and 230 °C. I might be wrong, though.

    Other properties will be addressed in the next log.

  • Insulation

    Christoph12/08/2017 at 20:46 0 comments

    When I think of thermal insulation, two basic types come to mind:

    • solid plates like I used in vapsy:
      and
    • the wool type (mineral wool or glass wool for example)

    Solid plates are advantageous because they can be part of the support structure, while wool will most probably need some kind of outer shell.

    In Vapsy, vermiculite plates with 25 mm thickness were used and they did a decent job. Easy to cut and drill, reasonably robust and not too brittle. I guess I'll use them again at least for the lower part of the chamber where the saturated vapor will reside:

    For the upper part, it might get a bit fancier:

    If an outer shell is required for e.g. wool insulation, I can also exchange wool for something else like expanded glass granules:

    They come in various grades and would form a packed bed. A packed bed has the added feature that it can be cooled after soldering:

    There would be some problems though, like natural convection in the packed bed resulting in a probably unwanted heat loss, and also transporting hot air towards the fan when it's not blowing, which the fan might not like. Also, the fan would only begin by cooling the insulation, but not the chamber. Needless to say that this wouldn't be particularly easy to build, either.

    The arrangement shown above is a kind of counterflow arrangement where the cold inlet air hits the coolest part of the chamber first (I've written about the temperature profile within the chamber in a previous log). I could also move the fan to the bottom and make it blow upwards through the insulation, resulting in something like a parallel flow because the cool air hits the hottest part of the chamber first. If this was a common single-phase heat exchanger I'd probably say that the counterflow arrangement would result in a higher overall cooling heat flow, but since phase change within the chamber will take place, things are probably a  bit different. Moving the fan to the bottom would also eliminate the risk of hot air reaching the fan by natural convection.

    Simply using more vermiculite plates for the upper part is probably simpler, but I'd loose the ability to have active cooling for the chamber. I could also just try it without insulation first and add a fan for cooling.

    Regarding thermal conductivity I found these values:

    • rock or glass wool: 0.03 ... 0.05 W/m
    • vermiculite plates: 0.06 ... 0.07 W/mK
    • expanded glass granules: 0.06 ... 0.12 W/mK
    • expanded clay granules: 0.10 ... 0.16 W/mK

    Bulk density and heat capacity might be important aspects as well (for cooling the insulation with a fan), but my gut feeling is that the resulting bulk heat capacity will be in the same ball park for common materials.

  • gastronorm container: someone else had the same idea

    Christoph12/07/2017 at 22:07 0 comments

    I found this on the net, where someone started with a simple beaker and then also created the successor with a gastronorm container:

    http://www.ibrtses.com/g/dampfphasenloeten.html (in german)

    The interesting bit is how he did the heating: immersed power resistors, rated for 5 W. Apparently he did some tests and came to the conclusion that even 30 W per immersed resistor is acceptable. Resistors are rated for a specific dissipation in air, but those numbers don't apply when the resistor is surrounded by a fluid with hugely different properties.

    However, supplying power to immersed resistors might be a problem. Using 230 V just doesn't feel right even if the Galden doesn't conduct current, because it's still a steel container (afraid of shorts...) and the cables would have to exit through the top where I'd be handling the PCBs.

    About 10 rows with 4 or 5 resistors each fit into the available space at the bottom. At, say, 10 W each that's a total power of 400 to 500 W. This could be handled by a decent ATX power supply, or a 24 V PSU for less current. That's an attractive option epseciall with PWM, but with the drawback that I'd need enough Galden to cover the resistors.

    Power resistors aren't cheap if bought from digikey or mouser: about € 0,50 to 1,00 each. That's a lot if you need 50 of them. Replacing one would also be tedious.

    Regarding heat transfer, immersed resistors might be very effective since they provide a relatively large surface and there's no extra heat loss from an external heater below the container.

  • Basic system overview

    Christoph12/07/2017 at 20:53 0 comments

    The principle isn't that complicated. The oven consists of a container with (probably partial) insulation, a lid, and some way to heat the Galden (see https://hackaday.io/project/28449-vapsy/log/71187-basic-chamber-construction-and-heating-options for some ways of heating I have considered):

    As the Galden is heated up, it will eventually reach its boiling point, start to evaporate and push out some air. Galden vapor has a higher density than air and will stay at the bottom. The lid may not seal the container because we don't want the pressure inside the chamber to increase.

    Heating up and evaporating will go through multiple phases:

    • plain single-phase natural convection
    • "silent" boiling, with Galden evaporating at the surface (Galden/ boundary)
    • nucleate boiling with vapor bubbles travelling from the bottom to the surface
    • we don't want to reach the film boiling regime. Nope.

    Once the second phase is reached, Galden vapor will start to move up from the surface and interact with the air above: It will mix with air, and it will push out air since the volume in the container must stay the same.

    The insulation is not built up to the top of the container because we want a layer of saturated vapor (no air) above the liquid Galden. Above that saturated layer, the Galden content in the air will gradually decrease from bottom to top. This corresponds with a decreasing temperature of the Galden/air mixture. Insulating everything would result in a high vapor level, which we don't need or want.

    The temperature will thus be low at the top and increase towards the bottom, up to about 230° C above the liquid. The PCB can simply be moved to the right height within the chamber to put it into an atmosphere with the right temperature along the reflow profile:

    The whole thermodynamic system is quite complex and we should probably not try to control it within tight boundaries. Trying to maintain a specific temperature profile over height will be hard to impossible. Instead, the heater will be controlled to maintain a certain minimum level of saturated vapor above the liquid. Everything else will settle at some equilibrium that we just have to live with. There are two more ways to "shape" the temperature profile, though:

    By increasing the height of the insulation, the saturated vapor cushion can be made higher, and the mixed zone will be shorter, probably with a higher temperature at the top. The insulation can also be thinner at the top. Choosing a higher container gives more flexibility here.

    Cooling the upper part of the chamber is another way, and comes close to the opposite of pulling the insulation higher. Can also be used during cooldown. The original vapsy needed ages to cool down.

    In order to dig more into the details of the various types of heat transfer involved I'll need more information about the properties of Galden. The data published by Solvay is given at 25° C, which is far from the boiling point. The surface tension for example has an influence on the heat transfer during nucleate boiling, and it will decrease with temperature. It would be plain wrong to use the 25° C value for that.

  • Gastronorm container

    Christoph12/06/2017 at 22:47 2 comments

    My gastronorm container (size "1/4" x 200 mm) arrived!

    Measured inner dimensions:

    At the top: 232 mm x 134 mm

    At the bottom: 215 mm x 115 mm

    Corner radius at the bottom, side to side: about 32 mm 

    Corner radius at the bottom, side to bottom: about 15 mm

    In order to see how flat the bottom might be I just put it on the stove with some water:

    As the water started to boil it was possible to see where the bubbles start to grow, which was just a smallish part of the bottom:

    To be fair, the lower left part is probably limited by the size of the stove area itself, but even then only about 1/4 or 1/3 of the area seems to have contact with the stove. 

    However, this observation might be totally wrong because the existence of bubbles only indicates where the bottom is surely heated, but the absence of bubbles doesn't necessarily indicate that the respective area is not heated.

    Nonetheless, this was not a waste of time. I'll call it not flat.

  • Basic chamber construction and heating options

    Christoph12/03/2017 at 19:30 0 comments

    So I'll need to get heat into a chamber with galden in it:

    Chamber construction

    I don't really want to build a chamber from scratch, but rather use something off the shelf and adapt it to my needs.

    Gastronorm container

    The first idea was to use one of these standardized containers used in gastronomy (they're called "gastronorm" containers):

    There are many sizes and heights available. The size is derived from the basic "1/1" size, which is 530 x 325 mm outer dimension. That's of course too large for this purpose, but size 1/4 (265 x 162 mm) might be right. The largest standard height is 200 mm. These can be had in stainless steel for about 15 € (incl shipping). Possible drawback: I'm not sure how flat the bottom is. If it's not flat, this might be a problem when trying to heat it from below. gastronorm containers with a massive, flat bottom are available, but expensive (150 € at least).

    A Pot

    An alternative is a standard pot you'd find in your kitchen. Comes with a flat bottom, but usually also with a round cross section. Height around 200 mm is absolutely normal and the price won't hurt: 20 to 30 € for a cheap one, and cheap will suffice.

    Heating

    Heat! The end of the exergetic food chain comes in many forms and so the list of ways to heat the chamber is long. I'll start the list with internal, immersed heaters.

    Immersed cylindrical heating element

    Some of these would do the job:

    They are available in many sizes, down to about 4 mm, and some even include an internal temperature sensor. Connecting wires would have to escape to the top through the chamber. That is not a drawback per se, but the wires' stiffness might be. I would want the heaters to be as close to the bottom as possible, because the higher they are from the bottom, the more liquid galden has to be in there. Stiff wires would simply make it harder to get the heaters to stay flat on the bottom. Letting the heaters run "dry" might overheat galden beyond the allowed temperature where it starts to dissociate into nasty stuff like HF. The heating surface isn't very large to start with, so the danger of overheating at the shell/liquid boundary is relatively large.

    Immersed heating pad

    This:

    Silicone heating pads also come in a few sizes, but they are expensive. Sticking one to the bottom of the chamber with liquid galden around also doesn't sound like an easy to implement idea. Again, sturdy wires through the chamber that might ruin the show (see above).

    External heating pad

    Same price as internal, but might be easier to handle and attach to the chamber. Textile versions are also available, but similarly expensive. It might be possible to laminate a heating pad directly on the chamber's outside using glass fiber, flat nichrome wire and 2-component silicone, though. Surely an interesting endeavor and a project just by itself, especially with the lessons learned from the #Carbon/silicone hotplate fail.

    Hot plate (resistance or halogen)

    Only available when the chamber has a flat bottom. Simple hot plates can be wired into the control system and are readily available for little money.

    Hot plate (induction)

    There are cheap induction plates, some as low as 20 €:

    The same model is used by many brands and I guess it might be possible to hack it into the control system (but that's something I wouldn't want to try). One advantage would be that induction is fast, and the plates have an internal temperature sensor for the pot on top. Again, chamber must have a flat bottom, which narrows down the options to induction compatible pots.

    One more thought about control: Setting the plate to a certain temperature (the one shown above is marketed with a temperature mode ranging from 80° to 270° C) and then simply cutting power with a relay would at least make it possible to limit the overall thermal energy in the system. The controller could then try to make...

    Read more »

View all 6 project logs

Enjoy this project?

Share

Discussions

Similar Projects

Does this project spark your interest?

Become a member to follow this project and never miss any updates