Close
0%
0%

Trinket Watch

A watch with an OLED display, powered by a Trinket

Similar projects worth following
My plan for this project was to make a digital watch powered by a Trinket. I'd seen a few watch builds on Hackaday before, and thought I'd take a stab at making one. The Pro Trinket is perfect for this project because of its size; it barely sticks out behind the 1.3" OLED. The parts for this project come out to under $50, so it's also relatively affordable.

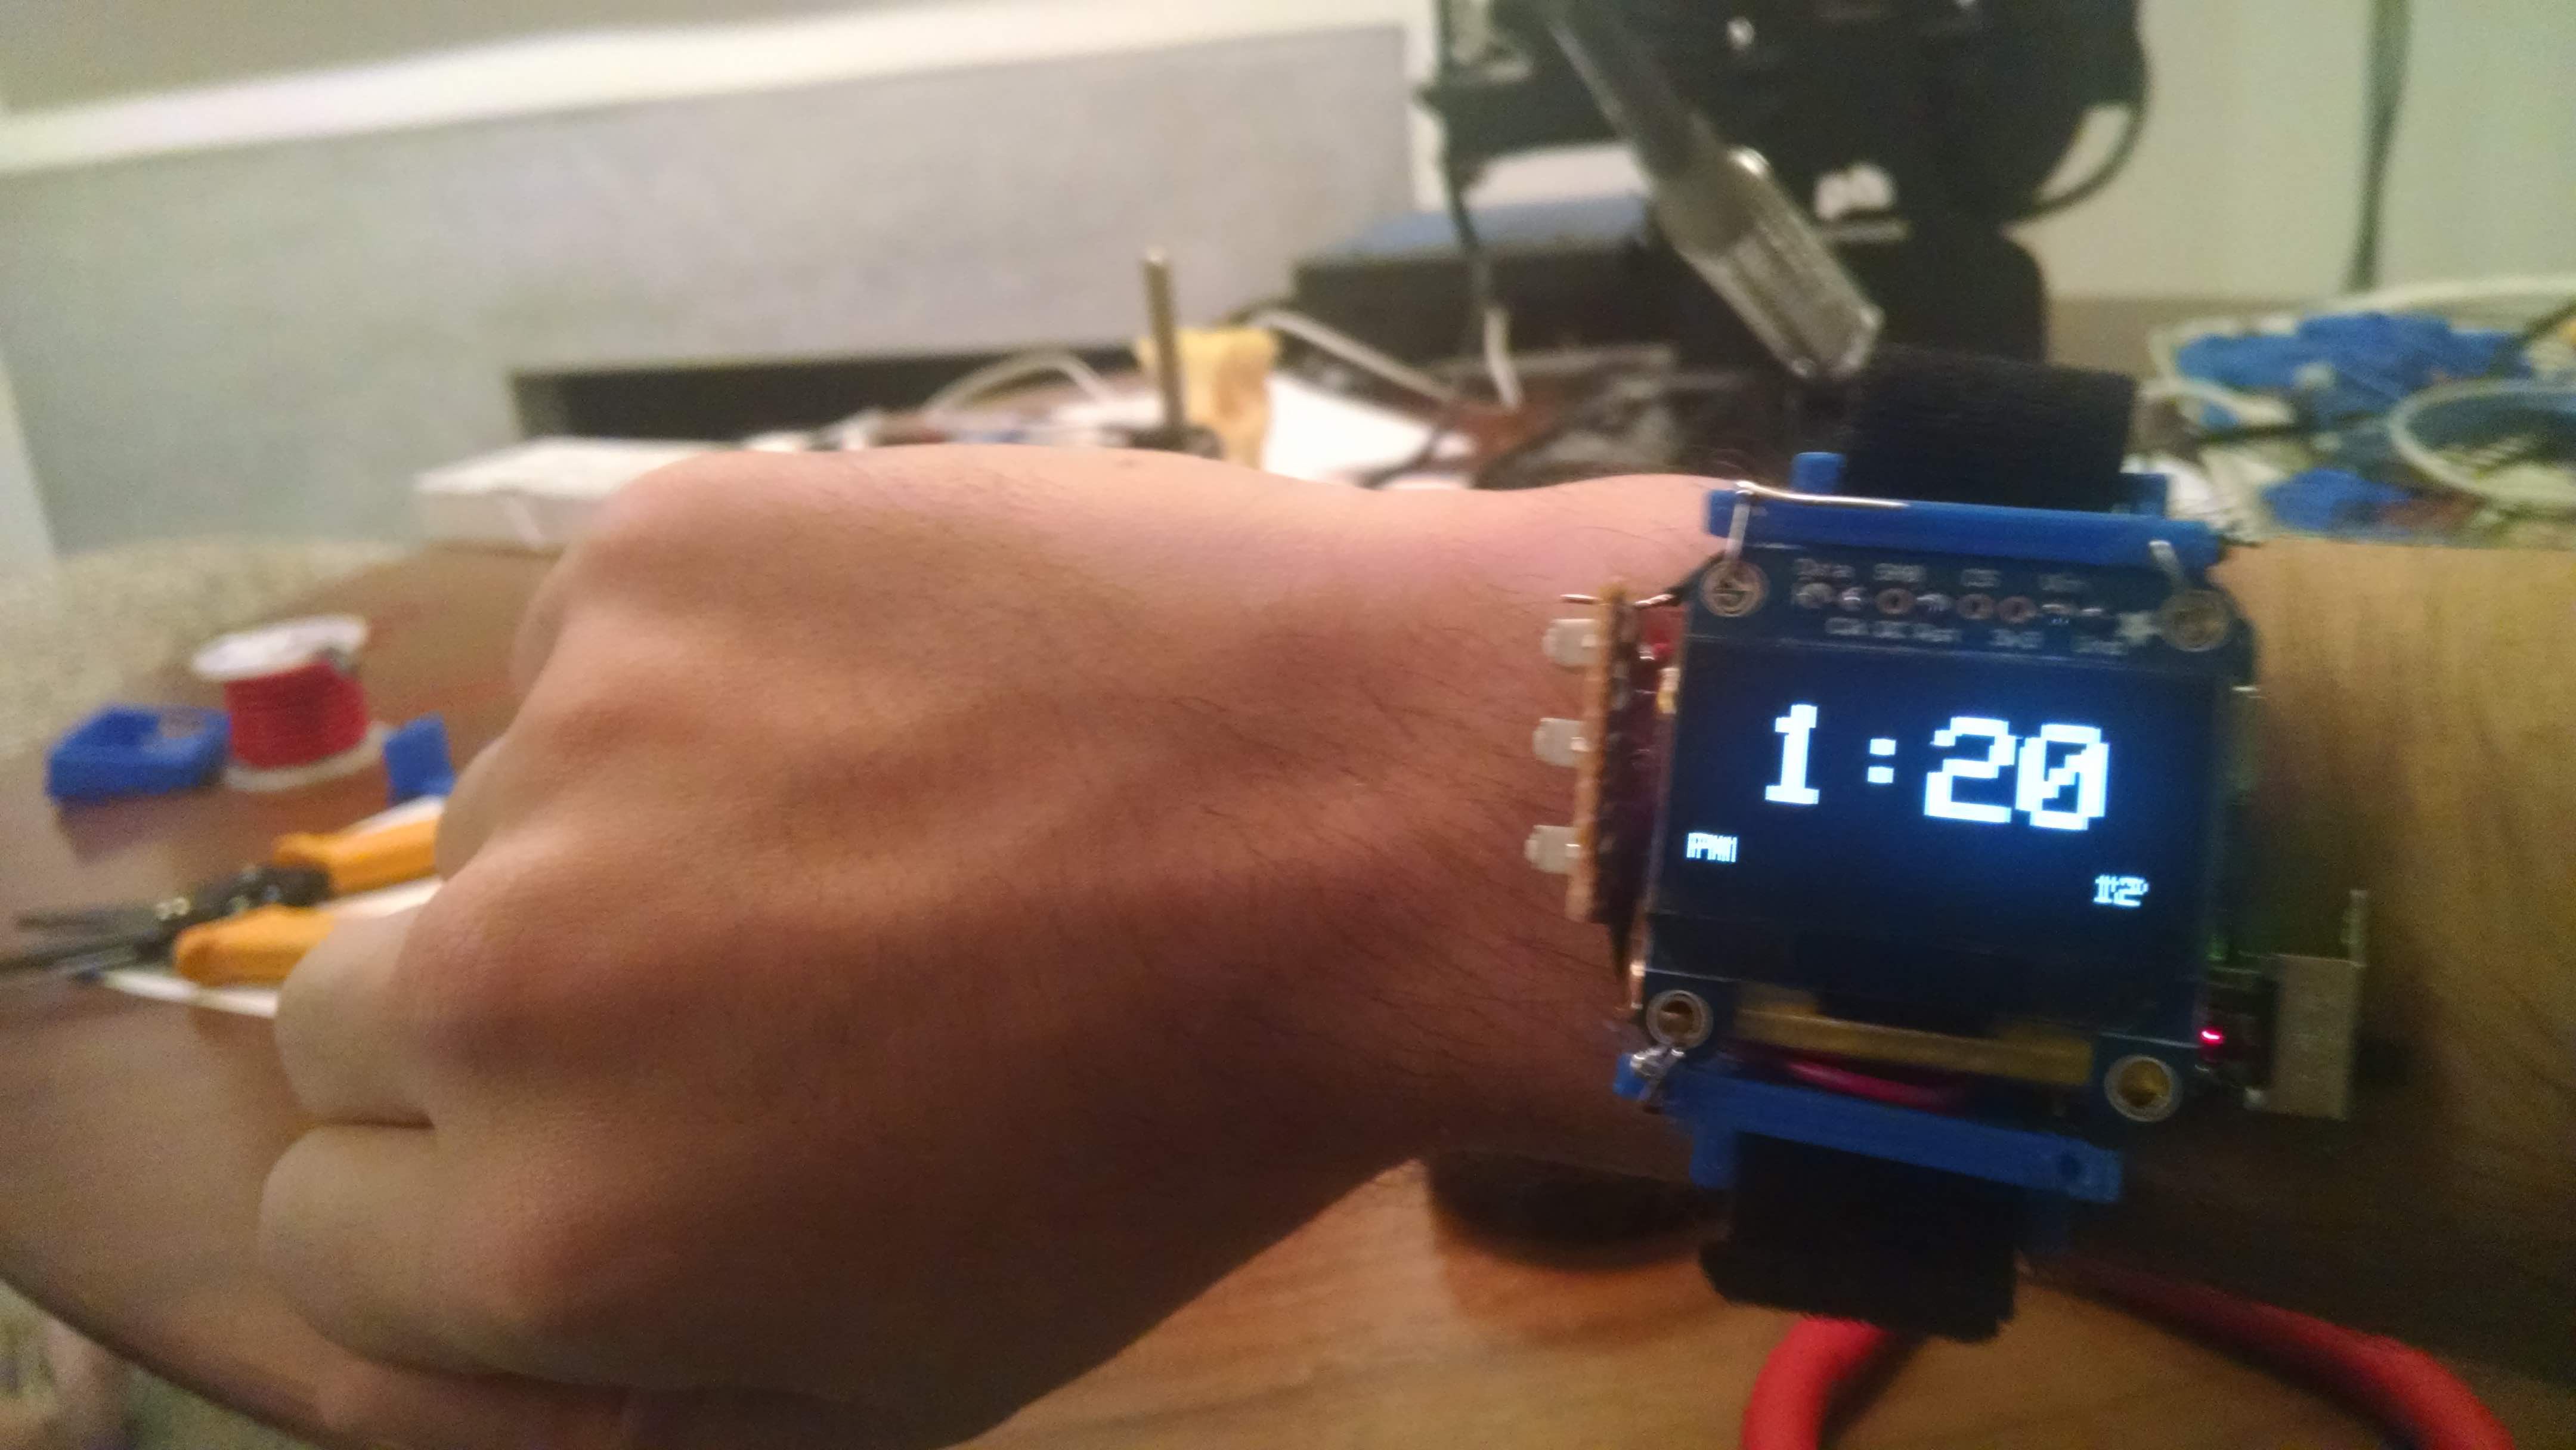
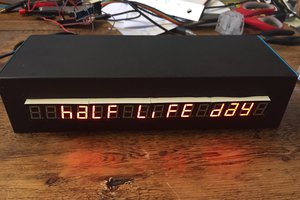
The Trinket Watch is a fully-functional digital watch. You can use it as a stopwatch or even pass some time by playing Pong.

The UI is similar to most other digital watches. The center button cycles through different modes, and the top and bottom buttons perform other functions.

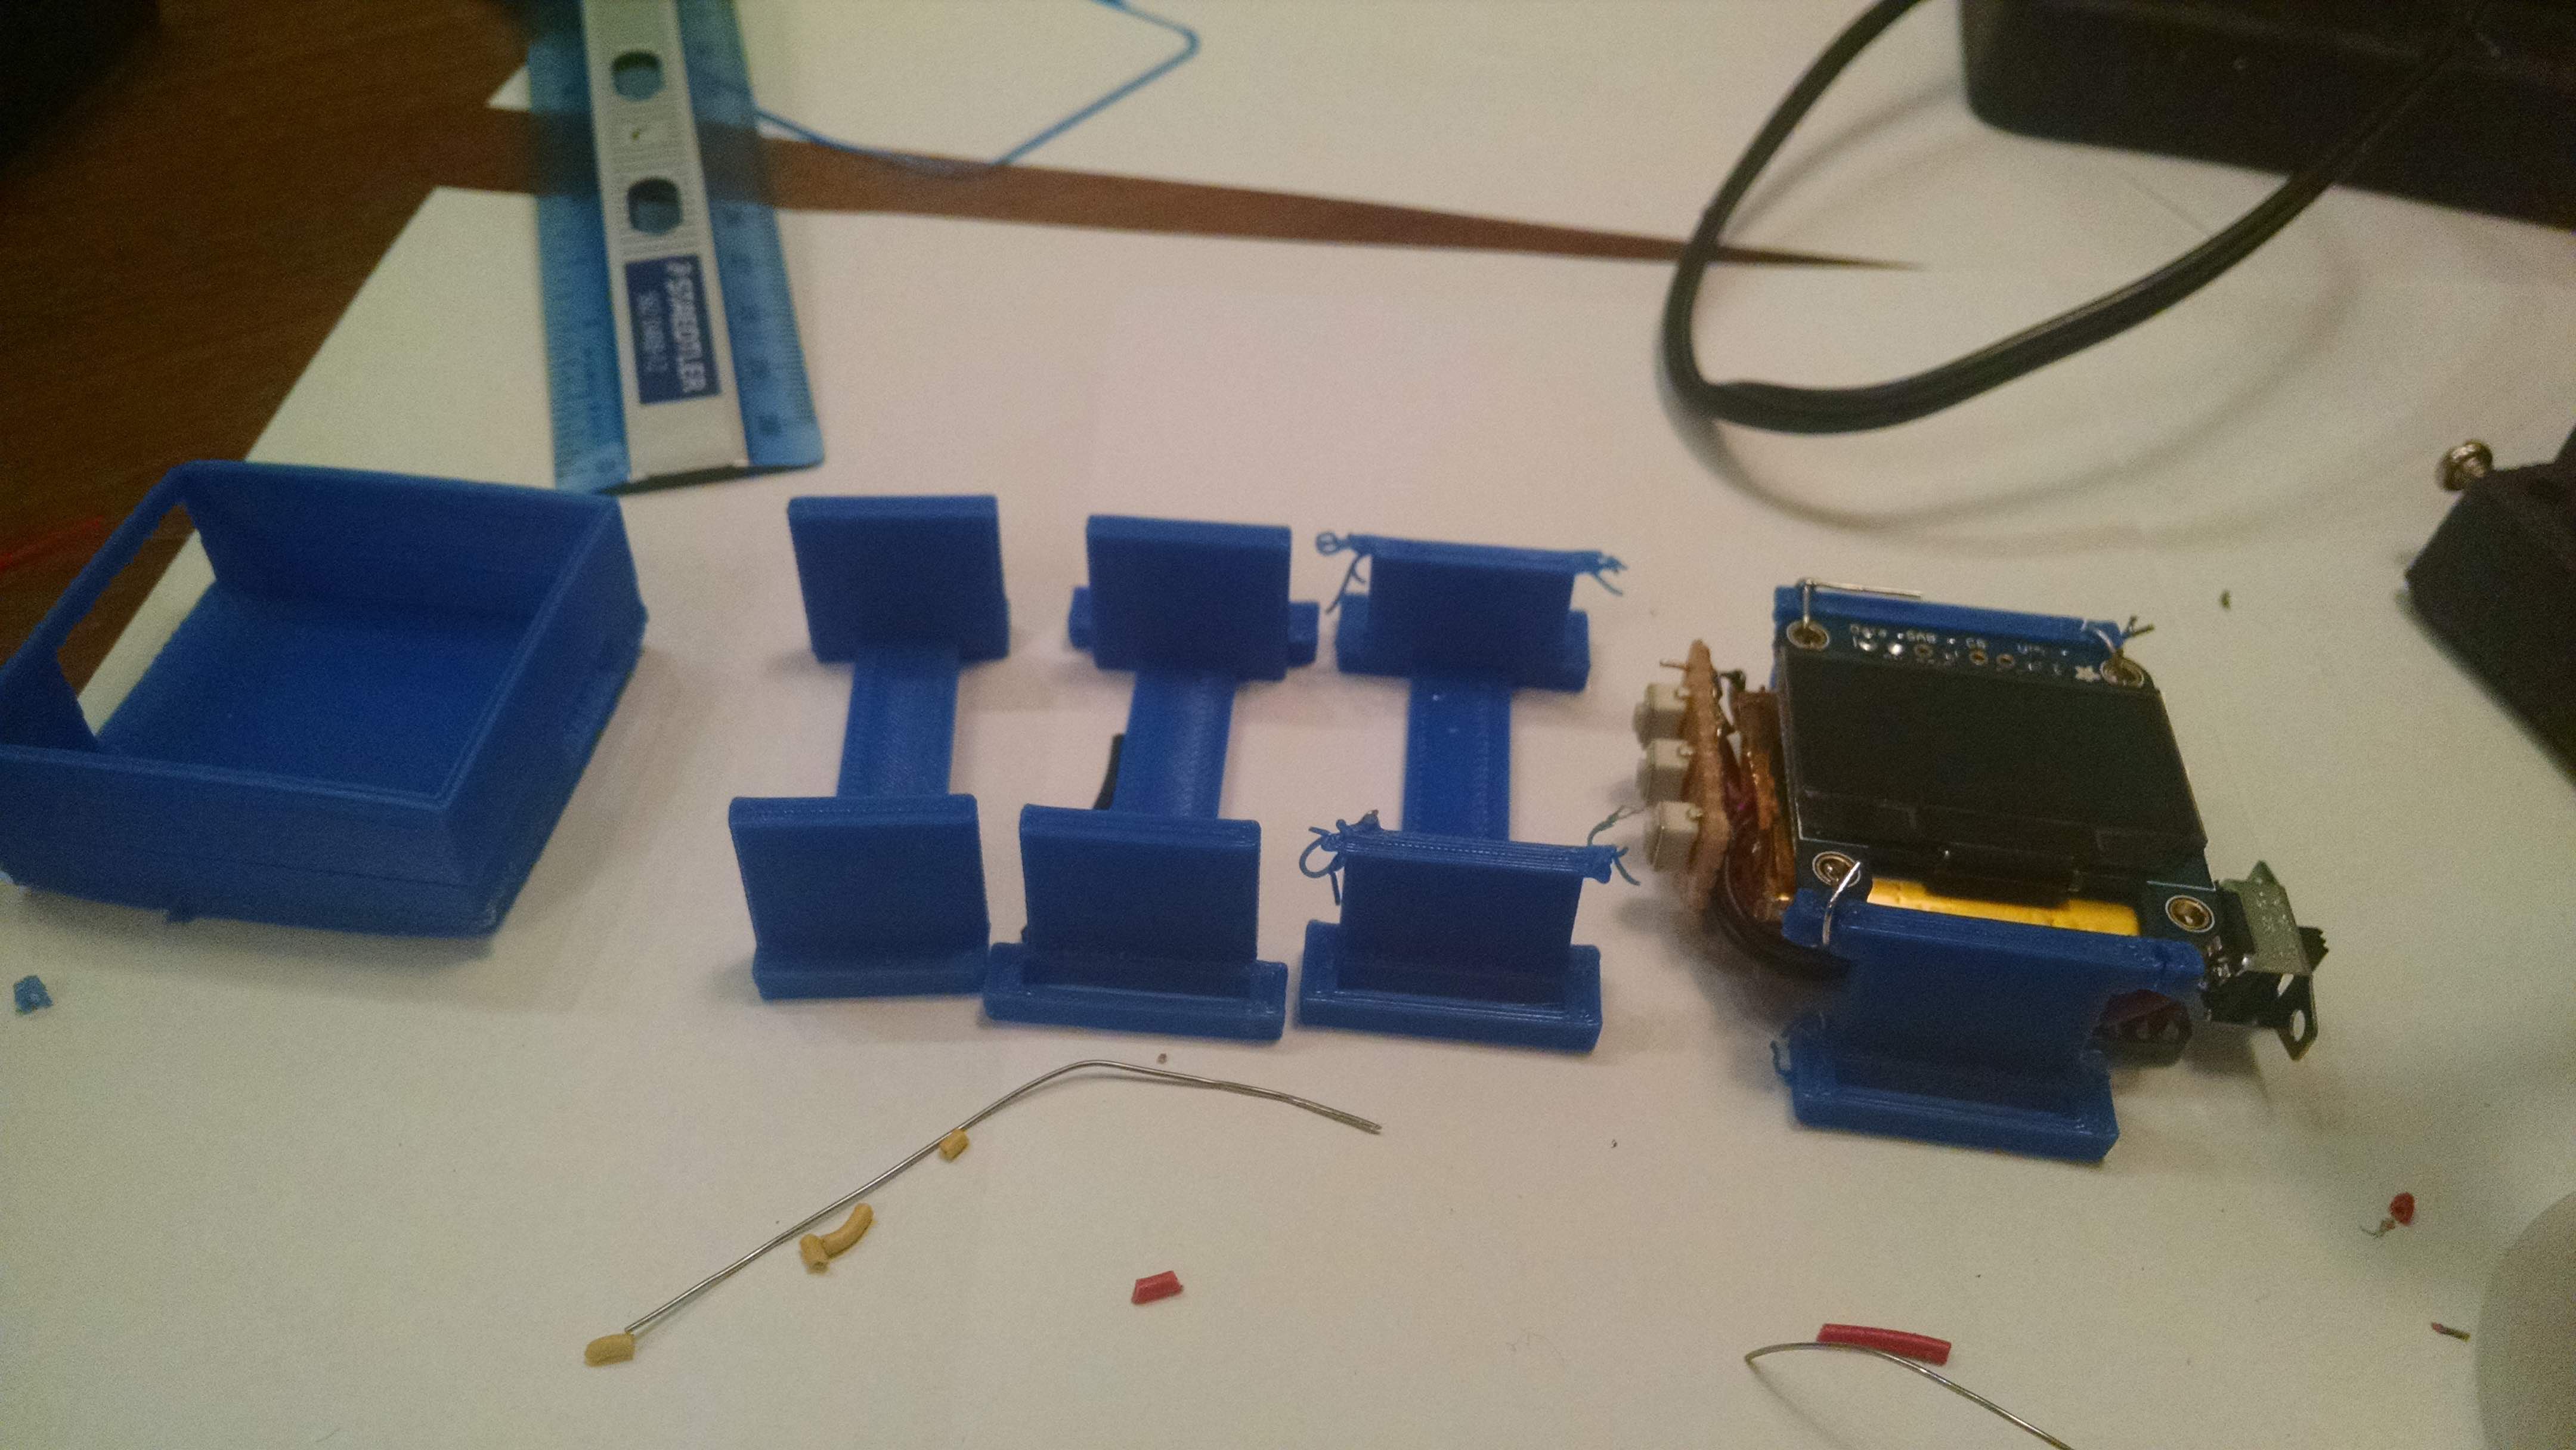
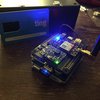
The "case" of the watch doesn't do very much protecting – I opted to have a more open design so that people can see the insides of the watch. And it sure is a conversation starter. The case does do its job well, though: it keeps the watch connected to the watch band.

I drew the schematic by hand, since I'm not experienced with Eagle or anything like that:

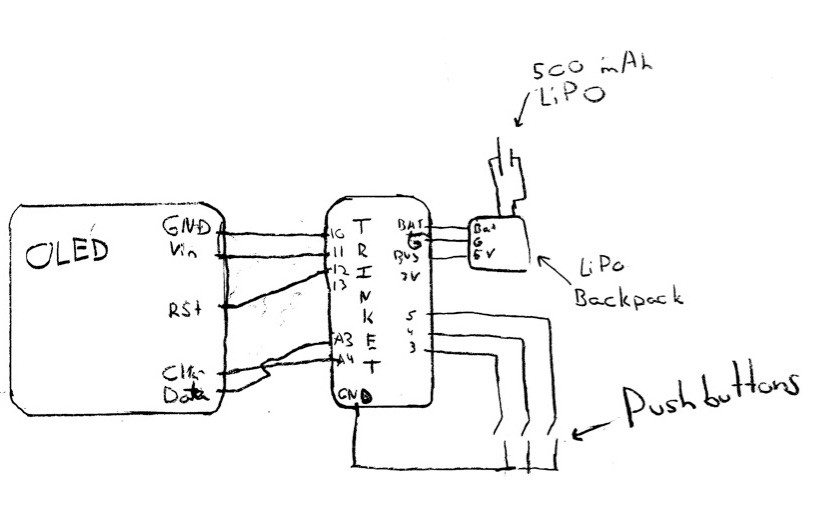
Note: The schematic's missing an optional on/off switch for the LiPo backpack, which is well documented in the instructions.

  • 1 × Adafruit Pro Trinket - 3V 12MHz $9.95 Adafruit PID 2010
  • 1 × Adafruit Pro Trinket LiIon/LiPoly Backpack Add-On $4.95 Adafruit PID 2124
  • 1 × Monochrome 1.3" 128x64 OLED graphic display $24.50 Adafruit PID 938
  • 1 × Lithium Ion Polymer Battery - 3.7v 500mAh $7.95 Adafruit PID 1578
  • 3 × Tactile Switch Buttons (6mm slim) x 20 pack $4.95 Adafruit PID 1489, for menu navigation

  • Final Touches

    davish01/03/2015 at 00:04 0 comments

    With everything electronically on the watch complete, today I added a much-needed power-switch and made a case. I went through a few iterations of that. First, I tried just making a box around the watch, but that was too bulky, and didn't let any of the hackiness of the watch show. So, I opted for a much more barebones design that doesn't protect the watch very much, but shows off the insides. The progression goes from left to right:

    You can see the final watch all the way on the right, but here's a close-up, on my wrist:

    Now that the watch is done, the next (and last) thing to do is film the demo video!

  • Putting it all together

    davish12/30/2014 at 03:53 0 comments

    Instead of waiting for the step-up regulator to arrive, I decided to put everything else together in a small package. First thing I did was cut down the leads on the OLED. Then, I soldered the SDA and SCL wires to A4 and A5, respectively. The reset pin was switched from 4 to 12, since 4 was on the other side of the trinket. I soldered Vin to pin 11 and Ground to pin 10. In the code, 11 is set to OUTPUT, HIGH and 10 is set to OUTPUT, LOW. This way, the wires don't have to stretch all the way across the board. After that, I soldered the backpack back on.

    The next thing to do was to solder on the buttons. I placed them on some PCB from RadioShack (I know, I know), and soldered them in. I then cut off the extra board so it would be less than height of the watch, and then soldered leads for the three digital pins to the other side of the switches. After soldering that all together, soldering the ground lead, and bending the wires to "smush" everything together, I had something that resembled a watch:

    Since the RTC currently isn't integrated, the next thing was to find a way to set the time. C++ adds a string constant, __TIME__, that represents the time in HH:MM:SS format. I parse this string, and set the hours, minutes and seconds to the right value. I wrote a function, adjustInternalTime(), that increments milliseconds using millis() and increments seconds, minutes, and hours accordingly. The last thing I added was a new mode for changing the time. It looks pretty similar to the digital clock view, but it's in 24-hour mode and tells you if you're incrementing hours or minutes. A video, showing off the new form factor as well as an overview of the software as it stands, is below:

    Next thing to do is to make an enclosure and watch strap. This'll be a little tricky since it can't be too bulky.

  • From Uno to Trinket: Some Problems

    davish12/26/2014 at 05:23 0 comments

    Now that all the parts are proven to work on the Uno, it was time to move it all over to the 3.3V trinket. The screen and buttons worked perfectly fine, but it turns out that even though the DS1307 RTC works fine with 3.3V on its I2C pins, it still needs 5V input voltage; hooking it up to 3.3V just gives a random date that doesn't change. It doesn't seem like there's a way to get around this, so I've ordered a 5V step-up regulator from Pololu. Hopefully, that'll trick the RTC into behaving properly. While I'm waiting for that to arrive sometime next week, I'll be working on a case to be 3D-Printed, and refining some of the code.

  • Real Time!

    davish12/26/2014 at 05:19 0 comments

    I started off today by soldering together the DS1307 RTC kit and hooking it up to the Uno. After running the example program that sets the time, I wrote a function called updateTime() that takes the place of demo(), but hands off the actual time instead of the minutes looping over and over. This worked out fine, and as of now, the Trinket Watch was a functioning bedside clock! I also polished off my stopwatch mode, which works just fine. Video below, with some more Pong as well:

  • Back to the hardware

    davish12/25/2014 at 05:10 0 comments

    After a long day of traveling I come home, check Hackaday, and realize that I won the fourth drawing for the EDC contest! That definitely made my day. To follow up my "victory" (if you can call getting randomly chosen a hat a victory), I loaded up all the code that I wrote while I was away (I ported the JS to Arduino's Processing language on the plane). The analog clock face works just as well as the digital one.

    Read more »

  • Emulator

    davish12/21/2014 at 20:39 0 comments

    From now until Wednesday, I won't be around to work on the physical watch. The same will be true from Saturday through New Years. Such are the holidays. So, to make sure I'm not completely wasting my time, I decided to write an emulator to test on. You can find it at it's current stage on Dropbox, and check out the source in this project's GitHub Repo. Both links are in the sidebar.

    It turns out Adafruit's Graphics Library doesn't have any documentation to my knowledge: I have to find out how shapes are drawn by writing the code and testing it out on the display itself. Not wanting to wait four days to get something done, I decided to write a little emulator for the OLED display.

    Read more »

  • Basic OLED Watch Code Completed

    davish12/19/2014 at 05:15 0 comments

    After I tested the OLED in the last entry, I decided to code up a function that would display a time in a relatively pretty way. I started by just finding the part of the Adafruit example code that renders text on the display, and changed it to print out a string, formatted (HH:MM):

    I then looked at the example code for the RTC module, and it showed that the values from the RTC are put into a Date object, where you can get the hours and minutes from, as well as Unix time. I wrote code that took variables with seconds and minutes and added one minute to the time every 200 milliseconds. Here's the outcome:

    (I apologize for the vertical video).

    All of my code is now on GitHub, so feel free to check it out! The link will be in the sidebar.

  • OLED Up and Running!

    davish12/19/2014 at 03:03 0 comments

    OLED works! Next step is to write a small program for the OLED that displays a dummy time, in digital for now, and have it count up minutes, to see if it updates correctly. When that works, I know I can move on to making the RTC kit and wiring that up.

  • Parts Arrived!

    davish12/19/2014 at 01:36 4 comments

    Parts arrived from Adafruit today! Pictured is all the main components, plus a gyroscope that I accidentally included in the snapshot. After checking the pins on the RTC, it looks like it takes 5V. Well, that won't work well with the 3.3V trinket and 3.7V battery. After some research, it looks like it can work with 3.3V logic by not soldering in the two pullup resistors. Easy enough. And for the voltage input? Let's hope that when Adafruit writes that it "works best" at 5V, it actually works at all at 3.3V. Hopefully I can test the OLED tonight with an Uno, and possibly poke around with setting the RTC.

  • Quick Calculation

    davish12/18/2014 at 17:10 0 comments

    Tabulating up all of the thicknesses of the components for the watch, it seems like if everything is just stacked on top of each other, the thickness of the watch will be 18.75mm. Putting the backpack and trinket side-by-side, it comes out to a slightly more reasonable 16.75mm. The watch I currently wear is around 15 or 16mm, so it shouldn't be as unwieldy as a 2cm thick watch sounds. I'll see different ways I can arrange the parts once they arrive later today.

View all 11 project logs

  • 1
    Step 1

    Prepare the Display

    Solder wires to the OLED display pins Data, Clk, Rst, Vin and Gnd pins.

    Since we're using I2C, you'll need to solder together the two pads on the back of the OLED display. (Picture c/o Adafruit)

  • 2
    Step 2

    Connecting the display

    Now you'll connect the display to the Trinket. Connect Data to A4, Clk to A5, Rst to 12, Vin to 11 and Gnd to 10.

    At this point, you can run Adafruit's OLED example code to make sure that everything is connected properly.

  • 3
    Step 3

    Backpack

    Now solder the Trinket LiPo backpack to the trinket. To keep the thickness down, the backpack will be next to the Trinket, not on top of it.

View all 11 instructions

Enjoy this project?

Share

Discussions

Bhragals wrote 05/07/2016 at 12:25 point

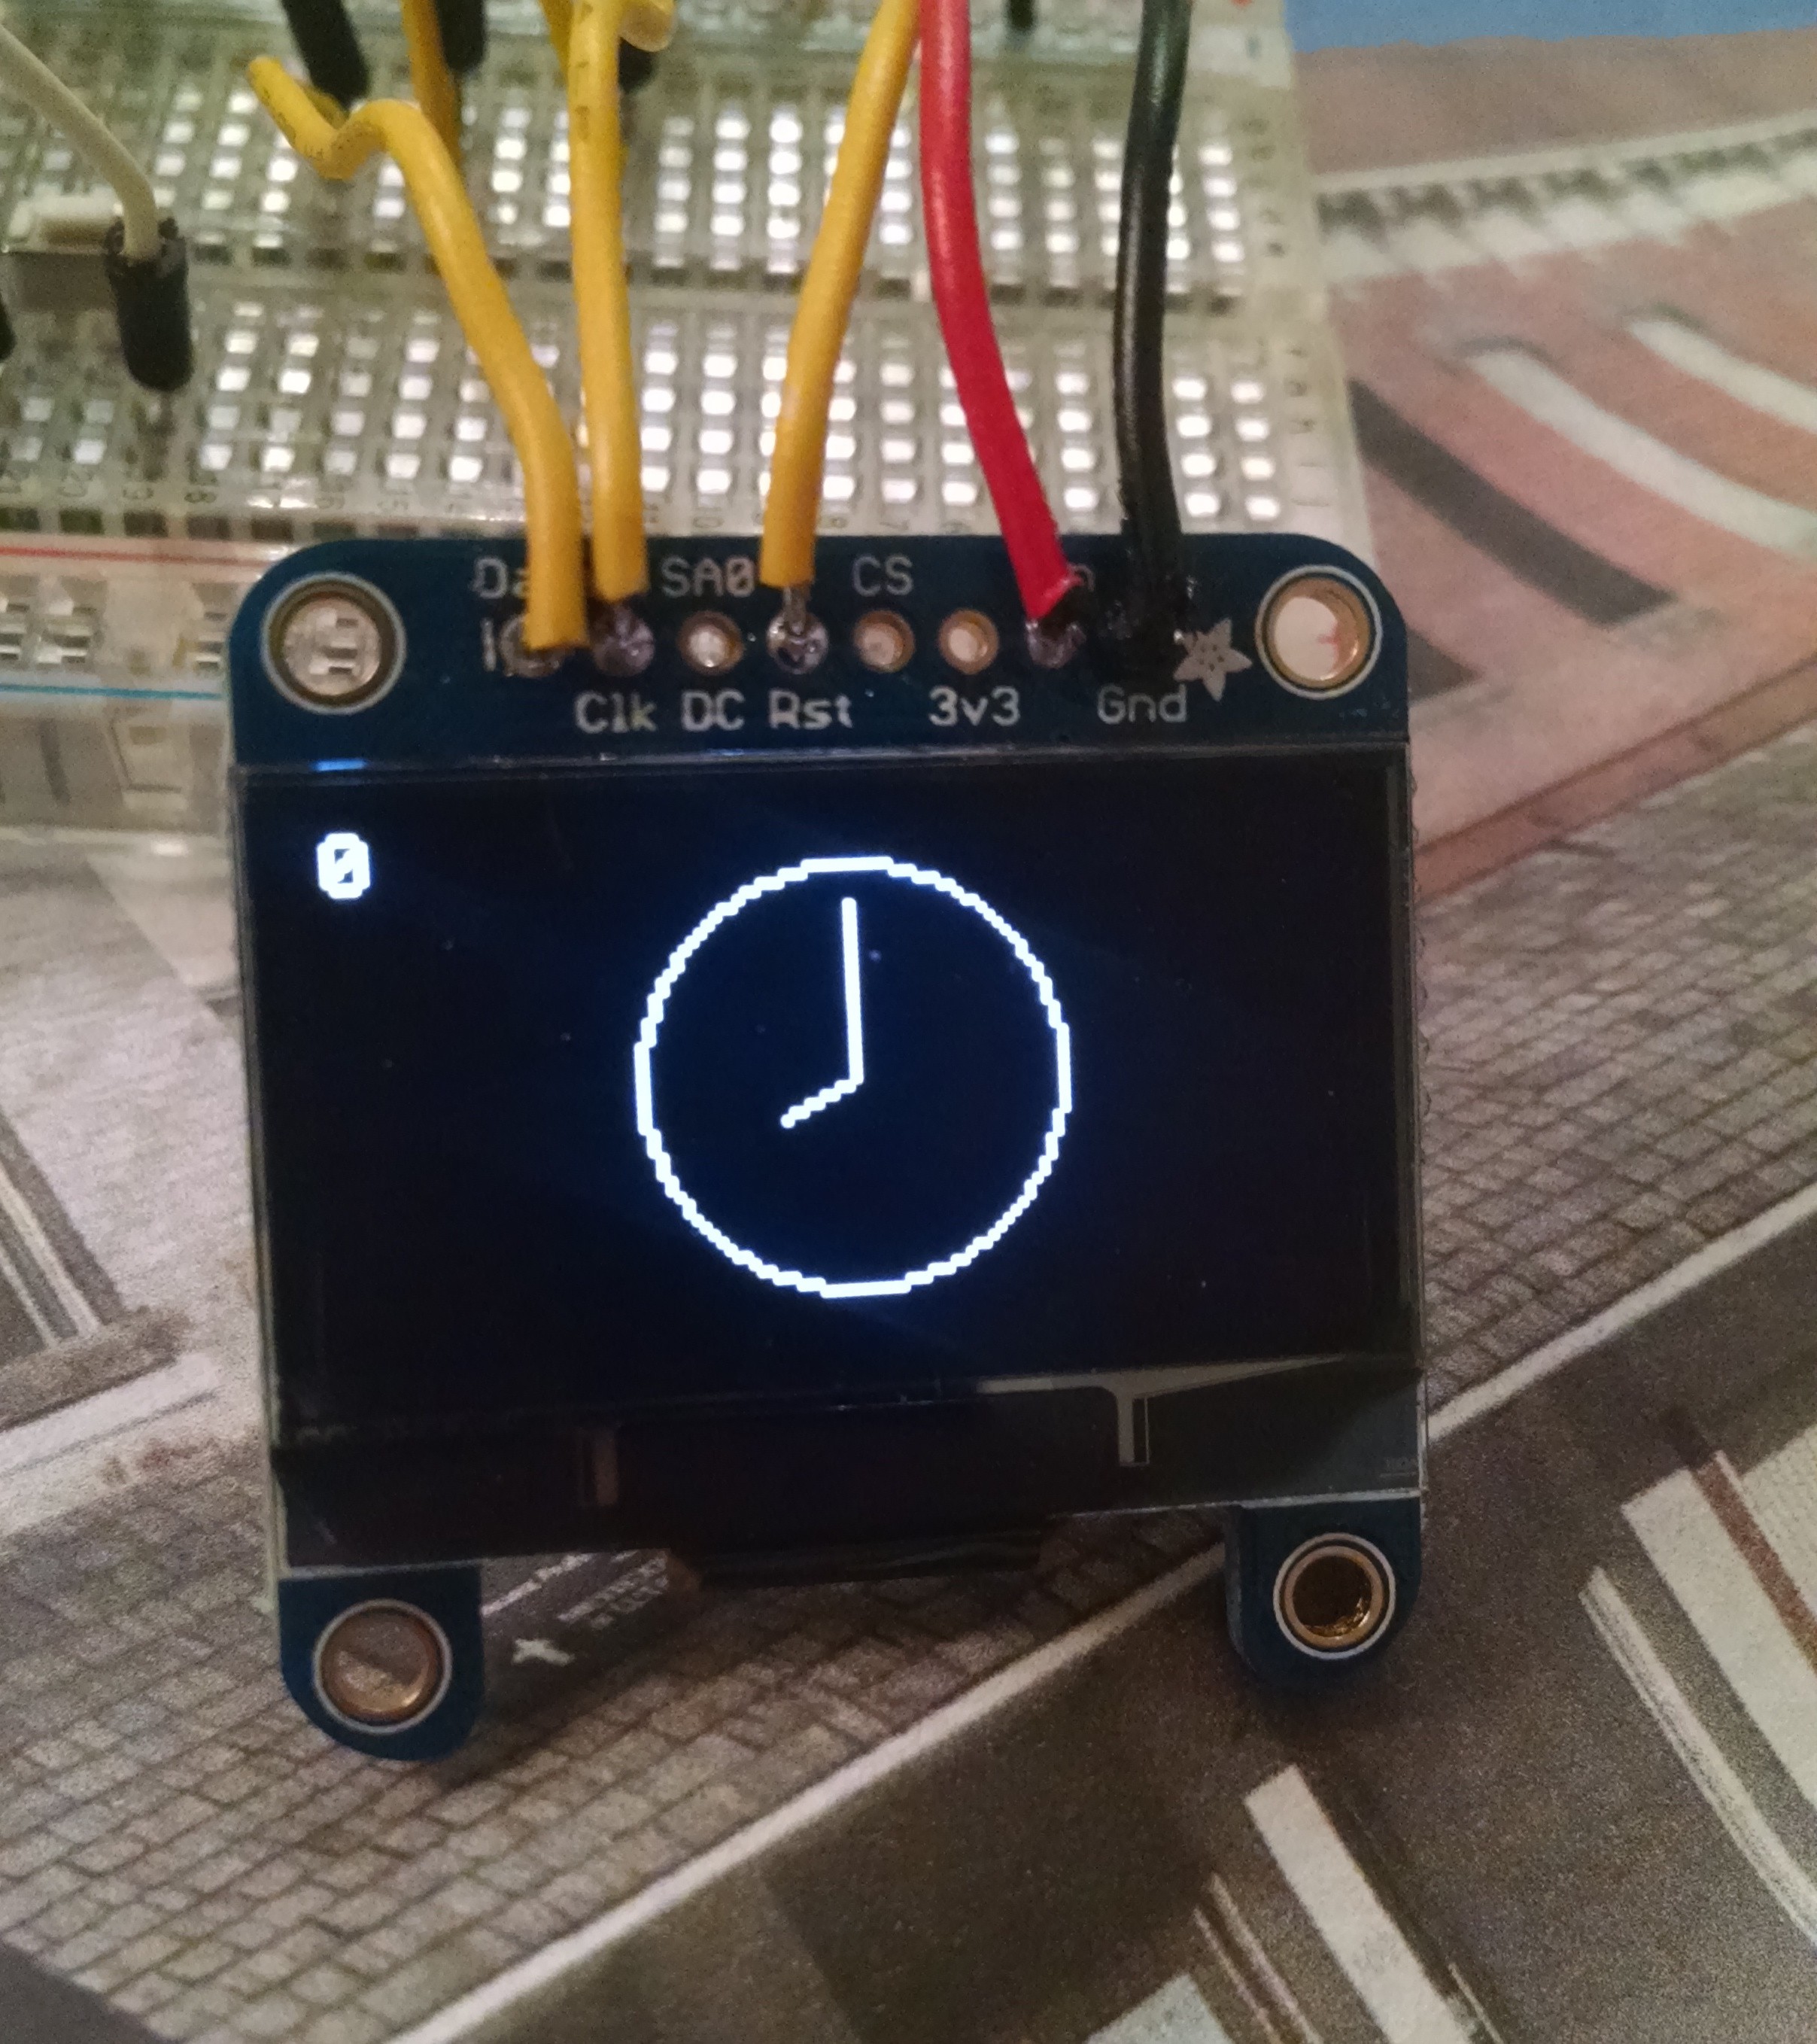
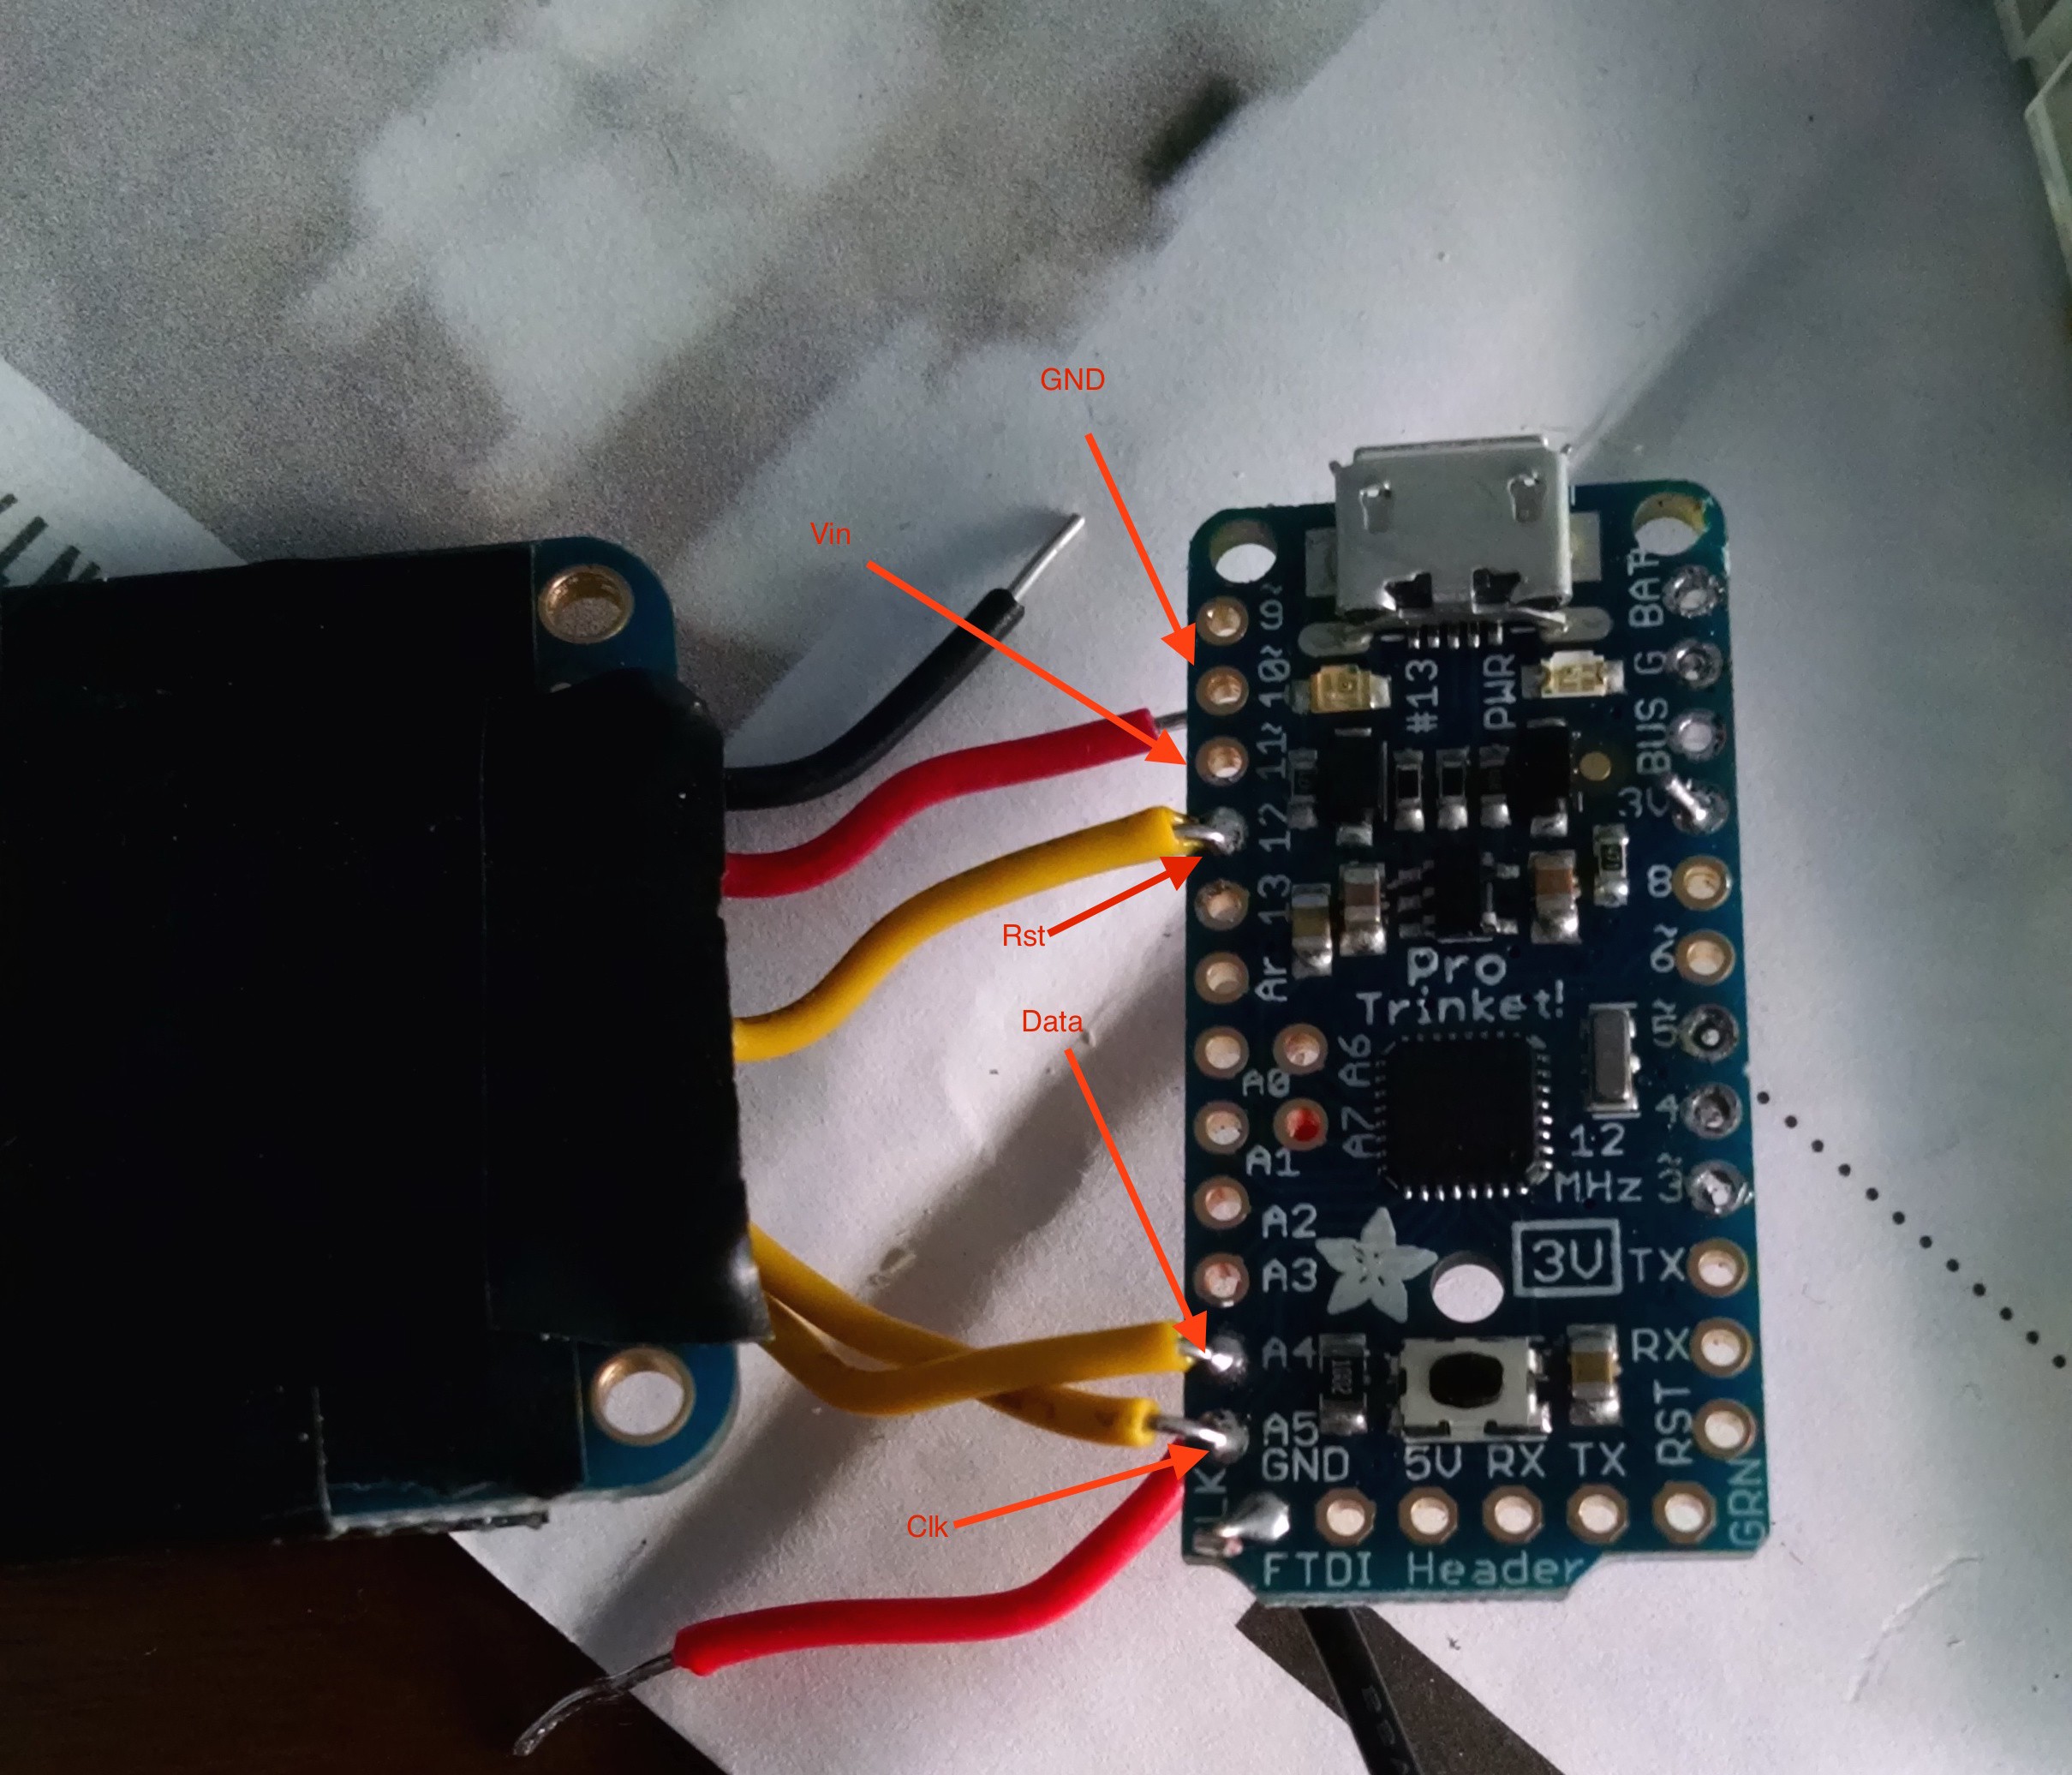
hi, I'm 13 so I am just learning. I was wondering how to connect a diymall oled (4 pins) to the 3volt pro trinket. Also, is it possible to get a ds1307 rtf to run on 3v? The pins for each are the same. They are: vcc ground sda scl. Thanks!

  Are you sure? yes | no

davish wrote 05/07/2016 at 20:53 point

That OLED also communicates over i2c, so you should be able to just connect SDA to A4, SCL to A5,  VCC to 11 and GND to 10. I haven't tested this, but apparently the Adafruit display libraries that I used in this project work well for the diymall board as well. You just need to change [this line of code](https://github.com/davish/trinket-watch/blob/master/TrinketWatch.ino#L66) to have 0x3C instead of 0x3D.

I hope that works!

  Are you sure? yes | no

Bhragals wrote 05/07/2016 at 21:07 point

thank you sooooo much. But what about the rtc? Did you use one? Also, I was wondering how to set up reminders(i.e. At 8 o'clock, "make dinner") or something like that. Thanks

  Are you sure? yes | no

davish wrote 05/07/2016 at 21:42 point

I actually stopped working on this project around a year ago, and I never got around to adding an RTC. Having to add a voltage regulator on top of the RTC (which is already thick because of the battery) would've made the watch way too unwieldily. Stuart's suggestion might very well work, I'd have to look into that.

  Are you sure? yes | no

Bhragals wrote 05/07/2016 at 21:50 point

Stuart, i have no idea what that means. Also, davish, the code worn't work on the ide. what libraries did you use?

  Are you sure? yes | no

davish wrote 05/07/2016 at 21:52 point

@Bhragals Follow the instructions here: https://learn.adafruit.com/monochrome-oled-breakouts/arduino-library-and-examples. That should let you download all the libraries you need.

  Are you sure? yes | no

Bhragals wrote 05/07/2016 at 21:55 point

thanks, really for all the support. I have a good feeling about this watch. I'm getting my friend to also 3d print a custom case with my logo that i drew(don't worry, its just for me, not stealing any code/hardware ideas)

  Are you sure? yes | no

davish wrote 05/07/2016 at 21:57 point

@Bhragals Don't worry about it! Everything's licensed under the MIT License so as long as you give credit (which I'm sure you would), you can use the code and designs however you'd like. Let me know how the build goes!

  Are you sure? yes | no

Bhragals wrote 05/07/2016 at 22:06 point

Thanks. do you know what stuart means? this is getting sort of confusing.

  Are you sure? yes | no

davish wrote 05/07/2016 at 22:15 point

Not exactly. He's probably talking about the Timer libraries for Arduino (Timer1, Timer2, and Timer3) which can be modified to achieve more accurate ticks than the millis() calls that I use in the code. Lady Ada talks about them here: https://learn.adafruit.com/multi-tasking-the-arduino-part-2/interrupt-etiquette. Upon further investigation, actually, it doesn't seem like a good idea to mess with the interrupts. 

Timekeeping seems to drift pretty easily with my code, so I think I'm doing something wrong, as the Arduino's clock shouldn't be that far off. This library (http://www.pjrc.com/teensy/td_libs_Time.html) might be of some use to you if you want to try improving the timekeeping code. If you do, I'd love to get a pull-request!

  Are you sure? yes | no

[deleted]

[this comment has been deleted]

davish wrote 05/07/2016 at 22:38 point

Go into your libraries directory and find the file called "Adafruit_SSD1306.h". You're going to want to un-comment out the line that says "#define SSD1306_128_64". That should fix your issue. I'm assuming all the other errors are because that first thing was broken.

  Are you sure? yes | no

Bhragals wrote 05/07/2016 at 22:42 point

I tried that. How do i uncomment again? there are three "/"s. also there is a bunch of spaces. (Sorry about the comments, they are out of order beause of my wifi.).

  Are you sure? yes | no

Bhragals wrote 05/08/2016 at 01:07 point

ok, i think i fixed it. i did not have the newer version. heres my new error code:

trinketwatchmk1.ino: In function 'void loop()':
trinketwatchmk1:85: error: 'updateInternalTime' was not declared in this scope
trinketwatchmk1:88: error: 'pressedOnce' was not declared in this scope
trinketwatchmk1:92: error: 'pressedOnce' was not declared in this scope
trinketwatchmk1:99: error: 'analogTime' was not declared in this scope
trinketwatchmk1:101: error: 'digitalTime' was not declared in this scope
trinketwatchmk1:106: error: expected '}' at end of input
'updateInternalTime' was not declared in this scope

(i call it trinketwatchmk1)

  Are you sure? yes | no

Bhragals wrote 05/08/2016 at 12:28 point

ok, now i figured it out. I'm supossed to remove the # instead. but, it still doesn't work. Did i do something wrong? (again)

  Are you sure? yes | no

mikwii wrote 01/30/2016 at 20:17 point

Love this code! only one issue, I have noticed that the minute hand  is not updating / moving every 60 seconds in the analoge clock mode.

  Are you sure? yes | no

davish wrote 05/07/2016 at 20:54 point

Yeah, I didn't take the time to program a new minute-hand position for each minute (as I found each position by hand to make sure it looked alright on the low-res screen), so the minute hand updates every five minutes. 

  Are you sure? yes | no

kamil.dom wrote 12/26/2015 at 13:47 point

how to set that showed at 24 hours instead of just 12

  Are you sure? yes | no

kamil.dom wrote 12/13/2015 at 18:44 point

Hello!

if you could deploy clock OLED display, ie the whole complex? because the files I see that everything is separate, but surely you have one all the code in which you can switch between watch and stperem a game
I will be very very grateful for the help

  Are you sure? yes | no

fhlipZero wrote 06/19/2015 at 03:49 point

what are you seeing out of battery life? i stole a 385mah out of my little quadcopter and am at 19 hours and surprised it lasted that long!

  Are you sure? yes | no

davish wrote 06/19/2015 at 22:21 point

I've worn it for a full day without the watch dying on me. Honestly, I haven't done any real look at battery life. If you were getting that amount of time out of a 385 mAh battery, I might try to get a smaller battery!

Also, thanks for your praise in the last comment! I'm happy the build instructions were easy enough to follow. We're there any modifications you made along the way? I'd love to see some pictures of your build!

  Are you sure? yes | no

fhlipZero wrote 06/20/2015 at 00:27 point

I think my total battery time ended up somewhere around 22 hours total so i definitely agree, a smaller battery is in order! i did mine a little different by using a hackaday trinket ive had laying around and a smaller OLED since the 1.3 was out of stock when i originally shopping for them (funny enough, the 1.3 stock was refilled the day this one came in:P) I of course gave credit where very much due on my hackaday.io that i keep more for my own records than to be seen, thanks again and i'll be sure to update if i do a smaller battery or anything else! https://hackaday.io/project/6372-trinketpro-powered-watch

  Are you sure? yes | no

fhlipZero wrote 06/18/2015 at 00:23 point

I'm still learning lots about the trinket but this project was pretty easy and fun to play with! working on slimming mine down now, thanks!

  Are you sure? yes | no

Austin Marandos wrote 03/13/2015 at 05:24 point

Great work, i've created the exact same thing, however i started on an Arduino mini, after hundreds of testing, soldering, re-soldering i eventually broke the mini. I then turned to a pro tinket and plan to 3d print a case to enclose it all. Your watch looks great! 

  Are you sure? yes | no

bram wrote 01/01/2015 at 15:52 point

Nice project, I am doing almost the same thing but with a Arduino pro mini. But how do you keep the time? because there is no real time clock on it.

  Are you sure? yes | no

davish wrote 01/01/2015 at 18:19 point

I was also originally looking at the Pro Mini to do this project, but the trinket, being a little cheaper, was convenient. The use of a Nokia battery in your project is pretty cool!


I apologize in advance for the horrible formatting; comments don't give you options for syntax highlighting and the like.


I explain it in my most recent project log, but I'll expand on it here. To set the time originally, I use a constant/macro that's in C++ called __TIME__. This is a char array with the time of compilation in the format HH:MM:SS. I parse this string and use atoi() to get integer values for hours, minutes, and seconds, which I set in the setup() function. I actually took this code from the example code for the DS1307 RTC, which sets the RTC to __TIME__ if no time is specified.


Once the time is set, I use the difference in milliseconds [millis()] between different calls to the function, to keep time. Here's the function that is called at the beginning of loop() (it's on GitHub in the sidebar in the "time.ino" file, too):


void updateInternalTime() {
ms += millis() - sinceLast;
sinceLast = millis();
if (ms >= 1000) {
seconds += ms / 1000;
ms = ms % 1000;
}
if (seconds >= 60) {
minutes += seconds/60;
seconds = seconds % 60;
}
if (minutes >= 60) {
hours += minutes / 60;
minutes = minutes % 60;
}
if (hours >= 24) {
hours = 0;
}
}


ms, seconds, minutes, hours and sinceLast are global variables.


As you can see, sinceLast is set to the value of millis() in the second line of the function. When ms is incremented in the first line, it is incremented by the number of milliseconds since the last time the function was called. This is expressed as the difference of [current milliseconds since arduino reset] and [milliseconds since arduino reset of a few milliseconds ago]. Since I don't know exactly how long my code takes to run, this allows the arduino to keep time without knowing exactly how many milliseconds it took to run all of the code. The next part is how the time gets put into a readable format. If ms is greater than 1000 (how many milliseconds there are in a second), then seconds are incremented by how many seconds have passed since the last call (the quotient is truncated because seconds, minutes and hours are all integers) and milliseconds are set to the remainder. The same happens for minutes and hours.
I also have a mode on the watch to adjust the time by incrementing hours and minutes, so you don't have to upload the code every time you want to adjust the time. You can see it in action here:

  Are you sure? yes | no

Similar Projects

Does this project spark your interest?

Become a member to follow this project and never miss any updates