 Keith Violette
1.) Break apart old key and extract the metal key blade - if you need these parts, this likely already happened at the worst possible time...
2.) 3D print the above parts at 100% infill
3.) While it is printing (≈2 hours) trim/file/sand off the three little triangular protrusions from the transmitter body. They will interfere with the new housing.
4.) Insert the hex nuts into the back of Key Bottom. It is intentionally a tight fit. I used a soldering iron to heat the nut and melt it into place.
5.) Squeeze the metal key shank into the Key Bottom using a smooth-jaw vise. The shank of the key is also a tight fit to prevent any play. Apply loctite and install one 3mm long screw through the back into the threaded hole in the key shank.
6.) Install the transmitter and anti-theft chip into the Key Top, align with Key Bottom, and again squeeze together in a smooth-jaw vise until the two sides just touch - Do Not Crush!
7.) Apply loctite and install the remaining screws. The long screws go in the corners, the second 3mm long screw goes into the key from the top.
I redesigned the housing from scratch to make the panic button slightly below the surface, as I kept setting off the panic alarm. The two red housings were my prototypes, while I worked to get the fit just right.
Also, if you have another Honda with a similar key that has the trunk button, follow the above assembly steps, but instead, print out the other part Key Top - With Trunk Button.STL I have included SolidWorks files, .STP files and .IGES files on thingiverse so you can open and modify in CAD.
Materials and methods
(1) Broken Honda Pilot Key, with working transmitter and anti-theft chip (1) Key Top (print) (1) Key Bottom (print) (4) M2 x 8mm long screws - McMaster 91292A832 or 92000A015 (2) M2 x 3mm long screws - McMaster 91292A003 or 92000A010 (4) M2 Hex Nuts - McMaster 94150A305


 Awesome Makes
 Dave Pedu
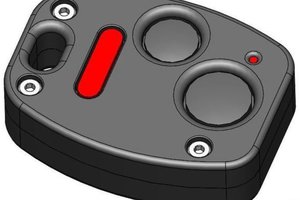
Update: I no longer own this vehicle, or any other Honda.
The replacement vehicle (Silverado) only came with one key & fob. I needed a second, and found that they are called "Laser Keys" (no laser involved, I guess they thought it sounded cool) with the internal groove. I scanned it on a flat bed scanner, 3D modeled it in SolidWorks, used HSM Express to generate the G-Code and milled 3 spare keys from $8 key blanks from Amazon. The genuine key fobs are also available on Amazon for $20 each. I reluctantly brought those to the dealer to have them programmed, and was charged $60. So I now have 4 keys and three fobs, for a total cost of $124 - less than half the price if I were to have purchased ONE spare key and fob from the dealer ($325/set, roughly $800+ for three keys & 2 fobs).
Additionally, our new car just uses my phone as the key... So much better than keys!