Close
0%
0%

Smart Greenhouse using a Raspberry Pi & Launchpad

As a part of my work/private investigation regarding sensor networks and Internet of things, I am discovering the works using a toy project.

Similar projects worth following
Although I have been working as a management consultant for many years now, the idea of actually building something has never left my mind. With the current trends such as Open Data and Internet of Things, I'd decided to pick up my old rusty skills and build a smart greenhouse.

The greenhouse will be connected to the internet and can be managed with a web page. I hope to learn many new things about sensors, microcontrollers and building web applications using a python web framework. Of course the herbs I will be harvesting using this greenhouse will find their way to our dinners.

I decided to put this project up on Hackaday Projects to stimulate myself to actually create the greenhouse.

Whether this greenhouse leads to commercial insights, educational opportunities, I don't know. It should be plain fun and I hope to be inspired by my fellow makers.

In order to prevent this project to become my "forever project", I am entering this project in Hackaday Projects. The project aims to combine different technologies and concepts to build a smart greenhouse, that can be monitored using a webpage and eventually uses Machine Learning to optimally support plants.

The project has been born out of the curiosity to investigate sensor networks, cheap electronics, embedded systems and creating web (and open data) enabled systems. Although many different ideas could have been chosen to implement, I have specifically chosen for a greenhouse.

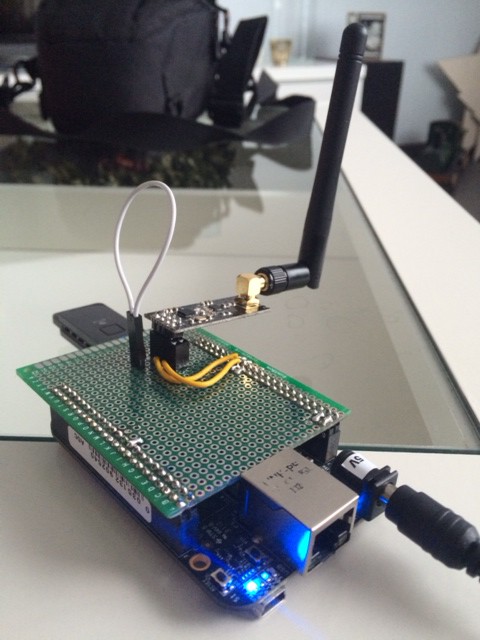
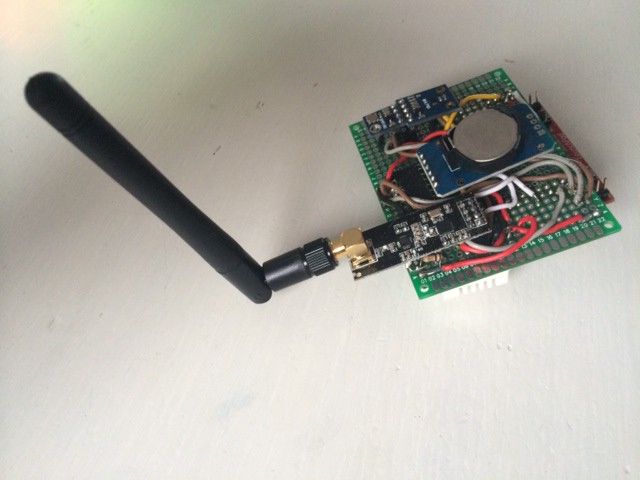
Some of the highlight components used in this project are, the Socker greenhouse from IKEA, dirt cheap environmental sensors to measure air pressure, temperature and humidity. small mechanical parts and wireless technology based on the NRF24L01+, also dirt cheap.

The "preparation" of this project already has taken months, browsing eBay, trying software approaches and now I am prepared to undertake the final step...actually creating the greenhouse.

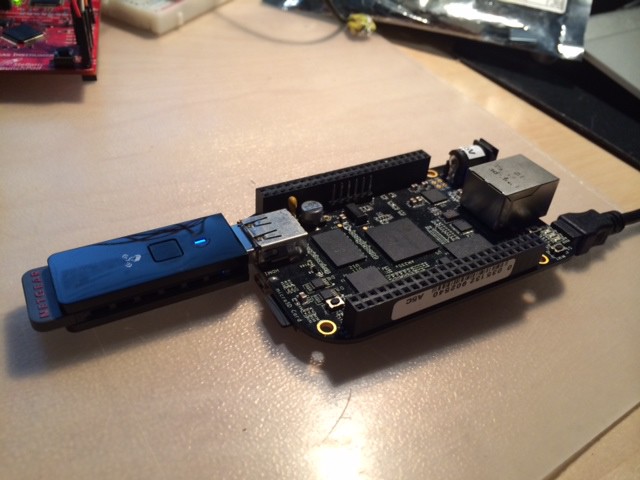
I want to create an engaging demonstration of a system attached to the Internet. The chosen scenario of a wireless link between a microcontroller board and the Raspberry Pi enables new possibilities, like using iPython (Interactive Python) to interact with the greenhouse and the produced data.

Besides producing data from its environmental sensors, the Smart Greenhouse will also consume data from OpenWeathermap.org, As the concept progresses, it would be nice to anticipate to changing weather conditions (like sprinklers that do not irrigate the lawn when rain is coming). This is, however, one of the later goals.

There are some things I would have loved to implement, but chosen not to:

- Peltiers for heating and cooling - These would make a beautiful addition to the greenhouse, but soak up too much energy.

- Raspberry Pi Camera to make timelapses and color analysis - I would love to add some RGB leds to light the plants and take pictures. Using different colours will yield information regarding the health of the plants. Unfortunately, the Raspberry Pi soaks up too much energy as well. Maybe I will add another Raspberry Pi that will switch on and off at specific intervals.

  • 1 × BMP180 - Barometric Pressure Sensor Part of the environmental sensors, both pressure and temperature.
  • 1 × BH1750 - Ambient Light Sensor Part of te environmental sensors, light in Lux
  • 1 × DS3231 - Realtime Clock - Temperature Controlled Crystal Oscillator A ready made module from eBay. Advantages over the DS1307 are voltage, accuracy and alarms.
  • 2 × Servo's - Regular Regular servo's to open the flaps.
  • 1 × Solar Panel 10W or 20W It would be great to make the greenhouse outside autonomous. A simple 10 or 20 Watt panel could charge a battery and drive electronics.

View all 14 components

  • When "forever" starts to become forever...

    eelco.rouw03/14/2016 at 09:35 0 comments

    Good morning,

    I finally found time to update my project log. A lot has happened since the last update, unfortunately not related to the Smart Greenhouse, which has been in use by my wife for her dings and dents.

    3D printing

    3D printing happened to me, and I have been perfecting my Prusa i3 printer, which has been very time consuming but also very rewarding (I'll probably start another project blog for all printer related stuff). Basically half of the printer has been replaced with better components. Direct drive has become Bowden with an official E3D v6 hotend, M5 lead screw have become TR8 lead screws with brass nuts, the PCB heated bed has become a Silicone AC heatbed, manual bed levelling has become auto bed levelling and the Megatronics controller has become a MKS SBase smoothieware compatible controller. The final step is a housing to move the printer to our shed.

    Lately I have been thinking about the direction the Greenhouse should be taking. I still would like to create an autonomous greenhouse solely powered by small solar panels.

    ESP8266

    Another very important development is the availability of the ESP8266 or WiFi on the cheap. With its low power operation of 1uA in deep sleep and 70-100mA when transmitting, it would be able to send back telemetry without relying on external power. I have been experimenting with MQTT and the lmroy library seems to be a perfect fit. Combined with a linux server, NodeRed, Python Flask/iPython and MongoDB would be a perfect learning platform for the Smart Greenhouse.

    Arduino compatibility is a boon for this platform and the use of its huge library of libraries makes it easy to prototype.

    Raspberry Pi 2 and 3

    The raspberry Pi 2 and 3 have increased computational oompfh and could be easily used as low power data analysis platforms. All packages mentioned earlier work like a charm (although MongoDB is a pain).

    I have been thinking to power the Raspberry Pi from Solar, but somehow this does not seem to add up favorably in the Netherlands (you will need a big solar panel). Maybe the NEMA17 wind mills will be able to power the platform. I need to look into a suitable charging system to rely on both solar and wind power.

    Team additions

    It is nice to see that although I have not updated the project log for a long while, people found it worthwile to join the project. I hope that the greenhouse will be a collaborative project sharing best practices for mechanical, electronic and software best practices.

    Next steps

    As I mentioned earlier, I am still pondering where to take the project next. There are still a lot of things to be sorted out. I am looking into several scenario's:

    1. Building the complete data pipeline - Start with one plant, temp/humidity sensor and build a data collection, aggregation and presentation platform.

    2. Adapt the greenhouse for actuators - Being able to open and close the greenhouse with servo's and create an irrigation infrastructure using pumps and silicone hoses.

    3. Enable autonomous operation - Use solar panels to charge batteries and look into possibility to power platform, actuators (servos/pumps) and a Raspberry Pi (optional).

    4. Advanced photometry - This has been suggested by one of the team members. Use spectrography to determine the health of the plants.

    Of course help and tips would be greatly appreciated ;)

    Hope to update you soon on new progress!

  • Quiet, but still going strong...

    eelco.rouw03/11/2015 at 08:12 0 comments

    Hi!

    It has been quite a while since I did my last post in this project. It has been a busy 6 months juggling with the family, the sale of our old house and a career change. Well, besides getting rid of my old job, house and lease car, several things happened. For instance, the ESP8266 happened, several boards from TI, the most notable the CC3200 and last but not least the release of the Raspi 2. The latter being a platform with a power consumption between the "old" B and "newer" B+ depending on the workload.

    This created several opportunities on the hardware site. Running Lua on the ESP8266 enables me to connect to a MQTT server and publish/subscribe to service channels and data collectors. However, the footprint of Lua with MQTT is a little too much to handle for the ESP8266 and I am still wondering to what extent the ESP is able to do things intelligently. The 70mA power consumption is more attractive than the Raspi, especially with the deep sleep option of approx 1uA.

    So everything is available for experimentation and most stuff is populating my desk. Due to my career change, I've finally been able to restart my project... So watch this space!

    Regards, Eelco

  • Just practicing

    eelco.rouw05/29/2014 at 22:18 0 comments

    It has been quiet the past weeks, although I have been working quite extensively to find out new stuff for both my energy meter and greenhouse. I have been working primarily on the software side of things. I have been using a combination of Python, Flask, iPython and Pandas.

    Python and Flask

    One of the things I want to achieve is to have a web application for the greenhouse. This web application should enable telemetry of all the various sensors in the greenhouse as well as controlling the water pump, servo's and other stuff that can be automated. I stumbled upon Python-Flask, which is a great micro platform for writing powerful web applications. The hello world example gives a nice sneak peak what can be achieved easily with Flask:

    from flask import Flask
    app = Flask(__name__)
    
    @app.route("/")
    def hello():
        return "Hello World!"
    
    if __name__ == "__main__":
        app.run()<br>

    The example generates a web application that can be seen with a browser pointing to 127.0.0.1 (the internal browser of the Raspberry Pi or Beaglebone). When app.run() is replaced by app.run(host='0.0.0.0', debug=True) the web application can be seen on the network. Enabling debugging is great, as the code is on the fly reloaded when you change your source code. 

    The @app.route decorators take care of routing and can be used to create several URL's supporting different methods (GET, POST). Flask even facilitates the creation of a flexible web api, that can be used by other applications as well. There are several tutorials on the web that explain more on Flask. The following tutorial has been very helpful to me:

    http://blog.miguelgrinberg.com/post/the-flask-mega-tutorial-part-i-hello-world

    This is a multipart tutorial explaining how a sort of Twitter/Blogroll can be built using Flask. For the energy monitor, I've built a Flask application which uses a separate thread to receive a pulse counter value wirelessly (through the NRF24L01+ and library). 

    Templates, JQuery and JQuery Mobile

    Web applications become more and more user friendly by adding interactivity. The Hello World example shows an unformatted text in your browser. Adding <H1> and </H1> tags around "Hello World!" formats the text but will be very cumbersome when creating a user interface.

    Flask provides a templating engine based on Jinja2. One can create HTML templates with additional keywords and code that can be used dynamically with Flask. 

    I have used JQuery mobile for my energy monitor and plan to use this library for the greenhouse as well. JQuery mobile contains a style, various functions and user interface elements that lead to a slick web application. I could have also been using Bootstrap, the Javascript library from Twitter. 

    Templates are stored in the templates subdirectory. I have created a basic "layout" template that forms the base of most other templates:

    <!doctype html>
    <html lang="en">
        <head>
            <title>Say somthing</title>
            <meta http-equiv="content-type" content="text/html; charset=utf-8">
    		<meta name="viewport" content="width=device-width, initial-scale=1">
    		<title>buttonMarkup demo</title>
    		<link rel="stylesheet" href="/static/jquery.mobile-1.3.2.min.css">
    		<script src="/static/jquery-1.9.1.min.js"></script>
    		<script src="/static/jquery.mobile-1.3.2.min.js"></script>
        </head>
        <body>
            {% block content %}{% endblock %}
        </body>
    </html>
    

    The {% block content %} and {% endblock %} provide a "hook" to other templates. This template mainly sets the style and javascript libraries. The webpage is:

    {% extends "layout.html" %}
    {% block content %}
    <div data-role=page id=home>
    	<div data-role="header"  class="ui-header ui-bar-a" role="banner">
    		<h1 class="ui-title" role="heading" aria-level="1"> Smart Energy Monitor </h1>
    	</div>
    	<div data-role="content">
    		<div id="meetdata">
    		</div>
    	</div>
    	<div data-role="footer" class="ui-footer ui-bar-a" role="banner">
    		<h4 class="ui-title" role="heading" aria-level="1">Powered by Flask/jQuery/jQuery Mobile</h4>
    	</div>
    </div>
    ...
    Read more »

  • Quiet, but fruitful

    eelco.rouw04/26/2014 at 17:46 1 comment

    The past two weeks have been very busy with work. Most progress on the greenhouse has been made in the preparation and thinking department. Several design choices have been validated.

    Beaglebone Black

    Although everything works like a charm on the Raspberry Pi, I've been looking at changing to the Beaglebone Black platform. Two 2x20 headers and a doublesided protoboard and a 2x5 header made a more permanent setup for my gateway.Beaglebone black with protoboard

    The Beaglebone Black is a more powerful platform for the greenhouse. I am thinking about creating a "sandbox" using iPython. Building several classes to describe the greenhouse should make it possible to make an experimentation platform.

    In a more definitive form I could switch back to the Raspberry Pi. But for now I will develop using the Beaglebone Black.

    Stellaris Launchpad

    Although the G2553 launchpad provides just enough functionality, the internal memory becomes cramped when using strings for communication. As I am thinking of a sort of JSON-like protocol with acknowledgements, space is running out quickly.

    I have several Stellaris/Tiva launchpads at home. These launchpads use a ARM Cortex M4F (with floating point) processor with ample flash memory, speed, SRAM and I/O pins.Stellaris Launchpad with sensors on protoboard

    As I have been using Energia for the original code, porting is quite easy. The Stellaris/Tiva launchpad has multiple SPI and I2C modules which need to be selected by the

    Wire.setModule(X);
    SPI.setModule(X);

    statements.

    Protoboards and d'Oh.

    Having soldered the protoboard for the Beagleboard and a protoboard containing all environmental sensors for the Launchpad, a more definitive setup has been made.

    Time to work a bit more on the software side. The original sketch reads out the different sensors and sends their values periodically to the gateway. There is no bidirectional communication.

    So the first step is to try bidirectional communication. Using radio.startListening() and radio.stopListening() communication is possible. Switching between the transmitting and listening state should make bidirectional communication possible.

    However, the first experiments yield no results. As soon as I switch between the two states no bit is received at the gateway. Two hours of mildly cursing and trying different routes I found the culprit.

    The NRF24L01+ module uses the CE pin to switch between the two modes. This pin has been mapped to P8_23, but with the Beaglebone Black this pin has been mapped to the eMMC flash memory. Switching the pin to P8_19 saves the day! 

  • Just pondering...

    eelco.rouw04/16/2014 at 21:27 0 comments

    It has been quiet the past few days. It has been a hectic week for work and a lot of family things kept me from undertaking radically new ideas. 

    However, I've done some things... I've ordered a couple of plant sensors to be able to monitor all my plants. I've ordered some waterproof DS18B20 leads, which could be used to sense the plant's temperature.

    Somehow I have been reluctant to build some server side scripts on my Raspberry Pi. I have some trouble with the PyNRF24 library. Somehow I'm not able to have duplex communication. Sending and receiving seems to be broken. It could be my auto acknowledge setting, but I haven't found the little culprit yet.

    As an alternative I have been looking into the C++ library for the RF24. I've been reading on building custom extensions for Python, and it seems to be doable. It is great that both Beaglebone and Raspberry Pi have been outfitted with the complete GCC toolchain. It has been really helpful and I am currently brushing up my rusty C++ knowledge.

    I have soldered a baseboard for the beaglebone that consists of a 5x2 female header to accommodate the NRF24L01+ module. Still pondering whether I should use my amplified versions or not.

    Just some random ramblings. I am looking into getting the data into a database and showing graphs on a website. To be continued...

  • Wireless adventures with the Beaglebone ;)

    eelco.rouw03/26/2014 at 22:13 1 comment

    Introduction

    For the "brains" of my smart greenhouse, I've been considering multiple options. I am currently working with the Raspberry Pi, a great platform but limited in raw performance and potential I/O expansions (note this platform will be placed indoors and communicate using a wireless link with the greenhouse). The other option I've been considering is using a Beaglebone, which is more powerful and has a lot more I/O options (multiple SPI, multiple GPIO etc.). 

    Another great benefit of the Beaglebone is the onboard eMMC storage, which saves you a memory card (although I currently use a 16GB card).

    Challenges with the Beaglebone

    Although the Beaglebone is a great platform at a great price point ($45), I have been experiencing several challenges to get the platform to work.

    The Angstrom distribution is limited and not all packages are available (at least I couldn't find them). I want to use iPython as an "interactive learning environment" and I couldn't get Numpy to work on Angstrom. 

    I had some earlier encounters with Angstrom when working with the Beagleboard and I wasn't happy with it (needed a lot of kernel hacking to get all hardware to work properly). 

    Ubuntu works like a charm, but I had several issues with getting SPI to work properly. The device tree manager has been documented very poorly across the various sites and the older version I used earlier didn't work well with SPI. A newer version (14.01) does work well, but nobody describes what is the correct output.

    Finally, the original tiny RTL8192cu dongles seem to work at a glance but have a lot of stability issues when plugging directly in the Beaglebone. Even using extension wires didn't solve the problem. A switch to a NetGear WNA1100 (based on an Atheros chipset) did miracles. I now have a rocksteady connection.

    Figure: BeagleBone Black with WNA1100 wifi dongle.

    Conclusion

    So in the end I have two viable platforms to form the "hub" communicating with the greenhouse. I haven't made my mind up yet which to use. I think it all will depend on how much I want to expand on the central hub. I am thinking of adding a display and potentially some other UI elements and that could benefit greatly from the additional GPIO's from the beaglebone.

  • Wireless adventures using the NRF24L01+

    eelco.rouw03/18/2014 at 10:01 0 comments

    When browsing eBay and looking for the NRF24L01+ one is swamped by a multitude of sellers selling these dongles for really low prices. The current rate is approx. $1.60 to $1.70 and you get a lot for that amount of money, a transceiver capable of:

    • Sending and Receiving data at a max rate of 2Mbps using 2.4GHz.
    • 5 additional "pipes" to communicate with other NRF24L01+ transceivers (which makes a total of 6).
    • Auto acknowledgment and CRC coding for reliable transmission.
    • Low power modes and maskable interrupts for reception and transmission of data.
    • Lots of information on the web regarding these dongles.

    I found my dongles at eBay and have the best experience with the green ones containing a "loop". I also have the PA+LNA version, but that doesn't seem to add much to the range.

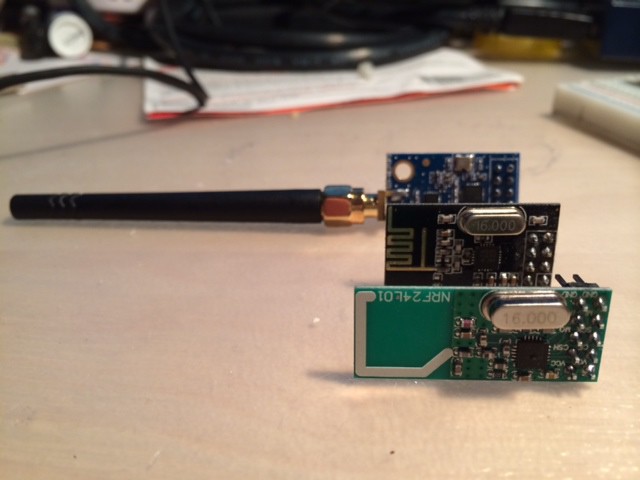
    (Figure: Three varieties of the NRF24L01+ dongle. The green version is the one currently used)

    Launchpads and wireless

    The first part has been getting the wireless link up and running on the launchpad. Although many libraries exist for the Arduino, getting it to work on the launchpads (both MSP430 and Stellaris) requires some tweaking. I finally chose to use RF24 by Maniacbug as it exposes a lot of low level functionality as well. I did the following tweaks (file will be up in my repository soon):

    - MSP430 - Add an external C function at the beginning of your sketch for "putchar(x)" for printf to work:

    extern "C"{
      int putchar(int c)
      {
        Serial.write((uint8_t)c);
        return c;
      }
    }
    

    - MSP430 and Stellaris - Remove references to flash memory from the RF24.cpp file. These are the pgm_read and pgm_write functions and the PROGMEM directives. Note: this is probably not necessary as there are several #if and #endif statements declaring alternatives for these commands and directives.

    - MSP430 and Stellaris - Remove the #include "printf.h" directive.

    - Stellaris - Comment the _write(x) function in the startup_gcc.cpp function and add this function to your sketch.

    - Stellaris - You need to select the SPI module to get a working connection. 

    SPI.setModule(0) or SPI.setModule(1)

    This will yield a working version. I somehow messed up the printf statements. These are only needed to execute the radio.printDetails() function, so if you remove this function you can skip many of the steps.

    Beyond pinging hence and forth

    When the changes have been made in the code it is possible to try out the examples. I've been trying the "pingpair" examples and finally made it work between two launchpads. These could either be the Stellaris or one of the MSP430 launchpads.

    OK, that's nice and it's a nice way to check the potential range. You will get the best results when you use 250Kbps, a small payload size  and auto acknowledge enabled. I am able to get a range of 6-15 meters indoor, depending on the medium (we have a concrete house which blocks many signals).

    Now, it's time to do some sending and receiving of other data. I've created a sendval(char* x) function that sends a string with a maximum length of the configured payload size. I will be sending strings constructed from sensor data and finally I will write a small parser to parse commands to the greenhouse.

    Note: Using strings is very costly for memory. Although small examples work with the MSP430G2553 controller, larger examples will yield strange results as the memory overflows. I am currently using the Fraunchpad which provides just enough storage. The F5529 launchpad is nice but cannot be powered by other means than the USB port (which is annoying the least).

    Using simple libraries for my RTC (snippets from a DS1307 program), DHT22 (from the DHT22 lib found on Energia.nu), BMP180 (from the BMP085t lib from Energia.nu), I've been able to construct environmental data.

    A Raspberry Pi gateway

    The Raspberry Pi can also handle the NRF24L01+. I specifically wanted to program it using Python. I found the Pynrf24 library on the net which maintains the same class members as the RF24 library used for the launchpads....

    Read more »

  • Thoughts on Autonomous operation

    eelco.rouw03/17/2014 at 14:21 0 comments

    One of my intentions is to make the greenhouse an autonomous entity, connected wirelessly to a gateway (either RF or WLAN based). The greenhouse should be powered by a 10 or 20W solar panel that charges the batteries.

    Initial thoughts

    Initially I wanted a full autonomous system. The greenhouse should have both the electricity and computing power to be self sufficient and serve webpages. I looked into two candidate systems for automation:

    • Raspberry Pi Model A
    • Beaglebone Black

    The latter being more powerful and efficient. The Raspberry Pi has a couple advantages compared to the BBB:

    • A better community with a lot of shared experience.
    • The possibility to add a relatively high quality camera for timelapse.

    The Beaglebone black however has more memory, more processing power and a wider array of I/O ports. 

    Both systems have pretty much the same power consumption ranging from 0.5 to 0.8 amps depending on the workload. Based on a 5V power supply, this equals 2-4 watts of power. 

    The solar balance

    The system will be powered by a battery that is charged by a solar panel. After building some nice panels myself, I decided to go for an assembled version sold by your favorite Chinese broker (Aliexpress). I selected a 10 and 20Watt panel costing approx. 40 dollars together. 

    I've been investigating the electricity generated by these panels and was struck by the impact of a cloudy/rainy day. The power plummets and is only a percent of its power with full sunlight. These panels will not deliver enough power to create a sustained power source for the greenhouse.

    The compromise

    Although I had my high hopes for a full autonomous greenhouse, I've learned that the Netherlands doesn't have the sunlight to power a Beaglebone or Raspberry Pi without resorting to large panels not fit for a small garden.

    Therefore I've chosen to go for a low power platform in the greenhouse using cheap NRF24L01+ dongles which connect to a Raspberry Pi as internal gateway.

    The low power platform

    Thanks to the wonders of Arduino and Energia, I've been able to use the same source code on vastly different platforms (albeit with some minor modifications). The current systems I am evaluating are:

    • Arduino Leonardo
    • MSP430 Launchpad - MSP430G2553 
    • Stellaris/Tiva C Launchpad
    • Fraunchpad
    • F5529 Launchpad

    Each offering has its own strong and weak points. The jury is still out on the definitive platform. I suspect the Tiva C platform could be a serious contender.

  • Project Officially Started

    eelco.rouw03/16/2014 at 18:55 0 comments

    Finally a good platform for sharing

    I've been working for several months on this project. I've paid many visits to eBay and Chinese broker sites to find components. Finally I think I have found the right mix of components for my Smart Greenhouse and then some. 

    In my daily life I work as a management consultant working with clients to solve IT management related issues concerning Enterprise Architecture, Innovation and shortly Data Management. My current line of work is a huge deviation from my roots. I've been studying Electrical Engineering and got my PhD as well. 

    After several years of fulfilling assignments and helping clients to solve their problems, I noticed a craving for more technology in my working life. These cravings have led to my interest in innovation and Data Management. As I am a firm believer in learning things by doing them, I wanted a pet project.

    This is my pet project and I will try to give you some insights, and hopefully inspiration to undertake your own eco friendly and fullfilling project. It'll take probably several years to come to the envisioned end result of this project. 

    Milestones

    In the meantime I've discovered a couple of milestones that I want to achieve:

    • Build the IKEA greenhouse and customize it for electronics and electromechanical parts. (IKEA greenhouse has been built).
    • Create a small infrastructure to communicate with the greenhouse.
    • Create a web dashboard and control for the greenhouse using jQuery, Bootstrap, D3js and other web technologies.
    • Invent ways to irrigate and feed plants.
    • Invent ways to open and close the greenhouse.
    • Make the greenhouse self sustaining using solar power.
    • Grow plants.

View all 9 project logs

Enjoy this project?

Share

Discussions

Similar Projects

Does this project spark your interest?

Become a member to follow this project and never miss any updates