• LLaVa example

    Peter Walsh12/29/2023 at 18:45 0 comments

    An example of LLaVa, downloaded and run from Donald Papp's recent article.


    [NB: This is not a comment on Justine Tunney's work, which is both excellent and valuable. I'm only pointing out that current AI systems leave a lot to be desired.]


    I used an example image (below) that was not on the net, and asked the LLM to describe the image.

    The entire process took almost 24 minutes, and the description is *almost* accurate.

    #
    # LLaVa Command
    #
    /tmp/Pics: time /Data/llama/llava-v1.5-7b-q4-main.llamafile     --image DSCF2753.jpg --temp 0 -ngl 35     -e -p '### User: What do you see?\n### Assistant:'     --silent-prompt 2>/dev/null
    
    The image features a large metal table with a silver top, sitting on
    a white floor. On the table, there is an industrial-sized fan or
    blower, which appears to be made of metal and has a circular shape.
    This fan is placed in the center of the table, drawing attention due
    to its size and design. The overall scene gives off a sense of a
    workshop or a place where such equipment might be used for various
    purposes.
    
    real    23m40.456s
    user    93m53.092s
    sys    0m8.459s


    The long execution time suggested that perhaps a smaller image would be faster, so I resized the image for a 2nd run.

    The second run is completely inaccurate, with notably several hallucinated items.

    /tmp/Pics/SmallImages: time /Data/llama/llava-v1.5-7b-q4-main.llamafile     --image DSCF2753Small.jpg --temp 0 -ngl 35     -e -p '### User: What do you see?\n### Assistant:'     --silent-prompt 2>/dev/null
    
    The image features a room with a large metal table in the center.
    On top of this table, there is an industrial-sized food processor
    or blender, which appears to be made from metal and has a silver
    color. The table occupies most of the space in the room, extending
    almost all the way across the scene.
    
    In addition to the main focus on the table and its contents, there
    are several chairs placed around the room, with some located near
    the edges of the image. A bench can also be seen in the background,
    further emphasizing the room's purpose as a workspace or dining
    area.
    
    real    24m11.196s
    user    96m11.241s
    sys    0m6.162s
    

    Food processor? Chairs?

    This AI is not quite ready for prime time.


    The original image was 4608x3456, the resized version (2nd run) was 533x44.

    The image (large/small) given to LLaVa:


    I'm using an older, but still beefy, NVidia graphics card with CUDA installed. I have a 4 core 4GHz system with 48GB of memory installed.

  • My work area

    Peter Walsh06/01/2023 at 01:48 0 comments

  • Error for feedback

    Peter Walsh10/16/2020 at 14:07 0 comments

  • Power divider question

    Peter Walsh04/01/2020 at 03:59 0 comments

    A recent Hackaday post describes the construction of a quarter-wave impedance matching circuit. The author was asking why his system shows a resonance at around 600 MHz.

    Typing his circuit into SimSmith shows the following results.

    The first image (above) shows the SimSmith simulation of his original circuit. The green line on the Smith chart shows that a 90 degree length of his 41.56 ohm cable will indeed match the 25 ohm load to - approximately - the 50 ohm generator. The line actually lands on 69.1 ohms, which reflects the fact that he's using a constructed 41.5 ohm line and not 35 ohm line (which would make an ideal match).

    This next image shows SWR plotted as a function of frequency. His calculations indicate that the minimum SWR should be around 200 MHz, but was confused when his NanoVNA showed a minimum at 600 MHz.

    The image above shows what is actually going on. I believe he's seeing the 2nd harmonic of his calculated frequency, and SimSmith indicates that there should be a 3rd harmonic as well.

    SWR is not 1, which reflects the fact that his impedance match is not perfect - 69 ohms instead of 50 ohms - because his constructed transmission line is not the optimal value.

  • RasPi Button debounce in python

    Peter Walsh11/18/2019 at 17:22 0 comments

    I needed to debounce a RasPi button in python, and found that the software in this link has problems: sometimes the button press is ignored.

    Here's an improved version fixing the problem. It uses the GPIO hardware to initially detect the button press (rising or falling, or both) then uses a timer to detect changes in state for a user-selected debounce time.

    A full library file implementation "Button.zip" can be found in the project files section, along with a simple test program.

    DEBOUNCE_MS = 50                        # Debounce time, in ms
    UPDATE_MS   = 5                         # Update/check time, in ms
    
    class ButtonHandler(threading.Thread):
        def __init__(self, pin, func, edge='both', bouncetime=200):
            super().__init__(daemon=True)
    
            self.edge = edge
            self.func = func
            self.pin = pin
            self.bouncetime = bouncetime
            self.bounceleft = bouncetime
            self.bouncing   = 0
            self.prevpinval = GPIO.input(self.pin)
    
        def __call__(self, *args):
            if self.bouncing:
                return
    
            self.bouncing   = 1
            self.bounceleft = self.bouncetime
            self.prevpinval = GPIO.input(self.pin)
            self.timer = threading.Timer(UPDATE_MS/1000.0, self.Tick, args=args)
            self.timer.start()
    
        def Tick(self, *args):
            pinval = GPIO.input(self.pin)
    
            if self.edge == GPIO.RISING  and pinval == 0:
                self.bouncing = 0
                return
    
            if self.edge == GPIO.FALLING and pinval == 1:
                self.bouncing = 0
                return
    
            if pinval != self.prevpinval:
                self.bounceleft = self.bouncetime
    
            self.bounceleft -= UPDATE_MS
    
            if self.bounceleft <= 0:
                self.bouncing   = 0
                self.func(*args)
                self.prevpinval = pinval
                return
    
            self.prevpinval = pinval
            self.timer = threading.Timer(UPDATE_MS/1000.0, self.Tick, args=args)
            self.timer.start()
    

  • My PCB holder

    Peter Walsh03/12/2017 at 19:25 2 comments

    Reference to a discussion online.

    Here's a picture of the PCB holder I designed. It has magnets in the base, to stick to any metallic surface.

    The magnets have a surprisingly strong and stable holding force - enough that the system can hold a PCB on the metal bed of a CNC mill without bolts.

    This one has washers at the far ends. This PCB slides in from the front and stops at the washers. Reverse one side (one washer in front, one at the rear) and the PCB is locked in place.

    The side slots allow me to hold a PCB vertically or at a 45 degree angle. The elongated holes are for mounting on a mill table, and the threaded holes are for some attachments I made.

  • Fixing Alt-Tab behavior, V2.0

    Peter Walsh01/11/2017 at 02:25 0 comments

    TL;DR

    1. New version of the <alt><tab> selector is available
    2. Environment variables can define the task order
    3. Project files and wiki are on github

    A new version of Alt-Tab

    After nosing around the completely undocumented Cinnamon code for several more hours, I could find no place where the taskbar stores it's task list.

    I *did* find a function that let me safely poke around in the source files and see what information is available:

    Main.warningNotify(String1,String2);

    Later, I found a function that appears to get an environment variable:

    GLib.getenv(ORDERENV);
    And one that appears get the workspace name and index:
    Main.getWorkspaceName(global.screen.get_active_workspace().index());
    So I wrote a better version of the Alt-Tab switcher that lets the user use environment variables to set the sort order.

    You can find the new file and documentation on the GitHub project, including installation instructions and more documentation.


    Overview of the new version

    Check the GitHub project, for more/better documentation.

    The new Alt-Tab order is determined by the CLASS and TITLE of the application window.

    The CLASS identifies the application, and will be something like "Firefox" or "Nemo".

    The TITLE identifies what the application is showing, such as a specific web page (Firefox) or directory (Nemo). The TITLE is the string shown in the taskbar, and will be something like "Google - Mozilla Firefox" (for Firefox) or "Home" (for Nemo), depending on what your application is showing.

    To show all window classes and titles:

    #
    # List all window titles
    #
    wmctrl -l -x | awk '{print substr($0,index($0,$5))}'
    
    #
    # List all window classes
    #
    wmctrl -l -x | awk '{ print substr($3,1+index($3,".")) }'


    Setting the sort order

    Environment variables in the user's .profile file can define the sort order.

    1. In workspace n, the sort order is determined by "ALT_TAB_WORKSPACEn" if this variable exists.
    2. Otherwise, the sort order is determined by "ALT_TAB_ORDER" if this variable exists.
    3. Otherwise, the windows are sorted by title.

    The ALT_TAB_xxxx variables contain multiple CLASS:TITLE specifiers separated by semicolon.

    Workspaces are numbered from 1, not zero. The first (leftmost) workspace is "WORKSPACE1".

    The variables are part of the user's original login, so changes must be made to the user's .profile file (and not, for example, the .bashrc file). After editing, log out and log back in for changes to take effect.


    Examples

    Example1:

    export ALT_TAB_WORKSPACE1="Firefox;Nemo;Gnome-terminal"
    export ALT_TAB_WORKSPACE2="Gnome-terminal:Edit;Gnome-terminal:Work;VirtualBox;Firefox;Nemo"

    In WORKSPACE1 the alt-tab listing will have firefox leftmost (in first position), Nemo in 2nd position, the terminal in third position. Other windows will be to the right of the terminal.

    In WORKSPACE2 the alt-tab listing will have both terminals leftmost, but the one titled "Edit" will come before (to the left) of the one titled "Work", in 2nd position. VirtualBox, Firefox, and Nemo will follow, then any unspecified windows.

    Other workspaces will be sorted by title (the default).


    Example2:

    export ALT_TAB_ORDER="Firefox;Nemo;Gnome-terminal"
    export ALT_TAB_WORKSPACE2="Gnome-terminal:Edit;Gnome-terminal:Work;VirtualBox;Firefox;Nemo"

    WORKSPACE2 Alt-Tab will be as described above.

    All other workspaces will show Firefox->Nemo->Gnome.


    Example3:

    #
    # No preference in window order
    #
    #export ALT_TAB_ORDER="Firefox;Nemo;Gnome-terminal"
    

    Alt-tab will sort by title, the default.


    Named Workspaces

    If you have named your workspace, use "ALT_TAB_" with the new workspace name.

    Example4:

    #
    # Workspace named "PERSONAL"
    #
    export ALT_TAB_PERSONAL="Thunderbird;Firefox;Nemo"
    

    The renamed workspace "PERSONAL" will show in the order Thunderbird -> Firefox -> Nemo

    All other workspaces will sort by title, the default.

  • Fixing Alt-Tab behavior

    Peter Walsh12/26/2016 at 19:49 3 comments

    I'm on a campaign to remove minor annoyances in my life, and the alt-tab behavior in Cinnamon finally annoyed me enough that I had to change it.

    The new version presents the task list in a fixed and predictable order every time alt-tab is activated, which allows me to use muscle memory to quickly switch between windows.

    Update1: A diff listing below shows the changes more clearly.

    Update2: Firefox and Chrome titles include the web page title; in other words, their window_title(), hence their position in the list, will change depending on which webpage is accessed.

    The solution might be to sort on "Mozilla" or "Chrome" if the task name contains "Mozilla" or "Chrome". Perhaps if the title contains a dash, sort on the substring after the dash character. I'll look into that later if it becomes a problem or if enough people request it.


    The Problem Statement

    On linux/Cinnamon (and windows), pressing <alt><tab> pops up a list of active applications, allowing the user to navigate and select a window to switch to. When a different window is selected, the current window is pushed down, and the new window comes forward.

    The problem is that alt-tab sorts the windows in least-recently-used order; meaning, the window you are in is the 1st position, the one you were in last is in 2nd position, and so on.

    This works for switching between two - and only two - windows, but if you need three or more it quickly becomes a permutation engine. Selecting the 4th window puts the 1st window in 2nd place, the 2nd window in 3rd place, and so on.

    For example, if you simultaneously use an editor for source, a command window to build, and a third window for test (seeing the results), you cannot quickly switch between windows because the ordering is always different. You have to stop, look at the list, recognize the icons, and then tell your fingers how many times to tap the <tab> key.

    Add one or two more apps (a file explorer say, or a system monitor) and it rapidly becomes an exercise in fumbling and redoing while paying attention: your fingers *want* to learn a fixed action to switch to the editor, but half the time they go somewhere else and you have to stop, look, and recover.

    It's annoying as hell.


    Initial Attempts

    My go-to solution for these sorts of problems is to go out on the net and see if someone else has solved it, then download their solution. Usually with an "apt-get install their-solution" command.

    Apparently no one has done this for Alt-Tab. So far as I can tell, there's no add-on or applet that will change the behavior.

    However, in looking around the net I accidentally found a reference to this file:

    /usr/share/cinnamon/js/ui/appSwitcher/appSwitcher.js
    

    Could editing this file change the alt-tab behavior?


    Step 1: Is this the right file?

    Linux comes with a long list of default annoyances, and the first step in fixing any of them is to find the right file to change. This can take anywhere from 4 hours to several days, depending on on the specific annoyance you want to change.

    So when I found the file reference above, I knew that there was a fair chance I could address the issue without spending a lot of time finding the right file.

    Maybe.

    Editing Cinnamon files is roughly akin to walking a tightrope over a canyon with no net: it's trivial to completely bork your system in such a way that a complete system reinstall is the easiest fix.

    Knowing this, I felt it was *likely* that messing up alt-tab *probably* wouldn't completely bork my system, since I could reboot and put things back without activating the alt-tab function.

    I've been wrong about this before. To give you an idea of how easy this is, I typo'ed the filename of the screen saver executable, and Cinnamon went into an infinite error-popup-reload cycle that was almost impossible to get out of. You would *think* that missing a screen saver would not be a critical/must reboot error, but it was.

    Looking through the directory, I noticed the file "classicSwitcher.js" has the following few lines...

    Read more »

  • Clothespin Switches

    Peter Walsh12/15/2016 at 21:26 0 comments

    Some images for a response on the blog.

    You can make an improvised switch by pressing two thumb tacks into the jaws of a clothespin, and soldering wires to the nails that stick through.

    Then put something between the jaws to break the contact.

    For example, grab the plastic tab that holds a loaf of bread shut and tie some fishing line to that. Place the plastic tab between the jaws, run the line across a doorway or path, and anchor the end to the wall somehow.

    When a person enters the room/crosses the path, their leg snags the fishing line and pulls the tab out from the jaws of the clothespin, completing the circuit.

    (Note: The particular buzzer used is really, *really* loud!)

    (From the article, you can put an aspirin between the jaws to detect moisture.)

    The version below includes a battery and a transistor socket. Stick the wires of a flashbulb into the socket and use the plastic tab as described above to make a flash-bulb warning of intruders.

    Also of note: It's hard to see from the photo, there are 2 thumb tacks sticking out from the base of the battery. Take the whole unit and press it into the side of a tree or wooden molding and run the trip wire across the room to another thumbtack.

    Takes about a minute to install 1 intruder sensor.

    I probably shouldn't mention this, but mount a 35mm film canister on the clothespin, put the flashbulb *inside* the canister, and fill the canister with gunpowder.

    This makes a very satisfying flash *and* bang for unwanted intruders!

    It's also reasonably safe, assuming you use a plastic film canister and not a metal one.

    I couldn't immediately find one of those or I would have posted an image.

  • An Industrial Robotic Arm for Hobbyists

    Peter Walsh12/05/2016 at 01:44 0 comments

    [A Hackaday article submitted for the "we're hiring" article.]

    [Third attempt. I can't seem to find a good enough article to write about for Hackaday, so maybe I'll just compose one of my own. A "good enough" article needs a video, is interesting, and not already have a HAD article covering it.]

    [Oh, wait! Here's one...]

    by Peter Walsh

    One of the best things about the Hackaday prize is that it presents all manner of great projects to the world to build, modify, and learn from. One of these is the Thor 3-d printed robotic arm.

    Thor is not your typical hobbyist or robotics club build, it's pretty much a scaled-down industrial robotic arm in a desktop configuration. The yaw­-roll­-roll­-yaw­-roll­-yaw configuration is the same as found in many industrial robots on the market.

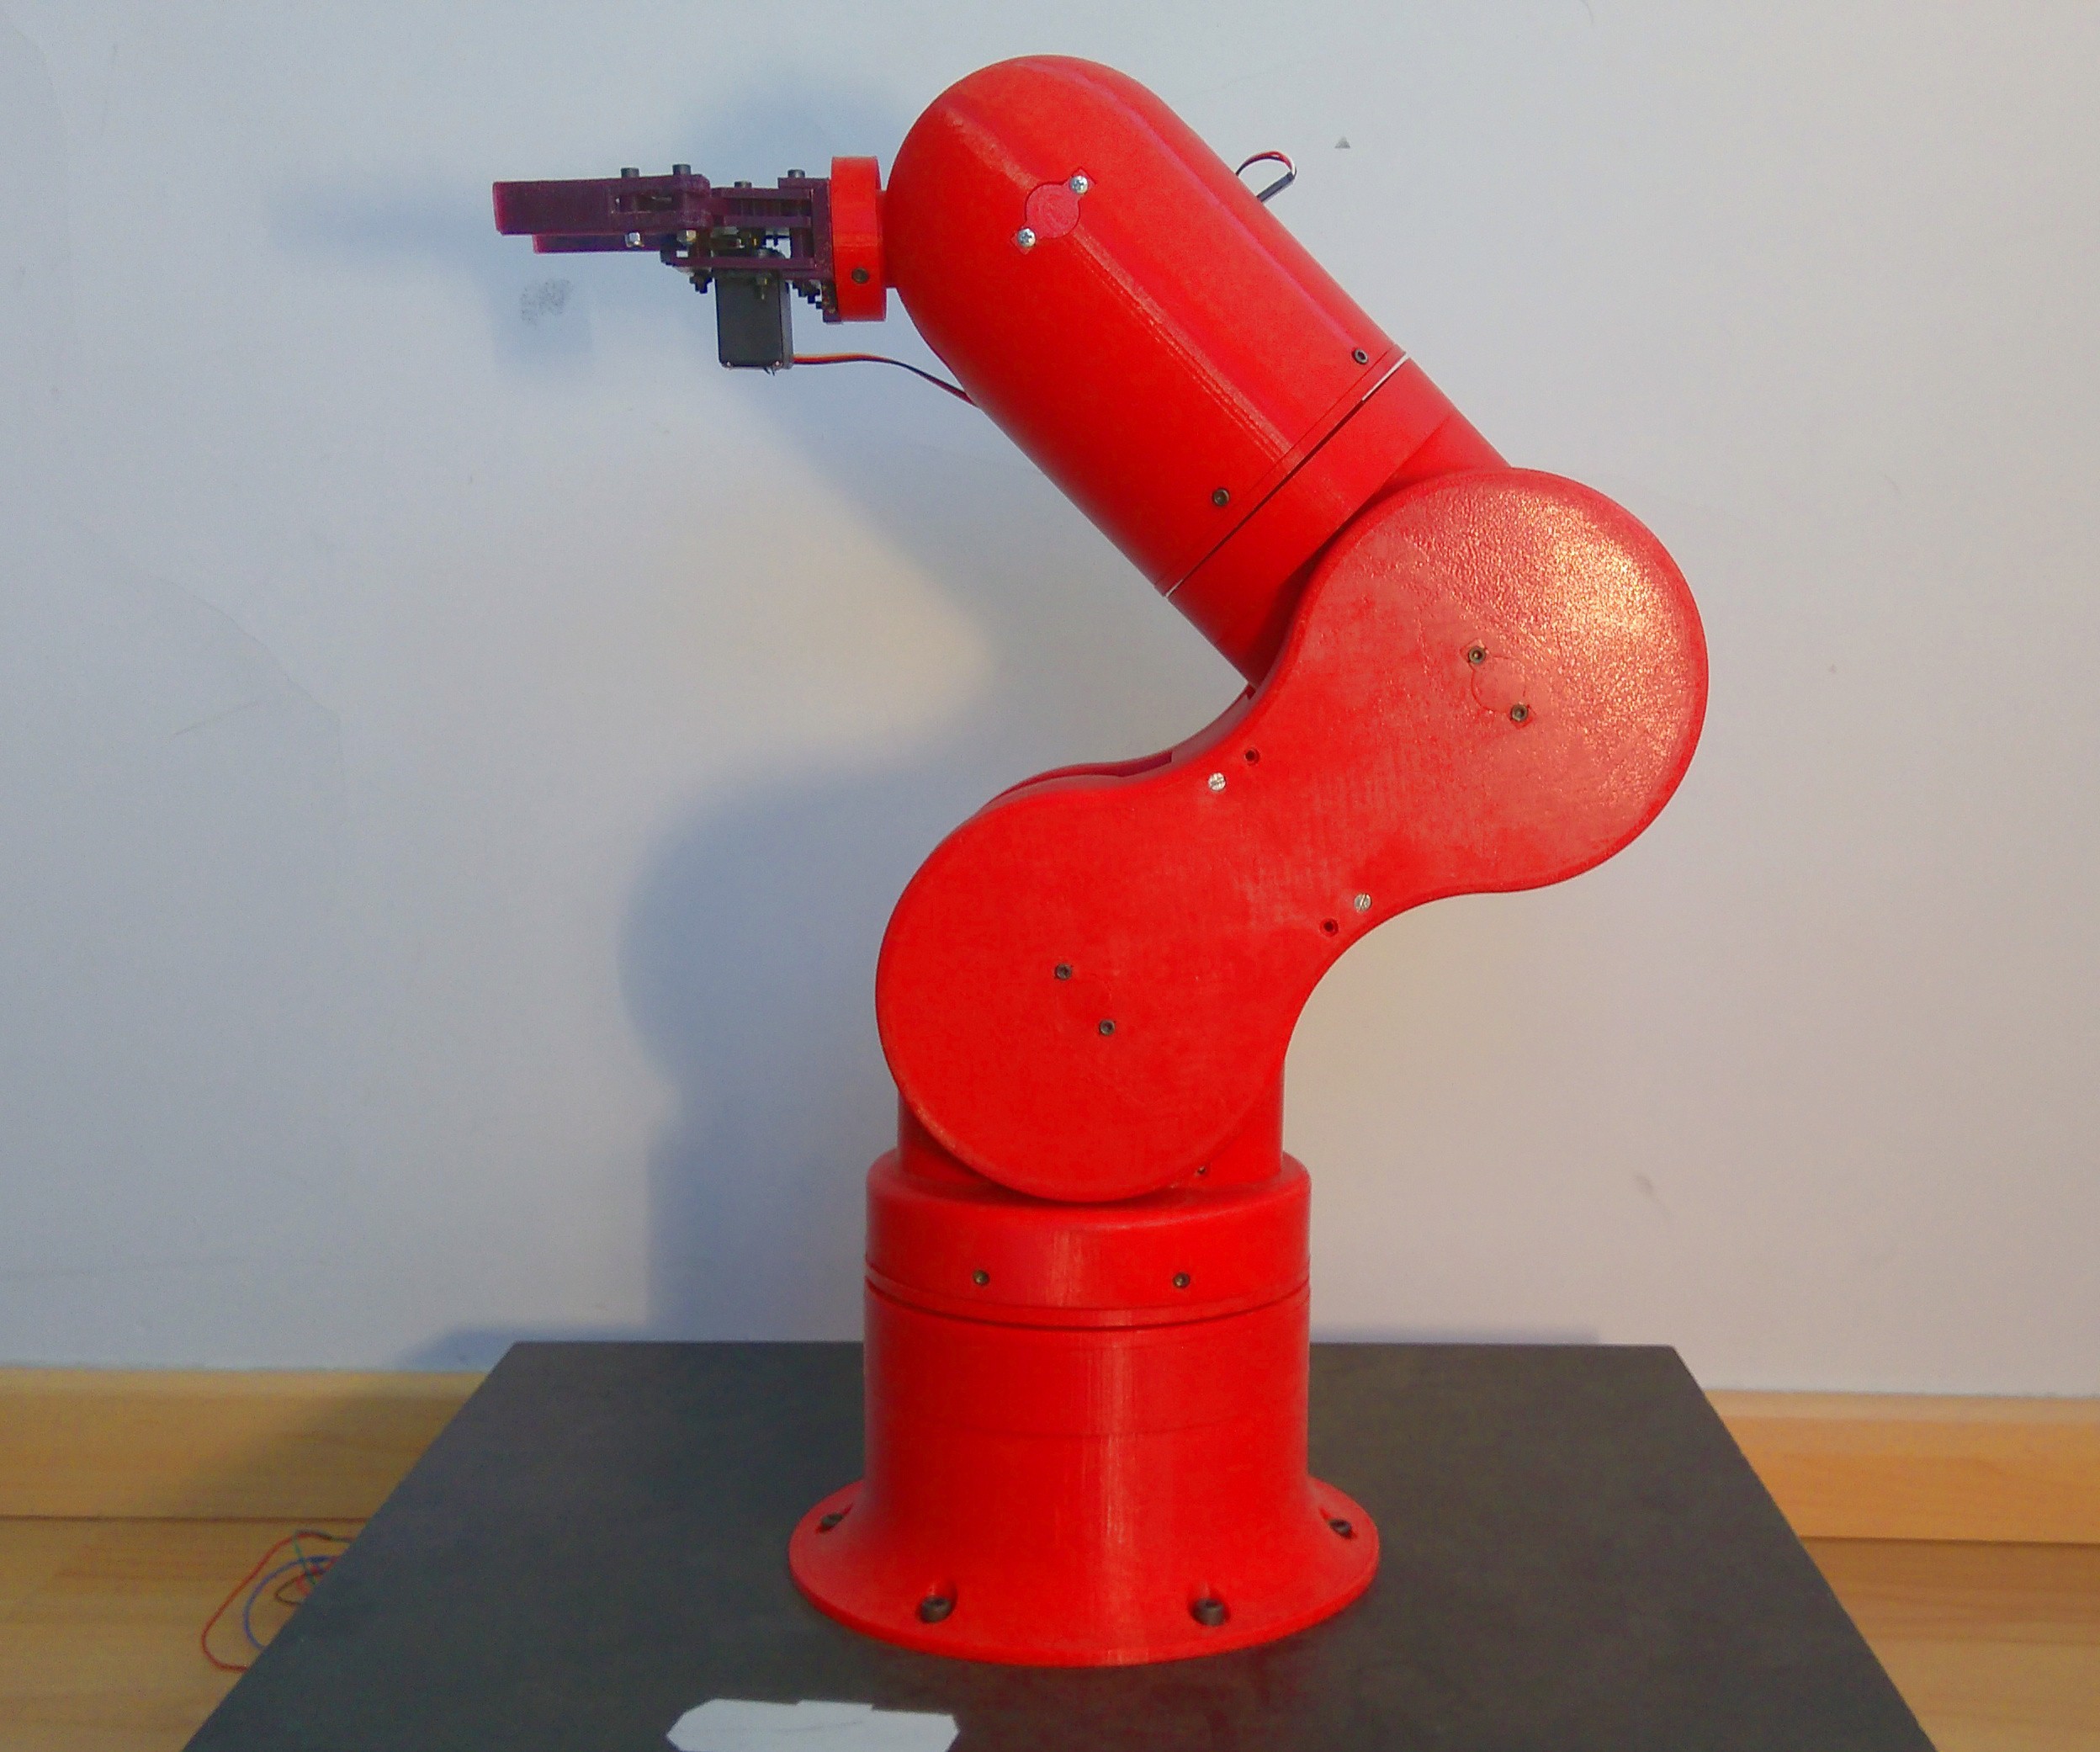
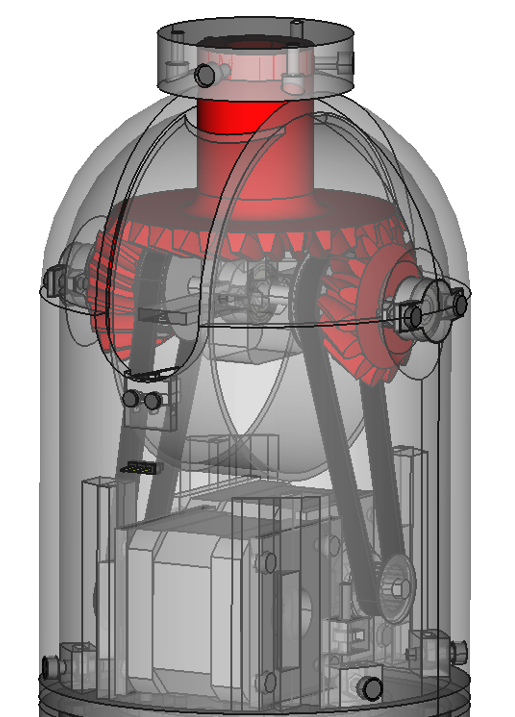
    The arm has six degrees of freedom using seven stepper motors, some of which are gear-reduced for greater torque. The design hides the internal mechanism: all the pulleys, belts and wiring are enclosed, making the whole project kid safe.

    Steppers are controlled by an Arduino Mega using a specially-designed 7-motor driver shield and pololu motor drivers. The system could probably also be driven by a couple of RAMPS boards, and the project logs talk about using a smoothie board to control 5 of the seven motors.

    Thor is 3-d printed plus hardware, and the entire kit looks like it would be perfect for learning about industrial robotics, solving a Rubik's cube, or perhaps stirring your tea.

    We've seen robotic arm projects on Hackaday before, including one made from cardboard.

    Check out the video of Thor in action after the break.

    Posted in Arduino Hacks, robots hacks

    Tagged ,