 Dylan Bleier
The goal of this project is to make a much cheaper Raspberry Pi 2 laptop with a much more usable keyboard.
0%
0%
$100 Raspberry Pi 2 laptop using a lapdock
The Pi-Top will run you $300. This project creates an equivalent product for 1/3 the cost by being resourceful with cheap hardware.
Become a Hackaday.io member
Already have an account? Log in.
Just one more thing
To make the experience fit your profile, pick a username and tell us what interests you.
Pick an awesome username
hackaday.io/
Your profile's URL: hackaday.io/username. Max 25 alphanumeric characters.
Pick a few interests
Projects that share your interests
People that share your interests


 ajlitt
 Raphael
 Torbjörn Lindholm
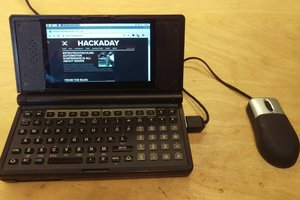
 Rune Kyndal
A Pinebook costs less than $100. It has a quad core A53 SBC. Good performance, no disassembly, no wiring required.