Close
0%
0%

plotly + Arduino + ESP8266

(Plotly has stopped support) A Wireless Real-time Data Logger/Grapher

Similar projects worth following
NOTE: Plotly no longer supports streaming on their free cloud service. This project will no longer work :(.I highly recommend you look at this project first, as it's a better solution - https://hackaday.io/project/5797-plotly-esp8266 . I was recently asked to create a wireless sensor node for which it's data can be real-time graphed. I came up with several different low cost solutions, all with pros and cons, and better suiting for different applications. Although some attempts weren't suitable for the task at hand, they were very suitable for other projects. So I have included this solution here.

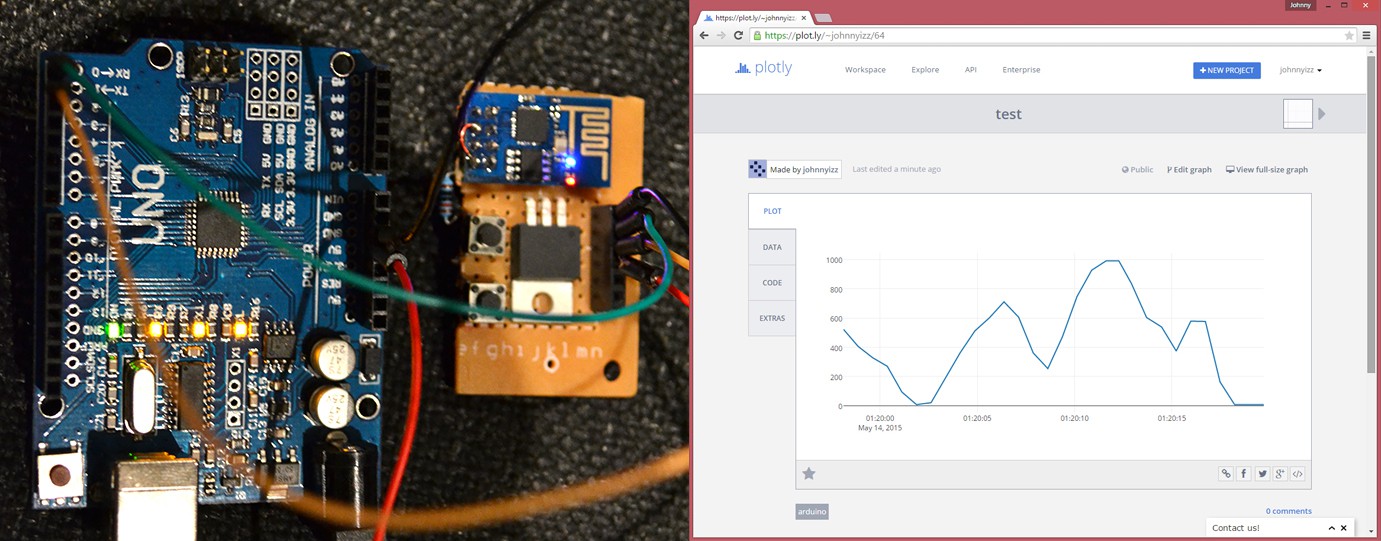
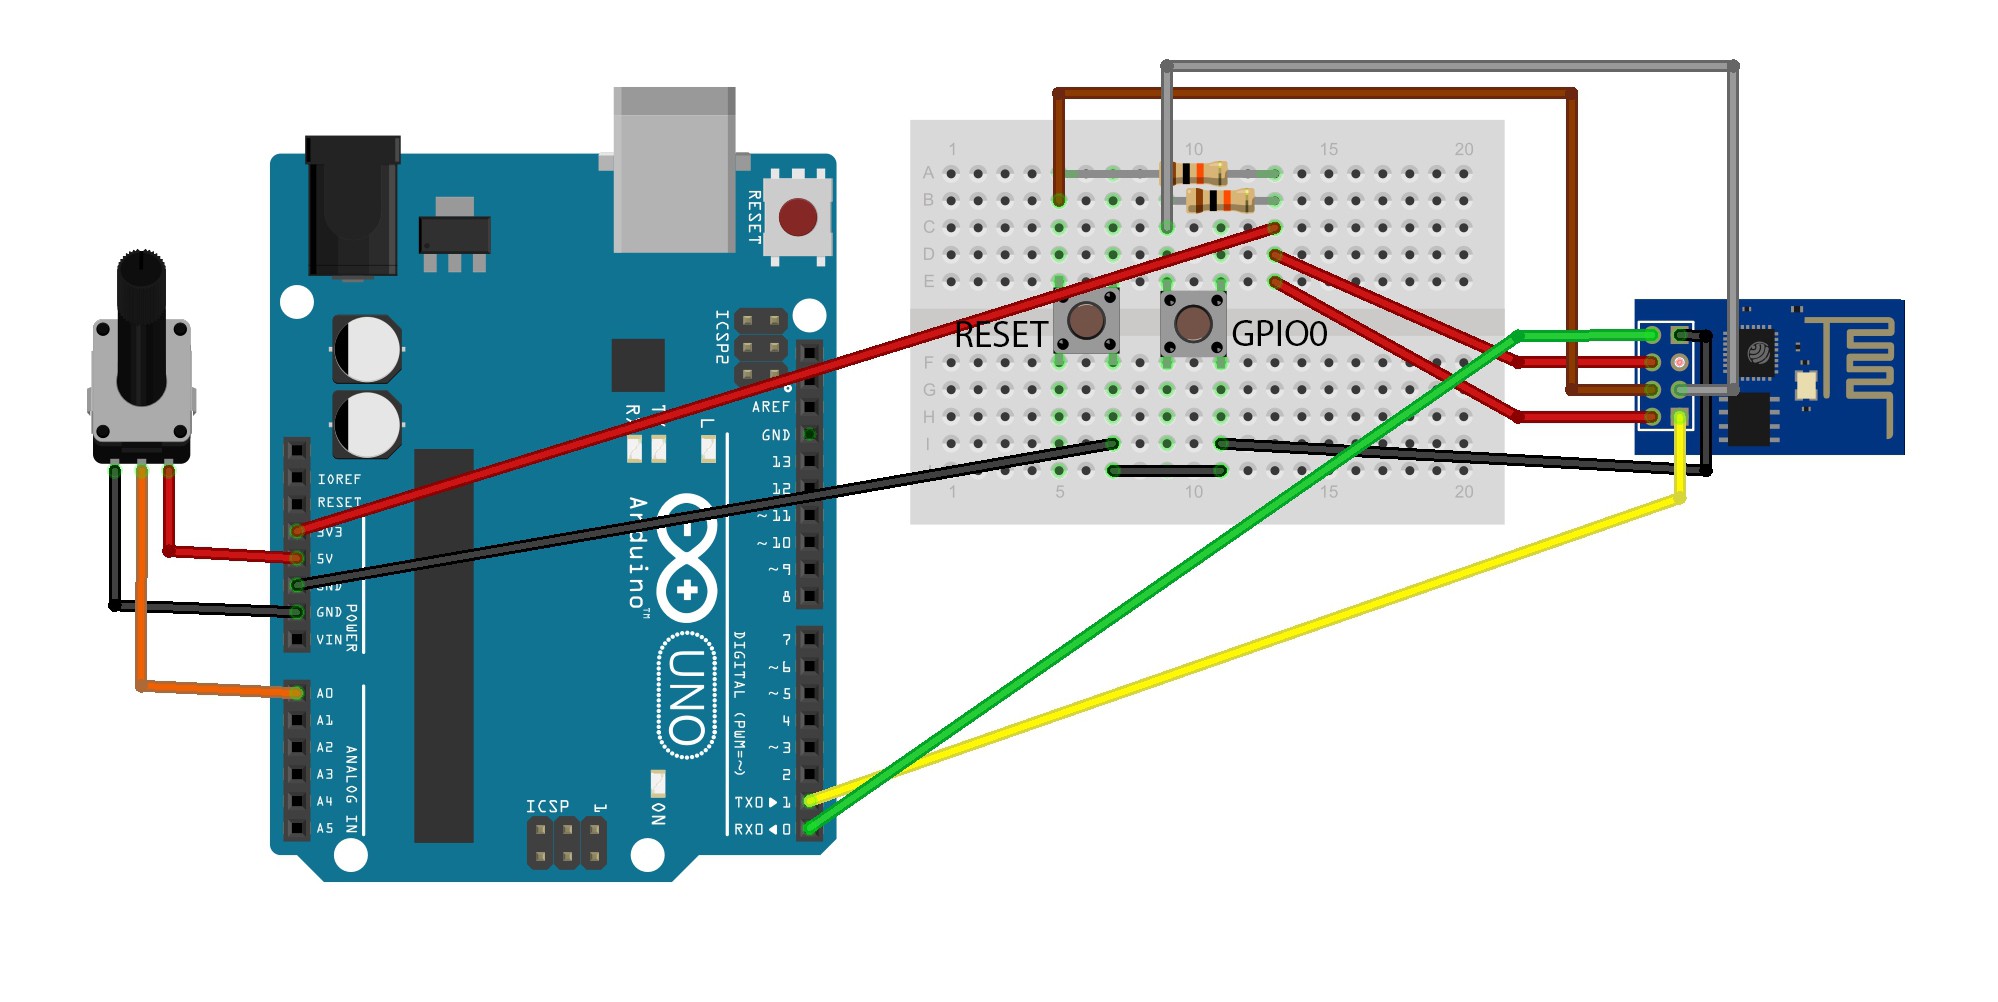
For this project I'm using an Arduino Uno with a ESP8266. I'm reading an ADC pin/pin's voltage on the Uno and wirelessly sending the data to plotly's server for real-time visualization. Plotly is a free online browser based tool for visualizing data, which also has a streaming feature for displaying your data in real-time. Plotly is great because any device that has a browser and is connected to the internet (smartphone, PC, tablet, etc) can see the real-time data. This is not a full professional solution I'm offering here, just a quick demonstration on how this can be done with these common cheap parts.

*I highly recommend you check out my other project, where I run similar code natively (no Arduino needed) on the ESP. It is much less work then this project.

I was helping out someone who wanted to send real-time data wirelessly to a smartphone/PC on a tight budget. I found this method of displaying real-time data to be useful. Even though we did not end up using this solution, I can see someone using this for a home weather station or something similar.

The Arduino Sketch

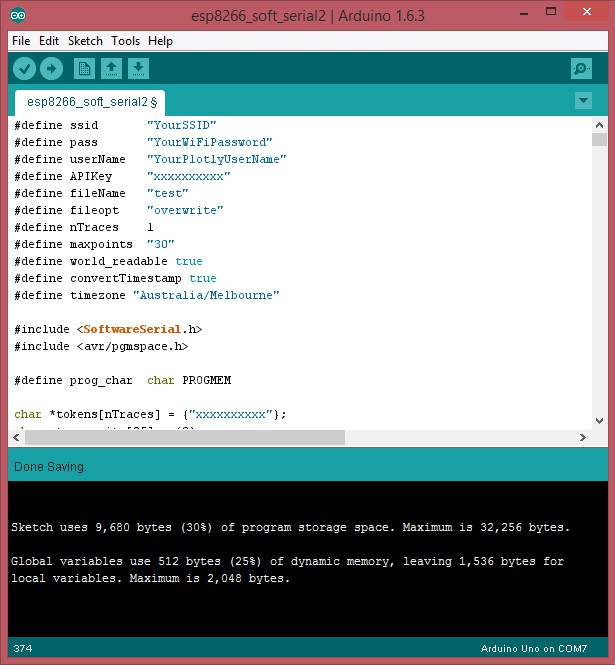
Here is my Arduino sketch. It is made for Arduino Uno/Pro Mini paired with a ESP8266 running the 0018000902-AI03 firmware (I have inlcuded the firmware bin file in the instructions section). Originally my code was development on an Arduino Due which has 96 KB of SRAM. This is plenty of SRAM to store the strings used in the original sketch, but because the Uno has only 2 KB of SRAM it's much wiser to store this in flash. This sketch compiles with 30% flash and 25% SRAM used!! Leaves plenty of room for more development. The code makes use of hardware UART (digital pins 0 & 1) to communicate to the ESP8266 and soft UART (digital pin 11) for debugging purposes.

#define ssid       "YourSSID"
#define pass       "YourWiFiPassword"
#define userName   "YourPlotlyUserName"
#define APIKey     "xxxxxxxxxx"
#define fileName   "test"
#define fileopt    "overwrite"
#define nTraces    2
#define maxpoints  "30"
#define world_readable true
#define convertTimestamp true
#define timezone "Australia/Melbourne"
#include <SoftwareSerial.h>
#include <avr/pgmspace.h>
#define prog_char  char PROGMEM
char *tokens[nTraces] = {"AAAAAAAAAA","BBBBBBBBBB"};
char stream_site[25] = {0};
SoftwareSerial mySerial(10, 11); // RX, TX
const PROGMEM  char  cmd_0[] = {"AT\r\n"};
const PROGMEM  char  cmd_1[] = {"ATE1\r\n"};
const PROGMEM  char  cmd_2[] = {"AT+CWMODE=1\r\n"};
const PROGMEM  char  cmd_3[] = {"AT+CIPMODE=0\r\n"};
const PROGMEM  char  cmd_4[] = {"AT+RST\r\n"};
const PROGMEM  char  cmd_5[] = {"AT+CIPMUX=1\r\n"};
const PROGMEM  char  cmd_6[] = {"AT+CWJAP=\""};
const PROGMEM  char  cmd_7[] = {"AT+CIPCLOSE=\""};
const PROGMEM  char  cmd_8[] = {"AT+CIPSTART=0,\"TCP\",\""};
const PROGMEM  char  cmd_9[] = {"AT+CIPSEND=0,"};
const PROGMEM  char  resp_0[] = {"OK"};
const PROGMEM  char  resp_1[] = {"ready"};
const PROGMEM  char  resp_2[] = {"no change"};
const PROGMEM  char  resp_3[] = {"CONNECT"};
const PROGMEM  char  resp_4[] = {"Unlink"};
const PROGMEM  char  resp_5[] = {"Linked"};
const PROGMEM  char  resp_6[] = {">"};
const PROGMEM  char  resp_7[] = {"~"};
const PROGMEM  char  error[] = {"*ERROR "};
const PROGMEM  char  error_0[] = {"0*"};
const PROGMEM  char  error_1[] = {"1*"};
const PROGMEM  char  error_2[] = {"2*"};
const PROGMEM  char  error_3[] = {"3*"};
const PROGMEM  char  error_4[] = {"4*"};
const PROGMEM  char  error_5[] = {"5*"};
const PROGMEM  char  error_6[] = {"6*"};
const PROGMEM  char  error_7[] = {"7*"};
const PROGMEM  char  error_8[] = {"8*"};
const PROGMEM  char  error_9[] = {"9*"};
const PROGMEM  char  error_10[] = {"10*"};
const PROGMEM  char  error_11[] = {"11*"};
const PROGMEM  char  error_12[] = {"12*"};
const PROGMEM  char  error_13[] = {"13*"};
const PROGMEM  char  error_14[] = {"14*"};
const PROGMEM  char  error_15[] = {"15*"};
const PROGMEM  char  error_16[] = {"16*"};
const PROGMEM  char  string_0[] = {"Initializing plot with Plot.ly server...\r\n"};
const PROGMEM  char  string_1[] = {"\",\""};
const PROGMEM  char  string_2[] = {"\""};
const PROGMEM  char string_3[] =...
Read more »

  • 1 × ESP8266-01
  • 1 × Arduino Uno/Pro Mini
  • 2 × 10K Resistors
  • 1 × Potentiometer
  • 2 × Momentary Buttons

View all 7 components

  • plotly's API Has Changed

    Johnny06/09/2016 at 14:13 0 comments

    I've updated the code to work with the current API (as of 11:42PM 9th June 2016).

    The code required "Content-Type: application/x-www-form-urlencoded\r\n" be placed in the POST header.

    POST /clientresp HTTP/1.1
    Host: plot.ly:80
    User-Agent: Arduino/0.6.0
    Content-Type: application/x-www-form-urlencoded
    Content-Length: 241
    
    version=2.3&origin=plot&platform=arduino&un=johnnyizz&key=xxxxxxxxxx&args=[{"y": [], "x": [], "type": "scatter", "stream": {"token": "xxxxxxxxxx", "maxpoints": 30}}]&kwargs={"fileopt": "overwrite", "filename": "test", "world_readable": true}
    

    The rest of the code remains untouched.

    The API has change since I first wrote my code, it is much more flexible now, so some other modifications can be made to make the code more simple.

    This type POST will now work: (Notice Content-Length doesn't need calculation!)

    POST /clientresp HTTP/1.1
    Host: plot.ly
    Content-Type: application/x-www-form-urlencoded
    
    version=2.3&origin=plot&platform=arduino&un=johnnyizz&key=xxxxxxxxxx&args=[{"y": [], "x": [], "type": "scatter", "stream": {"token": "xxxxxxxxxx", "maxpoints": 30}}]&kwargs={"fileopt": "overwrite", "filename": "test", "world_readable": true}
    

    Data can now also be sent as: (Notice JSON string length doesn't need calculating!)

    POST  HTTP/1.1
    Host: arduino.plot.ly
    
    {"x": 1234, "y": 1234, "streamtoken": "xxxxxxxxxx"}
    
    or
    POST  HTTP/1.1
    Host: stream.plot.ly
    plotly-streamtoken: xxxxxxxxxx
    
    {"x": 1234, "y": 1234}
    

    A following "\r\n0\r\n\r\n" (as seen in the my code) will close the connection (you will need to resend the header) or 60 seconds of the server not receiving a '\n'. If the connection doesn't close, subsequent data (e.g. "{"x": 1234, "y": 1234}\n") can be sent.

  • City Strings Accepted Following "plotly-convertTimestamp:"

    Johnny08/25/2015 at 05:53 0 comments

    https://github.com/plotly/arduino-api/blob/master/Accepted%20Timezone%20Strings.txt

    "Africa/Abidjan",
    "Africa/Accra",
    "Africa/Addis_Ababa",
    "Africa/Algiers",
    "Africa/Asmara",
    "Africa/Bamako",
    "Africa/Bangui",
    "Africa/Banjul",
    "Africa/Bissau",
    "Africa/Blantyre",
    "Africa/Brazzaville",
    "Africa/Bujumbura",
    "Africa/Cairo",
    "Africa/Casablanca",
    "Africa/Ceuta",
    "Africa/Conakry",
    "Africa/Dakar",
    "Africa/Dar_es_Salaam",
    "Africa/Djibouti",
    "Africa/Douala",
    "Africa/El_Aaiun",
    "Africa/Freetown",
    "Africa/Gaborone",
    "Africa/Harare",
    "Africa/Johannesburg",
    "Africa/Juba",
    "Africa/Kampala",
    "Africa/Khartoum",
    "Africa/Kigali",
    "Africa/Kinshasa",
    "Africa/Lagos",
    "Africa/Libreville",
    "Africa/Lome",
    "Africa/Luanda",
    "Africa/Lubumbashi",
    "Africa/Lusaka",
    "Africa/Malabo",
    "Africa/Maputo",
    "Africa/Maseru",
    "Africa/Mbabane",
    "Africa/Mogadishu",
    "Africa/Monrovia",
    "Africa/Nairobi",
    "Africa/Ndjamena",
    "Africa/Niamey",
    "Africa/Nouakchott",
    "Africa/Ouagadougou",
    "Africa/Porto-Novo",
    "Africa/Sao_Tome",
    "Africa/Tripoli",
    "Africa/Tunis",
    "Africa/Windhoek",
    "America/Adak",
    "America/Anchorage",
    "America/Anguilla",
    "America/Antigua",
    "America/Araguaina",
    "America/Argentina/Buenos_Aires",
    "America/Argentina/Catamarca",
    "America/Argentina/Cordoba",
    "America/Argentina/Jujuy",
    "America/Argentina/La_Rioja",
    "America/Argentina/Mendoza",
    "America/Argentina/Rio_Gallegos",
    "America/Argentina/Salta",
    "America/Argentina/San_Juan",
    "America/Argentina/San_Luis",
    "America/Argentina/Tucuman",
    "America/Argentina/Ushuaia",
    "America/Aruba",
    "America/Asuncion",
    "America/Atikokan",
    "America/Bahia",
    "America/Bahia_Banderas",
    "America/Barbados",
    "America/Belem",
    "America/Belize",
    "America/Blanc-Sablon",
    "America/Boa_Vista",
    "America/Bogota",
    "America/Boise",
    "America/Cambridge_Bay",
    "America/Campo_Grande",
    "America/Cancun",
    "America/Caracas",
    "America/Cayenne",
    "America/Cayman",
    "America/Chicago",
    "America/Chihuahua",
    "America/Costa_Rica",
    "America/Creston",
    "America/Cuiaba",
    "America/Curacao",
    "America/Danmarkshavn",
    "America/Dawson",
    "America/Dawson_Creek",
    "America/Denver",
    "America/Detroit",
    "America/Dominica",
    "America/Edmonton",
    "America/Eirunepe",
    "America/El_Salvador",
    "America/Fortaleza",
    "America/Glace_Bay",
    "America/Godthab",
    "America/Goose_Bay",
    "America/Grand_Turk",
    "America/Grenada",
    "America/Guadeloupe",
    "America/Guatemala",
    "America/Guayaquil",
    "America/Guyana",
    "America/Halifax",
    "America/Havana",
    "America/Hermosillo",
    "America/Indiana/Indianapolis",
    "America/Indiana/Knox",
    "America/Indiana/Marengo",
    "America/Indiana/Petersburg",
    "America/Indiana/Tell_City",
    "America/Indiana/Vevay",
    "America/Indiana/Vincennes",
    "America/Indiana/Winamac",
    "America/Inuvik",
    "America/Iqaluit",
    "America/Jamaica",
    "America/Juneau",
    "America/Kentucky/Louisville",
    "America/Kentucky/Monticello",
    "America/Kralendijk",
    "America/La_Paz",
    "America/Lima",
    "America/Los_Angeles",
    "America/Lower_Princes",
    "America/Maceio",
    "America/Managua",
    "America/Manaus",
    "America/Marigot",
    "America/Martinique",
    "America/Matamoros",
    "America/Mazatlan",
    "America/Menominee",
    "America/Merida",
    "America/Metlakatla",
    "America/Mexico_City",
    "America/Miquelon",
    "America/Moncton",
    "America/Monterrey",
    "America/Montevideo",
    "America/Montreal",
    "America/Montserrat",
    "America/Nassau",
    "America/New_York",
    "America/Nipigon",
    "America/Nome",
    "America/Noronha",
    "America/North_Dakota/Beulah",
    "America/North_Dakota/Center",
    "America/North_Dakota/New_Salem",
    "America/Ojinaga",
    "America/Panama",
    "America/Pangnirtung",
    "America/Paramaribo",
    "America/Phoenix",
    "America/Port-au-Prince",
    "America/Port_of_Spain",
    "America/Porto_Velho",
    "America/Puerto_Rico",
    "America/Rainy_River",
    "America/Rankin_Inlet",
    "America/Recife",
    "America/Regina",
    "America/Resolute",
    "America/Rio_Branco",
    "America/Santa_Isabel",
    "America/Santarem",
    "America/Santiago",
    "America/Santo_Domingo",
    "America/Sao_Paulo",
    "America/Scoresbysund",
    "America/Shiprock",
    "America/Sitka",
    "America/St_Barthelemy",
    "America/St_Johns",
    "America/St_Kitts",
    "America/St_Lucia",
    "America/St_Thomas",
    ...
    Read more »

  • Speaking to PLOTLY

    Johnny05/06/2015 at 03:46 0 comments

    1. First step is to create a plotly account and go to your setting and generate a token. Write down your username, api-key, and streaming token. This information needs to be added to the arduino code.

    2. Your microcontroller needs to talk to the "plot.ly" server to initialize and create your data file and prepare it for receiving data. To do this firstly your arduino will need to connect to the "plot.ly" server using the ESP8266. The AT command looks like this:

    AT+CIPSTART=0,"TCP","plot.ly",8

    Followed by a send command with the post length (formula code seen below). In this example "336":

    AT+CIPSEND=0,336
    

    Then a POST request is sent to the "plot.ly" server as follows:

    POST /clientresp HTTP/1.1
    Host: plot.ly:80
    User-Agent: Arduino/0.6.0
    Content-Type: application/x-www-form-urlencoded
    Content-Length: 241
    
    version=2.3&origin=plot&platform=arduino&un=johnnyizz&key=xxxxxxxxxx&args=[{"y": [], "x": [], "type": "scatter", "stream": {"token": "xxxxxxxxxx", "maxpoints": 30}}]&kwargs={"fileopt": "overwrite", "filename": "test", "world_readable": true}
    

    Then finally you disconnect:

    AT+CIPCLOSE="0"

    This has created your file.

    *note that your own user name (I used "johnnyizz"), api-key and token will be inserted here, and your own filename and graph settings. Therefore the calculated "Content-Length" will be different for you (the formula code for calculating this can be seen below). Also multiple stream tokens can be used for more graphs.

    unsigned int contentLength = 126 + strlen(userName) + strlen(fileopt) + nTraces*(87+strlen(maxpoints)) + (nTraces - 1)*2 + strlen(fileName);
    if(world_readable){
        contentLength += 4;
    }
    else{
      contentLength += 5;
    }
      
    String contentLengthString = String(contentLength);
    const char* contentLengthConstString = contentLengthString.c_str();
      
    unsigned int postLength = contentLength + 94 + strlen(contentLengthConstString);

    3. Once the file has been created in your account, we connect to the "arduino.plot.ly" server which will receive our data in jason form. Notice that the data is linked to your stream token. The following is the POST requests for sending data:

    POST / HTTP/1.1
    Host: arduino.plot.ly
    User-Agent: Arduino
    Transfer-Encoding: chunked
    Connection: close
    plotly-convertTimestamp: "Australia/Melbourne"
    
    0x34
    {"x": 1234, "y": 1234, "streamtoken": "xxxxxxxxxx"}
    
    0


    Here we can choose the time-stamp for our location (mine is "Australia/Melbourne"), the x and y data that's being sent, and our stream token.

    Note that the "0x34" above the jason string represents the length of characters making the jason string in hexadecimal.

    The following string equals 44 characters:

    string = "{/"x/": , /"y/": , /"streamtoken/": /"xxxxxxxxxx/"}/n";

    44 + length of 'x' data + length of 'y' data = 52. Converted to hex is 0x34 (see the formula code below).

    Each time you send data, you repeat this.

    Finally, don't forget to use this formula for calculating the post length:

    String xString = String(x);
    String yString = String(y);
      
    const char* xConstString = xString.c_str();
    const char* yConstString = yString.c_str();
      
    unsigned int jasonLength = 44 + strlen(xConstString) +  strlen(yConstString);
    String jasonLengthString = String(jasonLength, HEX);
      
    const char* ConstJasonLengthString = jasonLengthString.c_str();
    unsigned int postLength = 167 + strlen(ConstJasonLengthString) + jasonLength;

View all 3 project logs

  • 1
    Step 1

    Connect your arduino Uno to the ESP8266 as followes:

  • 2
    Step 2

    Visit the Plotly website and sign up. After that, go to your settings page, and generate a streaming token. Now write down your Username, API Key, and Token.

  • 3
    Step 3

    Open the Arduino IDE. Past in the code I have included in my project details section, add your own WiFi SSID and Password, plotly username, API key and token into the code and save.

View all 6 instructions

Enjoy this project?

Share

Discussions

ru4mj12 wrote 07/17/2016 at 23:22 point

I'm getting the "All Streams Go" and the url to the chart, but the streaming data isn't plotting.   i.e.

34
{"x": 7645, "y": 5000, "streamtoken": "2m5iq5n4ve"}

I tried using wireshark to capture the traffic, but not very familiar with how to parse or see why it's not plotting 

https://www.cloudshark.org/captures/ba50fba66815   (192.168.137.40)

Any idea how to format the capture to see what is causing the issue?

Thanks!

  Are you sure? yes | no

maryam.maqbool wrote 06/26/2016 at 19:17 point

I am very new to this stuff, so kindly cooperate with me. I have copied the whole code above and pasted in my arduino version (1.6.8) have placed my username, api , tokens , ssid and password. when i upload the code and open the serial monitor i only see written AT and nothing else..can u please tell where i am doing the mistake?

  Are you sure? yes | no

Daniel Solano wrote 06/15/2016 at 19:39 point

Hi Johnny,

Why does it stop sending data after a time? Does it have a limit or how does that work? I want it to run "endlessly".

Also, if I want to plot two values (A0 and A1), how do I do it? I tried increasing the nTraces and using plotly_plot(millis(),analogRead(A1),tokens[1]); but without success.

  Are you sure? yes | no

Johnny wrote 06/18/2016 at 05:00 point

Hey Daniel,

This code isn't the full solution, I made something simple to try out plotly and I uploaded it to hackaday in case anyone was interested in how to talk to plotly. The reason it stops and doesn't continue is because the connection was lost and in the error detection sections of code, there has been no code written to recover the connection. That could be an interesting task for you. Hint: the ESP8266 will say "link is not" if you try to send something and you are not connected.

To send multiple traces:

#define nTraces    2 // As you have already done

char *tokens[nTraces] = {"aaaaaaaaaa","bbbbbbbbbb"}; // Add a second streaming token (written as "bbbbbbbbbb" in this example)

In your loop, do something like this:

void loop() {
  mySerial.println("Reading ADC...");
  int val = analogRead(0);
  int val2 = analogRead(1);
  mySerial.println("Sending Jason...");
  long time_ms = millis();
  plotly_plot(time_ms,val,tokens[0]);
  plotly_plot(time_ms,val2,tokens[1]);
}

Hope that helps.

Johnny.

  Are you sure? yes | no

Johnny wrote 06/18/2016 at 05:09 point

also, give this a read, https://plot.ly/streaming/

  Are you sure? yes | no

Daniel Solano wrote 06/27/2016 at 19:35 point

Thanks a lot Johnny, the code works great, we were having trouble before getting your help. Thanks a lot.

Just a last thing; it has a time lag, for example, you started at 9 am and in  while it is measures minutes ahead; if we check at 10am it says 10:05 am. Can you help us ?

  Are you sure? yes | no

umesh patil wrote 04/22/2016 at 07:37 point

Hello johnny

I am using your entire code as it is with simple modifications as per my connections. I am happy to say that i can go up to ERROR 13 successfully. But i am unable to get response as ~ after polt.ly initialization. What is wrong with this? 

  Are you sure? yes | no

Johnny wrote 06/09/2016 at 14:23 point

Hi Umesh, 

Sorry I missed your comment. I worked out the issue. Plotly's API had changed from when I was first playing around with this. The code has now been updated and I can verify it's now working.

Let me know how you go.

Johnny.

  Are you sure? yes | no

Daniel Solano wrote 06/10/2016 at 17:58 point

I´m having the same problem and even with the updated code it can´t get the response needed.

  Are you sure? yes | no

Johnny wrote 06/11/2016 at 15:22 point

Sorry Daniel, I found the error. The code should work now.

Johnny.

  Are you sure? yes | no

Daniel Solano wrote 06/14/2016 at 18:34 point

It keeps skipping this if and going directly into the else and its infinite loop:

if(find_resp(7,error_13)){                     // find "~"

Thanks a lot for the quick response, Johnny!

  Are you sure? yes | no

Johnny wrote 06/14/2016 at 22:18 point

try and monitoring the response from plotly to verify your credentials are correct. Just need a serial adapter, and connect the Rx pin and ground to the esp8266s TX and ground. Another option is downloading the chrome app "postman" and manually talking to plotlys server. Make sure to copy the same firmware to your esp-01 and copy the code word for word, but change ssid, password, username, apikey and token.

  Are you sure? yes | no

Daniel Solano wrote 06/15/2016 at 19:29 point

I found my problem, I had misspelled my APIkey. Now works just fine.

Thanks a lot, Johnny

  Are you sure? yes | no

kiave91 wrote 08/24/2015 at 17:16 point

Hi Johnny, thank you for the code you shared. It's exactly what i needed.. It took to me few minutes to make it working, just copy/paste.. But :) I realized that if you change the timezone the program upload just one data point and then no more. I think Adi has the same problem, as you can see he changed the timezone to "Australia/Hobart". I don't know why this happened i tried many ways to solve it out but i've still the same issue. Could you try to put in your program a different timezone and see what happens? Thanks Nic.

  Are you sure? yes | no

Johnny wrote 08/25/2015 at 05:40 point

Hey Nic, I'm glad my code has been useful :). That's a good observation (the timestamp issue). I found a list for the accepted timestamps. Grab yours from the list and see if it works. https://github.com/plotly/arduino-api/blob/master/Accepted Timezone Strings.txt . If Adi has the same issue, I guess he could always use "Australia/Melbourne", it's the same timezone.

Thanks for bringing that up.

Johnny

  Are you sure? yes | no

Adi wrote 08/26/2015 at 09:31 point

Hi Johnny and Nic,

Thank you for that information. I will try it again, I did not get much time to try get the application running. I had to switch to DFrobot Beetle (Leonardo compatible) because it is a smaller board, which is what I need for my project. But I guess the timezone makes sense, I will try it soon again with Uno and see what happens. I briefly tried the code with the Beetle, and nothing happened. The serial seems to be a little bit different with Leonardo-type boards. I got something very basic running with ThingSpeak, but I don't like it because it updates every 15 seconds only and I need it to be a bit more real-time, like your application. Will be in touch.

Adi

  Are you sure? yes | no

Adi wrote 08/26/2015 at 09:56 point

It works now! Thanks!

  Are you sure? yes | no

Adi wrote 08/21/2015 at 17:20 point

Hi Johnny, 

Thank you for replying back so quickly and helping out. It seems to work now! :) Had a old FTDI board from year 2002/2003 (:-/). Seems to still work fine sending AT commands etc. Now, the plot seems to be generated but with only one point on it...I did not have a variable pot, so I connected an old function generator with a sine wave of 0.5Hz frequency, 1 Volt peak to peak amplitude and 2 V DC offset to emulate to pot. The terminals were connected to A0 on Uno and GND. At this point it seems to send one data point to the website and that's it...this is the last section of the serial monitor output...:

....

etc

....

POST / HTTP/1.1
Host: arduino.plot.ly
User-Agent: Arduino
Transfer-Encoding: chunked
Connection: close
plotly-convertTimestamp: "Australia/Hobart"


33
{"x": 9289, "y": 591, "streamtoken": "nk72l91wsn"}

0

AT+CIPSEND=0,221 

That's how far I got .. now just need to figure out why it does not stream (?)

Thanks again for your help, now it seems it's moving forward.

Cheers,

Adi

  Are you sure? yes | no

Johnny wrote 08/22/2015 at 11:24 point

Awesome, that's a great start! Just need to closely monitor the RX and TX lines to see what doesn't add up. One thing that can freeze it is if too much or not enough is sent in posts (content length). Too little will not get through and too much will cause an error. But if you've directly copied my code, it shouldn't be a problem. Bit hard to say what went wrong without all the data. Was that one data point the correct value?

  Are you sure? yes | no

Johnny wrote 08/25/2015 at 05:46 point

Nic brought up a interesting problem, please check if when the timestamp conversion is put back to "Australia/Melbourne" that the problem still exists. Here's a list of possible time stamps https://github.com/plotly/arduino-api/blob/master/Accepted Timezone Strings.txt . It appears "Australia/Hobart" is in the list, but something to try anyway

Johnny.

  Are you sure? yes | no

Adi wrote 08/21/2015 at 15:38 point

Hi Johnny, 

Great post! I have been immediately trying to implement your project, but for some reason I got stuck, as there is no plot output on plotly. Basically, I have flashed the ESP with the firmware that you recommend. Then I have connected the board as shown in the diagram. Have created an account with plotly and have inserted all required information into the code such as SSID, pass, username, APIkey, token etc. Then have uploaded the sketch to Arduino Uno while ESP is disconnected. Then I powered up the Arduino again with ESP drawing power from the Arduino which should reset and synch both. When I go to the plotly website to search for the plot ... I get a message that there are no plots yet generated. Do I need to manually type the commands in the serial monitor to generate the plot file or does the uploaded code do this automatically? I also do not get anything printed on the serial monitor apart from 'AT'. That is all I see output on the serial monitor. I was hoping that, based on your experience, you might be able to tell if I am missing something, or doing something wrong (?)...I am still learning how to program Arduinos etc. Any suggestions are most appreciated. 

Regards,

Adi

  Are you sure? yes | no

Johnny wrote 08/21/2015 at 16:29 point

Hi Adi,

Good to hear you're getting into Arduino :).

Sounds like your ESP might not be receiving your commands, as it didn't respond to "AT". Something to try. Do you have a serial terminal program like coolterm, and a usb to serial adapter? If so, try talking to the ESP directly. You may find your ESP's baudrate is different to what the ardioino's talking on. If you don't have a usb to serial converter, do a quick google search how to hook up a arduino uno as one. Find out if the ESP is using 9600 or 115200 or something different. Then use the "AT+ CIOBAUD=9600" to change it to the correct baud rate. Because you flashed it with my firmware I'm not sure if this could be the problem, but it's always a good idea to try manually talking to a device over UART first as a test.

Let me know how you go, Johnny

  Are you sure? yes | no

Adi wrote 08/26/2015 at 09:55 point

Hey just tried it. It works now! Thank you! Next step is to see if I can port it to the Beetle (Leonardo). 

  Are you sure? yes | no

[deleted]

[this comment has been deleted]

Johnny wrote 07/11/2015 at 23:42 point

Hey Adrian, 

1. yeah I stated which firmware the code works with, as I noticed different firmwares had different responses to AT commands. The firmware I put a link to is the one the code works with.

2. I packaged the hex files (4 hex files) into one hex file for convenience. Just need to upload one hex file at address 0x0. Makes it much easier. 

No worries mate, not only does it help others,  documenting like this is very useful for me when I need to come back to and remember how I did something. So helps others and me as well :). Cheers mate, you enjoy your weekend too. 

Johnny. 

  Are you sure? yes | no

[deleted]

[this comment has been deleted]

Johnny wrote 06/20/2015 at 05:48 point

That's awesome! Well done! No problem. Sounds like your weekends already been great ;). Cheers mate. 

John. 

  Are you sure? yes | no

Johnny wrote 06/18/2015 at 01:55 point

Hey Adrian, thanks man, you too. When fiddling the other day, I thing I may have found an error in my code, but didn't bother my ESP firmware, still sent message to server. The last things that's sent in the plotly_init function "serial.println("}");", I think should be "serial.print("}");" (removes carriage return and line feed, that's 2 bytes less). I'll have to verify this. What I'll do soon after the new code is written, I'll write a tutorial on flashing new firmware and include the firmware bin file that's in my ESP so code will work for everyone. Maybe I should also update the code for the latest firmware release. I'll get back to you on this. 

Johnny. 

  Are you sure? yes | no

Johnny wrote 06/14/2015 at 22:16 point

Thanks for bringing up your troubles. Interesting problem, I'm going to try replicate this later today. If you like, you could remove all the debug code and sent all the AT commands through the hardware serial. See if your code works. Using a mega is a good idea.

Cheers, Johnny.

  Are you sure? yes | no

[deleted]

[this comment has been deleted]

Johnny wrote 06/17/2015 at 07:26 point

I've been really busy lately sorry, so I haven't had much of a chance to change the code. I'll rewrite the code for ATMEGA328P (UNO, Pro Mini). The code works 100% for ESP8266 running 0018000902-AI03 firmware paired with Arduino Due. Check your firmware version is the same by "AT+GMR". The responses from the ESP8266 will be different for different versions (e.g. AT_0.21.0.0 SDK_0.9.5 replys "OK" instead of "Linked" & "Unlinked"). To quickly try out commands, I highly recomend Firat's program here on hackaday_io https://hackaday.io/project/3568-esp8266-test-program.

To get it up and running quick, use hardware UART to speak to ESP, and use soft UART to debug. If you don't have any luck, I should upload new code and tutorial soon, so hopefully that will help.

Good luck,

Johnny.

  Are you sure? yes | no

[deleted]

[this comment has been deleted]

Johnny wrote 06/17/2015 at 07:33 point

Regarding soft serial I haven't seen this issue, It's really interesting though. I tried soft serial replacement last night and worked ok at 4800baud. I have seen it miss responses before, but this is because soft serial is not full duplex like hardware serial (can only transmit or receive at one time). For that reason I think soft serial should be used for debug and hardware for talking to the ESP.

  Are you sure? yes | no

Similar Projects

Does this project spark your interest?

Become a member to follow this project and never miss any updates