Close
0%
0%

Tetris on Duinomite board with LCD4884 shield

Demo of controlling graphic LCD from user application under RetroBSD

Similar projects worth following
Duinomite is an Arduino compatible board, produced by Olimex, based on PIC32 microcontroller. With RetroBSD operating system installed, it becomes a tiny self contained development system.

LCD4884 shield has monochrome graphic display with 84x48 resolution and SPI interface (from Nokia 3110 phone) and a 5-position digital joystick, polled via analog pin.

This demo shows how to create a non-trivial user application with a simple user interface.

RetroBSD can run on a variety of boards (see Unix on your breadboard), but if you need an Arduino form factor - Duinomite is definitely a good choice.

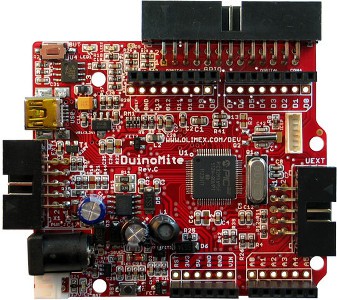
For technical details, see page: https://github.com/RetroBSD/retrobsd/wiki/Board-Olimex-Duinomite

LCD4884 shield is a pretty easy way to add a simple GUI interface to your Arduino project. The shield is available from SainSmart and Amazon; a few clones exist on Ebay.

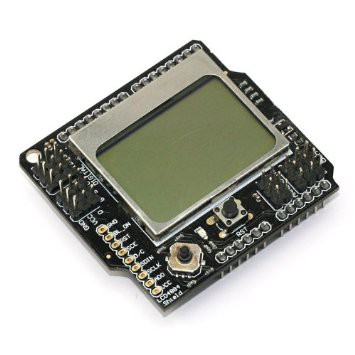
LCD part of the shield works fine with both 5V and 3.3V boards. Joystick needs some modification to make it 3.3V compatible:

  • Cut off 5V pin on the Arduino power connector (on the bottom side).
  • Solder 5V pin to 3.3V pin on the Arduino power connector (on top of the board).

Signals of LCD shield are connected to PIC32 microcontroller as shown in the table:

SignalFunctionPIC32
D2SPI_SCKRE2
D3SPI_MOSIRE3
D4LCD_DCRE4
D5SPI_CSRE5
D6LCD_RSTRE6
D7LCD_BLRE7
A0KEY_INRB3

SPi interface is compatible with Philips PCD8544 (data sheet).

Joystick buttons are connected to a series network of resistors: GND -- 3.3k -- 1k -- 620 -- 330 -- 2k -- VCC. See schematics here (PDF). When one of buttons is pressed, output voltage is defined by resistor divider:

Joystick positionDivisorVoltage at A0
Left00V
Select0.33 / (2 + 0.33)0.47V
Down(0.33 + 0.62) / (2 + 0.33 + 0.62)1.06V
Right(0.33 + 0.62 + 1) / (2 + 0.33 + 0.62 + 1)1.63V
Up(0.33 + 0.62 + 1 + 3.3) / (2 + 0.33 + 0.62 + 1 + 3.3)2.39V
Idle13.3V

View project log

  • 1
    Step 1

    To build and run the LCD demo, follow these steps.

    Download the binary RetroBSD package for Duinomite from here: retrobsd-duinomite-2015-05-23.zip

    Alternatively, you can build everything from sources. Follow instructions on page: install

  • 2
    Step 2

    Transfer the Unix kernel on to the Duinomite. Connect the board via microUSB cable to your computer. To enter a bootloader mode, press the BUT button first, hold it, then press the RST button. Green and yellow LEDs will now flash and your Duinomite board is ready to accept new code. Use pic32prog utility to program the flash code.

    Use proper binary for your operating system (included into above retrobsd-duinomite-2015-05-23.zip package):

    • pic32prog.exe -- for Windows
    • linux32/pic32prog -- for 32-bit Linux
    • linux64/pic32prog -- for 64-bit Linux
    • macos/pic32prog -- for Mac OS X.

    Unpack the package, go to retrobsd-duinomite-g228 directory and run command (say, for 64-bit Linux):

    linux64/pic32prog unix.hex

    For Windows, it should be like:

    pic32prog unix.hex

    On Mac OS X:

    macosx/pic32prog unix.hex

    You should see:

    Programmer for Microchip PIC32 microcontrollers, Version 1.112
        Copyright: (C) 2011-2014 Serge Vakulenko
          Adapter: HID Bootloader
     Program area: 1d003000-1d07ffff
        Processor: Bootloader
     Flash memory: 500 kbytes
             Data: 148744 bytes
            Erase: done
    Program flash: ##################################### done
     Verify flash: ##################################### done
    Rate: 16432 bytes per second
    

    Perfect! You have installed RetroBSD on your Duinomite board.

    Press RST button to restart the board. Green and yellow LEDs will stop flashing. Now the kernel is ready for console connection via USB.

  • 3
    Step 3

    Now transfer the filesystem image sdcard.img on to a SD card using a USB-to-SD reader. On Windows, use Win32DiskImager utility. On Linux or Mac OS X, run:

    sudo dd bs=32k if=sdcard.img of=/dev/XYZ

    where XYZ is a name of SD card on your computer (use lsblk or "diskutil list" to obtain).

    Once that is done remove the SD card from card reader and plug it into your Duinomite's SD slot. Your RetroBSD system is ready to run.

View all 5 instructions

Enjoy this project?

Share

Discussions

Similar Projects

Does this project spark your interest?

Become a member to follow this project and never miss any updates