Close
0%
0%

Amazon Echo Voice Command Automation

Yes! You can now have "Alexa" do what you want, when you want, by using a Raspberry Pi.

Similar projects worth following
By modifying the Echo controller, you can have "Alexa" notify you when you have mail, tell you your news without asking for it, play some music when it's time for a break.

The possibilities are endless! Well, not endless, they are limited by what Echo can do.

Check out the video to see it in action!

Phase 2
=======

I plan on figuring out how to bypass the MEMs microphone and have a RPi Zero talk directly to the ES305 voice processor via I2S.

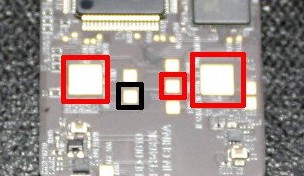
  • Echo remote control was disassembled and power rails identified using a digital multi-meter.
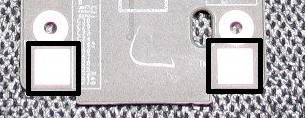
  • Tactile switch membrane was pulled back from the microphone/command contacts and a piece of wax paper was placed underneath in order to preserve the membrane's adhesive.
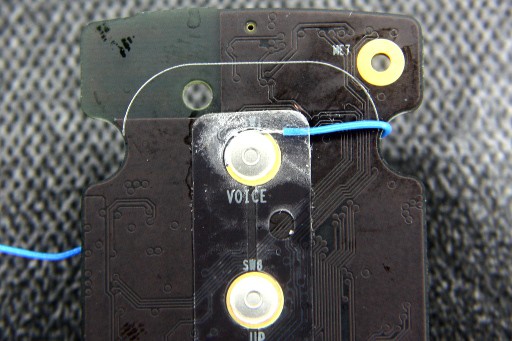
  • Some wire-wrap wire was soldered onto the outer contact of the microphone/command switch after it was identified to be the one going to the main micro-controller on the back side of the board.
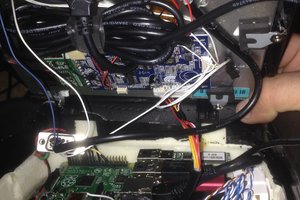
  • Standard right-angle headers where used as SMD headers (since I ran out of actual SMD headers) where soldered onto the test pads in the back in order to supply power and ground to the controller board.
  • Since the controller is powered with 2x AAA batteries, a 3v3 regulator was used to power the controller.
  • Tactile switches connect the outer switch contact to a 1v8 rail, so we use a simple 1/2 voltage divider for the RPi's GPIO in order to trigger the switch safely.
  • A script is used to toggle the RPi's GPIO HIGH and LOW before and after espeak reads out the voice command.

  • 1 × Amazon Echo The subject.
  • 1 × Raspberry Pi The brains.
  • 1 × Amazon Echo Controller The Interface.
  • 1 × 3v3 Voltage Regulator Used to power controller.
  • 2 × 100 Ohm Resistors Used for voltage divider.

  • 1
    Step 1

    Attach a 3v3 power supply to any of the V+ (red) pads shown in the tare down image below.

  • 2
    Step 2

    Attach common ground between your Raspberry Pi and one of the GND (black) pads shown.

  • 3
    Step 3

    Solder a wire to the outer ring of the voice button contacts.

View all 5 instructions

Enjoy this project?

Share

Discussions

jesusis4cody wrote 11/03/2018 at 18:41 point

I wanna use it

  Are you sure? yes | no

Harrison wrote 11/27/2016 at 03:30 point

Did you ever implement Phase 2?

  Are you sure? yes | no

jason_panko wrote 07/20/2016 at 17:53 point
Guillermo -Questions about the details on the wire setup and breadboard. Can you provide a detailed list of the parts plugged into the board? Not the list of instructions on Hackaday.io. Need to get
the voltage regulator and the resistors on Amazon and don't know what
to get. A diagram or even just some close up pics of the wired board
would be awesome!

  Are you sure? yes | no

gamaral wrote 07/24/2016 at 05:34 point

There's an easier way to go about it that I found. I need to document it though, but I don't have time ATM. Keep watching the project and I'll update it as soon as I get a chance to finish working on it. :)

  Are you sure? yes | no

jason_panko wrote 08/29/2016 at 21:04 point

So, can you tell us about the easier way that you found? What about some of those close up pics of the wired board? I've been working on the code to manage some of the stereo equipment and want to add the voice part as soon as I can.

  Are you sure? yes | no

chown wrote 01/09/2017 at 19:36 point

So then just share the current way? Where are you getting power for the remote itself? The components only say a 3V3 regulator but yet the instructions say a 3V3 power supply. Are you actually using a 3V3 power supply since the 3V3 on the RPI GPIO doesn't output enough mA? Your instructions are very vague and unhelpful for someone trying to complete this project.

  Are you sure? yes | no

Graham Toal wrote 07/16/2016 at 21:34 point

Guillermo - I bought a second Echo remote during Prime Day while they were discounted, with the intention of duplicating your project (one remote for normal use, one for hacking with the RPi...).  Unfortunately when I received it, there is a note in the instructions which says that only one remote can be paired with an Echo at any time!  Did you just give up manual use of your remote or did you find a way around this problem?  Is it possible perhaps to clone one remote with the other?

Thanks - Graham.

PS It was your project which inspired me to create this: http://www.instructables.com/id/Control-Any-Remote-From-a-Raspberry-Pi-and-Amazon-/

  Are you sure? yes | no

michael.shnitzer wrote 05/25/2016 at 23:00 point

It appears that all models of Raspberry Pi have a 3.3 volt GPIO pin on pin 1.  Is there a reason to use a 3.3V regulator rather than the output of this pin to power the remote?

  Are you sure? yes | no

gamaral wrote 05/25/2016 at 23:16 point

Those are for logic only,  50ma max for all 3v3 pins. I would not advice it. :)

  Are you sure? yes | no

gamaral wrote 01/10/2016 at 23:35 point

The idea was to automate it; Have it run 'X' command at certain times of the day, stuff like that. The "Simon Says" bit in the video was just for kicks.

  Are you sure? yes | no

Graham Toal wrote 01/10/2016 at 23:30 point

have you tried connecting to the Echo over bluetooth as an audio device from the Pi, to push announcements to the speaker without having to go through voice recognition and "simon says" to echo what it thinks you want to say?

  Are you sure? yes | no

ranger aziz wrote 09/01/2015 at 18:52 point

how you connected wire to Raspberry Pi from Echo controller 

  Are you sure? yes | no

Similar Projects

Does this project spark your interest?

Become a member to follow this project and never miss any updates