 David Prutchi
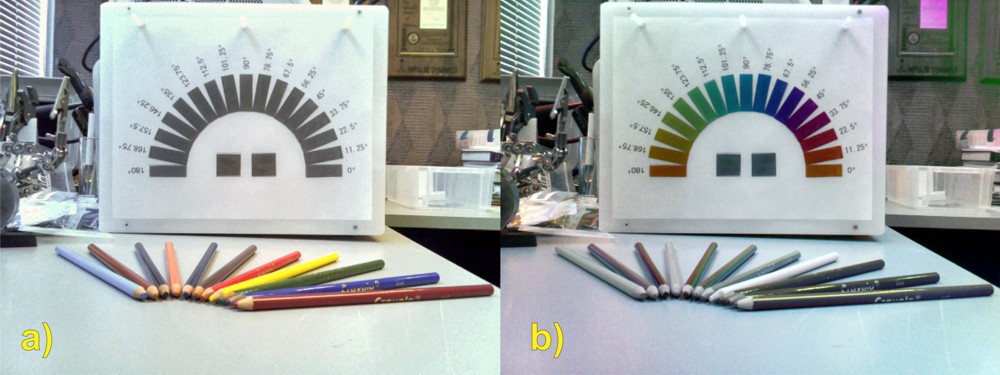
This (picture at right) is a sample image obtained through DOLPi-Mech (linear analysis only, using pictures acquired with analyzer set at 0, 90, and 45 degrees).
The picture on the left is unfiltered (RasPi camera looking through open slot in filter wheel), while the picture on the right is produced by assigning the 0 degree grayscale image to the Red channel, the 90 degree grayscale to Blue, and the 45 degree grayscale to Green.
The sample target is made of polarizing film set at the angles shown. The two bottom squares are circular polarizers. (one LHCP and the other RHCP). We can't tell the difference between the polarizer films because our vision is not sensitive to polarization (to any practical degree), and neither is the RasPi's camera sensor.
Please note that colors in the picture of the right have nothing to do with the actual color of the object, but instead encode the Angle of Polarization. Pure gray tones in the polarimetric image mean that light is unpolarized. Some of the coloring pencils and other stuff in the background shows in color because they partially polarize reflected light as a function of their material, texture, and angle of reflection.
Here is the Python code for the simplest DOLPi-Mech (mechanical filter-wheel, not LCP-based) polarimetric camera:
# DOLPiMech.py
#
# This Python program demonstrates the DOLPi_Mech polarimetric camera.
#
# A servo motor rotates a polarization filter wheel in front of the
# Raspberry Pi camera. An Adafruit PWM Servo HAT drives the servo.
#
# (c) 2015 David Prutchi, Ph.D., licensed under MIT license
# (MIT, opensource.org/licenses/MIT)
#
#
#import the necessary packages
from picamera.array import PiRGBArray
from picamera import PiCamera
import time
import cv2
from Adafruit_PWM_Servo_Driver import PWM
import numpy as np
# Initialise the Adafruit PWM HAT using the default address
pwm = PWM(0x40)
pwm.setPWMFreq(60) # Set PWM frequency to 60 Hz
servoMin = 150 # Min pulse length out of 4096
servoMax = 615 # Max pulse length out of 4096
servoNone = 615 # PWM setting for open window
servo0=540 # PWM setting for 0 degree filter
servo90=465 # PWM setting for 90 degree filter
servo45=390 # PWM setting for 45 degree filter
# PWM setting function
def setServoPulse(channel, pulse):
pulseLength = 1000000 # 1,000,000 us per second
pulseLength /= 60 # 60 Hz
print "%d us per period" % pulseLength
pulseLength /= 4096 # 12 bits of resolution
print "%d us per bit" % pulseLength
pulse *= 1000
pulse /= pulseLength
pwm.setPWM(channel, 0, pulse)
# Rotate filter wheel back and forth to check all is OK
pwm.setPWM(0, 0, servoMin)
time.sleep(1)
pwm.setPWM(0, 0, servoMax)
time.sleep(1)
#Raspberry Pi Camera Initialization
#----------------------------------
#Initialize the camera and grab a reference to the raw camera capture
camera = PiCamera()
camera.resolution = (640, 480)
#camera.resolution = (1280,720)
camera.framerate=30
rawCapture = PiRGBArray(camera)
camera.led=False
#Auto-Exposure Lock
#------------------
# Wait for the automatic gain control to settle
time.sleep(2)
# Now fix the values
camera.shutter_speed = camera.exposure_speed
camera.exposure_mode = 'off'
gain = camera.awb_gains
camera.awb_mode = 'off'
camera.awb_gains = gain
#Initialize flags
loop=True #Initial state of loop flag
first=True #Flag to skip display during first loop
video=False #Use video port? Video is faster, but image quality is significantly
#lower than using still-image capture
while loop:
#grab an image from the camera at 0 degrees
pwm.setPWM(0, 0, servo0)
time.sleep(0.1) #Wait for filter wheel to moves
rawCapture.truncate(0)
camera.capture(rawCapture, format="bgr",use_video_port=video)
image0 = rawCapture.array
# Select one of the two methods of color to grayscale conversion:
# Blue channel gives better polarization information because wavelengt
# range is limited
# True grayscale conversion gives better gray balance for non-polarized light
#R=image0[:,:,1] #Use blue channel
R=cv2.cvtColor(image0,cv2.COLOR_BGR2GRAY) #True grayscale conversion
#grab an image from the camera at 90 degrees
pwm.setPWM(0, 0, servo90)
time.sleep(0.1)
rawCapture.truncate(0)
camera.capture(rawCapture, format="bgr",use_video_port=video)
image90 = rawCapture.array
# Select one of the two methods of color to grayscale conversion:
# Blue channel gives better polarization information because wavelengt
# range is limited
# True grayscale conversion gives better gray balance for non-polarized light
#B=image90[:,:,1] #Use blue channel
B=cv2.cvtColor(image90,cv2.COLOR_BGR2GRAY) #True grayscale conversion
#grab an image from the camera at 45 degrees
pwm.setPWM(0, 0, servo45)
time.sleep(0.1)
rawCapture.truncate(0)
camera.capture(rawCapture, format="bgr",use_video_port=video)
image45 = rawCapture.array
# Select one of the two methods of color to grayscale conversion:
# Blue channel gives better polarization information because wavelengt
# range is limited
# True grayscale conversion gives better gray balance for non-polarized light
#G=image45[:,:,1] #Use blue channel
G=cv2.cvtColor(image45,cv2.COLOR_BGR2GRAY) #True grayscale conversion
imageDOLPi=cv2.merge([B,G,R])
cv2.imshow("Image_DOLPi",imageDOLPi) #Display DOLP image
#cv2.imshow("Image_DOLPi",cv2.resize(imageDOLPi,(320,240),interpolation=cv2.INTER_AREA)) #Display DOLP image
k = cv2.waitKey(1) #Check keyboard for input
if k == ord('x'): # wait for x key to exit
loop=False
# Prepare to leave
# ----------------
#
# Take a "normal" picture
pwm.setPWM(0, 0, servoNone)
time.sleep(0.2)
rawCapture.truncate(0)
camera.capture(rawCapture, format="bgr",use_video_port=video)
imagenone = rawCapture.array
cv2.imwrite("imagenone.jpg",imagenone)
cv2.imwrite("image0.jpg",image0)
cv2.imwrite("image90.jpg",image90)
cv2.imwrite("image45.jpg",image45)
cv2.imwrite("RGBpol.jpg",cv2.merge([B,G,R]))
cv2.imwrite("image0g.jpg",R)
cv2.imwrite("image90g.jpg",G)
cv2.imwrite("image45g.jpg",B)
cv2.destroyAllWindows()
quit
Discussions
Become a Hackaday.io Member
Create an account to leave a comment. Already have an account? Log In.