 RoGeorge
How it works
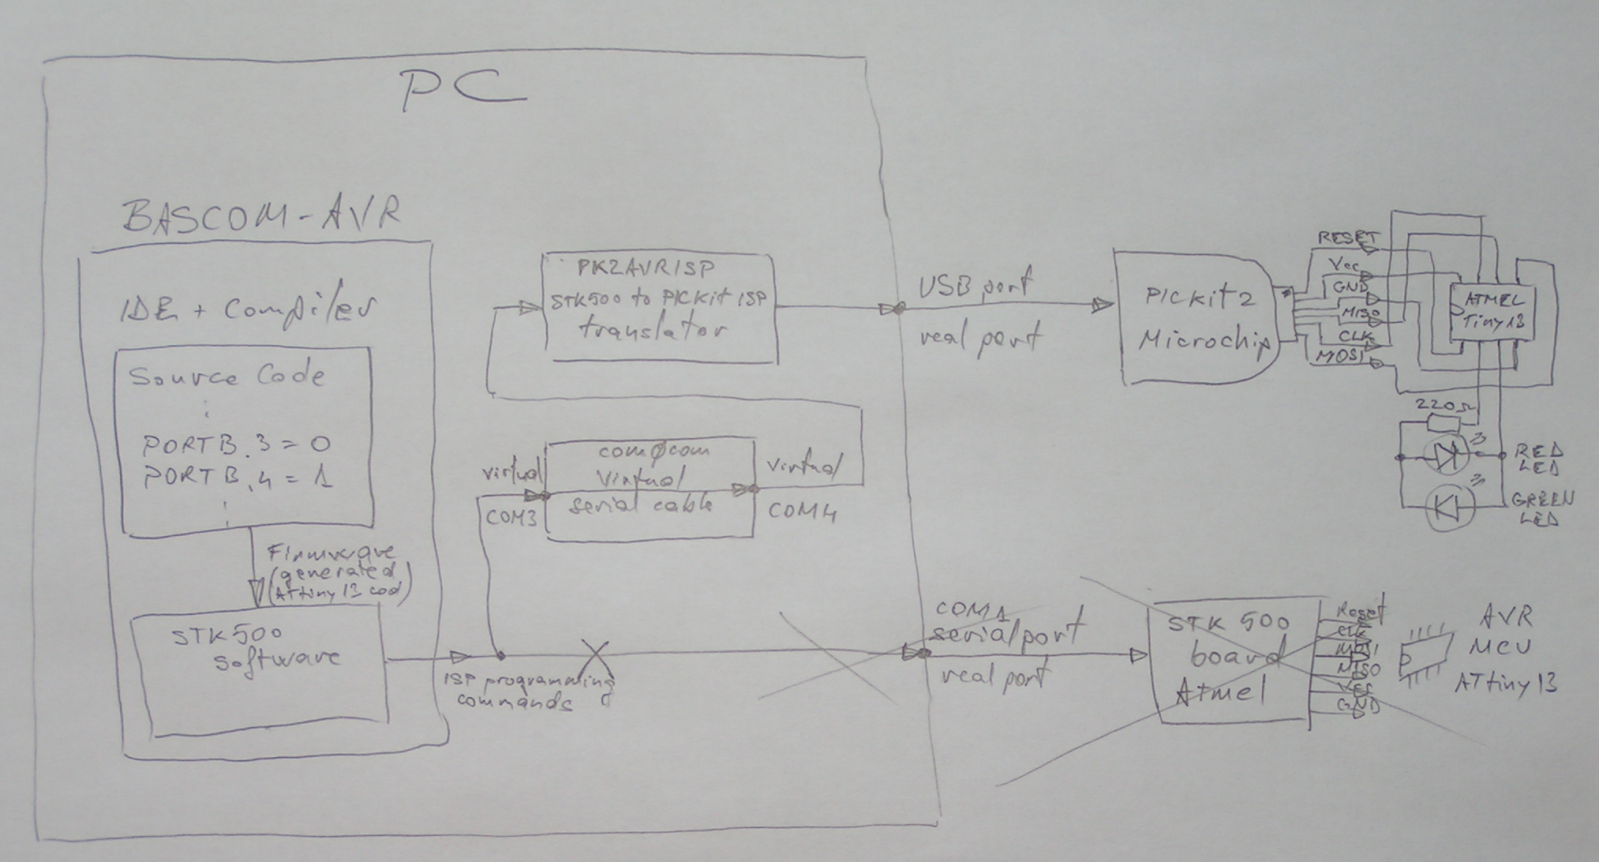
In a normal data flow, when we have the physical STK500 programmer board, the microcontroller code (firmware) produced by the compiler is sent to STK500 software. The STK500 software will produce ISP commands for the STK500 board, and will transmit those commands through physical serial port COM1, to the STK500 board. Based on the received ISP commands, the STK500 board will produce the MISO/MOSI/CLK pulses required to program the Atmel microcontroller.
In order to use a PICkit instead of a STK500 board, we will hijack the ISP commands. We will trick the STK500 software to send the ISP commands to our virtual COM3 port instead of the real COM1 port.
From the virtual port COM3, the ISP commands will travel through a virtual cable inside of the com0com software, and will arrive to virtual COM4.
At the virtual COM4 we will connect another software, PK2AVRISP, which is in fact an ISP commands translator. PK2AVRISP will translate the STK500 ISP commands into PICkit commands. From here, the PICkit commands will travel through a real USB port, and the commands will arrive to PICkit 2.
PICkit will execute these translated commands into MOSI/MISO/CLK pulses necessary to program our Atmel microcontroller.
Download software components
- Go to http://sourceforge.net/projects/com0com/ and download 'com0com-3.0.0.0-i386-and-x64-unsigned.zip'
- Download PK2AVRISP.exe (by kcsoft) from http://www.mediafire.com/download/12jmtmynhgw/PK2AVRISP.zip
- Download free BASCOM-AVR from http://www.mcselec.com/index.php?option=com_docman&task=doc_download&gid=139
Install downloaded software
1. Install BASCOM-AVR
BASCOM-AVR is an IDE that allows to write programs in BASIC language and compile them for AVR microcontrollers like ATtiny13, ATmega8, MEGA328 (last two also used in Arduino boards) and other Atmel MCUs. BASCOM-AVR is a copyrighted commercial program created by MCS Electronics company. MCS Electronics offer a free BASCOM-AVR Demo version for hobby, educational and noncommercial use. This version is limited to less then 4K of compiled code. Usually, 4k is enough for noncommercial use. If you need more, you can buy the unlimited version.
Unzip downloaded file 'bcavrdmo.zip', then run 'setupdemo.exe'. Follow the installer instructions
2. Unzip PK2AVRISP.zip
PK2AVRISP is a program that will intercept the ISP programming commands destined to STK500 AVR programmer, and will translate them into commands for PICkit programmer. This way, we can later use an PICkit 2 programmer instead of a STK500 programmer. PK2AVRISP is free (but not open), and it was written by kcsoft.
Just extract the 'PK2AVRISP.exe' from the 'PK2AVRISP.zip', it does not need an installation.
3. Install com0com
com0com is an open source software that can create pairs of virtual COM ports linked together, written by vfrolov (Vyacheslav Frolov). com0com will be used to redirect all ISP commands from the IDE to the PK2AVRISP.exe translator.
To install com0com is a little tricky, because the virtual COM ports drivers are not digitally signed for Windows. com0com can be used without problems with Windows XP, but for newest Windows flavors, like Windows 7, we need to disable the digital signature enforcement for drivers. The most easy way to do this is by restarting Windows and boot into disabled enforcement mode.
Restart your computer, and during the computer restart continuously pump the F8 key until you arrive to the following boot screen:

Using Up and Down keyboard arrows, highlight the entry "Disable Driver Signature Enforcement", then press Enter to boot into disabled enforcement mode.
This mode will stay active only until the next Windows restart. Please remember to boot into this mode each time you need to use com0com.
Now we can start installing com0com:
- Unzip 'com0com-3.0.0.0-i386-and-x64-unsigned.zip'
- Right click on 'setup.exe' and run it as Administrator
- At the step 'Select components to install:', uncheck the last two lines:
CNCA0 <-> CNCB0
COM# <-> COM# - At the Windows Security warning dialogue, allow the drivers to install.
Software and Hardware Setup
1. Create the virtual COM paired ports
- Click on Windows Start -> All Programs -> com0com -> Setup Command Prompt
- At the setup window type
busynames com* - Choose 2 unused com ports numbers (2 numbers that were NOT listed by the 'busynames'). I.e. for my computer, ports COM3 and COM4 were not listed by the 'busynames' command, so I pick them to be the virtual paired ports. NOTE: avoid port numbers too big. Some programs can access only COM ports less then 10, other programs can access only ports COM1 to COM4.
- It is recommended to use ports in range COM1 to COM4.
- If all of them are busy, this is usually because some unused drivers are keeping the names COM1...COM4 busy
- To remove unused drivers, open a Command Prompt as Administrator, and type
- SET DEVMGR_SHOW_NONPRESENT_DEVICES=1
- devmgmt.msc
- The Device Manager GUI will open
- In the Device Manager window check 'View -> Show hidden devices'
- Now you should be able to see all unused drivers as grayed out
- Right click on the grayed out device that you want to remove (i.e. COM3 and COM4) and click Uninstall
- In the setup window already opened at the beginning, type:
install PortName=COM3 PortName=COM4
By now, you should have a pair of virtual serial ports, COM3 and COM4, linked together with a virtual serial cable. To test them, open two terminals (e.g. two instances of PuTTY) and connect one to COM3 and the other to COM4. What you type in COM3 should be seen in COM4 and vice-versa. Connection speed and other handshake parameters of the serial communication doesn't matter for this two virtual ports. You can now close both terminals (both PuTTY instances), this was just to test that com0com was proper installed and setup.
There is also a GUI setup, you can start it from Start -> All Programs -> com0com -> Setup. My setup is looking like this:

2. Setup BASCOM-AVR to use STK500 and virtual COM3
- Open BASCOM from Start -> All Programs -> MCS Electronics -BASCOM-AVR -> BASCOM-AVR
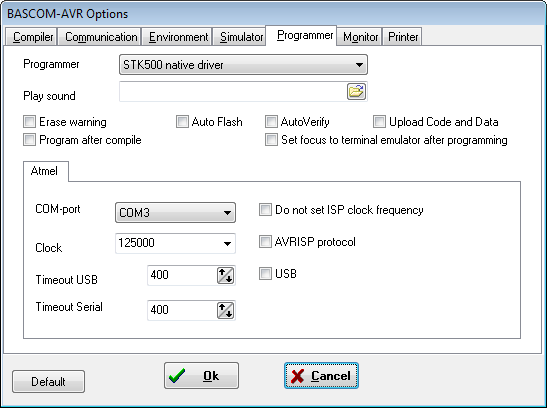
- In BASCOM-AVR go to Options -> Programmer choose 'STK500 native driver', 'COM3', timeout '400', then click 'OK'.
3. Setup PK2AVRISP.exe
- Connect your PICkit 2 programmer to a USB port (no Microchip drivers necessary)
- Double click on PK2AVRISP.exe. If the PICkit programmer was detected successfully by the translator, then in the PK2AVRISP window you should see "PicKit2 found. FW version..."
- For the PK2AVRISP, set the serial port to COM4
- LEAVE THE PK2AVRISP.exe WINDOW OPEN. If you close it, you close the translator.
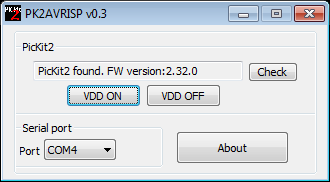
You can minimize it, but DO NOT CLOSE PK2AVRISP.exe
4. Connect the PICkit 2 programmer to an Atmel microcontrolle
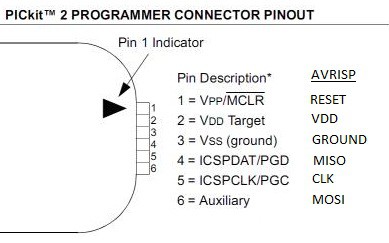

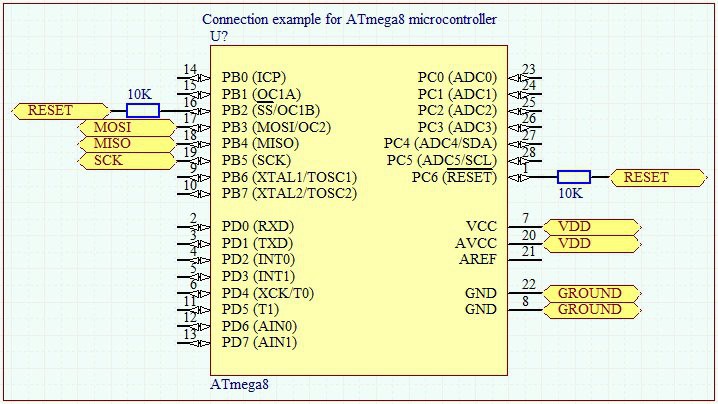
Images from kcsoft
5. Program it
Create a new BASCOM-AVR project and write a small Blink program (in this example I used ATtiny13 MCU):

Press F7 to compile, then F4 to download the code into microcontroller. In the programmer window, identify your chip.
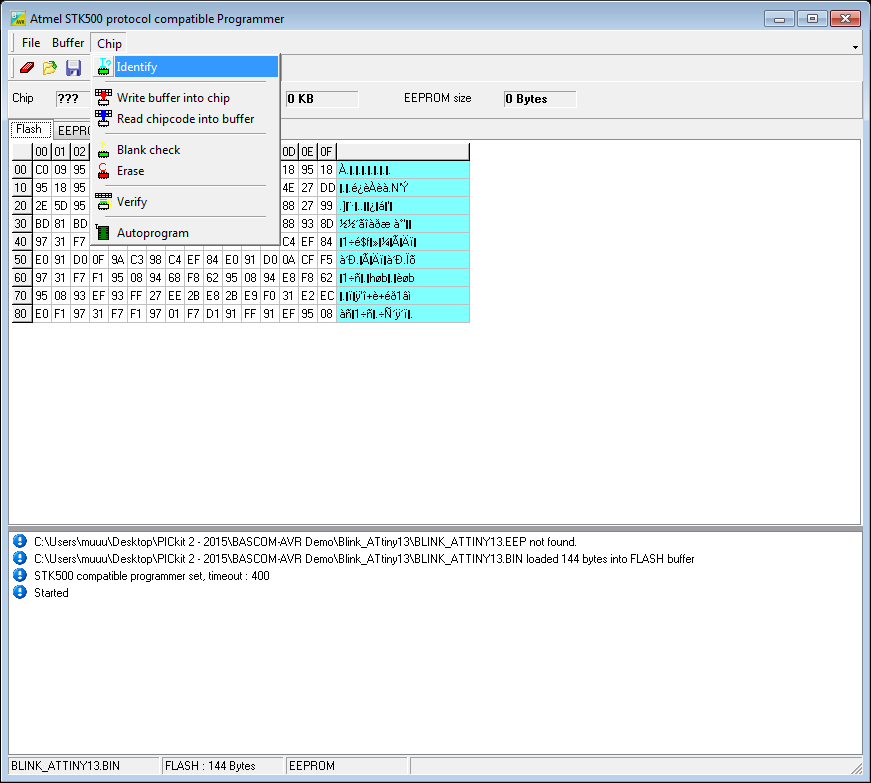
Now, the ATtiny13 microcontroller was identified:
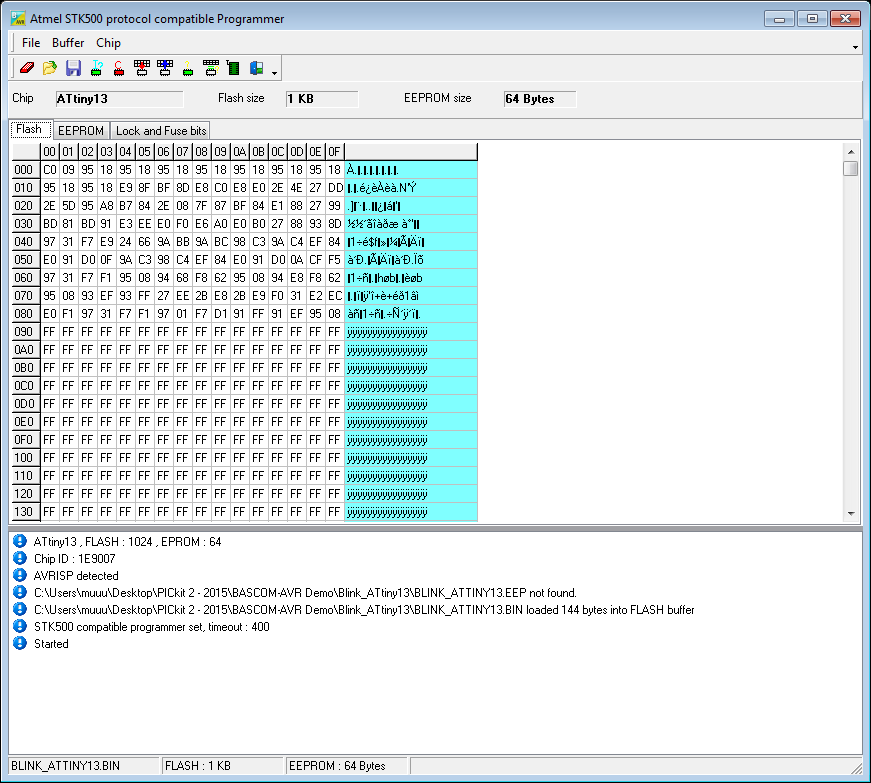
Press "Erase and program chip"

If you powered your MCU from the PICkit, power your MCU by pressing VDD on button, in order to see the LEDs blinking.

3D Printing AVR Arduino Art Audio Automation BeagleBone Bluetooth Cameras Clock Drones Environment Hardware IoT LED Medical Music Radio Raspberry Pi Remote Control Robotics Rockets Satellites Science Security Software Virtual Reality Wearables