Close
0%
0%

Up-Ride, the Bicycle to Elliptical Conversion Kit

Similar projects worth following
Convert a normal bicycle into an elliptical. Change the rotational motion of a bicycle into an ellipse with our patent pending motion conversion kit, Up-Ride. Up-Ride Provides 3 additional exercise capacities to complement your bike (BYOB) a stationary bicycle capacity, a stationary elliptical capacity and a mobile elliptical capacity. These are provided through the three components in the kit: the stationary trainer allowing stationary resistance for stationary elliptical or bicycle. Handlebar extensions to make it easy while standing and ellipticaling, and the core technology the motion conversion mechanism that mounts into your seat tube and changes rotational to elliptical motion simulating running. This is the only conversion kit on the market that allows you to work out where you want how you want. Upgrade your life with Up-Ride.

Up-Ride has gone through multiple iterations and refinements to become the almost ready for market product documented here. Up-Ride started with the premise of elliptical as an accessory instead of the purchase of a standalone machine. This approach has several advantages compared to traditional elliptical offerings. Up-Ride facilitates 3 additional capacities to your normal bicycle, stationary bicycle, stationary elliptical, and mobile elliptical. These allow to get exercise in the way you want, where you want. Since Up-Ride is not a big bulky machine the approach is cost cutting (lower part count and simpler construction create savings) and much more easily stored or transported in home or via car.

Up-Ride was originally conceived to help me train for long distance racing. I have a kind of juvenile arthritis related to an autoimmune disease I have and find exercise challenging due to the impact stress involved. I knew about indoor and outdoor rideable elliptical as a cycling/triathlon enthusiast but these options were outside my reach financially. I bought a knock off outdoor elliptical from ebay that was not good quality. I looked at this large machine and my bicycle and the lightbulb went off that elliptical could be a bicycle accessory. After several iterations we are almost done tweaking the design. I will document the process here on hackaday.

This product has several markets that are pretty clear through looking at current market participation. Injured athletes have been the primary target of my competitors in the outdoor elliptical space. Runners especially suffer injuries rates cited by some as high as 80% per year for those that run regular distance. 4 season athletes also find the indoor outdoor capability appealing as it compliments their lifestyle. Baby boomers are a huge potential market. As they age they are dropping off of high impact physical activity. Up-Ride is perfectly positioned as the affordable low impact fitness alternative to allow them to stay fit and active. The other large potential market is the suburban family that currently spends on gym membership but would rather have the convience of home fitness without the expense so they can redirect the fitness money they spend more towards their family.

  • 1 × Link-Af Weldment Current Design (CD)
  • 1 × Link-Am Weldment Current Design (CD)
  • 2 × Link-Cf Weldment Current Design (CD)
  • 2 × Foot Pedal Mounting Block Current Design (CD)
  • 2 × Foot Pad Plate Current Design (CD)

View all 20 components

  • Hackaday Prize

    Joseph Prosnitz04/11/2017 at 21:23 0 comments

    Progress on the project has signifigantly advanced. You can find the reposted project here: https://hackaday.io/project/20868-up-ride

  • Some Updates- New Prototype

    Joseph Prosnitz10/03/2015 at 08:36 0 comments

    I suppose I should mention the build of the new prototype based off the cad. Lot of small lessons learned. The piton button in spec did not have enough depth for thickness of tube. The foot platforms should sit on outside so design can be narrower. There needs to be some way to lock in place when you mount mechanism that releases when you drive forward to ease start mount and dismount. You can get 18 inches + but you do have some scraping which might be mitigated by narrowing of design when foot platforms get moved. This mitigation of scraping since primarily on turns lean(but not that much road riding right now overall). Trainer still not finished as welder is down. Handlebar extensions need to lock robustly if present. They probably can be significantly shorter and should probably act as a single rigid frame instead of two points. Riding without them was very forward leaning but seemed ok at least for short rides. Quick releases would be much nicer for major mounting points. Mechanism works fantastic, stride motion and spring tension system works well though springs probably could have higher tension and that tension should perhaps be adjustable. Foot platforms probably can be more narrow and need a toe box of some kind. Branding should be incorporated into next prototype. FK day of sram and world bicycle relief was kind enough to give time. looked at design and recommends manufacture in taiwan. Speculated entire assembly can be done under 100 including trainer and motion conversion device. Interbike also yielded interesting feedback on design and capital needs to move project forward. Patent is moving forward. Mostly positive. Planning trip to taiwan to iterate with right manufacturing partner. Looking to do one more prototype possibly stateside or abroad to prove out unit cost and final feature set. Distribution channel feedback is going to be sought and more user feedback. Excited, tired, somewhat stressed out. Lot of liabiliy concerns.

  • Special Note on Crank Extension

    Joseph Prosnitz08/16/2015 at 18:40 0 comments

    A typical bottom bracket on a bicycle frame is around 10.5 inches off the ground. Multiplying that by 2 you get a maximum extension of 21 inches. This is the theoretical limit of crank extension without lifting the bicycle off the ground. This is fine for stationary elliptical where you can lift the bike but for mobile elliptical this is a concern especially as clearance is needed for the road and road debris and turning. 18/19 inches is feasible but we want more. While still under wraps we have a design (may be physically impossible but hey that is research) that is a new mechanism take on a classic mechanism/assembly. More news on that if and when it works.

  • User Experience Prototype

    Joseph Prosnitz08/16/2015 at 18:34 0 comments

    With the more developed thinking on bicycle fit and user fit and some groundwork for user experience a second round of modeling and bill of materials was created. This was quoted. The design was then optimized and requoted. Currently the selected quote is being built. I included it in the links but here is a little animation of roughly the state of the current design: https://vimeo.com/132304800. Once that arrives from the shop we will assemble the parts and do a multipart user testing and safety battery of tests. Also user surveys, testimonials, promotional video and other work will be generated to help promote Up-Ride.

  • Round 2 Continued

    Joseph Prosnitz08/16/2015 at 18:21 0 comments

    We then dug deeper into user experience. Since most ellipticals are rear driven (the linkage that spins is in the back) we looked at different four bar linkage combinations. There is a great four bar simulator here: http://www.mekanizmalar.com/fourbar01.html

    We realized that since we were committed to front driven ellipse that the foot angle would be opposite what the foot is naturally inclined to angle at each position in motion. We created a platform sitting on a tension spring to act as foot angle adjustment throughout motion. Think of this like how the pedal spins on the bicycle crank arm to allow your foot to assume the most natural angle.

    After looking at research from an Australian journal Sports Technology:

    Use of an asymmetric ovate footpath to overcome the

    mechanical constraints imposed by non-impact cross-

    training devices in high-intensity exercise

    William H.P. Thomasa

    & Steven Cranitcha

    We modeled what we wanted our elliptical path to be to best simulate running. We made an analysis looking at ranges for body size, stride length etc for both men and women and calculated a ellipse that accommodated at least 80%. We are still deciding how much adjustability should be built into the product. A minimum criteria of at least 18 inch stride length and ideally more than 20 inches was established. The design also shifted the foot platform location farther back on the linkage instead of at the crank arm creating a more elliptical foot path.

  • 2nd Round of Engineering

    Joseph Prosnitz08/16/2015 at 18:09 0 comments

    After the first round of engineering there still remained a lot of questions about the feasibility of mobile elliptical. Stationary also had some implementation questions involving interaction with stationary trainer. I networked around and found former engineers from the Rehabilitation Institute of Chicago. We established a working relationship and started digging into the problems/challenges.

    First we established a custom trainer was necessary to make sure stationary elliptical would work universally (trainers liked wahoo kickr work out of box but they may be seen as prohibitively expensive). We based our new design off of slocum bicycle trainer (http://www.hscycle.com/Pages/slocumtrainers.html) as that design seems most stable independent of direction of forces exerted). We adjusted rear arms to create narrow central profile to allow clearance for ellipses travel through space


  • Initial Mechanical Engineering

    Joseph Prosnitz08/16/2015 at 17:57 0 comments

    After examination of bicycle fit we settled on the seat tube having both best location for the amount of stress created and the most viable general fit solution. I like the mechanism used for stems (what holds your handlebars to bikes) so we modeled the expander bolt mechanism into the seat tube. We looked at ways to distribute the load. A bill of materials and cad rendering were created for this prototype. A provisional patent was then drafted with illustrations. Some questions remained about the experience for the user but the novelty, non obviousness, and useful criteria were clearly being met. Company was formed at this point.

  • Revisions and Legal Kerfluffles

    Joseph Prosnitz08/16/2015 at 15:50 0 comments

    With my back ground in bicycle fixing/ basic design I begin doing the rethink on a general bicycle fit solution. I look at different mounting points. While the initial prototype mounted to both the crank arms/ pedal mount holes and the stays the stays do no appear to be a viable option. The seatpost, saddle rails, seatube (inside and outside) as well as stationary trainer integration are looked at (not to mention designs involving spin bikes) for mounting points/integration style. Plans are drafted. Discussions with John Marshall Law School Patent Clinic start. Questions about how the design actually works are raised. I realize I am over my head in mechanical intricacies. Mechanical engineer search begins to explain/answer the nuances of creating elliptical motion.

  • Prototype Challenges

    Joseph Prosnitz08/16/2015 at 15:43 0 comments

    Initial reveals the prototype is not universal bicycle fit solution. The geometry at seat and chain stay intersection is variable. The seat interferes with standing and striding motion. Stride length of initial prototype is 14.5 inches (in retrospect this is much to short).

  • A Prototype is Born

    Joseph Prosnitz08/16/2015 at 15:28 0 comments

    August 6th, 2014

    Grover Welding in Skokie Produces the first Up-Ride prototype. This first proof of concept is built from used bicycle parts bicycle stays clamp on style kickstand mounts, metal stock, and scraped parts from the Chinese knockoff of an outdoor elliptical. The ride is less than perfect but the concept is feasible and there is already clear room for improvement.

View all 10 project logs

  • 1
    Step 1

    Build Preamble:

    Apologies but, don't sue me. Seriously, Don't Sue Me. Any hazard you create is on you. I in no way take responsibility for what you do.

    That said I have filed for patents for this. I don't care if you use this idea non commercially. Weld/machine one up. If you are making these to sell for profit to other people you are not being awesome. I probably won't catch you or sue you but not right. Please credit me if you do build one. If you want to work on this or collaborate on this please contact me.

    This is a basic build. The instructions here are general since hackaday doesn't really have a good way to put up all of the solidworks/prints/specifications. There should be enough here that if you are a competent builder/diyer/fabricator you can get this made. Your build will likely be specific to your bike.

    Lets Get Started :)

  • 2
    Step 2

    Tools and Materials

    I used a mig welder to make basic prototypes

    Abrasion cut off metal power saw (a cold saw would have been less messy)

    Angle grinders galore which is also a good substitute for the cut off saw

    Multiple attachments for previous

    If you have the ability to machine parts you pretty much don't need any of the parts (other than tubing) as you can just make them instead of buying

    I used sections of steel tubing from crashed bicycles that a local non profit bicycle collective I am friendly with had.

    I bought clevises from mcmaster http://www.mcmaster.com/#rod-ends/=ygiz8v

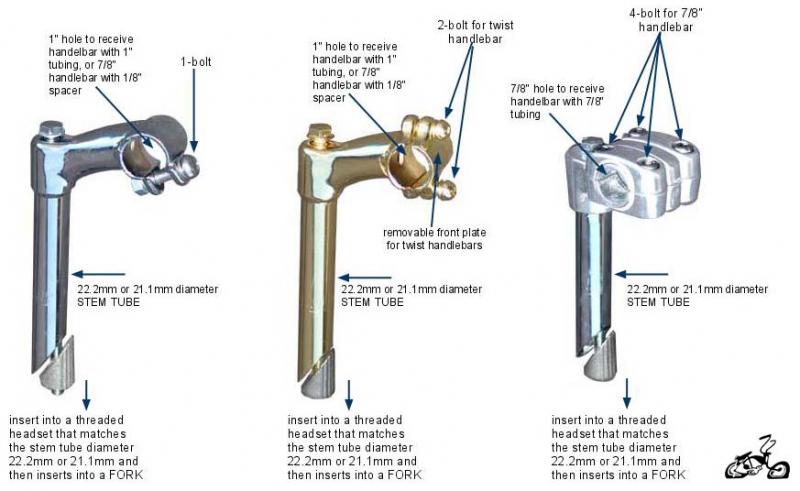
    I used bicycle stem
    and a piece of solid stock for seat tube connection and cross beam

    I used 2 sections of 1/8 inch flat 1" stock for my crank extension. Length will be dependent on your bottom bracket height and how much extension you want.

    I used bmx bar extensions. These may be referred to alternatively as bar ends. They go by alot of names. I just made sure mine were steel so I could weld up.

  • 3
    Step 3

    Special Note:

    Use resources like Sutherlands and UCI http://www.uci.ch/

    Or good old Sheldon Brown

    Bikes have lots of weird specifications. There are alot of bicycles and not so many good resources for standards

View all 8 instructions

Enjoy this project?

Share

Discussions

Does this project spark your interest?

Become a member to follow this project and never miss any updates