Close
0%
0%

Individualised nasal CPAP cannula for preterm kids

Preterm infants come in lots of different sizes. Nasal CPAP cannula come in few sizes. Read on to see if we can 3D print a solution.

Similar projects worth following
This project will attempt to build a prototype hardware/software solution using consumer 3D-scanning and printing technologies to produce individually designed and fitted nasal CPAP cannula for suitable for preterm infants in Neonatal Intensive Care. We intend to use 'Processing 2' open source programming language (2003-2014 Ben Fry and Casey Reas), some Arduino bits and bobs and NinjaFlex flexible filament.

The initial design and proof of concept will be undertaken using a resuscitation manikin as a proxy for a human infant. We intend to provide a solution that provides an improved seal to the nose to improve ventilation and reduce the potential for nasal septal injury. We hope that this prototype may pave the way for a product that has the potential to be better tolerated by the baby, should minimise handling by nursing staff and provide more consistent therapy.

Oh yeah - and we have zero experience in coding and electronics so this should be easy right?

Why do we need this?

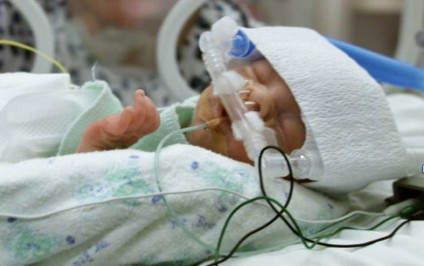
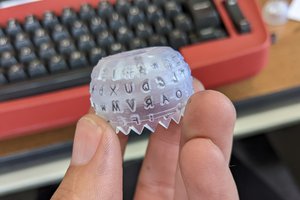
Most preterm kids require ventilation support during a NICU stay - these kids may weigh as little as 500g at birth and require months of ventilation support. Ill fitting nasal cannula can reduce the effectiveness of the therapy and in some cases can cause significant injury and disfigurement to the nasal septum of these kids.

Surely we can do better?

In true hackaday spirit this will be attempted by myself (Ben) - I work in a NICU but have no programming or electronics experience. What could possibly go wrong?

On that note - advice and input are welcome.

  • 1 × digital vernier calipers cheap chinese variety - with serial port
  • 4 × 10k resistiors
  • 2 × transistor NPN BC548
  • 1 × breadboard Electronic Components / Misc. Electronic Components
  • 10 × breadboard jumper cables

View all 10 components

  • Kinect hacking with Processing

    Ben Hartmann06/15/2016 at 01:23 0 comments

    Have been a bit quiet on this project as the real job has taken over. But I have been doing a little. A while ago I began messing with a Kinect (V2) to attempt a low res facial scan. Although the res is not great - there is a Processing library that allows me to pretty simply grab X,Y,Z co-ords from the scan, directly in Processing and potentially feed them to the model to allow it to curve to the face. More detail to follow - and progress is slow due to limited time but it is quite cool. The screenshot below shows overlays 2 scans - one of my whole head (white points) and one (red points) of a single line across my face. I have been thinking that as the Kinect also has a RGB image feed as well I might be able to use a facial recognition library to automatically locate the position between the base of the nasal septum and the top lip. This might require a re-write in javascript (not sure there are Processing libraries that could do this) so I have also started learning p5.js a javascript library based around Processing.

  • Steps forward and backward...as usual

    Ben Hartmann10/29/2015 at 03:01 0 comments

    So after inspiration form the likes of Neon22 (now a collaborator) I have had another shot at a more printable version in the CPAP prongs. But have hit a snag.

    So this is the new version - just the centre of the device coded at this stage - this will sit below the nose. The flat surface will sit against the face (wider distribution of load) and eventually the side 'arms' will curve to follow the infants face. This looks ok - but before I got carried away I exported it using nervous system's Processing library (exports an .obj file I can open in slicing software). This is my problem - the obj exporting library doesn't support the beginContour/endContour method I have used to 'cut out' the holes where the nares tubes intersect the top surface. So this whole top surface disappears when exported. Damn.

    So more code needed - I should be able to solve this by drawing half the surface at a time - easy to fix - just will take some more lines of code. Once this is fixed I need to do some test prints - This design will still have some unsupported overhangs (2-3mm) so I'll need to see how they print and maybe modify further.

  • Still much to do...

    Ben Hartmann09/21/2015 at 12:27 0 comments

    Certainly hoped to have made more progress by the Semifinalist round deadline. Kind of seems to have gone backwards, but the real job got in the way. Interestingly, the problems with the current code gave me an idea to simplify the model and make it a form that will print better. I can't see any reason the main tube of the cannula needs to be cylindrical. So am thinking I could optimise the form to simplify the intersection of the nares cylinders and the base form (cylinders intersecting with flat surface) and optimise it for 3D printing (minimise unsupported overhangs). Something that in cross section is something like the image below. Should be more Processing friendly and 3D printer friendly...so time to start over.

  • Dropbox link added (code and .stl)

    Ben Hartmann09/21/2015 at 12:09 0 comments

    Have linked dropbox folder that contains current Processing code. Also contains an .stl file of the plug I printed for the digital calipers. It can be seen in the photo's and early video. I didn't want to solder wires to the pads in calipers so used this and some breadboard jumper wires to create a custom connector. Just stripped the plastic off one end of the breadboard wire, pushed it through the 3D printer part (holes cleaned with 1mm drill bit). I then bent the wire ends down and filed them flat. Little bit of heat shrink on the wires to keep it all in place. Plugs into the back of the digital calipers - works quite well.

  • Scan set up with resus mannikin

    Ben Hartmann09/21/2015 at 10:14 0 comments

    Have completed the first test scan with my 3D scanner - the scanner only has Windows drivers and software (??) - and couldn't get it to work using Parallels. So bought a crappy 2nd hand Windows 8 laptop and got the scanner working. Here is the set up - rather gruesome with the resuscitation mannikin head...and not really practical for scanning a preterm infant (webcam and handheld laser). I might look at hacking a older Microsoft kinect I bought on eBay for $30 to do the same job - (Open Kinect for Processing).

  • Getting a 3D scan into a Processing sketch

    Ben Hartmann09/21/2015 at 10:02 0 comments

    So this is another deal breaker for the project - I really want the template CPAP model in the Processing sketch to be modifiable by the physical measurements by the calipers and a facial scan of the infant. Luckily Processing can import a OBJ file. I downloaded a facial scan from the website of the manufacturer of the cheap 3D scanner I am using. It was pretty straight forward to get Processing to display the scan.

    Its not a baby but here's the output from some of my test code...

    The red and green lines are just me stuffing around to locate the image in 3D space in the sketch ( I had to manipulate the scale and location to display properly).

    Now getting data out of the OBJ file so I can modify the CPAP template may prove a little more difficult.

    My understanding is that the OBJ file is just a list of x, y and z co-ords of each vertex that creates the mesh of the scanned surface. So I figure it should be possible to pull out the x and z co-ords of a plane of y's that sit below the nose in the scan. But to do this I need to understand how Processing imports the OBJ.

    The OBJ file is imported as a PShape - and there are functions to extract the vertices.

    So far I have been able to determine that the PShape of the scan above has 206,376 'children' (it is made up of 206,376 separate shapes). Importing the same scan into Blender shows that the scan has 206,376 faces. So each face appears to be dealt with in Processing as a separate 'child'. I have tried a couple of ways to save x and z co-ords that correspond to a particular y plane into an array - or even just colour them red on the scan - but the sketch freezes - may just be asking a bit much of Processing.

    So not completely successful but some progress...

  • More Processing...

    Ben Hartmann09/21/2015 at 09:24 0 comments

    So I needed to understand how Processing draws complex shapes. The reference describes an important aspect of the beginShape/beginContour function "The vertices that define a negative shape must "wind" in the opposite direction from the exterior shape. First draw vertices for the exterior shape in clockwise order, then for internal shapes, draw vertices counterclockwise."

    So I tried 'cutting' a circle out of a flat rectangle (red stroke and white fill kinda shows what is going on).

    This gave me the idea of making my life a bit easier and flattening the top of the base cylinder in the CPAP model so I could use a modified version of my testing code from the above example.

  • Intersecting cylinders in Processing

    Ben Hartmann09/21/2015 at 09:11 0 comments

    So one unresolved issue with the current model is that the 2 small nares cylinders do not 'cut holes' in the main horizontal cylinder where they intersect. The discussion below is really only a record of my attempts to learn how Processing draws complex shapes. Its not a tutorial.

    Within the beginShape/endShape (which I use to draw the cylinder) it is possible to describe a contour which essentially cuts out a negative shape in any 2D or 3D shape.

    I found the maths describing the curve of intersection of 2 cylinders here (see equations 13, 14 and 15). Wrote some code to see if I could draw the curve of intersection in Processing. As I was writing the code it was clear that this method would not work with using the beginShape/beginContour functions of Processing. The cylinders are drawn as 60 sided approximations of a cylinder - and the math I was using to describe the intersection could not account for this. The image kind of shows the problem - I've used a red stoke and white fill to show how the cylinder is drawn and then tried to cut out the intersections switching to a green stroke - clearly it don't cut out the intersection...

  • Some statistics...

    Ben Hartmann09/03/2015 at 04:57 0 comments

    So to give a quick idea of the need for this device I grabbed some statistics from the latest ANZNN (Australian and New Zealand Neonatal Network) annual report (2013). I'm based in Australia so these are relevant numbers to this project - they will translate to most developed world situations - data in the developing world is harder to track but no less important.

    In 2013 the population of Australia was 23.13 million (+4.4 million in New Zealand) . ANZNN tracks all babies registered to level II and III units (level II is Special Care, level III is NICU). Most CPAP occurs in NICU so I will just focus here. In 2013 there were 9,721 babies registered to NICU in Australian and NZ. This is about 2-3% of all live births. Only 5% of these babies did not receive CPAP during their NICU stay. So in 2013, 7,815 preterm infants received greater than 4hr of CPAP in NICU across all 28 NICU's in Australia and New Zealand.

    I work at King Edward Memorial Hospital in Western Australia - we are the only tertiary care maternity hospital in the State and that makes us pretty big. In 2013 we had 117 SCN beds in our unit, 55 of those NICU beds. Of the 9,721 admissions to NICU across 28 units, about 1,150 were admitted to our NICU. We are probably one of the biggest NICU's internationally.

    Thankfully significant injury from CPAP does not occur that often, but these are reported as 'pressure injuries' for our hospitals accredition purposes. We would see 8-10 pressure injury reports each year attributable to nasal CPAP. This would equate to as many as 85 babies each year in Australia. However, this is the tip of the iceberg. These are the most significant where tissue damage and injury is quite extensive and reported as a clinical incident (could result in permanent disfigurement). The clinicians I work with report that the occurrence of 'redness' and 'soreness', through to minor injury requiring some intervention is more common particularly in patients receiving CPAP for longer durations. In 2013, of the infants receiving CPAP the median duration of therapy was 40 hours (range 14-128). Remembering that these kids are born extremely preterm (down to 23 weeks gestation) their skin is extremely fragile and susceptable to damage.

    Since taking on this project, many parents of NICU 'graduates' have expressed their desire for a better solution as they have first hand experience with the discomfort and damage these devices can cause.

    The image below (used with permission) gives some idea of how the current device is fixed to the patient.

  • What Works - What doesn't...

    Ben Hartmann08/17/2015 at 10:11 0 comments

    The basic template with customisable dimensions works from a software perspective and prints (just). You may notice when the object rotates on the screen I need to write the code to cut out the internal surface of the main cylinder where the two nares tubes intersect it. Found the math - just not written the code yet.

    I am currently optimising the printing. So trying different profiles and wall thicknesses for the cylinder tube. I am finding an eliptical (in profile) cylinder prints well as does a cylinder with a circular outer surface and eliptical inner surface. Bridging the top of the cylinder is obviously the difficult part of the print.

    Next step will be to import a 3D facial scan into a Processing sketch as a PShape object and work out how to extract the data I need to match the basic template to the profile of the infants face. Got some ideas on how to write a loop to run through the points that define each face in the PShape and extract a plane (through y axis). Given this is the first programme I have ever written it is a little daunting.

    Currently the Processing sketch draws the cylinder by drawing the circles each end of the cylinder (inner and outer) and then essentially joining them up with a series of triangular surfaces. I figure if I can get a profile of the face, directly under the nose, and then slice that line into a number of segments I can then draw a whole bunch of connecting cylinders that follow the profile of the face.

    That's the plan anyways. At the very least I am pretty happy with my progress for a complete novice.

    I plan that this will be the first prototype - design elements may change once the proof of concept is complete. A few interesting ideas have cropped up while printing these test versions. We do think it might be interesting to look at the internal structure of the main cylinder. Creating turbulent air flows within this form may improve ventilation. This could well be an interesting application of the rapid prototyping concept. Particularly as the glaring obvious issue this product will have is that there is currently no FDA (or TGA in Australia - where we are based) approved flexible 3D printing filament. Partly the point of this Hackaday Prize entry is to demonstrate the potential uses of such a filament.

View all 14 project logs

  • 1
    Step 1

    We decided extracting some detailed measurements on an infant nose from a 3D facial scan would require more expertise than we currently have. To get the ball rolling we decided to do some Arduino tinkering and rig some cheap digital vernier calipers to send measurements via serial to a Processing sketch.

    We got lucky and found this project by a bloke called Martin. By the way - we don't think it's useless Martin.

    This worked perfectly for our calipers - maybe it will for yours too. This is a pretty common project - there are quite a few descriptions of different data transmission protocols for these calipers.

  • 2
    Step 2

View all instructions

Enjoy this project?

Share

Discussions

Similar Projects

Does this project spark your interest?

Become a member to follow this project and never miss any updates