 erhanyilmaz.ytu
Hi all!
In this post I'm gonna share my new application. Recently I had published post that was control application over the telegram. That should be here. At that aplication I also wanted to use serial port with nodejs because of this I used other hardware(MSP430 launchpad) to control devices over the serial port. So to do this application we need at least a reasonable computer and a hardware such a MSP430 launchpad. Because of that it doesnt make sense and not low cost I have decided to do it with Raspberry Pi. Raspberry Pi is also computer and has a GPIO pins to control devices. Thus we can do it same application with just Raspberry Pi. It's cool! Also we don't have to change so many things in the javascript codes. Lets do it!
Step 1: Using of Telegram Bot API and RPI GPIO Modules

To write applicaton code I used two modules for nodejs. One of them isTelegram Bot API module and the other one is Raspberry Pi GPIO module.
Using Telegram Bot API you can create your own bot that can get/send messages to the other people on telegram. With this bot you can make so many interesting applications. Also I used this bot to do this application. You can find more details here about telegram bot API
To create a new Bot you should talk with the BotFather. Don't worry it's so easy. Just write him "/newbot" then after a while you will get your own bot and token number. And then you will be ready to use your bot in your applications. For more details about how to create a bot take a look here.
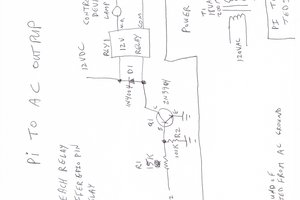
Step 2: Test Circuit and Runing the Application


To see application results on the GPIO pins I setup simple test circuit on the bread board. Above you can see the circuit.
To runing application first of course you should install nodejs and required files and modules. When applicaton start to run it waits for the commands. For this app I defined basic few commands. These are gpio36read, gpio38high, gpio38low, gpio40low, gpio40high. These are also not case sensitive. Easily you can change or add more commands. If you send invalid command app alerts you. Also I added ID control to app. So, no body can't controls or reads pins except you.
I did it with simple a line code which is below. If you want you can cancel it.
if(message.chat.id == "<Your Chat ID>") { // app code here}
Step 3: Results


As you see above pictures when you send valid commands to Bot you can write/read Raspberry Pi GPIO pins. That's mean you can control or read status of your devices over the telegram just using Raspberry Pi and simple control circuit. You don't need any pc or expensive devices. Cool!
Of course, all the source files about this application are available here as github project.
I hope that this post was useful for you.
See you next post "inşaallah". Have a nice day!
 Ted Mieske
 tinandjar
 Chris
Chris
 ahmed Ibrahim