Close
0%
0%

LZRTag - Flexible DIY Lasertag

An easy to build, program, modify and use AVR and ESP based Lasertag system for everyone!

Similar projects worth following
Ever wanted to play Lasertag just ... Anywhere?
Maybe with a different game mode too, or for longer periods than those offered by arenas?
I know I wanted to - so I decided to create my version of it!

LZRTag (and yes, I know, that's not a good abbreviation but whatever) has been a long-running project of mine. It's a couple of years old, but only recently got started!

Its main motivation has always been, and will always be, to have an easily customizable, affordable to create Lasertag system whose capabilities rival those of professional sets, without adding proprietary software or complex hardware.

Based entirely on the popular ESP32 with ESP-IDF based firmware, and requiring nothing more than a Raspberry Pi as a server, this project still provides a huge variety of well-documented functions and a boatload of flexibility!

Important note for those interested in building their own:

Please give it a few more months before you order any hardware!
The currently uploaded files here on HackADay will work just fine, however, I am not happy with them!!
There are a few smaller issues that I would like to fix to improve reliability, as well as adding some more important features that require hardware changes.
This project is currently on a bit of a pause, but I will plan to get back to it by the end of 2021!
Please be patient as I tend to other projects first before polishing this up :>

Ever felt like you needed something to sink a whole bunch of time into?
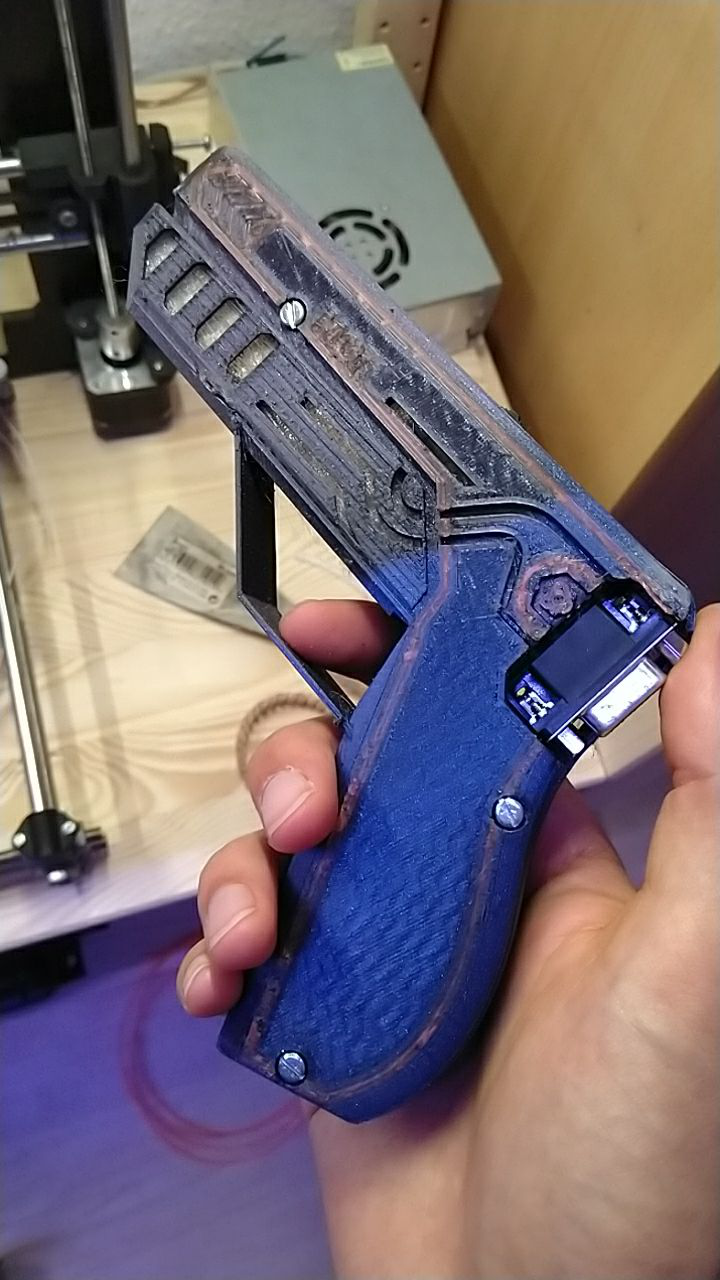
Some silly yet at the same time very satisfying, extremely glowy project?

Well, maybe this could be for you! This Lasertag project was created mainly out of my interest, over a long and fun process of a few years - of the last few have been documented here!

The whole project is still very fluid and active as of Oct. 2019, and I am making more and more sure that it is suitable for anyone to build and experiment with, without compromising on some of the more awesome features that any good Lasertag system should have.

Below, I'll outline a few nice key aspects of the system - if you want to see videos of its progress or similar though there are always the project logs further below ;)

The hardware

This project had a history of somewhat haphazardly hardware, using a breadboard and only an ATMega328P. 

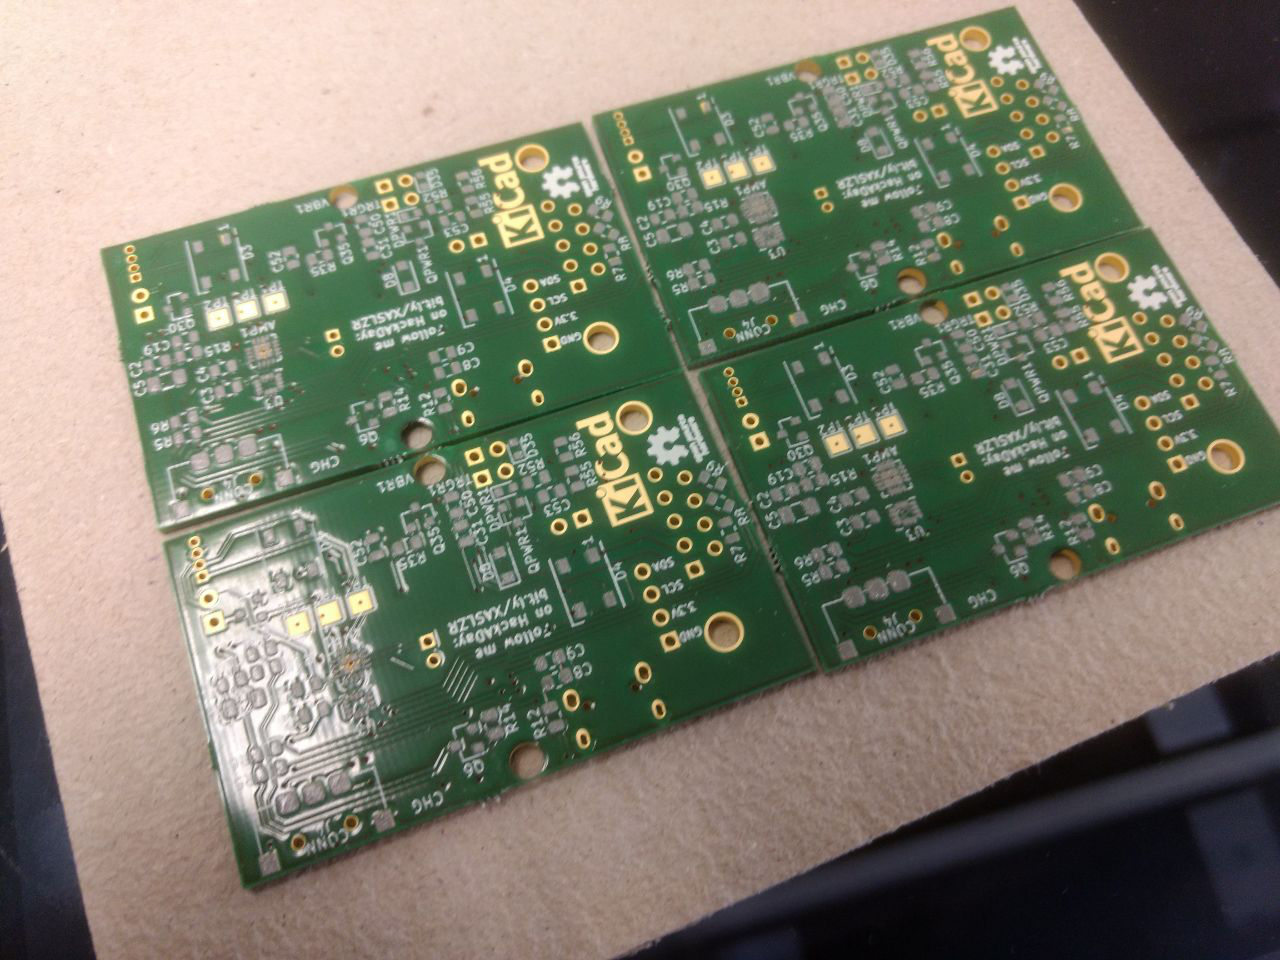
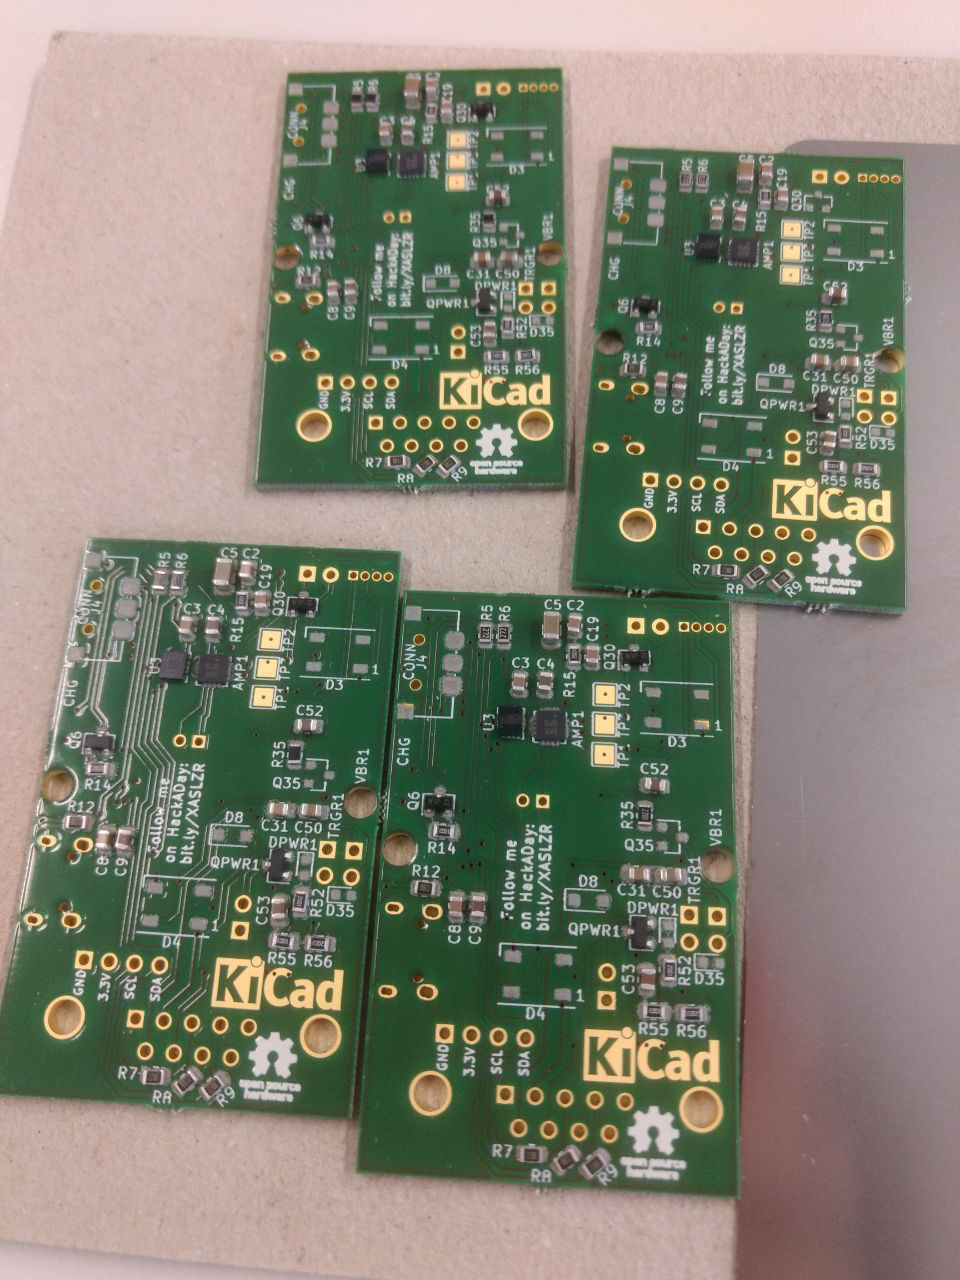
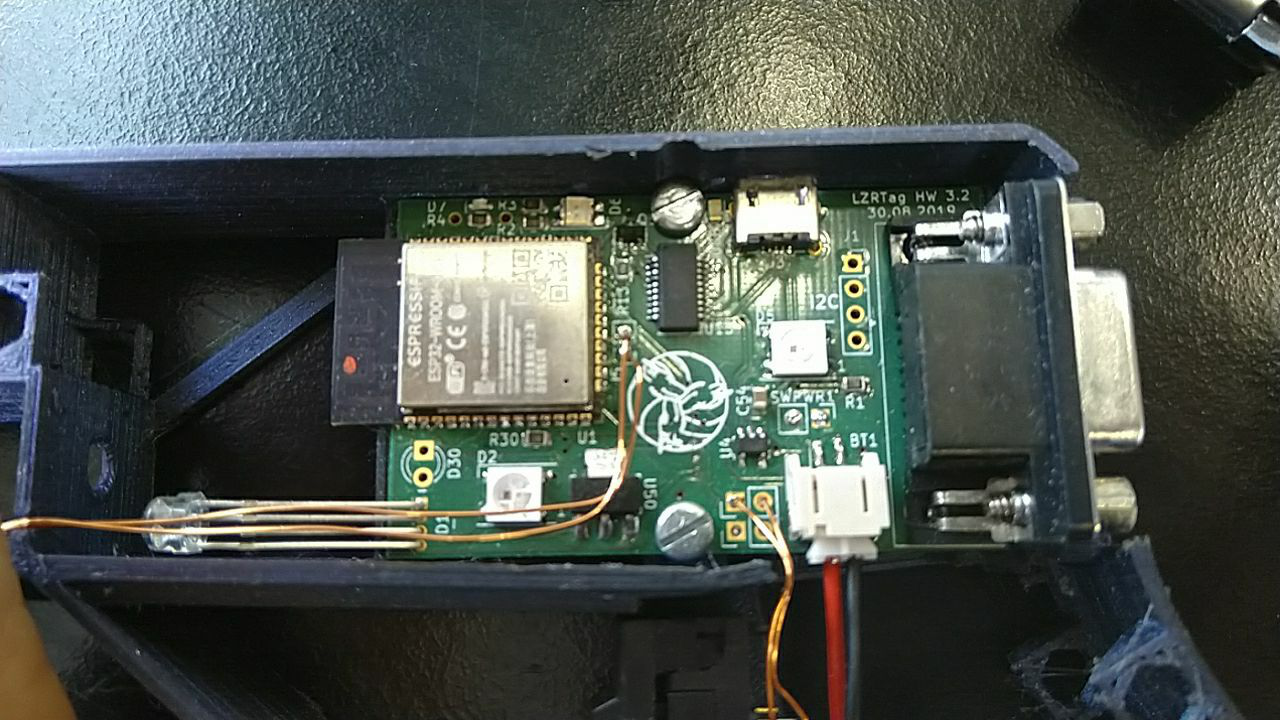
This is no longer the case as of Revision 3.2, and I can proudly say that this project has evolved to have expert hardware.

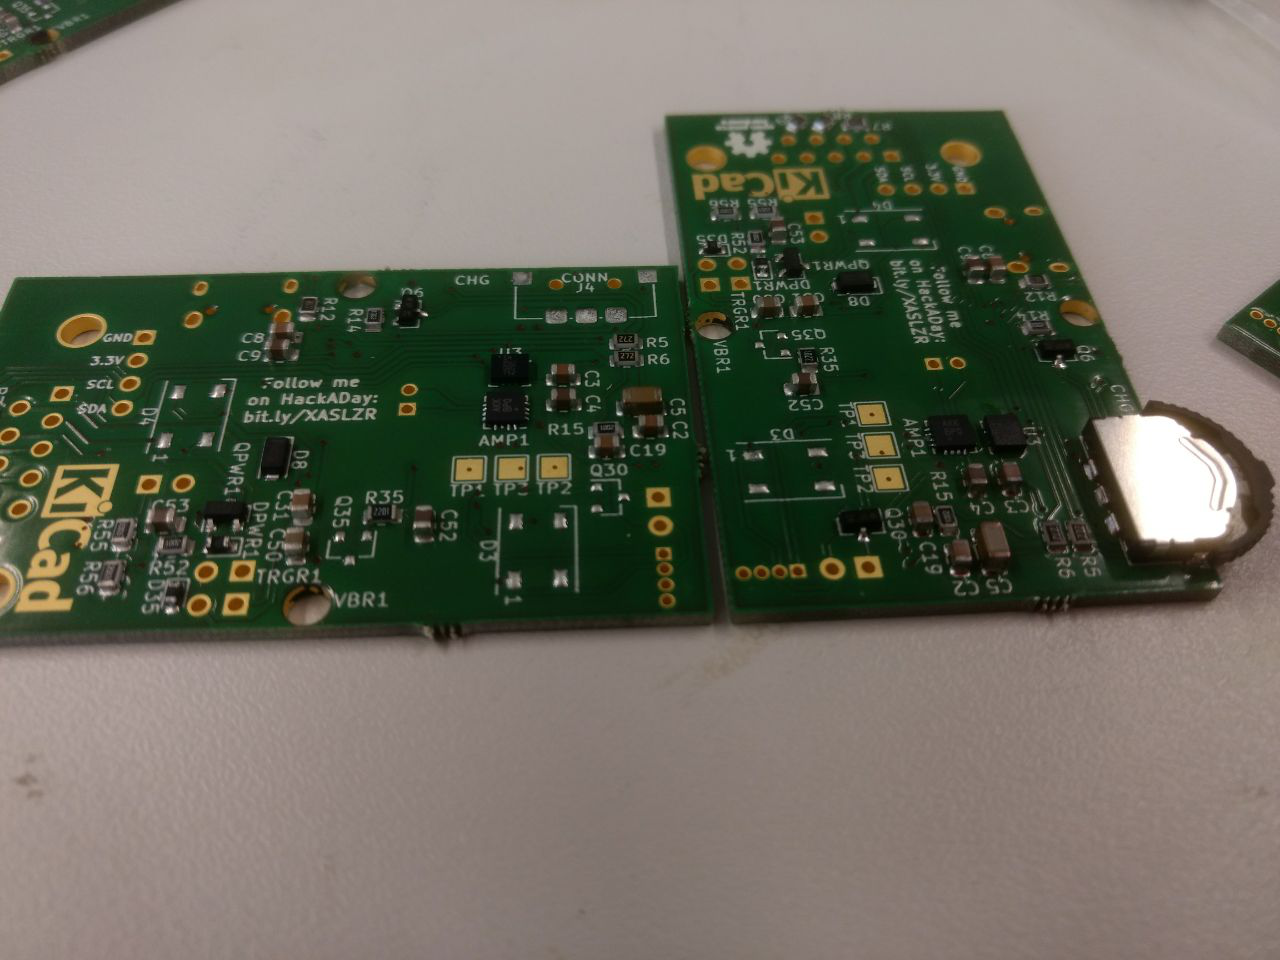
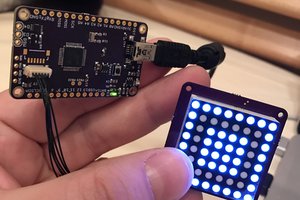
Based on the powerful ESP32 this project's PCB features a set of numerous peripherals to deliver a rich game experience.

These include a 44.1kHz I2S audio amplifier for crisp game sounds, an I2C gyro/accelerometer to detect gestures and player activities, and multiple WS2812 LEDs, both on the PCB and broken out on the vest, to provide colourful visual feedback.

Aside from this the board also contains a robust 3.3V LDO, good capacitance to keep the ESP running, a USB to UART converter with an auto-programming circuit, a LiPo charge circuit with voltage measurement, and a vibration motor to provide haptic feedback.

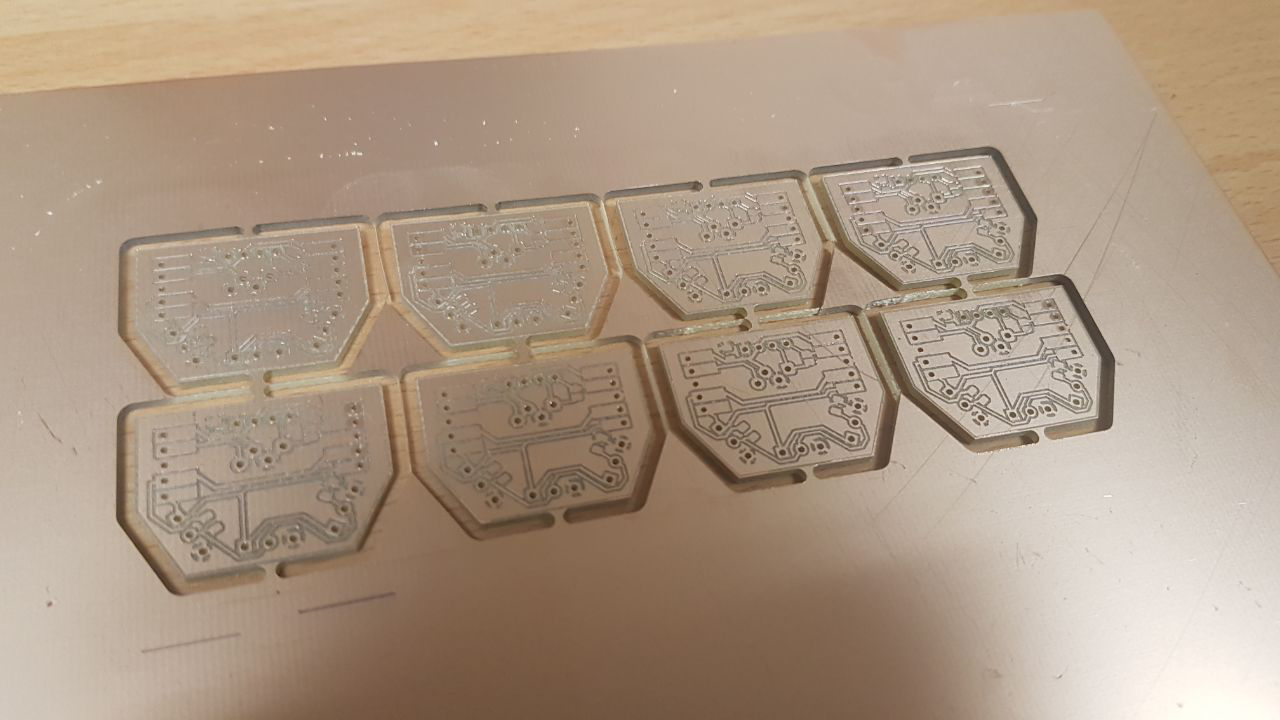
Despite all this, the boards are designed with ease of use in mind. It features only two components that require hot air reflowing - one of which (the IMU) is optional, the other one can be replaced with a cheaply available breakout board.

All other components are hand-solderable 0805 capacitors and resistors as well as a few TSOP packages - nothing that a fine soldering iron couldn't handle.

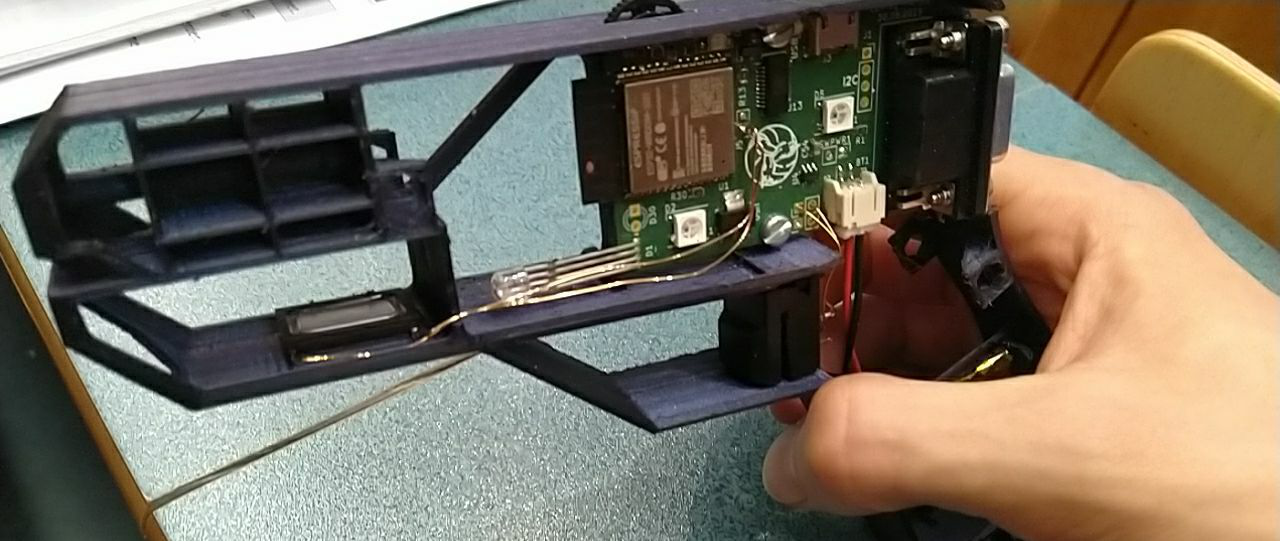
Communication between the sets is done via a simplistic but surprisingly effective IR channel. Using 850nm VSCEL IR lasers as emitters, their range exceeds 40 meters in good conditions.

Sunlight sadly reduces this to just a few meters, but during dawn, dusk, or indoors, this will work plenty.

The receivers are made from a simple single-sided board, but even they feature a nice WS2812 LED and high-quality 40kHz VISHAY receivers that provide precise decoding of the IR signals.

Due to the nature of the IR encoding, cheaper AVR based modules like my IR-Bacon can also be used as positioning beacons, providing a cheap way to set up capture points and spawn rooms. The signals can even be expanded to include custom signals, such as grenade shots, weapon type, and other interactions.

The software

Now, this is where it gets a bit more interesting. For Revision 3.2, a lot of the code on both server and client-side have been majorly reworked and documented, making sure they provide a simple but flexible interface for the user to work with.

The ESP32-Side

Based on the ESP-IDF v3.3 the firmware for the ESP has been written in pure C++. This makes sure that it remains fast and snappy in all situations.

The ESP handles a multitude of tasks, the most important of which are:

  • Providing a smooth 60FPS LED animation
  • Running the I2S sound interface
  • Detecting and sending shots,...
Read more »

MainBoard.csv

DigiKey parts list for the Lasertag case - Resistors, Capacitors and some standard parts *not* included!! (Buy them in bulk is my suggestion)

Comma-Separated Values - 400.00 bytes - 01/12/2020 at 16:53

Download

Binaries.zip

All files necessary to flash the ESP32. Uses a default WiFi of SSID "Lasertag", static MQTT Server at 192.168.250.1:1883, and it's MAC as PlayerID For now, reconfiguring these parameters requires compiling the firmware yourself - one day I'll add a terminal-based reconfigure

Zip Archive - 771.24 kB - 11/10/2019 at 13:02

Download

Lasertag_Case.zip

All 3D STL files that are necessary to print a casing. Multi-Material-Capable, for single material printing just leave out transparent and marking sections!

x-zip-compressed - 435.41 kB - 10/31/2019 at 15:02

Download

KiCAD_R_3.2.zip

The revision 3.2 KiCAD files. Preferably pull them from the GitHub site, but they're here if anyone asks!

Zip Archive - 2.39 MB - 09/02/2019 at 19:59

Download

  • 1 × MQTT and Ruby server Could be anything, from a small Raspberry to a huge server rack. The lower ping, the better!
  • 1 × A stable WiFi network throughout the field Anything that allows the ESPs to quickly connect, and stay connected, throughout your entire arena
  • 2 × or more Lasertag PCBs You can find those over on Aisler: https://aisler.net/Xasin/xasworks-lzrtagpcb/mainboard-esp32
  • 2 × or more fancy shells for the PCBs Those could be the 3D printed casings, old airsoft guns, or something made from carton. As long as it glows and looks great!

  • Visit me online!

    Xasin05/20/2021 at 12:24 0 comments

    Many of you will have had some fun just reading through this project website.

    For those that still have some more questions though, or would like to say hello more directly, we have wonderful news!

    This project has been accepted for the online MakerFaire as an exhibit!

    This means you can come to visit us and get into a 1:1 Online Chat on the 18th of June from 11:00 to 16:00 European Summer Time!
    We'll be there the whole time, showing off our projects, mainly the Lasertag but also any of the other shenanigans we've run into, and with this sort of stuff I always like to say "the more the merrier"

    Sign up here:

    https://app.vystem.io/event/maker-faire/signup

    We hope to see you there!
    And then hopefully next year in real life, with live demonstrations :D

  • Current progress and moving forwards

    Xasin02/16/2021 at 09:54 0 comments

    So!
    It seems like our project has gathered quite a bit of a following in the last few weeks. Multiple people have already shown interest in building their own, some even helping with different aspects of the system like the weapon optics or making components to spice up the battlefield!
    (Thanks to Anthony Webb and Nathan here ^^)

    However, let me say this loud and clear:

    I'm not 100% satisfied with the current hardware!

    It will work just fine, but it has a bunch of quirks and small errors - things that I feel should be addressed and improved before I can confidently recommend that others build their own version of the system.

    Don't get me wrong, if you want a challenge, by all means, go ahead and try this out!
    But you'll have to deal with some quirks in the code, a little bit of awkward wiring... It's just not as good as it should be.
    If you want to make your own system but you are willing to wait a little bit, please do so!
    I expect to get back to this Lasertag project by the end of 2021, plus or minus a few months!

    Like many hackers on here, I don't just have this one project, and my attention is currently elsewhere. Right now I want to get my DIY Smart Home back online after it broke down recently due to a number of "Ah, I'll worry about that later", and there are a few other projects that I'd like to go through first.

    So, what's up next?

    With all that said and done, I do want to give you guys a list of what I intend to fix up for the next version!
    There's actually quite a bit, so bear with me for a moment.

    Hardware-Related issues:

    • The main processor will be swapped out, from the ESP32 to, hopefully, an ESP32-S3. The CPU's vectoring instructions should hopefully speed up OPUS Audio decoding, while the extended I/O give more options for buttons and other peripherals.
    • Then there's the optics. The current IR LED setup just uses a small tube to straighten out the beam a bit. In the future, I'd want to use a proper Lens + LED setup. Actually, I want to make the IR LED move back and forth to implement a variable cone of fire and combine that with a proper constant-current driver that will allow me to control the range at which the IR signal can be received. That way, I hope to implement damage falloff over distance!
      The same weapon could switch between being a long-range sniper and a close-range shotgun. Neat, huh?
    • A connector for a proper display should be added. I always liked the charm of OLED panels, so this will probably just be an I2C or SPI line to connect to a cheap SSD1327 module, but even just that would be great!
    • I want better haptic feedback too. Right now, the system just uses a simple vibration motor, but that doesn't really offer the same 'kick' that I'd like to have. I'm thinking perhaps a solenoid with a strong driver could be interesting, to really give at least a bit of a clicky feel here.
    • The current battery management is a bit floppy. A better charger would make larger LiPos easier to use, and there is no good shutdown or battery SOC measurement. A proper battery monitoring chip would help out a lot here.
    • I want to add a headphone socket to let users plug in their headphones, giving them game-stats and other announcements.
    • The way the board connects to the rest of the hardware needs to be cleaned up, some parts don't use any connectors at all and require you to just solder in stuff... Ew?
    This would also include better protections for any potentially exposed I/O lines, using proper drivers to make signals more reliable over longer distances, etc.

    Software:

    The current software is just... A bit of a mess, frankly?
    The current repository is just one huge chunk of folders, branches, and I barely tag what I use where etc.

    In the remake, I would write the entire batch of software from the ground up, making sure to properly keep things clean and well-documented. Things would be put into more appropriate components so that they can be reused more easily, and the different elements of the software etc. should be kept in...

    Read more »

  • Rewritten weapon handling code

    Xasin01/26/2021 at 14:34 0 comments

    Well, looks like we had a bit more free time on our hands than expected, and way more fun with the set of audio files we bough from the Unity Store.

    Seriously, check this soundpack out, it is gorgeous <3

    Either way, the weapon handling code we had been using up until now simply wasn't flexible enough to incorporate some of the other weapon behaviours. We had been using a fairly hard-coded state-machine that wouldn't be able to do anything but regular gunshots, so no energy weapons, charging up or machine-gun style spinning up.

    What to do about that... Oh yes, rewrite the whole thing from scratch!

    Well, after having gotten some extra motivation and free time after finishing up some university homework, we are now officially done, and just look at her beauty! ((It's being tested on #The WuffCorder since it has a far better speaker and I had the code ready) :>))

    https://twitter.com/XasinTheSystem/status/1354072054040055810

    The new code is also fairly independent of the rest of the Lasertag codebase, meaning that it should be easy enough to pull out and reuse in other projects if any one of you so desires ^^

    There's still some awkwardness to fix up, such as the ESP barely being able to keep up with this amount of OPUS Audio Decoding. If we want the real deal to not glitch out we might have to make use of both cores in parallel for decoding, that means fun multi-core synchronizing... Plus the memory requirements are huge, so the next version will have to see a WROOM Module, probably with an ESP-S3 too so we can make use of the vector instructions...

    Whew, this is getting me pretty excited already <3

  • It ain't done yet!

    Xasin12/27/2020 at 19:31 0 comments

    Don't you dare think that we're done with the Lasertag just yet!
    We just... We have a backlog of stuff here, we had an amazing time finishing a few really good #Some Christmas gift presents (will have to be updating that one later too, it is turning out really nice :D), BUT 

    We FINALLY bought it! The Principle Sound Design Sci-Fi weapon SFX Unity asset we have been dreaming about for oh so long.
    It was reduced by 30%, and now that we finally have OPUS encoding we can store compressed audio, allowing us to have 20 times more sound effects in the same storage space, meaning it's actually worthwhile to get high-quality SFX and slap them in there!

    The SFX pack has a huge list of weapon designs, some of which are just blowing us away, but we will need to rewrite the entire gun handling core to make use of things like energy-beam weapons and the different pre-charge/post-charge effects.

    You can see a first rough draft of the improved effects here:

    https://twitter.com/XasinTheSystem/status/1343277045342736386https://twitter.com/i/status/1343277045342736386

    Oh, and on another note, a few people have shown interest in trying out the VSYL Emitter Type, which is a type of IR laser instead of regular IR diode. It could seriously improve the transmission distance of the Lasertag. 

    Look down into the comments to see how it's going!

  • Feature Creep Avoided!

    Xasin11/09/2019 at 20:07 0 comments

    Whew, so ... Finally.

    Before I start rambling on about stuff, I'd like to share a proper video demonstrating a handful of features that are now fully functional and supported in the Lasertag code <3

    This means that my system is fully functional and useable for games, with everything you'd need to set it up:

    • Team selection before the game
    • Gun reloading and switching during the game
    • Configurable parameters like damage, life regeneration, revival, team damage etc.
    • Beacons to allow for King Of The Hill gamemodes, as well as Capture The Flag with a bit of trickery.
    • Stats tracking of Kills, Deaths, Damage done and received and self-healing done.
    • Registering and starting of different games via MQTT, meaning a headless server is also doable now.
    • A slightly crude but still useable Webinterface (that I'll polish uh ... Eventually >.>)

    And I also spent all the time needed to build and wire up four of these sets all by myself, which was fun, but also a surprising amount of work.

    As of this time, I've completed my list of issues and ideas I wanted to implement, have successfully avoided feature-creep and am a bit out of breath :P
    This means I can finally put this project's development back on pause for a well deserved break while I focus on Uni.

    Trust me, this is not the end, and you will see more progress on the webinterface and some general polishing all around once I feel like it again - but for now I am really more than happy with the system, and it's time to enjoy the fruits of my labour by inviting my friends over for a round or two <3

  • More software stuff!

    Xasin10/24/2019 at 20:09 0 comments

    Alright, just a quick poke for all you guys somehow still following along.

    Over the last few days I have been refining the whole game control system a little, there certainly were some bugs to squash but nothing out of the ordinary.

    I also took some time to set the new Raspberry Pi up properly - and I might do an instruction on how to get a nice WiFi AP setup with internet forwarding, so you guys can do that stuff yourselves.
    The important news here is that the new Raspberry Pi + better WiFi stick have massively improved the connection stability of the Lasertag, which is a huge relief and improves the gameplay!

    There has also been a huge bunch of extra code documentation that I did, and now all the important Ruby library functions have been documented with YARD. I've also pushed a first version of the libraries onto Rubygems, who has been refusing to build my documentation ever since, so I can't show it off for now :C 
    Seriously, if you know how to fix this, please tell me. 

    Oh, also, a friend offered me to mill the vest detector PCBs, and they're on their way right now. They already look great, and will be much better to use than hand-wired breadboard stuff and eeeeh >->

    And as one last thing:
    We switched the IR Protocol around a little, to a DIY library we call "XIRR". The nice thing is that we already have AVR code ready for another project - IR Bacon.

    We already reprogrammed them to be small positioning beacons for the lasertag game, which opens up a TON of possibilties, from Payload and Capture-point games to Kill and Revive zones or "safe" regions to play in.

    It's awesome, and I will definitely show those new features off when we complete the vest sensor boards :>

  • Progress! Small but progress

    Xasin10/13/2019 at 18:36 0 comments

    It's been a while since I last posted a log, so I felt like doing it now - it's an opportune moment for a number of reasons.

    Firstly, the new hardware is now pretty much 100% supported, all the way from the new navigation switch to the gyroscope. This includes support for the Ruby backend, as well as a few snippets of template code that already show off how useful these new elements are!

    My favorite example is the gyroscope. It can detect when the weapon is pointing up or down - so at the start of the match, players can choose their team simply by picking up the weapon at a certain moment. I call that quite useful!

    Secondly, the Ruby backend is also nearly complete - not just for the new hardware, but for a completely overhauled game control system.
    With the current code, it's very easy to define various states of your game (such as starting, team selection, prep, active gameplay and a post-game celebration), and switch between these manually.
    There's also a way to register various configurations of games into Ruby, and select a game via MQTT, meaning that it's now feasible to set up a central, "always on" server from which games can be started!

    What's next?

    More importantly, with the individual Lasertag components coming to a polished state, we have started working on the system as a whole.

    We bought a new Raspberry Pi 3 A+, which we will turn into a proper central LZRTag server. It will have more power than the RPi Zero we are using right now, but more importantly, it also has a USB and Ethernet port, giving us much better connectivity options than with just the Zero. 

    The extra processing power will also be relevant to host a webserver!

    That's right, we finally started to work on the Lasertag's web app. React + MQTT is turning out to be a perfect combination, and we were already able to extract all relevant information on players and display it live!
    We'll have to create a good design first, and especially optimize the whole thing for mobile viewing as well as for a big "scoreboard" screen, but those tasks are surmountable.

    Video pls?

    Well, right now there just is a lot of small, disconnected stuff going on. Showing each element off individually will be tricky.
    Once we properly set up the Raspberry 3 A+ and got all five current sets running with an example game though, we will definitely provide you guys with a rich video showing off the features of our system!

    There will also be more documentation incoming on the Ruby gem and setting up the Raspberry Pi as we go along, and we're almost done tweaking the 3D printed casing for the new system and will be uploading a zip with the files soon!

  • You want your glowy toys? Take it!

    Xasin09/23/2019 at 20:34 0 comments

    That's what I'm counting on~
    I used to want you to beep, but now I only want you ooonn~

    Heh, couldn't help myself there.

    A lot has been happening with the Lasertag sets recently. Sadly, most of it has to do with internal reconfigurations and polishing. I'm slowly working on adding the new features that the hardware has given me, and it has been going very well! 

    The Nav Switch works super well, the weapon's power supply is stable, charging works just fine... The Ruby-Side is getting a good amount of affection too, making sure it's the best it can be for the new stuff.

    But ... I felt like doing something ... Silly. Something to really savor what it means to have four whole Lasertag sets at once. And there was no better way to do that, than to make them play "Cara Mia", the Portal 2 turret song in the end sequence.

    One thing that really swept me off my feet here was an experience that I think many of you can cherish.

    While trying to play the song, bugs and glitchy sounds kept popping up. I thought it was some kind of malfunction, maybe a faulty packet transmission... But when I cleared up the typo that caused a unsigned vs. signed calculation, it suddenly all came together as a ... Frankly quite stunning melody.

    We hackers deal with randomness and glitches all the time, constantly trying to turn it into some form of pattern, rhythm, music, or art. It was quite poetic, really.

  • First Bootup of 3.2!

    Xasin09/18/2019 at 09:07 1 comment

    Aw hell yeah <3 

    Aisler took its time with delivering the PCBs, so this project log is coming up a little later than expected.
    However, as usual, the wait time was more than worth it! The PCBs are of the usual high quality I've come to know from them, and the stencil with it was perfect as well.

    Perfect solder paste application, partly thanks to the good stencil, partly thanks to the good stencil-holder I was allowed to use~

    I had just gone through an exam, so sitting down and being able to take some time to solder the Lasertag was ... Actually kinda tranquil.
    It certainly began to rapidly eat up any sense of time I had left, so I was able to, somehow, sit through an entire morning and afternoon just soldering away :>

    So, enough of the talk, let's share some pretty pictures!

    ...

    Ok I might have forgotten to take more pictures.
    I did, however, not forget to write a detailed assembly guide over on GitHub :> 

    Here's the awesome extra: Everything worked first try!
    Seriously, how often does that happen? It did make me rather proud, in a way :>
    The only thing that went wrong was the fact that I didn't have enough PMBT2222A transistors, which means that for now not all weapons have their vibration motor running, but for initial programming etc. that's no problem at all.

    A few minutes after finishing up their solder, I was already able to get some lovely blink action running~

    Gha, just look at these precious little babies! 
    The fourth one is functional too, I just didn't have a USB cable or LiPo at hand to run it.

    So yeah, Revision 3.2 is finally underway at basically full speed. We've even already started adjusting the 3D casing for the new navigation switch at the side, and will be printing them out either today or tomorrow, so stay tuned! 

    It's going well :>

  • Lights? Check

    Xasin09/12/2019 at 21:16 0 comments

    Alright, so it seems Aisler is taking their sweet time with the new boards...
    It's still quicker than LCSC, and they'll be here tomorrow, but the wait was a biiit annoying. Happens <.<

    The DigiKey components arrived though, and oh boy: <3

    In the mean time however, I was able to work on some other, extremely important and long-awaited code rewrite:
    The light handling! 

    Before, a lot of the patterns were defined in a rather static manner, making it hard to add new effects and get them integrated in the code in a smooth fashion.

    I was finally able to change this by using a completely new, class-based approach with a proper, abstract interface and a list of components to render.
    The result is a very easy to expand, stable, and quite stunning new effects system!

    I think the video here shows it off best:

    I'll be reviewing the changes in a GitHub PR soon. Those that are interested can poke me for a link :>

    And next monday?
    Time for the new hardware to be soldered~

View all 20 project logs

  • 1
    Solder things up!

    The first step to any good hardware project like this is to take some time (i.e. a whole afternoon <.<) and solder up your first batch of sets.

    For this, you will need:

    • A package from Aisler, found here: https://aisler.net/p/QLILZEMV
    • A couple of standard value 0805 Caps (47uF, 10uF, 1uF and 100nF, though you can use what you have)
    • And a few 0805 resistors (10k, lots of 220R, 100k and 200k) 

    Oh, yeah, and buy some solder paste, because this PCB is best made with hot air reflow due to QFN components on the backside!

    All ready?
    Great, then head over to the GitHub wiki page for the more detailed, up-to-date instructions!

  • 2
    Print and assemble the casing!

    Any good piece of hardware needs an appealing and sturdy casing to work right, doesn't it?
    That's the same for this project, and we got you covered with an easily 3D printable frame!

    The model provided in the files consists of multiple parts. Model pieces named "COREx" are what you will definitely need to print - these are:

    • The central core that holds speaker, PCB, battery, LED, and so forth
    • The two side panel pieces that will cover the PCB.

    If you have a multi-material printer, or know how to use Prusa's Single Extruder Multi Material feature with manual filament swaps, there are a few extra models to let you add some style to the casings. The appropriate model pieces will be named "COREx_MODa.b", with "a" being the material number and b just an identifier.
    I recommend a clear material for the pieces going below the side-cover slits, and a nice, bright, contrasting material for the top indicators to add some "pop"!

    When the central holder is printed you can already start assembling it:

    1. Carefully insert the PCB. The navigation switch has to slide through the hole for it, so you need to angle the PCB a little and push the nav switch in. Then, just push the PCB into the frame and position it until the screw holes line up with the screw mounts on the printed piece.
    2. Screw the PCB in place with two M3 nuts and short (6mm) M3 screws. It should look a little like this:
    3. Prepare the speaker, button and switch. We'll glue them in in the next step which will make their solder points hard to reach, so we need to add some wire now. The button needs a bit of wire going from its upper left and bottom right pins to the two upper connection points next to the JST connector.
      The speaker's wires need to reach from the front nozzle section of the casing to the two connection points next to the ESP32 - or, if you use a breakout board for the I2S audio, to that.
      The power switch needs its wires to reach from the little cutout below the D-SUB connector to the two connection points above the battery JST connector. 

    4. Glue in the different components!
      You can use either a strong adhesive tape or something like loctite or cyanacrylate. Important is just that it can solidly connect the different parts to the frame, but that it also doesn't seep into the mechanics of the button and switch.
      For the switch and speaker you won't need that much glue, since neither will experience that much force - but for the trigger button I highly recommend a little more, just because players will probably be tempted to smash it a little harder than they need to. 

    5. Push in the two front LEDs (3mm IR LED and the WS2812) into their respective spots in the casing. You shouldn't need glue to fixate them since the case should fit them snugly, but it can't hurt to add a bit to make sure their bond lasts.
      Once they are in place, you can solder them up, using some copper wire to hook them to the six connection on the front of the PCB. 
      You shouldn't have to cross any wires over one another, but I highly recommend double-checking the polarity of the WS2812 and the IR diode!

    6. Slide in the battery into the holder. Depending on the type of battery you get, 

    7. Push M3 nuts into the six attachment points on the top and bottom of the core casing. You can fixate them by heating them up so the plastic melts around them, or just by adding a little more glue. Either way, make sure they sit flush with the surface of the casing 

    8. Screw on the top and bottom halves using the same small M3 screws as for the PCB!
      If everything went well, your piece should look somewhat like this now:

       
    9. And now?
      Plug the PCB into your computer via USB. If the firmware is already loaded it should start charging the battery (indicated by a very slowly growing battery LED). If not, you can go to the next step to flash the firmware of  the ESP and configure your access point

View all instructions

Enjoy this project?

Share

Discussions

MRSalguod wrote 11/09/2023 at 03:50 point

@Xasin Are you still working on an update for this?

  Are you sure? yes | no

Rick M wrote 07/17/2022 at 21:01 point

Do you have a PDF of the schematics? Do you transmit an ID with the shot? How do you do that?

  Are you sure? yes | no

anthony.webb wrote 02/13/2021 at 19:41 point

@Xasin have you considered using a mesh network on the esp32? https://www.espressif.com/en/products/sdks/esp-wifi-mesh/overview

  Are you sure? yes | no

Xasin wrote 02/13/2021 at 20:05 point

Maybe!
I haven't tried it out yet, but I also don't really see the benefits. A mesh network might have pretty high latencies, depending on how the ESPs are connected. I measure pretty nasty ~200ms ping times sometimes with the ESP directly on a WiFi AP with minimal power saving settings, so meshing the ESPs might add a lot to the latency.

Setting up WiFi routers for a proper network connection seems more sensible.

Having said that, if someone knows more about the ESP Mesh performance, I'd be a little interested. Could make the game field a bit larger :D

  Are you sure? yes | no

anthony.webb wrote 02/13/2021 at 21:45 point

I suppose it depends on the kind of experience you are building.  As you pointed out, open air outdoor military simulation type experiences could benefit greatly from a mesh.  Latency might not be an issue depending on what the UX is.  I may give this a go https://gitlab.com/painlessMesh/painlessMesh https://www.hackster.io/davidefa/esp32-wireless-mesh-made-easy-with-painlessmesh-part-1-f716f5

  Are you sure? yes | no

Xasin wrote 02/13/2021 at 23:36 point

Well, even for open-air type installations, it wouldn't be too hard to set up a bigger WiFi grid.
Get a beefy outdoor WiFi hotspot with decent range, set it up on an elevated position, and potentially add a few small WiFi repeaters throughout the arena to cover more occluded spots... Should be fine.

I do think that latency would be noticeable because every hit that a player gets has to be sent to the server for confirmation. That is how my system avoids having a single shot kill multiple targets.
But that also means that even just 500ms round-trip time means it takes 1 to 2 seconds before the weapon registers that it's supposed to now be dead :P

  Are you sure? yes | no

anthony.webb wrote 02/13/2021 at 23:48 point

Thats an interesting issue I had not considered (the single shot hitting multiple targets problem)  Not sure if that would be considered a bug or a feature :) I wonder how difficult it is going to be to really hone in the IR to avoid spillover, perhaps that is really difficult, I need to play around with the power levels I send to the emitter to see if this has any effect.  I also have some lenses that I am excited to play with.

  Are you sure? yes | no

ko4dnm wrote 02/12/2021 at 23:44 point

This looks really cool. I'm getting together different gerbers to order after Chinese New Years is over and was wondering where the project stands as far as functionality, updates, bugs, etc. I'd love to try this out with the IR laser you mentioned below 

  Are you sure? yes | no

Xasin wrote 02/13/2021 at 10:05 point

Hi Ko4dnm!

The current hardware will work, I have four Lasertag sets with it in my possession and so far it has been quite nice to use them.

However, I do advise you to wait for me to get around to the redesign of the hardware, in approx. 1 year or so.
I want to add a bunch of important features such as better haptic feedback, better battery power monitoring and regulation, as well as fixing a few small issues with the LEDs etc.

The main difference will be that I intend to use the upcoming ESP32-S3. The increase in GPIO pin count means more peripherals, and the Vectoring Instructions can hopefully be used to accelerate the OPUS audio playback to smooth out some issues I am having in the current version.

  Are you sure? yes | no

ko4dnm wrote 02/15/2021 at 15:37 point

Sounds good, I appreciate the reply and transparency. 

I'm happy to see a project with continued support and future plans, so I think I'm going to order a set of 10 from PCBway to use until the updated hardware comes out -- and I'd be happy to test features or let you know of any issues if that would help.

You probably are aware of this, but if not, PCBWay also has a shared projects database where they supposedly give you 10% of the proceeds from anyone that orders your boards.

  Are you sure? yes | no

Xasin wrote 02/16/2021 at 09:02 point

Alright, keep me reported on the progress of your adventures!
I believe that the KiCAD Files I uploaded here on HackADay should be the most recent ones. Do *not* use the files from GitHub from the Master branch, it's a bit outdated because I got rather messy about merging branches in.

You might also need to fiddle with the software a bit to get it to compile, I'll have to publish some changes to make the audio work with the newer audio system that I wrote, but those don't require hardware changes.

And no, I had no idea that PCBWay has that shared project database. That does sound very nice though, and I'll have to look into that for the next revision!

  Are you sure? yes | no

ko4dnm wrote 02/19/2021 at 17:37 point

Will do! Is the 3.2 KiCad rev the one I should be using? In the description here on Hackaday, it says to use the GitHub files, but both GitHub and Hackaday seem to be rev 3.2.  This is the Hackaday folder (this one says last update 2019--unless there's another one somewhere else) folder: https://cdn.hackaday.io/files/1608046879838336/KiCAD_R_3.2.zip         Here's the pcbway shared projects: https://www.pcbway.com/project/  -- I found some cool projects using it, plus it's good to know that the developers are getting something back.

  Are you sure? yes | no

Xasin wrote 02/20/2021 at 13:30 point

https://www.pcbway.com/project/shareproject/LZRTag_Project_Revision_3_2.html

Does this look about right?
I have not used PCBWay before. Also, caution, I didn't add the BOM-File yet, partly because I don't have one for all the smaller components.

I checked, the KiCAD file uploaded here on HackADay is the latest one, if you want you can use it to check which components you need.

  Are you sure? yes | no

ko4dnm wrote 02/20/2021 at 16:10 point

Cool, thanks! No problem about the BOM - I probably have most of the passive components, I'll try running the KiCAD BOM output. I replaced the IR sensors from the files with an eCAD model from mouser so that the sensor board outputs the BOM properly also. Will keep you posted!

  Are you sure? yes | no

jason mantor wrote 01/09/2021 at 19:43 point

Would it be possible to use an ESP32 thing from Spark fun to run your code?

  Are you sure? yes | no

Xasin wrote 01/11/2021 at 14:29 point

Yes, quite possibly!

You should take a look at which pins are available on the ESP32 Thing, and you might need to change the pin layout a bit if some of the ones that I use are occupied.

But in general, any ESP32 WROOM Module with at least 4MB Flash should be sufficient to run this code, there aren't that many important prerequisites.

  Are you sure? yes | no

Xasin wrote 12/26/2020 at 19:08 point

@Anthony Webb 

Good news, first things first: I just bought a proper Unity asset pack for Sci-Fi weapon SFX, and they are AMAZING! 
Will have to do a video of that soon :>

The receiver needs to be a 40kHz IR receiver, I used the TSOP32240 (DigiKey MPN) - a bit pricy but it delivers very clean data output.

The original transmitter diode is a SFH 4346 (which might be discontinued now?), but I really want to see what this new diode like the VSLY5940 can do.

I recommend a driving BJT or Small-Signal FET, anything that can provide the ~100mA that we will be pumping through the transmitter diode. Apart from that, you won't need anything more.

Keep in mind that the VSLY doesn't need much current since it's a laser, so maybe add a resistor, measure the current and adjust until it's in the recommended operating current range. It might even be OK to run it directly off of the ESP32's I/O if it's below 10mA.

For the current IR LED I actually didn't use any resistor at all, and probably pumped a few 100mA's through it using a BJT, but we don't need to do that with the VSLY.

  Are you sure? yes | no

Anthony Webb wrote 12/30/2020 at 01:46 point

VSLY5940 is backordered at DigiKey, but I should see them in the next couple weeks.  Got everything needed to breadboard up some tests.  I'll let you know how things look!

  Are you sure? yes | no

Code Press wrote 02/04/2021 at 06:27 point

@Xasin I have the VSLY5940 in house and have set up a test right for it.  It is communicating very well.  If I shield the sides of the housing it appears to be pretty directional, of course if I do not it will spew IR all over, which was somewhat surprising.

I was curious what specific things you would like me to try?  As I understand it, I will not need any sort of lens with the VSLY5940 correct?  Are you aware of any IR camera setups that I might be able to use to display the IR pattern/size being thrown by this thing?  if I shield the sides it does seem to be pretty directional, its just hard to really know how accurate it is without being able to visualize it?

  Are you sure? yes | no

Xasin wrote 02/04/2021 at 08:41 point

Hi @Code Press, that's already great to hear!

The spillover of IR is something I experienced with other LEDs too, even with shielded sides where I used some 3D printer filaments that weren't opaque enough. The receivers are incredibly sensitive, so I think they might simply be picking up some faint reflected/diffused light coming from the emitter.

The main thing that I am interested in is:

- Maximum reachable distance at night (so I can compare it with my system)
- If communication is achievable during daylight, and if so, how far it can go
- The beam spread or accuracy of the system, especially in the first five or six meters. If you can hit an enemy that is 30° away from where you're actually aiming, that's a bit annoying.

I sadly do not know of any camera setup that will definitely work. Some phone cameras can detect IR light due to a missing filter! 
And night vision cameras will definitely do the trick, they use IR LEDs as light source.

Truth be told, I am thinking of not using the VSLY5940 in favour of a LED with a lens system. The main idea here is that the beam spread would be adjustable by using a small motor to move the LED back and forth a bit, which would let the system both do very accurate long-distance shots, as well as shotgun style, close-range ones.

But knowing that the VSLY5940 will work as good long-distance emitter is awesome!

  Are you sure? yes | no

anthony.webb wrote 02/04/2021 at 14:50 point

@Xasin oops I see I was logged into my code press account.  At any rate, I will give the night vision camera thing a try.  Would be real nice to visualize that.  I was watching a video where a guy was using a lens and actually uses a RED LED to get the focus on his lens just right, also looks like the lenses are pretty cheap too https://www.youtube.com/watch?v=aKUF_zrhvQg

  Are you sure? yes | no

anthony.webb wrote 02/04/2021 at 22:25 point

@Xasin got some more info.  I am seeing the same, lots of spillover, in our testing, and that receiver is WAY sensitive (wish we could tone those down a bit) such that I really think that I'm leaning toward the lens route myself.

I did find that an old security camera I had laying around could see the IR and would work great to dial in the focus.  From the camera I could tell that the IR from the VSLY5940 is indeed pretty tight already, but the spillover is making it a little difficult to test directionally.

  Are you sure? yes | no

Joshua Grauman wrote 10/31/2020 at 22:33 point

You mention in the comments that you were thinking of using VSCEL IR Laser diodes. Have you tried that yet? What type are you looking at? Link?

  Are you sure? yes | no

Xasin wrote 11/04/2020 at 08:30 point

I haven't yet tried anything out, but I would really love it if someone were to test it <3
Right now I have some more pressing matters in Uni going on.

I was looking at a VSCEL in standard 3mm LED packaging, with about 3° beam spread. That thing would easily double the distance of the system, but might also pose more of an eye-safety risk (though honestly, I think it's minimal unless someone stares right at it while the MCU glitches out and continually activates the beam...)

Try something like the VSLY5940, it's a Vishay 950nm "Surface emitter" (I guess the term VSCEL was bought by someone else?), with 3° beam spread and an absolutely stellar 600mW/sr output power at their nominal voltage!
(Eye safety for temporary exposure is 100W/m² or 4W/sr according to the VISHAY IR safety datasheet, so this is still OK.)

The receivers I use have a minimum irradiance of 0.25mW/m², so... Ok I am bad at this kind of spherical surface maths, but this is quite far <.<

  Are you sure? yes | no

Anthony Webb wrote 12/21/2020 at 04:57 point

I have a few cycles over the next month or so that I could do some R&D on this VSLY5940 device.  I'd need to get a receiver set up so I can validate the entire emitter/receiver stack.  Do you have any extra boards laying around that I could buy from you?

  Are you sure? yes | no

Xasin wrote 12/21/2020 at 10:10 point

@Anthony Webb 
I sadly don't have any spare boards I wish to part with, and not really any time to solder up a new one.

A simple test setup could consist of only an ESP32 devboard and one of the Vishay receivers (about 1€ in single quantity), which are pretty cheap and quick to get though, and the IR Sender/Receiver code is packaged in a standalone library that can be used independently of the actual Lasertag system.

What might help there is to retrofit a better checksum or redundancy, but we'll see about that.

  Are you sure? yes | no

Anthony Webb wrote 12/23/2020 at 23:33 point

Thanks for the reply @Xasin I will build up a testing environment with a couple ESP32 I have laying around if you can help me identify the hardware I will use for testing.  I am thinking of trying the VSLY5940 emitter, and maybe pick up one of the one you use in the current design, which part number is that?  Also on the receiver side of things can you get me a part number for that as well?  Will I need any other components to breadboard out this thing and start testing?  Really excited to see what kinds of improvements we can make!

  Are you sure? yes | no

NjordCZ wrote 08/05/2020 at 10:49 point

Aren't you considering MILESTAG 2 support for the lasertag protocol?  https://openlasertag.org/language/en/milestag-2-protocol/

  Are you sure? yes | no

Xasin wrote 08/05/2020 at 21:10 point

I am not, not right now. It would be possible by writing a different ESP-RMT parser, but I would essentially have to send all commands back to the Lasertag server to have them executed there.
It makes more sense to run the commands such as "Add health", "add rounds", etc., directly from the Lasertag server, and since I doubt that any MilesTag2 systems will have WiFi and/or MQTT-Capabilities, mixing devices might not make sense.

Very maybe you could Re-Use the MilesTag beacons for Ammo, health and flags though, but my protocol already supports positional beacons for that.

I do like the overall idea though - maybe I'll take some inspiration from it.

  Are you sure? yes | no

Craig Gardner wrote 05/11/2020 at 22:54 point

Looks great! How much run time do you get off a single 18650?

  Are you sure? yes | no

Xasin wrote 06/04/2020 at 08:15 point

It's hard to say, if I am to be honest, but with the current setup of the Lasertag I haven't had that much trouble running them for an hour or more with a much smaller 400mAh cell.

The ESP32 with its WiFi enabled probably averages 100mA (+ the LEDs and all that), so with a larger 18650 you can surely go an afternoon :>

  Are you sure? yes | no

Joshua Grauman wrote 03/13/2020 at 23:16 point

Nice project. I created a prototype lasertag a while back using IR leds/receivers and atmega. I've always wanted to resurrect it someday. Looking through your docs I didn't see anything about a lens. Are you using lenses to increase distance?

  Are you sure? yes | no

Joshua Grauman wrote 03/13/2020 at 23:30 point

@Xasin, I tracked down some info that I was looking at back when I was exploring it. This may be useful to you. But this person seems to have had a lot of experience with DIY lasertag back in the day and says that glass optics work well... http://web.archive.org/web/20080613050558/http://www.lasertagparts.com/mtoptics.htm

  Are you sure? yes | no

Xasin wrote 03/13/2020 at 23:39 point

Nope, I am not using any lenses!
I felt like those are hard to get, integrate and tune, and thusly would overcomplicate things for the average hacker trying to recreate this.

Right now I am thinking of buying so-called VSCEL IR Laser diodes, which might increase Range x4 at a cost of just 4€ per IR diode, with a spread of only 4°
That would make lenses even less necessary.

  Are you sure? yes | no

Simon wrote 10/10/2020 at 04:37 point

Good suggestion on the VSCEL, however have you had any thoughts on encoding information on the laser and also receiving / decoding it? I think that is where a lot of projects go back to IR, because over IR that is well understood.

Edit: nvm. I understand.

  Are you sure? yes | no

amd599 wrote 03/02/2020 at 22:13 point

Hey @Xasin - this is a really incredible project. You did a great job detailing everything out. We are working on a project and we were wondering if you do consulting work (paid, of course). If so, is there a way to get in touch with you via Skype or something? I think you'd be interested to hear what we're working  on for an experiential marketing event this summer. Please let me know when you have a chance. Great work again, very impressive!

  Are you sure? yes | no

Xasin wrote 03/04/2020 at 10:17 point

Thanks a lot for the praise, amd599!
This was my first attempt at a more community-oriented project, and I am glad to hear that it worked out.

Regarding your offer, I must politely decline. I am still a student, and with my Bachelor's thesis starting next semester I am not sure if I will have the time to give your project the attention it deserves, while also focusing on my own work.

I see no problem with offering some advice on certain issues every now and then, but I can't ensure that I will have time to reliably respond.

Thanks a lot, and I wish you the best of luck for your own endeavors!

  Are you sure? yes | no

amd599 wrote 03/12/2020 at 16:45 point

Sure thing! It's an incredible project and no worries at all. Perhaps some day in the future we can collaborate more :) Thank you for this awesome project to the community!

  Are you sure? yes | no

André Costa wrote 02/27/2020 at 15:08 point

Been interested in doing something similar and just found your project. Nice one! One small question tho, i can understand how the player detects he got hit but how do you know which player hited him?

  Are you sure? yes | no

Xasin wrote 02/27/2020 at 18:17 point

Hi Andre,
glad to hear you like my project! I hope it'll give you some inspiration.

Player hit detection is done very similarly to how TV remote controls work. The IR LED sends out a digital signal very similar to how UART looks, except at only 2000 Baud and with a 40kHz modulation on top of that.

Inside the IR Signal I've encoded a 8-bit player ID, which allows the hardware to figure out who it was hit by.

Since the data format I made is easy to expand with custom information, you could in theory also use the IR sending and receiving for other data. I've already built small positioning beacons you can use to play King Of The Hill etc.

  Are you sure? yes | no

Tomm Dool wrote 09/08/2019 at 20:49 point

Just came across you project looks great.  Going to be following this project.
Just played with a Lazertag system at the Halo: Outpost Convention in Anaheim the other weekend, provided by Battlecompany.com.  There system was one of the best I have ever seen and used. It uses a Class 1 Laser that will reach out with accuracy across a football field in day light.   They had a test target out 150 - 200ft and if you didn't have the red dot on it perfectly you would miss.  very accurate and apparently you can adjust the beam width manually based on skill level.

They also use BT to connect to head band sensors, so no wires between head band or vest.  Just a thought as I know how the wiring is the weak link in most commercial products out there.  Thought that was a fantastic idea.  The rest works over wifi so figure a ESP32 or something.

I loved how simple the system was.  you carried just a rifle and a head band connected via BT to that rifle.  It had life indicator through 4 LED that changed colour as you die. Sounds for weapons fireing, hits and enemy hits.  LED read out for shots left and a simple button to reload.  No wires.  Respawn you just had to aim your rifle at the box and it respawned you in 5 seconds.  back in game.   Controlled through there  software, that ran off of tablets and had a display for score for all to see.  Sounds exactly what you are trying to do here.  Which I love.

Looking forward to see the progress, I will be building it myself

  Are you sure? yes | no

Xasin wrote 09/11/2019 at 14:38 point

Aw, why thank you!
I recommend waiting a little while for me to receive and test the newer hardware generation, to see if there are any problems. Most likely it's fine though.

Regarding the Battlecompany com technology, there are a few reasons why I chose to do my system this way:
1) IR Lasers are a bit expensive to come by. Even if you find a model for only 10€, it would still increase the price a good bit. The best I can do is a VSCE IR Laser diode. 4° of spread, 4€ price, should give you 100m range in dark conditions :)
2) A bluetooth headpiece would require another ESP32, LiPo, charge controller ... Essentially, a whole new main board. It could add 20 to 30€ of cost, and while I agree that cables are slightly annoying, they're sadly not that big of a problem to make me want to replace them with Bluetooth. It's still cool stuff though!

Health and ammo indicators are currently not added on the weapon itself, but it's very easy to add modules via I2C to realize this. My current goal is to build a interactive Webpage though, which lets you display stats via phone or projectors or such :)

Oh, one thing that I am going to do a bit nicer is respawning:
I'll be using Infrared beacons to determine player position, and set rooms for players to respawn in, as well as to capture. No weapon-pointing necessary :>

  Are you sure? yes | no

André Costa wrote 02/27/2020 at 13:39 point

Have a question. If u only carried an headband. Did you have to headshot people to kill them?

  Are you sure? yes | no

Brandonkeithangelo wrote 09/04/2019 at 19:27 point

I fly scale RC airplanes and would like to mate this to an in-cockpit FPV setup . Xasin, seems you might be into RC as well, might you be interested in getting a project going? here's a cool setup with some fancy optics on a beautiful day- https://www.youtube.com/watch?v=L57KXqWJSDE&t=1s

  Are you sure? yes | no

Xasin wrote 09/04/2019 at 20:55 point

That sounds pretty awesome, actually!
Adapting the code here to work for FPV shouldn't be too hard. The core components like shot handling can essentially stay the same, it just needs a remote trigger and most likely a better network connection. 

I'll be focusing on the normal setup for now, getting the new hardware up and stuff, but after that ... Why not.

  Are you sure? yes | no

Brandonkeithangelo wrote 09/04/2019 at 21:43 point

Hmmm...does seem like a fair amount of work has gone into the networking aspect. I wonder if we could just drop something like an Xbee3 onto the pads and run with that!

  Are you sure? yes | no

Brandonkeithangelo wrote 09/04/2019 at 21:46 point

Also, any reason you aren't using a IR laser diode?

  Are you sure? yes | no

Xasin wrote 09/05/2019 at 06:51 point

Well, the ESP isn't just networking. It also controls all the peripherals, from Audio to the IR data transmission and WS2812 control. I could, however, connect an XBee or LoRa module, and tweak my code to communicate via that. 

Also, if you have a good source of cheap IR Lasers, please do share! 

I just haven't found any on Digikey or similar yet, and so far the IR led has worked well. A laser would be way cooler though... 

  Are you sure? yes | no

Xasin wrote 09/05/2019 at 07:00 point

Actually, I need to go back on my own word here regarding lasers.

Turns out there is a technology called Vertical Cavity Surface Emitting Laser, or VSEL 

I found a emitter for only 4€, so an acceptable price, with monochromatic light output at the wavelength of my detector, and a near perfect 4° beam divergence without further optics. Makes me wonder how far I could push the range with these! 

  Are you sure? yes | no

Dylan Brophy wrote 07/29/2019 at 15:12 point

I haven't looked at this project yet, but all your pictures look really f***ing cool.

  Are you sure? yes | no

Xasin wrote 07/29/2019 at 16:26 point

Hey, what looks good sells better!
Right now there's a bit of a lack of documentation. I'm going through some University stuff right now, and will do a new revision of the Hardware, with a proper clean-up of the Software and Documentation, and a better Server with a nice webinterface.

The whole base is fully functional though, and I got a few "in-action" videos already :>

So feel free to stick around and see what it'll turn into!

  Are you sure? yes | no

Daren Schwenke wrote 05/04/2019 at 04:01 point

I am going to *have* to build this.  Good job!

  Are you sure? yes | no

Xasin wrote 05/04/2019 at 07:00 point

!!!! 

Oh, please do! But don't order the PCBs just yet. There's a bit of a redesign I need to do, since I switched to a different audio processor, and the current design has a PCB trace shorted to ground and needs fixing.

I'm assuming you can Solder QFN parts, but if not I'll include Solder points for a breakout board to be attached on. All other parts are hand-solderable though.

  Are you sure? yes | no

Daren Schwenke wrote 05/04/2019 at 07:53 point

At this point I'm pursuing the #P2 - Pick and Place for 3D Printers project mainly to attempt to compensate for my rapidly failing ability to solder anything small without screwing it up.  :)

  Are you sure? yes | no

Boris van Galvin wrote 03/04/2019 at 21:20 point

What an amazing project! 
Many many moons ago I built the first generation of laser tag units down here in NZ, they used a 8080 processor and ran a HeNe laser tube. A real pain in the rear as after a few big knocks the mirrors would go out of alignment. The vest was constructed from motor cross armor and had a pile of small solar sensors installed to register hits.

We later changed the system to something a little more simple and used a strobe light constructed from an engine timing light. These were a little more robust but there was no communications as to who hit who.

Your project is really cool, having it set up like you have creates so many opportunities to expand on it.  

  Are you sure? yes | no

Xasin wrote 03/04/2019 at 21:33 point

Gha, your version sounds like a heck of a lot of fun too though!
I haven't done much in terms of vest equipment yet, but the connector at the back exposes a WS2812 signal for as many vest LEDs as wanted, as well as a general purpose I2C connector for other peripherals.

All source files are available for others to work with, mainly on the Github site! The PCB uses mostly hand-solderable components, so feel free to take some inspiration from it :D

  Are you sure? yes | no

Daren Schwenke wrote 05/04/2019 at 08:00 point

All the HeNe lasers I used in the 8080 era already had bonded optics.  I guess I was privileged and didn't even realize it..

  Are you sure? yes | no

Michael Obed wrote 09/25/2018 at 12:04 point

This looks awesome, man! Very promising!

I've implemented a Laser Tag project myself using a very similar method...I initially used an ESP8266 + Arduino IDE for the hardware side and C for the software side. It worked well, but for scalability and reliability I re-did the server side in C++ and implemented checksums and a HTTP web server. I want to do the hardware with the ESP-32 as well, as the extra power and comms are attractive...

Who knows, maybe that project will make it here too! ;)

  Are you sure? yes | no

Xasin wrote 10/02/2018 at 18:27 point

You made the server with HTTP and in C? 
Now that's kind of impressive! I had no idea how to make something like that, so I chose Ruby for my server software. I intend to stick with it though, as it is a lot more flexible than C or C++ in terms of live reloading of software - something that could come in very useful for custom servers or similar.

At least I didn't use the Arduino IDE - I prefer the cleaner, more professional environment of Eclipse (as well as the C++ autocompletion it offers <3)

  Are you sure? yes | no

HP (@banjohat) wrote 09/12/2018 at 05:23 point

This is great!

Some interresting details in your build - how uncool of visahy to call the IR receiver TSOP >_< it's not even an SMD package :P

Are you only registering hits on the gun? I would love to see a vest with targets as well!

  Are you sure? yes | no

Xasin wrote 09/13/2018 at 17:04 point

Oh, thanks for pointing out my mistake!
I accidentally called it that because the vendor I buy my parts from has their own naming scheme. Their IDs vary quite a bit from the original ones, I must have mistaken that!

Also, it's exactly the opposite - the guns don't have any built-in sensors (although adding one is trivial), and it's only the "vest piece" (or in this case a tiny strap-on shoulder sensor) that registers the hits.
Since the sensors I use have a pull-down output they're easy to connect in parallel, to have as much sensor coverage as you need.

  Are you sure? yes | no

dlhavema wrote 09/08/2018 at 05:30 point

post some code.  Super cool start man

  Are you sure? yes | no

Xasin wrote 09/08/2018 at 06:49 point

The link to the GitHub is already there. I'm still working on a bit of documentation, but it's mostly self-explanatory. 

There's also a directory with one or two example game scripts ^^

  Are you sure? yes | no

Similar Projects

Does this project spark your interest?

Become a member to follow this project and never miss any updates