 David Karla
The initial idea was to make something that I could use to control the 4 looping samples. The four ultra cute push buttons seemed like a good idea at the time, and this is in standard Arduino territory. The angled layout let me access the buttons with my feet in a minimally compact way. Adding a socket for an expression pedal is likewise straightforward. The real inspiration, and for me, the real fun, was the idea of using an accelerometer on the end of the sax to control the X-Y parameters of the KPIII. It's a different way of interacting, and it's something that's very expressive as a player ... and it just comes out naturally as a movement with the right kind of intensity. Connecting this was going to be a bit more involved (and this is my first 'duino project), but fortunately I2C with the ADXL 345 is also relatively straight forward.
Connecting the ADXL was a more complex issue, as it needed to be attached to the horn. In the end, I used a small separate project box, and made plugs for the ever plentiful cat5 cable using ethernet keystone jacks,
There's an RGB LED that will flash blue for a second on startup if the ADXL initializes ok, and then turns green. It will also flash briefly for the buttons. It will also flash yellow in 'edit' mode where I can adjust the parameters for the ADXL via a standard button/rotary knob. Edit mode wasn't am essential feature, as I had a very specific plan for usage, but as the 'duino would be inaccessible, a plan B for reconfiguration was a good idea.
Of the problems I faced, most were to do with the very limited space I allowed myself. The 'duino clone was just about squeezed as tight as it could go, and there was barely enough room for the optocoupler that the MIDI in required. Both project boxes could just fit the keystone jacks and the other sockets. Other difficulties were in trying to work with the zany, oddly shaped animal buttons, which had to be filed by hand to get fully smooth.
Arduino source code is at https://github.com/dakyri/stompy

 Dave Ehnebuske
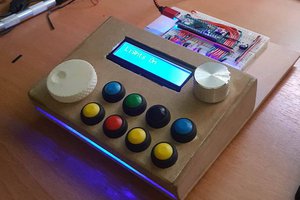
 Victor Frost
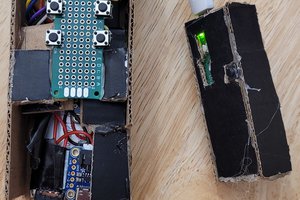
 Dylan Turner
 Jerry Isdale