Close
0%
0%

SimplePnP

Very low cost Pick and Place machine

Public Chat
Similar projects worth following
This project has one goal: deliver a reliable and expandable Pick and Place machine at a hobby 3D printer price point.

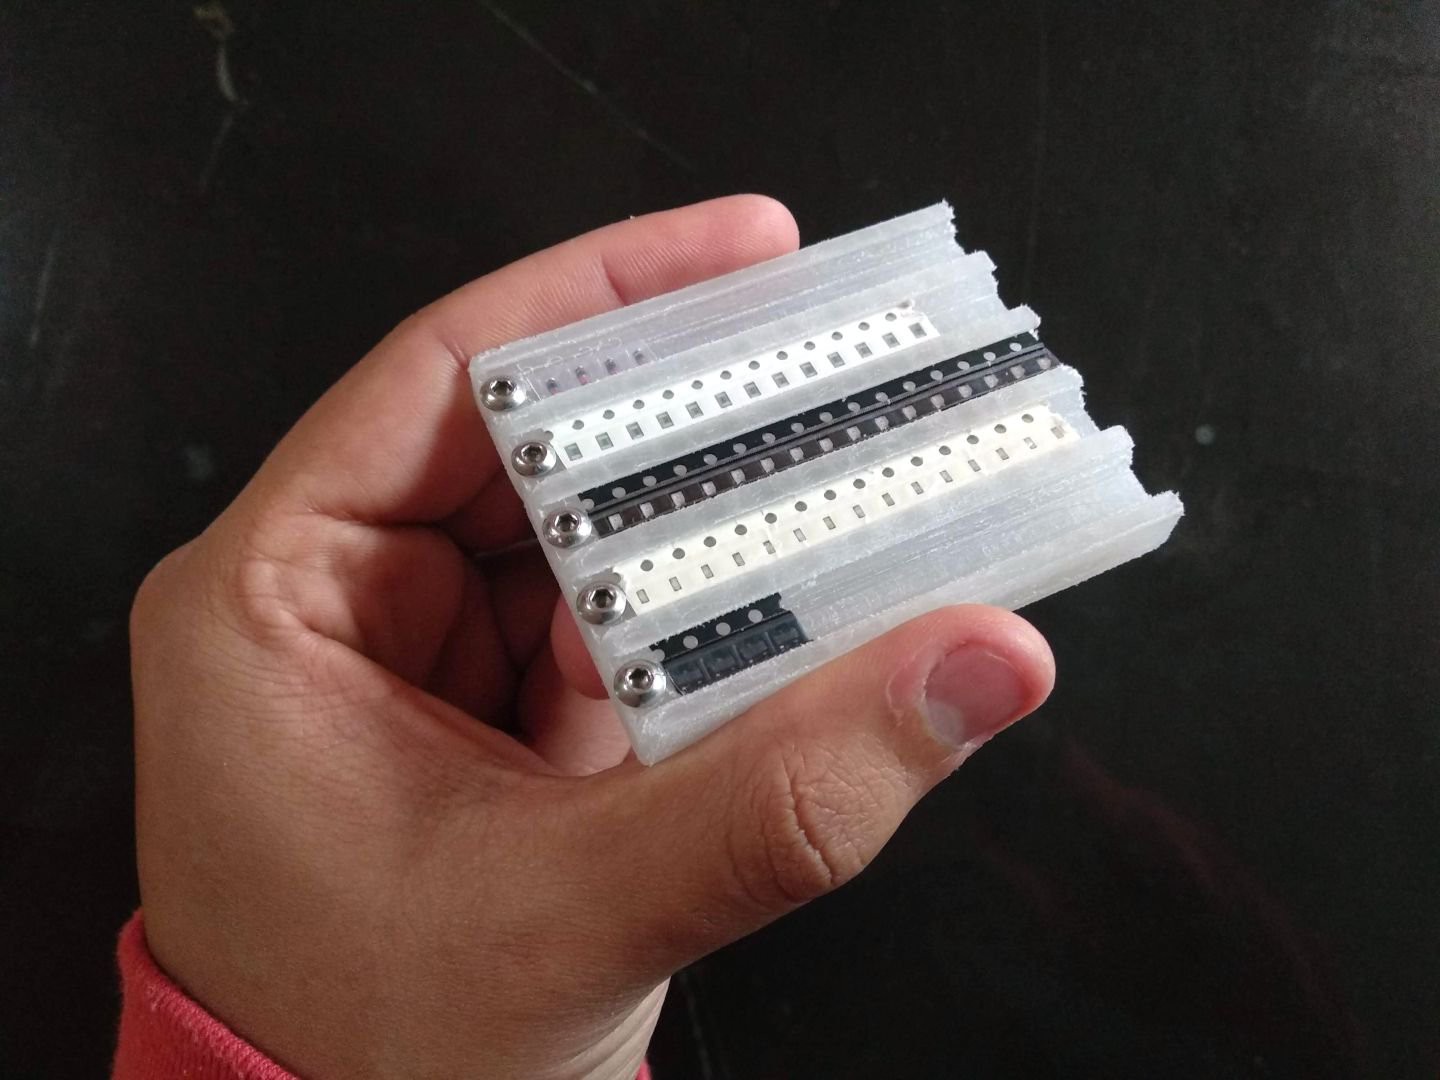
Printed circuit board assembly is a critical part of building electronic devices. Prototypes are often built by hand, and high volume PCB batches are normally handled by specialized machines in a factory assembly line. But there are several cases where hand assembly is slow, difficult and very tedious, and off sourcing the work to a factory is not cost effective or has some constrains that make this route undesirable.

Having a personal Pick and Place machine is a way to solve this issues. While not as fast as an industrial machine, it easily beats hand assembly. The goal of this project is to provide an affordable Pick and Place machine.

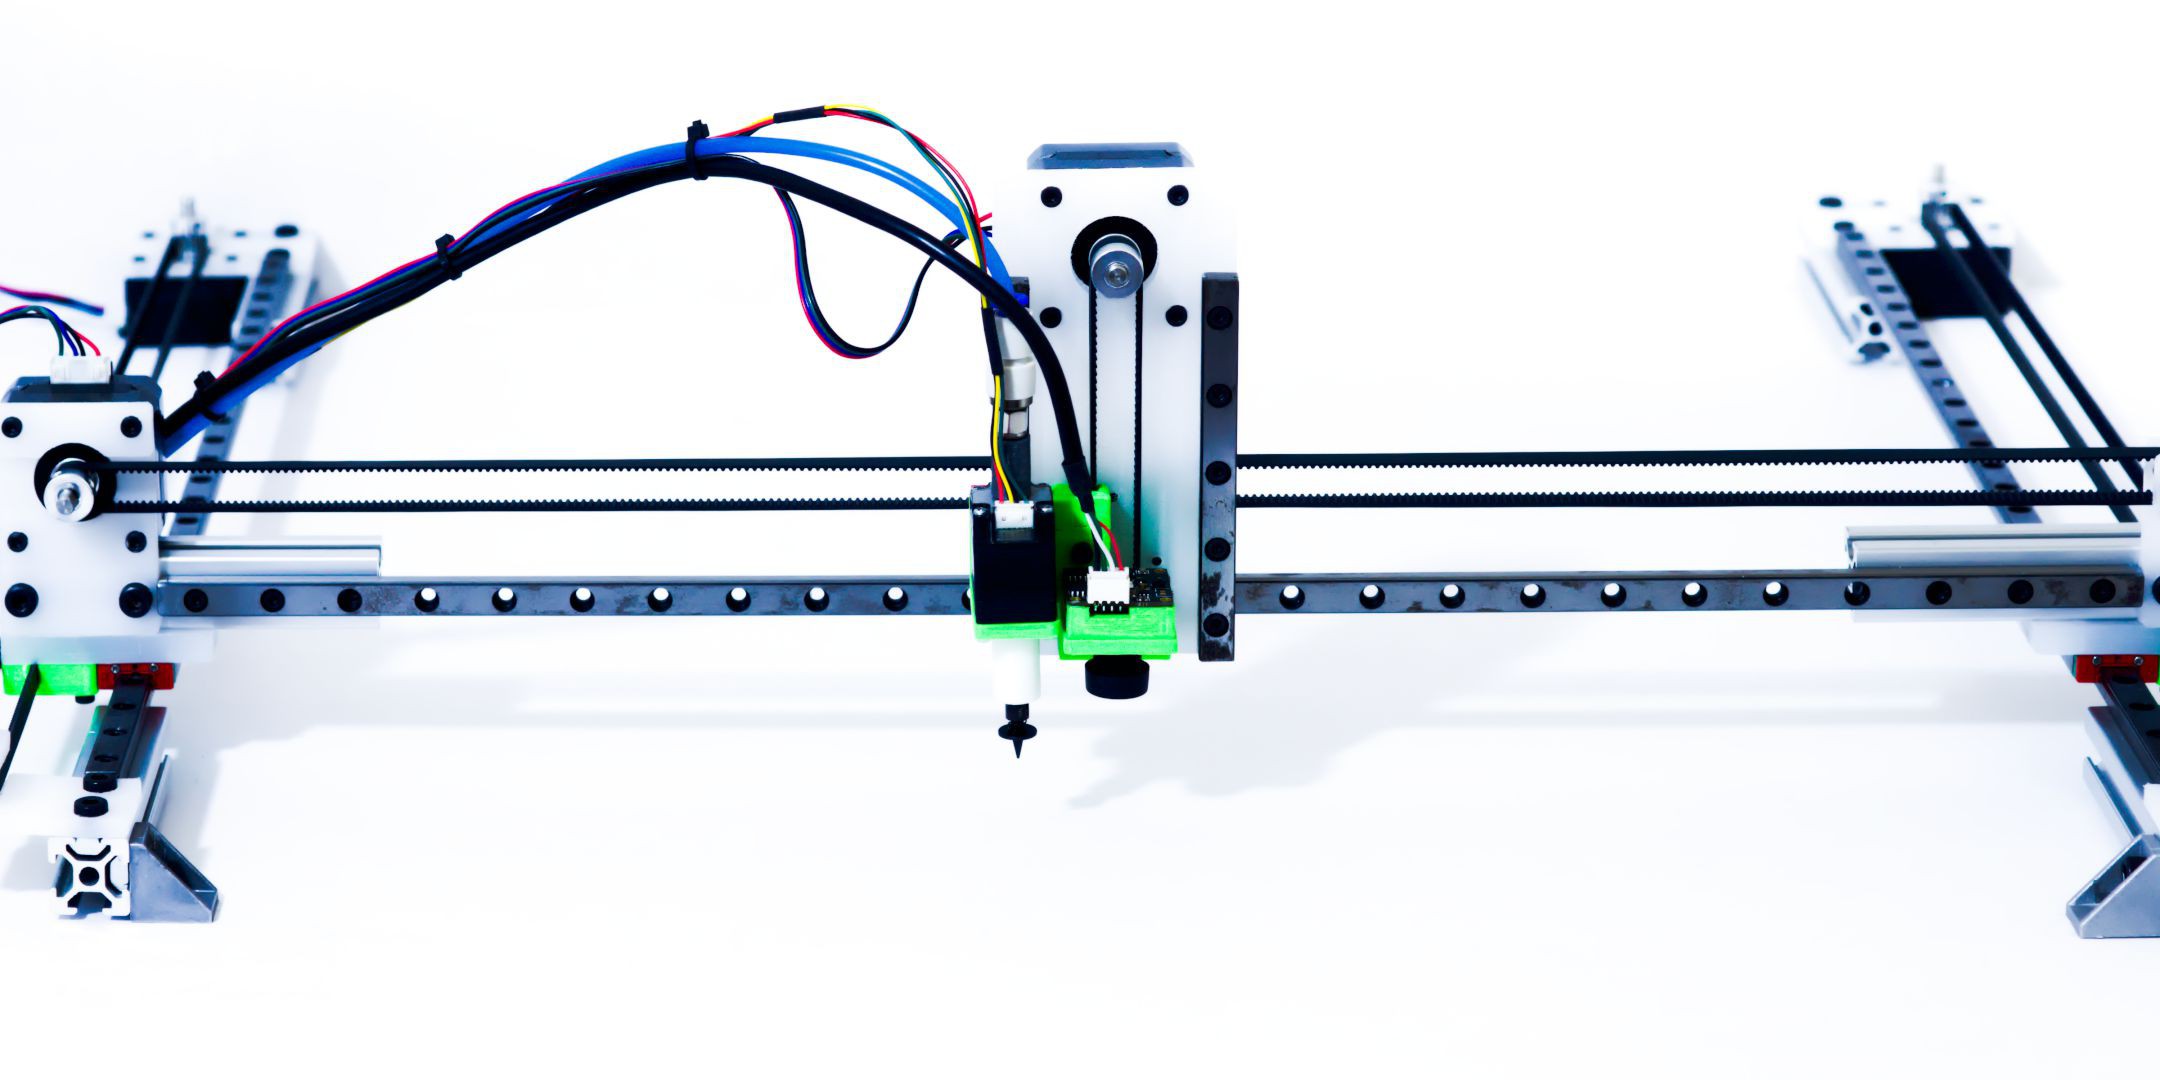
This Pick and Place machine can be divided in two parts: the head and the table.

The head is the part used to grip every component meant to be installed on a PCB. It uses a hollow shaft stepper motor to rotate the parts and allow a DC vacuum pump to grab them through a nozzle and a camera to help locating features and components.

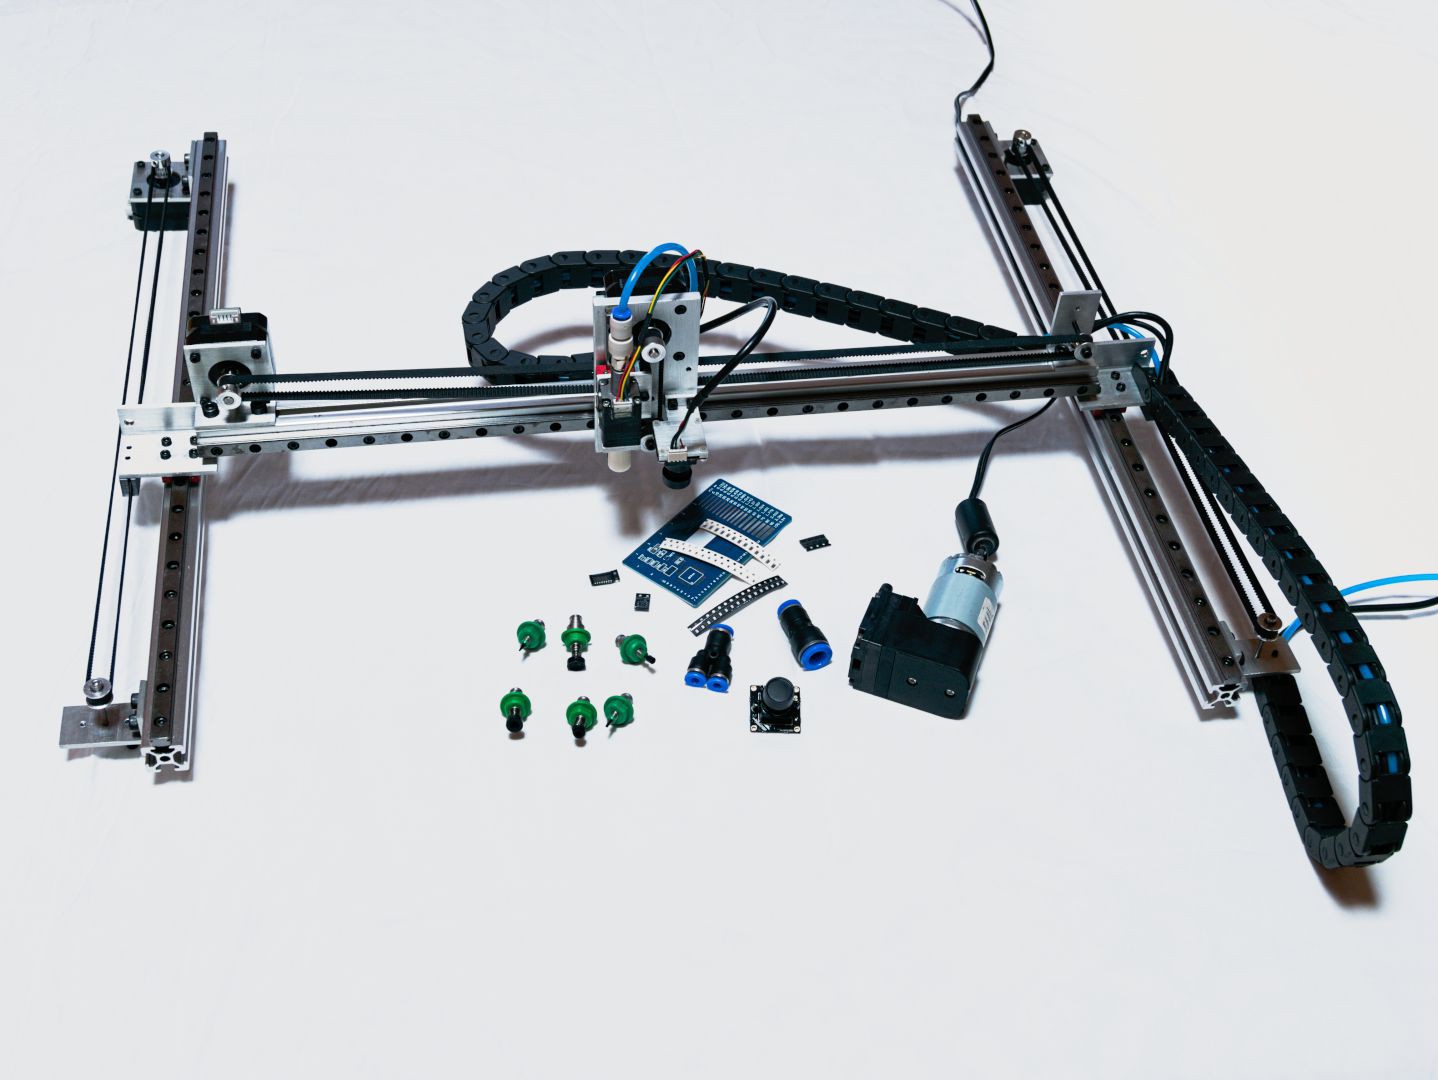
The table is meant to position the head in the correct spot to hold and release each component. It is a gantry style Cartesian system built from aluminum extrusion and uses linear rails, stepper motors and timing belts to perform motion.

A computer running OpenPnP is used as the brains of the machine, which sends the control commands to a pair of GRBL boards that control the motion and the rest of the operations needed to perform the PCB assembly job.

Its specs are as follows:

X travel

300 mm


Y travel

300 mm


Z travel

23 mm


Footprint

650×500×200 mm


CPH

750

With vision assist

Component size

Up to 0402 (1005 metric)


Nozzle type

Juki 5xx


Vision

Top vision

Optional bottom vision

Number of Heads

1 (base model)

Optional dual head

Power consumption

60 W

With a 12 V power supply

Weight

4 kg

Bench mountable

Bill of materials - preproduction.ods

preeliminary bill of materials

spreadsheet - 17.85 kB - 12/18/2019 at 19:03

Download

  • Machined strip feeder holder

    ottoragam01/05/2020 at 23:59 0 comments

    Yesterday I gave machining an 8mm strip feeder with a dovetail cutter a try. Material is 10 mm thick polyethylene, which isn't very rigid and makes a lot of fuzzies (even after trying to sand them away), but is quite cheaper than acetal, so it's acceptable for the prototyping stage.

    The dovetail angle is 45 degrees. The tape fit was quite tight, so I think I'm gonna change the angle to 60º and play with the dimensions a little bit more before I publish the tray design file.

  • Github repo

    ottoragam12/15/2019 at 00:17 0 comments

    I'm happy to announce the Github repo is live. You can find the files for laser cut motor and linear carriage brackets, along with a complete set of parts for the vacuum head, icluding .stl files for items that must be 3D printed. https://github.com/ottoragam/SimplePnP

    I'll also upload a BOM as soon as I can.

  • SimplePnP crowdfunding campaing begins

    ottoragam12/13/2019 at 18:58 0 comments

    My crowdfunding campaign for the pick and place machine is now live at Crowdsupply

    https://www.crowdsupply.com/citrus-cnc/simplepnp

    I'll be posting the source files to the repository on the next days, so keep an eye out for it if you're interested on that info.

  • Pick and place on Crowdsupply

    ottoragam10/22/2019 at 19:41 0 comments

    I'm making SimplePnP available for purchase. You can now subscribe to the project on Crowdsupply to be notified when its crowdfunding campaign begins.

    https://www.crowdsupply.com/citrus-cnc/simplepnp

  • Using OpenPnP

    ottoragam09/04/2019 at 03:03 2 comments

    OpenPnP is a Java based open source software program that can be used with this machine in order to program and run PCB assembly jobs. This log will cover the configuration of machine drivers, head and feeders. In depth information about configuring OpenPnP can be found at https://github.com/openpnp/openpnp/wiki

    Machine Drivers

    A machine driver contains all the info pertaining the communication between a motion controller (GRBL in this case) and a computer running OpenPnP. SimplePnP uses two separate motion controllers, one for the table and another one for the head, so we need to set up the table driver and the head sub driver.

    Table Driver Setup

    Setting

    Message

    COMMAND_CONFIRM_REGEX

    OK

    CONNECT_COMMAND

    $X

    G90

    HOME_COMMAND

    $H

    G92 X0 Y0 Z0

    MOVE_TO_COMMAND

    G1 {Y:X%.4f} {Y:Y%.4f} {X:Z%.4f} F{FeedRate:%.0f}

    G4 P0

    PICK_COMMAND

    M8

    PLACE_COMMAND

    M9

    Head Sub Driver

    Setting

    Message

    COMMAND_CONFIRM_REGEX

    OK

    CONNECT_COMMAND

    $X

    G90

    HOME_COMMAND

    G92 X0 Y0 Z0

    MOVE_TO_COMMAND

    G1 {Z:X%.4f} {Rotation:Z%.4f} F{FeedRate:%.0f}

    G4 P0

    The machine.xml sub driver section should look like this:

    Head

    The head machine component has the information regarding the nozzle carriage and bottom looking camera parameters and capabilities. OpenPnP allows the user to set the preferred head parking location and the soft travel limits.

    Nozzle

    To set up a nozzle for the SimplePnP machine, the user needs to do the following:

    • Set nozzle X offset

    • Activate “Limit Rotation to 180º”

    • Set pick and place dwell times to 350 ms

    • Create default nozzle tip and mark it as compatible with the nozzle

    Camera

    To set up a nozzle for the SimplePnP machine, the user needs to do the following:

    • Set top camera as down looking

    • Configure units per pixel depending on Z distance from surface

    • Calibrate test using built in routine

  • GRBL Motion Controllers

    ottoragam09/04/2019 at 01:45 1 comment

    This machine uses a pair of Arduino based GRBL controllers with V1.1 firmware for both the Cartesian table and vacuum head. Only the controller parameters will be presented in this log. Instructions on how to program GRBL parameters are available on the web.

    Parameters

    Table

    Head

    Table

    Head

    $0=10

    $0=10

    $26=250

    $26=250

    $1=50

    $1=255

    $27=1.000

    $27=1.000

    $2=0

    $2=0

    $30=1000

    $30=1000

    $3=0

    $3=1

    $31=0

    $31=0

    $4=0

    $4=0

    $32=0

    $32=0

    $5=1

    $5=1

    $100=50.000

    $100=50.000

    $6=0

    $6=0

    $101=50.000

    $101=50.000

    $10=1

    $10=1

    $102=50.000

    $102=4.444

    $11=0.010

    $11=0.010

    $110=20000.000

    $110=18000.000

    $12=0.002

    $12=0.002

    $111=20000.000

    $111=18000.000

    $13=0

    $13=0

    $112=20000.000

    $112=18000.000

    $20=1

    $20=0

    $120=1000.000

    $120=1000.000

    $21=0

    $21=0

    $121=1000.000

    $121=1000.000

    $22=1

    $22=1

    $122=1000.000

    $122=1000.000

    $23=7

    $23=0

    $130=310.000

    $130=23.000

    $24=25.000

    $24=25.000

    $131=310.000

    $131=23.000

    $25=1000.000

    $25=1000.000

    $132=310.000

    $132=360.000

  • Presenting the machine

    ottoragam08/24/2019 at 19:24 0 comments

    I wanted to make a video to showcase the general operation of the SimplePnP. The machine is sorting a few scrabble letters using my new Samsung CP45 nozzle holder, without computer vision assistance. Here I'm using a dial vacuum gauge to make sure suction is achieved. Normally, a pressure transducer is used instead, to provide feedback on whether the component was picked correctly or not.


    Let me also show you another video of the machine actually picking some 0603 resistors. If you wonder why it looks a bit sloppy, it's because, at the time of recording that video, I was turning the vacuum pump on and off by hand, and my placement Z height wasn't set up correctly.


    I'm currently working on a more complete demo board, so keep tuned for a full video of the machine in action.

View all 7 project logs

Enjoy this project?

Share

Discussions

Simon Merrett wrote 12/19/2019 at 09:54 point

@ottoragam how many USB ports will this need. So far I make it 2x for grbl shields/controllers and 1x per camera used. Is that correct?

Also, have you measured any deflection in the y axis on the x gantry during rapid y acceleration/deceleration? Seems a bit too flexible not to have any beam other than the linear rail on there!

  Are you sure? yes | no

ottoragam wrote 12/19/2019 at 18:38 point

That's correct. The GRBLs can be connected via USB hub or with something like a CP2105 USB to dual serial converter, to save a port.

I haven't measured the deflection yet. I recently ordered a 5 micron resolution quadrature linear scale to do some more characterization of the machine. I should be able to install it in the middle of the gantry and measure how it oscillates. I don't believe it is a problem tho, the head is not very heavy and the acceleration is not very high (1 m/s^2 at most). The machine has also quite a bit of time to settle, as the Z motion only starts after the X/Y moves are complete, and the software waits a few hundred of milliseconds, for the camera to produce a usable frame and for the pump to reach its working pressure.

  Are you sure? yes | no

James Newton wrote 12/11/2019 at 19:31 point

If you leave the pump on, and use a two port valve, you can actually get a little puff of air to blow the part off when the valve releases.

  Are you sure? yes | no

ottoragam wrote 12/13/2019 at 04:50 point

Yes, I'm considering making that upgrade to the machine. I think I'll add a microcontroller to handle that too, because I'm also contemplating the use of an analog pressure sensor for feedback.

  Are you sure? yes | no

dar.ryl wrote 12/07/2019 at 01:41 point

my smt50 conversion/rebuild/mod/hack sorta stalled out, this is inspiring me to get at it again. 

https://hackaday.io/project/25437-hot-hot-yushengtech-smt50-openpnp-conversion

  Are you sure? yes | no

jamie wrote 11/13/2019 at 21:06 point

Just as a side note , I ended up using an aquarium pump as you can get a vacuum and pressure to stop components sticking to the juki

  Are you sure? yes | no

jamie wrote 11/13/2019 at 21:03 point

Cool project, I am also trying to get dual grbl controllers to work with OpenPnp Gcode driver/subdriver , could you share your machine.xml as a file ?

  Are you sure? yes | no

ottoragam wrote 12/13/2019 at 04:47 point

Sorry for the very late reply. Here's the Github repo https://github.com/ottoragam/SimplePnP

I'll be adding all the machine design files and stuff there

  Are you sure? yes | no

James Newton wrote 08/30/2019 at 17:55 point

Nice! This is really cool!

  Are you sure? yes | no

ottoragam wrote 08/30/2019 at 18:46 point

Thanks James, Never again another PCB batch by hand!

  Are you sure? yes | no

Similar Projects

Does this project spark your interest?

Become a member to follow this project and never miss any updates