Close
0%
0%

Dirty Clean Power

Super Simple Soil Microbial Fuel Cell

Similar projects worth following
Single chamber Soil Microbial Fuel Cell, built using cheap/recycled everyday components. Power anybody can build.

These are prototype cells that I'm developing for the end goal of building a MFC battery of some kind. I have some distance to go yet, but I'm closing in.

This project is my attempt to perfect a simple low tech power producing soil microbial fuel cell.  I've been working on it and collecting data for several months now and will be sharing updates and design changes as well as attempting to develop it into a system for the production of useful clean power.

I intend to build at least 2 or 3 more of these in order to tune the design and components, it's a hurry up and wait kind of game. As each new cell stabilizes and is removed from incubation I will add another pair of meters to the board and a new cell will be constructed. I'll update the instructions as I make improvements and create a new project for the MFC battery when it becomes a thing.

  • 1 × Plastic or Glass Container To hold the cell, must not be metal
  • 4 × 100% copper dish scrubbers Other metals work, possibly better, but copper is cheap and easy.
  • 2 × Insulated Copper Wire 3ft
  • 1 × Soil The more nutrient rich, the better

  • Hiatus

    williamolyolson10/30/2019 at 02:45 0 comments

    Unfortunately, I have some other business to attend to, out of town for the next month.  I've spent the last few days preparing for that, so I apologize for the lack of updates.  The project has continued a bit since the last update.  I assembled the 5gallon cell and it is seriously under-performing...  There will be some big changes made when I return so I'm not going to go into too much detail about it until then.  Cell 9 is stable and holding in its 275ish zone, cell 10 stabilized in the 290s.  I have noticed some corrosion on the cathode of no.9 so I'll probably be moving on from copper electrodes when I return, likely to carbon.  

  • Cell 10, behaving. Moving forward.

    williamolyolson10/24/2019 at 17:09 0 comments

    No.10 is scraping 291mv & 1.04ma this morning at about 12degC.  This marks the first time this cells output has responded in an expected manner to a temp drop(by also dropping).  It will be interesting to see how/where it settles out over the next few days.  Personally, I'm ready to move forward.

    I'll be mixing the substrate and firing up no.11 sometime today.  It will be my first 5 gallon fuel cell.  I'm very excited to see what it does.

    I've also been thinking of other ideas for anode materials.  I'm presently using copper only because I tried it experimentally and it worked way better than I expected it would.  That and it is relatively cheap and easy to work with.

    I think the next anode material I'll be working on(after no.11) will be based on some homebrew carbon.  Probably sucrose to start with, I've found it can be foamed to nearly any rough shape in a proper steel container, just using a small fire.  I've done this a few times for previous investigations and the resultant material seems perfect.  It forms a fairly sturdy conductive glass-like carbon, not the greatest surface area, but better than the copper mesh.  

    The only reason I haven't done it already is because I'm still trying to figure out the best way to connect a conductor to it.  I have a few ideas, and there's always the "poke a wire in it" method, but I know something clever will find me.  For instance, the idea of encapsulating a conductor in the foam keeps getting stuck in my head.  It seems like the best method, but will likely require some titanium or at least SS wire to survive the 3+ hours at 1000degC the carbon takes to become conductive...

  • Life above 300mv.

    williamolyolson10/24/2019 at 05:14 0 comments

    Cell no.10 has been in excess of 300mv for a couple of days now.  Today at 4:19pm, while reading 308mv 1.10ma, I finally removed the incubator coil.  The shuffling about caused the output to drop to 301mv & 1.07ma, it has since recovered to 304mv & 1.09ma.  The output appears quite stable thus far, it will be interesting to see if it continues to increase now that the temps are going to be cooler.

    The incubator will again be necessary for boosting up cell no.11 which I will be mixing up sometime tomorrow.

  • No.11 found its forever home.

    williamolyolson10/22/2019 at 16:48 0 comments

     Lookin real comfy in there.

    Exactly 5 inches of head space.  Perfectly sized, ~2in of substrate to form the o2/proton membrane on top of the anode, and more than enough space to setup the cathode.

    No.10 was at 303mv 1.08ma at 8am.  It has since dropped to 302.  It was fairly warm last night so the cell temps are a full degree warmer this morning.  No.10 @ 17.5degC and no.9 @ 16.

  • No.10 Hits 300mv & New Anode for No.11.

    williamolyolson10/22/2019 at 06:49 0 comments

    Been a very good day for cell no.10.

    Also, here's a first peak at the anode for cell no.11.  It's something completely different.

    That's a 1 liter water bottle in the middle.  It's about 9.5-10inches tall and likewise in diameter.  It should fit snug in a 5 gallon bucket.

    18 copper mesh scrubbers and some 12ga copper wire...  Plus an hour or two of twisting.  I like the result.  Looks a bit like a jellyfish.  I haven't weighed it yet, but it's a good chunk of copper.  More tomorrow!

  • No.10 bumping off 290mv this am.

    williamolyolson10/21/2019 at 16:24 0 comments

    I can't yet be certain of it's going up or down at the moment, but we're still breaking new ground at this aprox. 16degC cell temp. range.  I think I'm going to give it another day or so to grow before I shut off the warm water circulation.  The reservoir temp.(measured outside of plastic bucket) is approximately 18degC.

    Either way it seems to be stable output and I'm fairly certain it's not done increasing.  I have yet to test the meter leads to see exactly how these two are comparing but I think it's safe to say no.10 is probably going to eclipse no.9.  Concerns of longevity will take some time still.

    I'm going to pick up some supplies today and hopefully start on cell no.11.  This one will be a bit more..More.

  • More output increases.

    williamolyolson10/20/2019 at 18:15 0 comments

    Yesterday no.10 closed the night at 277mv 0.99ma 16.5degC.  This morning it was again at 277 0.99 yet at 15degC.  So, I can at least say the lower temps aren't negatively effecting performance.  In fact if the leads of both sets of meters had the same resistance(fairly sure they do not) then no.10 might actually be outperforming no.9.  I may swap meters around later and test that theory.

  • No.10 responded to temp drop.

    williamolyolson10/18/2019 at 16:39 0 comments

    After lowering the incubation temp yesterday cell no.10s temp dropped from an average of about 20.5degC to about 19.  By 11:30pm last night it was generating 266mv 0.95ma.

    This morning @ 8:37am no.10 is at 268mv 0.96 cell temp 18.5degC.  I've again lowered the incubation temp. another 10degF, to its lowest setting.  One more day of slight warming and then we see what happens when nature takes over.

  • Turning the heat down.

    williamolyolson10/17/2019 at 16:41 0 comments

    Well the last few days have been less than extraordinary.  Cell no.10 reached 263mv 0.94ma at 3pm on the 15th.  Since then the ambient temps have stabilized and so has the output, in the mid 250s.  I'm trying to get this cell to develop a kind of circadian rythem, so I guess it's time to wean it from the incubator and let nature take over.

    The fish tank heater in my water reservoir has been turned down about 10degF.  The current res. temp. is about 28degC.  I'll monitor the cell and report any significant developments, then tomorrow the heater will go down some more.  If I cannot get it to respond to temp changes reliably then I will have to call this cell a failure.  Though I will likely keep it around for a while and see what becomes of it. 

    One of the goals here is to develop a repeatable procedure for building these things in a timely manner.  So I guess as far as that goes I'm way off track already, lol.  I guess I should start hacking together cell no.11.

  • Another 10mv morning!

    williamolyolson10/14/2019 at 16:41 0 comments

    Cell no.10 is really starting to push.  At 9:09am it was reading 257mv 0.91ma 18.5degC, that's 10mv on yesterday's recorded high of 247mv 0.88ma 21degC.  It's presently bouncing off of 258&.92.

    No.9 continues to lead with a cell temp of 12.5degC, only loosely wrapped with insulation.  It has a mature microbe colony capable of exceeding 300mv in 20degC temps.  

    The next phase for no.10 will commence once the output peaks and has leveld out.  Then I will begin lowering the incubation temp a few degrees a day over the course of several days, ultimately removing it from the heat.  At which point it hopefully will have developed a microbe colony that behaves similarly to no.9 in that the output will be proportional to temp., and not inversely so as it still seems to be.

View all 27 project logs

  • 1
    Gather Components

    - A reasonable container, with lid, with enough vertical space to accommodate 5cm of soil space between the two electrodes, so minimum height will be the height of your electrodes + 5cm.  I use recycled plastic coffee cans, but any suitable plastic or glass container will do(no metal).

    - Some 100% copper dish scrubber pads and some insulated copper wire, about 2 arm lengths or so.  The wire pictured is certainly overkill.  The scrubbers I like to use unroll into a tube of woven copper, very easy to work with and  they are 2 for a dollar at the local dollar store.

    - Some soil mixed with some organic matter(compost, old coffee grounds, etc.), rough sifted so there aren't any large bits or stones.

    - A multi-meter, preferably two, to measure your success.

    - A pinch of patience and a fairly temperature stable place to allow your cell to incubate and polarize.

  • 2
    Assemble your electrodes!

    Unroll your scrubber pads and stretch and re-roll them into a larger ring shape.

    If your scrubbers do not unroll then you may have to simply pull them apart and use some copper wire to sculpt them into a suitable shape.


    I spliced two together and rolled a smaller ring with the other end of the tube so I ended up with two rings, one inside the other.

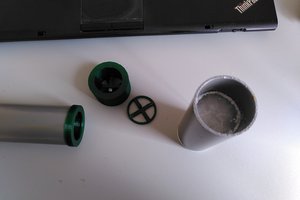
    Here are 2 complete electrodes.

  • 3
    Wire them up!

    Take your copper wires and strip them so they only have a foot or so of remaining shielding.  Now wrap those bare ends around each of the electrodes as many times as possible to ensure a good electrical connection at all times.  Feel free to weave it through a bit too.  The more contact your wire makes with the electrode the better. 

    Two electrodes ready for installation in container.

View all 5 instructions

Enjoy this project?

Share

Discussions

Stewart Lugosi wrote 10/14/2019 at 15:46 point

Really interesting project, I'm going to have to look into setting something like this up.

Is there a reason for horizontal anode\cathode rather than vertical?

  Are you sure? yes | no

williamolyolson wrote 10/14/2019 at 16:51 point

Thanks!  Yes, the anodic reaction is anaerobic(no oxygen), it is natural decomposition, which frees up electrons that travel through the wire where they ultimately pair with some oxygens and hydrogen protons at the cathode forming water.

Most fuel cells use expensive high tech membranes to keep the oxygen out of half of the cell, these use the soil substrate as the membrane.  The microbes in the 5cm of soil between the electrodes consume any/all the O2 before it can make it to the microbes living on the anode, forcing those electrons up the wire instead.  

So essentially the anode has to be a bit underground and the cathode has to be just touching it.  This could be achieved vertically, but I'm afraid the construction and materials would be a lot more complicated.

  Are you sure? yes | no

s0s wrote 10/11/2019 at 00:25 point

I love this. I love anything that helps Earth and the environment. I wish more people were like you. I just hope that humanity can stop climate change and start reversing it in time.

  Are you sure? yes | no

williamolyolson wrote 10/11/2019 at 05:03 point

Thanks, I wholeheartedly agree with you.

  Are you sure? yes | no

natevplas wrote 10/09/2019 at 16:20 point

Cool idea!  I realize this is just for fun, but do you think there's any feasible way to scale this up to a reasonably useful output?  I'm no electrician, but it would seem to me that you'd need at least 10 of these to power a single LED.

  Are you sure? yes | no

williamolyolson wrote 10/09/2019 at 16:45 point

Thanks!  It's a little more than just for fun, these are prototype cells that I'm building in order to develop a "battery" of microbial fuel cells.  There are a number of enhancements that can be made to the substrate and other aspects, for instance I've read in one paper that including blood-meal in the substrate can produce cells with voltages up to the 800mv range, significantly more millliamps as well.  My present concerns are mechanical/chemical stability of the electrodes and the longevity of stable energy production with simple components.  The primary goal though is to produce a cell with much more power output.  I'm presently on design no.10 all the cells that preceded no.9 we're drastically different in every way.  We will get there, I feel like it's more than feasible.

  Are you sure? yes | no

Tom Nardi wrote 10/06/2019 at 04:42 point

This is a dirty and disgusting project. I love it.

  Are you sure? yes | no

williamolyolson wrote 10/06/2019 at 17:22 point

Haha, thanks!

  Are you sure? yes | no

Similar Projects

Does this project spark your interest?

Become a member to follow this project and never miss any updates