This project was developed in partnership with Robô Lúdico School and JLCPCB Factory that offers 5 free PCBs of Arduino Compatible Board.
Introduction
This article refers to a game that participated in the childhood of many children in the 90s. It was basically composed of a few buttons that represented the players of the match and a small cylinder that was used as a ball.
The participants had to press the device that represented the ball over the button in such a way that the bull was fired towards the goal. Initially, it is decided which team will start with possession of the ball, soon after, one of the participants pressed the ball using the button and the ball until the opponent's goal, and when the ball hit and was in an opponent's button, the opponent took the possession of the ball and making the moves.
The game was conducted in this way until one of the participants scored a greater amount of goal. With this principle, the game became similar to a football game and was known as button football.
The entire development of the game was conducted manually or in logic, however, it is possible to implement this game including some devices, such as the LCD display to show the scoreboard and make the necessary settings such as the gameplay time scoreboard, among others through some buttons.
To make the automatic scoring of goals an electronic object detector device programmed through the Arduino development platform can be used, which through its programming is possible to make all the necessary settings for the development of the game.
Figure 1 illustrates a case developed for this game using these electronic devices.

In the development of this didactic case, the object detector infrared (IR) sensor module, the LCD display and 4 buttons were used to make the necessary configurations.
The developed case was designed with the intention of supporting the infrared (IR) sensor module, which will emit a signal when the ball is detected at the moment it passes through the goal line.
After that, the LCD display will be responsible for visually showing the point values of each participant and the development of the game itself.
In this way, the buttons will be necessary so that the participants can choose between the configuration options and confirm their choice, with the whole game being processed by Arduino UNO.
In this article, you will understand the assembly of the didactic case of the game, as well as know its mechanical structure, which was fixed by means of the nut bolt set, in their specific fittings.
Therefore, through this article you will learn:
- Know the structure of the teaching case using the infrared (IR) sensor module, the buttons, and the LCD display;
- Analyze the fixation of the mechanical structure of the case by means of screw, nut, and fittings;
- Understand the importance of each part of the case structure for the project as a whole;
- Understand the operating logic of the game Button Soccer Using Arduino.
Now, we will start the full presentation of the development of Button Football Using Arduino.
Developing the Button Football Project
This project consists of presenting a didactic model of a case for the game Futebol de Relógio using the LCD display, the IR sensor module, and some buttons among other components, as well as the assembly of its mechanical structure.
The project basically consists of the physical structure of the case to support the electronic components, which will process the signal to make the game work.
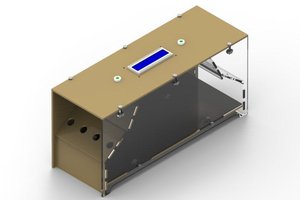
Figure 2 illustrates the internal region of the game case, as well as the lateral, front, rear, top, and bottom surfaces.

In its internal structure, it is possible to observe two IR sensors in one of the goals just below the field, in the region close to the goalkeeper, the LCD display and the Arduino UNO just below.
For the fixation of the structure, lateral supports were designed, with fittings dimensioned for M3 nuts and screws. The necessary...
Read more »
 Hulk
Hulk
 Jaques Lopes Schroeder