Close
0%
0%

Computer Head Costume

Computer Head Costume with 16x16 LED Matrix, Raspberry Pi, and Espeak

Public Chat
Similar projects worth following
Last year I hastily made a Halloween costume: a CRT Monitor shell hollowed out, converted into a wearable helmet, and given life with a simple animated eye and espeak voice. The eye has a simple animation of looking left and right, occasionally blinking. A wireless keyboard is used to provide phrases for espeak to say. This costume got a positive reaction last year. However, the quick implementation leaves much to be desired. There are three main issues: poor ergonomics, limited LED matrix utilization, and a clunky user interface. The helmet is poorly balanced, heavy, and very difficult to put on. The LED matrix is underutilized. Despite having an endless number of options for displaying symbols and expressing emotions, my headset uses only eight frames of animation played randomly. Finally, the costume's voice is driven using a keyboard. While it works thematically, it made operating the helmet clunky and slow. My goal is to fix these three issues.

Most of the work in this project has been writing better software. If you want to see some low-quality code that barely manages to work, look at my GitHub repository!


https://github.com/cogFrog/computerHead

View all 11 components

  • Stage 3: Halloween Hackfest Submission

    Skye Rutan-bedard10/28/2021 at 06:23 0 comments

    Well, the day is finally here! It took me a while but the result is a decent improvement over last year's version! Anyways, I have attached a video of me using the updated features of the costume. I didn't have anyone on hand to record, so I took the microphone out so I can control the costume without wearing it. Enjoy!

  • Stage 2: More Animation, Music, and Finalization

    Skye Rutan-bedard10/27/2021 at 16:54 0 comments

    With time running out, I made a push to add a few features before finishing things up. In the course of this, I was able to add more animations and icons for the Neopixel matrix, add a system for playing songs, and make a couple of final adjustments.

    Adding Animations

    One of the early objectives was to better utilize the flexibility offered by the Neopixel matrix. To that end, I expanded the sprite sheet to include more animations and icons.

    Before I get too far into discussing my new way of handling these icons and animations, I will briefly discuss how it worked in last year's version of the costume. The original testNeopixel.py (as seen in the speechRec branch in the GitHub repo) is divided into two main parts. First, the displayImg() function. It takes in a monochrome green 16x16 LED matrix and displays it on the screen. In addition to taking in a .gif, it also has a reflect parameter. When true, the .gif will be displayed flipped across the center vertical axis of the screen. This was used to reduce the number of frames needed for eye animation. Rather than drawing the eye looking left and right, only left was drawn and reflection was used to make it look right.

    The second part of the old implementation was a simple state machine. Each state represents an animation state (looking far left, left, right, far right). Looking at the looking far-left state, you can see that it has a random chance of either remaining in the looking far-left state for a random amount of time or changing to the looking left state. Similarly, the left state can randomly transition to the right or far-left states, stay in its current state with no animation, or stay in its state while executing a blink.

    The new implementation adds a metastate for a nested state machine. If the metastate is "default", the old eye state machine will run will minimal differences (timing was tweaked a little). However, the metastate can be used to enter different animations or static icons, such as a moving clock or a jack-o-lantern. The metastate is taken from a shared.pkl file, with this pickle file serving as the interface between the speech recognition and display driving programs. This is ugly and more than a little bit of a mess, but I just needed something that would work without me having to learn threading.

    The speech recognition side is fairly simple. Once speech is recognized, it is checked for validity (neither an empty string nor just "he", as random noise would often be recognized as "he"). From there, it is checked against a set of command words. If it is a command word, shared.pkl is updated to reflect the new state for testNeopixels.py and the word is said if needed. For instance, "yes" results in a state of "check" (for a checkmark to be displayed on the LED matrix) while the word is said. Alternatively, "waving" is the command word for starting the waving animation while not having espeak repeat the word. If the recognized text is not a command word, it is just said by espeak without any change to shared.pkl. The result can be seen below, with me wearing the helmet. Not the best footage, but hopefully a good proof of life.

    Adding Music

    As a last fun feature, I decided that the music note icon could use some actual music. The desired functionality is to randomly play a .mp3 file (8-bit classical music in my case) from a folder when the note icon is selected. Similarly, any change of state (saying anything) should stop the music. The solution was just to use the python VLC module. While seemingly simple, I ran into two issues. First, the speech recognition system would hear the music. It wasn't loud enough to make it start recording a sample, but it was loud enough to make it not stop recording the sample so it could be processed. The result is that I couldn't say anything before the music stopped, preventing me from stopping the music. Luckily, the solution was easy to find. While I lamented the cost of the Samson Go Mic earlier, it has...

    Read more »

  • Stage 1: Speech to Text to Speech

    Skye Rutan-bedard10/02/2021 at 05:48 0 comments

    One of the simplest shortcomings of the original costume as outlined in stage 0 is the user interface. While I can thematically get away with a keyboard as an input method, it left my interactions a little stilted. To have a "conversation" required that I sit down with the keyboard in my lap or on a desk. To respond, I would have to look down at the keyboard (my touch typing isn't that good without feedback), carefully type out something, and then look back at the person I am talking to. My solution to this is to use speech to text to recognize what I say so espeak can repeat it.


    Software

    The basis of this new interface method is Mozilla's DeepSpeech (https://github.com/touchgadget/DeepSpeech), which was designed to run on Raspberry Pis. Apart from a momentary issue with Alsa, this was easy to get running and modify for my purposes. As of now, my work in this area has been done in the speechRec branch of this project's repo (https://github.com/cogFrog/computerHead/tree/speechRec). I used the mic_vad_streaming.py example as a basis for my speechToTextToSpeech.py.

    At first, I thought it would be a pretty simple adjustment. My original plan was to use pyttsx3's runAndWait() function to have espeak say the recognized speech. I expected that this would pause the collection of new audio samples, preventing the system from hearing itself and "echoing". There were two problems with this. First, the audio collection was done on a separate thread, so the blocking function of runAndWait() didn't prevent echoing. Second, pyttsx3 crashes when it is fed an empty string. The solution is in two parts. First, I added pause and unpause functions to the audio class, shown below.

    class Audio(object):
        ...
        def pause(self):
            self.stream.stop_stream()
    
        def unpause(self):
            self.stream.start_stream()

    Second, I used the new pause/unpause functions while double-checking that the recognized text is not an empty string. This actually works!

    text = stream_context.finishStream()
        print("Recognized: %s" % text)
                
        if len(text) != 0:
            vad_audio.pause()
            engine.say(text)
            engine.runAndWait()
            vad_audio.unpause()


    Hardware

    For this, only two changes were needed. First, the Raspberry Pi 3 B+ has been upgraded to a Raspberry Pi 4 with 4 GB of RAM. The 3 worked, but the 4 noticeably reduced the delay between an utterance and its recognition.


    The modification was to replace the keyboard with a decent microphone. The challenge here was to find a decent quality microphone that could work at low volumes. The costume effect is diminished if you can hear the human inside talking as well as the computer! I just went to the store, bought a couple of microphones, and found that the Samson Go Mic worked well enough. A little expensive at $50, but not horrendous. The picture of the current setup is below. Cable management is going to be non-existent until I get more of the functions working, so things are going to be pretty ugly for now.


    Next Steps

    Now that the speech-to-text-to-speech system is working, it is time to redo the LED matrix control. Adding new icons and animations won't be too much work. In my previous implementation, the two separate scripts were used for the speech and display controls, as the two functions are were separate. However, speech recognition offers a good opportunity to display more complex content, this probably means figuring out some type of threading.

  • Stage 0: What I already have, and what I want to change

    Skye Rutan-bedard09/27/2021 at 14:56 0 comments

    Last year, I made a computer head helmet. Rather than building an entirely new costume this year, I am instead improving this preexisting costume. Before I get ahead of myself, I should start by documenting this preexisting design a bit.


    Physical Construction

    The frame of the costume is an old CRT display that has been gutted and cleaned. From there, three key modifications. First, a hole was sawed in the bottom of the CRT case, with pipe insulation around the edge for comfort.
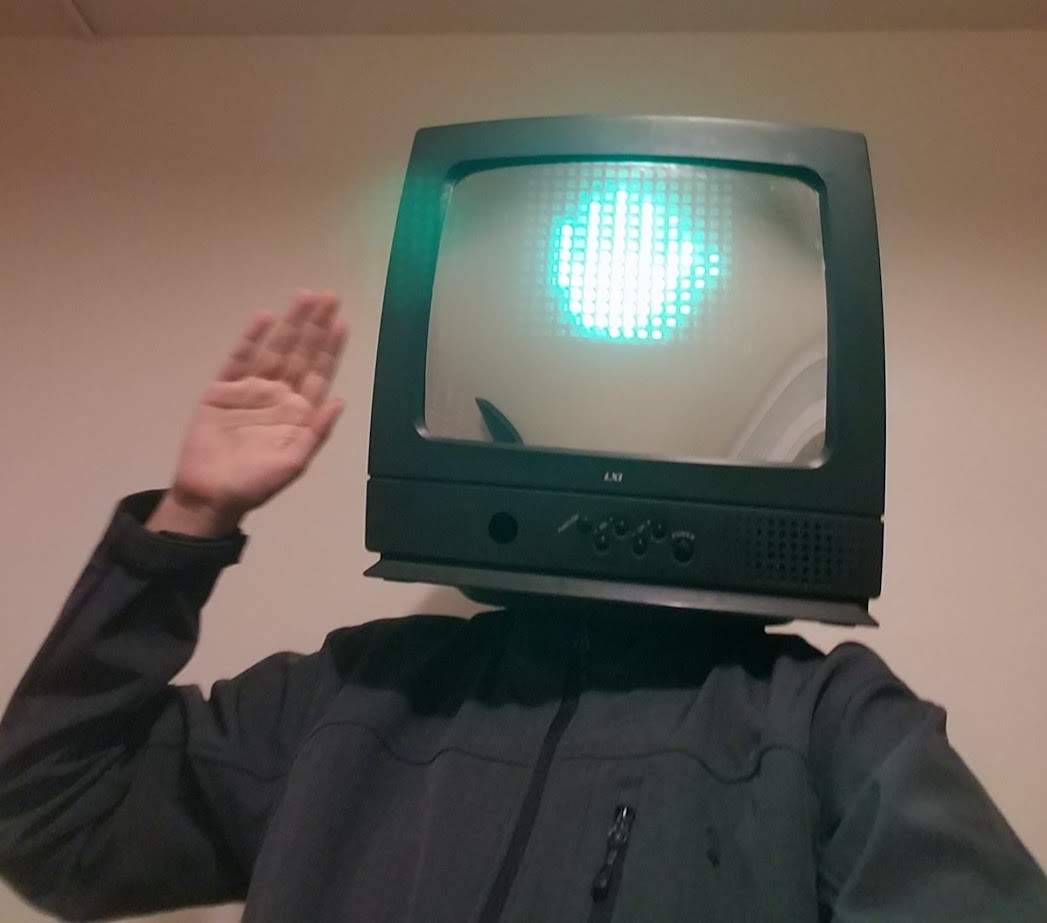
The second modification is a hard hat. This allows for the costume to be worn as a helmet. I was lazy, so the hard hat was literally epoxied to the CRT case. Not clean, but it works.

    The third modification is a screen. For this, an acrylic one-way mirror was cut to size and glued into place.

    Electrical Construction
    The electronics for this project were fairly simple, as shown below:

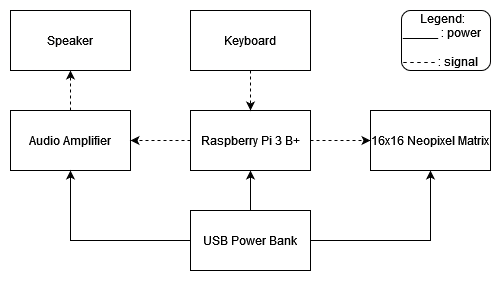
    The Raspberry Pi had two functions. First, it controlled the Neopixel matrix to display an animated eye in green. Second, it spoke. Phrases were typed on the keyboard, and Espeak was used to say them aloud through the audio amplifier and speaker.
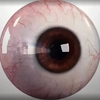

    Software
    The software used was similarly simple. While the code can be seen in the first commit to main in my git repo (https://github.com/cogFrog/computerHead), I will briefly explain it here. There are two separate scripts that are run at once. The first script, testNeopixel.py, drives the Neopixel matrix. It uses four .gifs as four frames of animation (eye looking far left, eye looking left, eye looking left while blinking, eye closed looking left). These four frames of animation are flipped to get a total of eight frames of animation. A state machine with random transitions from each state to the connected states brings it all to life.

    The other script, testSpeech.py, simply has Espeak say whatever the user types into the terminal. Unfortunately, there is no screen to allow the user to see what they are typing. The result is that I have carefully type and hope I don't make any mistakes.

    Conclusion
    That's it for now while I work on getting Mozilla's DeepSpeech working on my newly acquired Raspberry Pi 4. With any luck, updates will come soon and I can get this done before Halloween hits!

View all 4 project logs

Enjoy this project?

Share

Discussions

Johnny wrote 11/15/2022 at 17:29 point

Thats sick man!

  Are you sure? yes | no

Skye Rutan-bedard wrote 10/01/2021 at 14:13 point

I will definitely submit it when I have a little more work done on my improvement efforts.

  Are you sure? yes | no

Rajah wrote 09/28/2021 at 09:27 point

Maybe it looks strange, but the idea and implementation is awesome!!!

  Are you sure? yes | no

Mike Szczys wrote 09/27/2021 at 17:00 point

Looks great, nice work! I assume you're planning to enter this in the Halloween Hackfest Contest, but just in case you haven't heard about it yet, you should!

https://hackaday.io/contest/180664-halloween-hackfest

  Are you sure? yes | no

Similar Projects

Does this project spark your interest?

Become a member to follow this project and never miss any updates