Close
0%
0%

Embedding a mesh into 3D print

Easy method of embedding a mesh into a 3D print.

Public Chat
Similar projects worth following
How to embed a very fine mesh (40 mesh USA) into a 3d print.

Logs are best viewed sorted from oldest to newest.

In order to produce a new product that I'll be getting out soon, I needed to have a fine mesh attached somehow to the 3D print, with the idea that the mesh will allow easy fluid flow, but retain certain size particles.

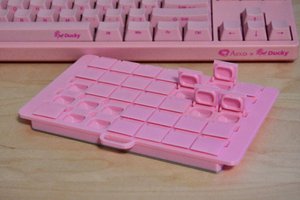
In this project, I'll show you how I was able to print a part that functions as if it was injection molded.

Cura print profile for mesh embed.curaprofile

Cura print profile used for embedding nylon mesh into PLA

curaprofile - 3.40 kB - 11/19/2021 at 01:47

Download

  • 1 × SnapMaker 2.0 A250 My printer
  • 1 × PLA filament Purchased from https://filaments.ca/
  • 1 × Mesh I used 40 Mesh nylon purchased from industrial netting
  • 1 × Painters tape Blue, cause that's what I had
  • 1 × FreeCad or some other program to create your design

View all 8 components

  • 200 micron mesh

    gwfami12/02/2021 at 23:56 0 comments

    Just tried it with some 200 micron mesh (0.008" hole size).  Works even better then the 400 micron (40 USA mesh size, 0.016" hole size) that I made the project with.

    I was able to take a nice picture showing the new mesh going through the PLA.

  • Close ups of mesh/PLA interface

    gwfami11/23/2021 at 21:01 0 comments

    As I don't have a dissecting stereoscope (donations accepted), I had to make a very cheap microscope ($1.50) using the collimating lens from a laser pointer.  Here are some close up's showing where the mesh and PLA are fused together.  Each image is around 180X.

  • Superglue plus a holding ring still doesn't work quite right

    gwfami11/18/2021 at 04:52 0 comments

    Ok.  Since I couldn't just squirt the superglue through the mesh, and I couldn't put down a layer of glue, then press the mesh on top of it, what if I had a ring that I could use to make a mesh sandwich. 


    So I printed a ring sized to fit inside the part and proceeded to make the mesh sandwich.


    First I put a nice fat layer of superglue on the lip of the part.  Then I gently laid the mesh on top that, then pressed the ring down onto the mesh.  

    Mesh sandwitch
    Mesh sandwich without glue

    Less sticky this time, and the glue pressed though the mesh so that it was in contact with the lip and the bottom of the ring.

    However...

    It didn't set.  I left it overnight and it still wasn't set, probably due to the dryness of the PLA.  So using accelerator, I set the glue and happily proceeded to make another one.

    The next one set fine but when tested showed that this wasn't vary viable, as it had low strength and the unevenness of the print allowed fine particles through.

    Failed!
    mesh sandwich with superglue failure

    There must be another way.

  • Superglue alone is not the answer

    gwfami11/18/2021 at 04:34 0 comments

    So for the first attempt, I simply tried to glue a precut mesh onto a lip on the inside bottom of the print using superglue.  Here's a picture showing the mesh laying on the lip (not glued).

    Mesh lying on lip
    Mesh lying on lip inside of print, not glued or attached

    If you have worked with superglue, then you probably can guess what happened.  I ended up gluing myself to both the mesh and the print.

    Once I pried my fingers off of both parts, sprayed superglue accelerator onto the glue, a quick strength test resulted in rapid failure of the connection between the mesh and the print.  I believe that this is a result of the glue no being applied in a consistent manner around the inner lip.  Having big clumsy fingers, there was no way I could do this without clogging the filter and/or making it look pretty bad.  I found this out by trying to glue it on many times.  Obviously this is not a method I can use.

View all 4 project logs

  • 1
    Create the base model

    First step is to create the base model of the part that you want to embed the mesh into. 

    Here's a simple stepped ring that I created with FreeCad. 

    stepped ring
    Simple stepped ring base model
  • 2
    Create the mesh holding ring

    You will now need to create a small ring.  This ring will be the part that the mesh is initially embedded into.

    mesh holder ring
    Mesh holding ring
  • 3
    Create a cutout in the base model

    Now make a cutout inside of the base model which is just a little larger then the mesh holding ring.  I like to start this at least 4 layers high. 

    I did this by creating a duplicate of the mesh holding ring in FreeCad, then slightly changing the external radius, the internal radius and the height of the part.  This part was then moved inside the base model and a boolean cut was executed, resulting in a cut out inside the base model.  The idea is to have the cutout be large enough to hold the mesh holding ring without excessive slop.

    This picture shows a cross section of the base model with the cutout.

    Base model with cutout
    Cross section of the base model showing the channel created by the cutout

    This picture gives you an idea of how the mesh holding ring will be encapsulated in the base model.

    Base model showing mesh holding ring
    Mesh holding ring inside the channel in the base model

View all 10 instructions

Enjoy this project?

Share

Discussions

Fekete Imre wrote 11/30/2021 at 20:17 point

What i did for prints like this is to program a pause at the location where i wanted to have the mesh. Placed the mesh on the print and pushed it in the print with a soldering iron. This way the mesh is embedded in the previous layer flush and you also have the possibility to adjust the tension of the mesh while pushing it in with the iron. Then resume the print. The mesh wont move or cause problems on the following layer.

  Are you sure? yes | no

gwfami wrote 12/01/2021 at 16:47 point

Interesting idea.  A couple of questions.  What temperature do you have the soldering iron set too?   Does this cause "indentions" in the surface of the mesh that are visible near the edge when the print is completed?

  Are you sure? yes | no

Fekete Imre wrote 12/01/2021 at 20:42 point

No clue about the temps, i have used different mesh materials, had to do test to figure out each types.

It might, this was not a concern for me. Just avoid the edges and "iron" the infill.

  Are you sure? yes | no

William wrote 11/30/2021 at 15:59 point

I have printed nylon meshes into PETG prints. It does work, but requires the mesh to be held tightly to the printer bed over existing print layers. Use a pause command and attach the mesh. This works well on prusa mk3s printers, because of the stainless bed surface that magnets readily stick to. It's important to have a high layer height, and not use too thick of a mesh when using this method.

  Are you sure? yes | no

sciencedude1990 wrote 11/19/2021 at 20:35 point

Hi there - Can you pause the 3D printer, lay the mesh in, and then keep printing, captivating the mesh between layers of the plastic?

  Are you sure? yes | no

gwfami wrote 11/19/2021 at 20:58 point

I tried that, and it kind of works but I had a very difficult time keeping the mesh from moving while it became encapsulated as the print head kept pushing the mesh out of position.

  Are you sure? yes | no

Similar Projects

Does this project spark your interest?

Become a member to follow this project and never miss any updates