 henrebotha
At this stage I have bought many of the parts I need. My CAD design is not even half finished, though; I have a lot of work to do there still, and I have no real previous experience in CAD (nor in 3D printing!) so it's a big learning curve. (I have restarted the CAD model multiple times, each time with a slightly better understanding of how to go about it "properly".)
In fact, this entire project is quite audacious. Here's a non-comprehensive list of skills and knowledge this project requires that I had little to none of when I started.
- Design for 3D printing
- CAD
- Mechanical design
- PCB design
Not only that, it's pretty expensive! I'm privileged to earn a very good salary, but even then it's hard to afford all of the expensive parts involved.
The major next steps at this point include the following, in mostly chronological order.
- Complete the CAD design.
- Order a test print in a cheaper material such as ABS.
- Order the remaining parts: batteries, screws, threaded inserts, PCBs, and possibly weights.
- Fit the test chassis with as many of the real parts as possible in order to test e.g. comfort, stability, etc.
- Update the CAD design.
- Repeat the test print → update design loop until I'm happy with the design.
- Order a real print in a tough, attractive material.
- Potentially send the chassis off to be finished in e.g. cerakote.
- Buy or borrow tools for assembly.
- Buy consumables for assembly (solder, wire, etc).
- Assemble the keyboard.
- Handle all the digital stuff (flashing firmware, etc).
 Sergio Costas
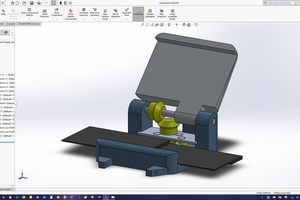
 Sleepless Engineer
 Andrea Piccinno
 Chad Paik