Close
0%
0%

"Lixie", an LED alternative to the Nixie Tube

Always jealous of people who could afford big Nixie Tubes, I rolled my own alternative with WS2812Bs and laser cutting!

Similar projects worth following
LIXIES HAVE DROPPED IN PRICE TO $36.99, AND ARE AVAILABLE RIGHT NOW! https://www.tindie.com/products/connornishijima/lixie-an-led-alternative-to-the-nixie-tube I've always been a fan of the Nixie Tube. Beautiful typography, endearing glow, and very clever technology. But when commercial production stopped in the 1990s, prices for surplus Nixie Tubes began to rise. Smaller tubes like the IN-16 are still only about $3.50/piece, but bigger and more desirable tubes like the IN-18 can run up to $45/piece. If you wanted to make a 6-digit clock, it can cost up to $270 just for the tubes! And they're potentially dangerous. And they might "burn out" next week. And they need special switching circuitry. And they're old news. So let's modernize the Nixie Tube!

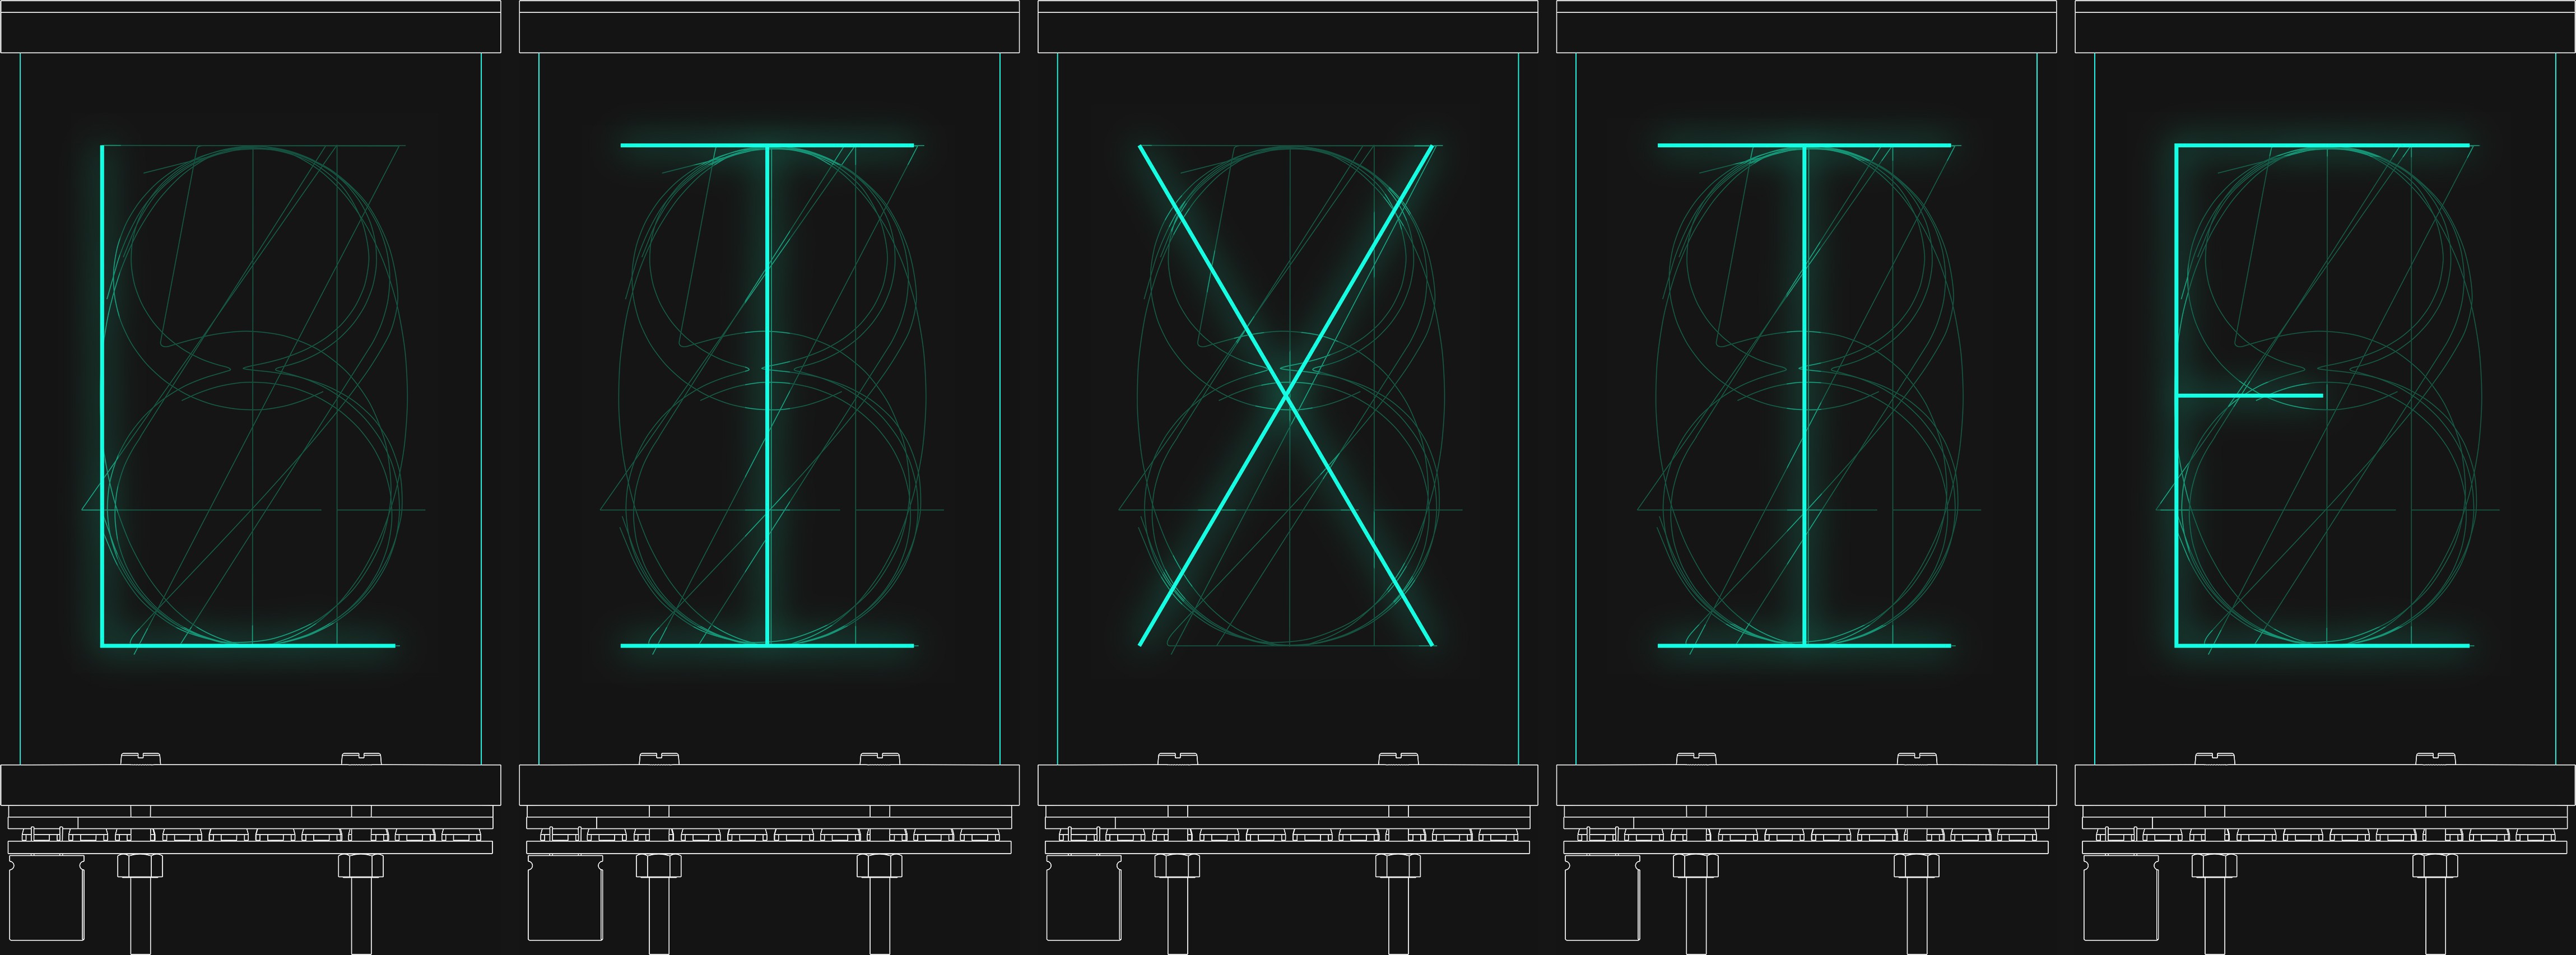
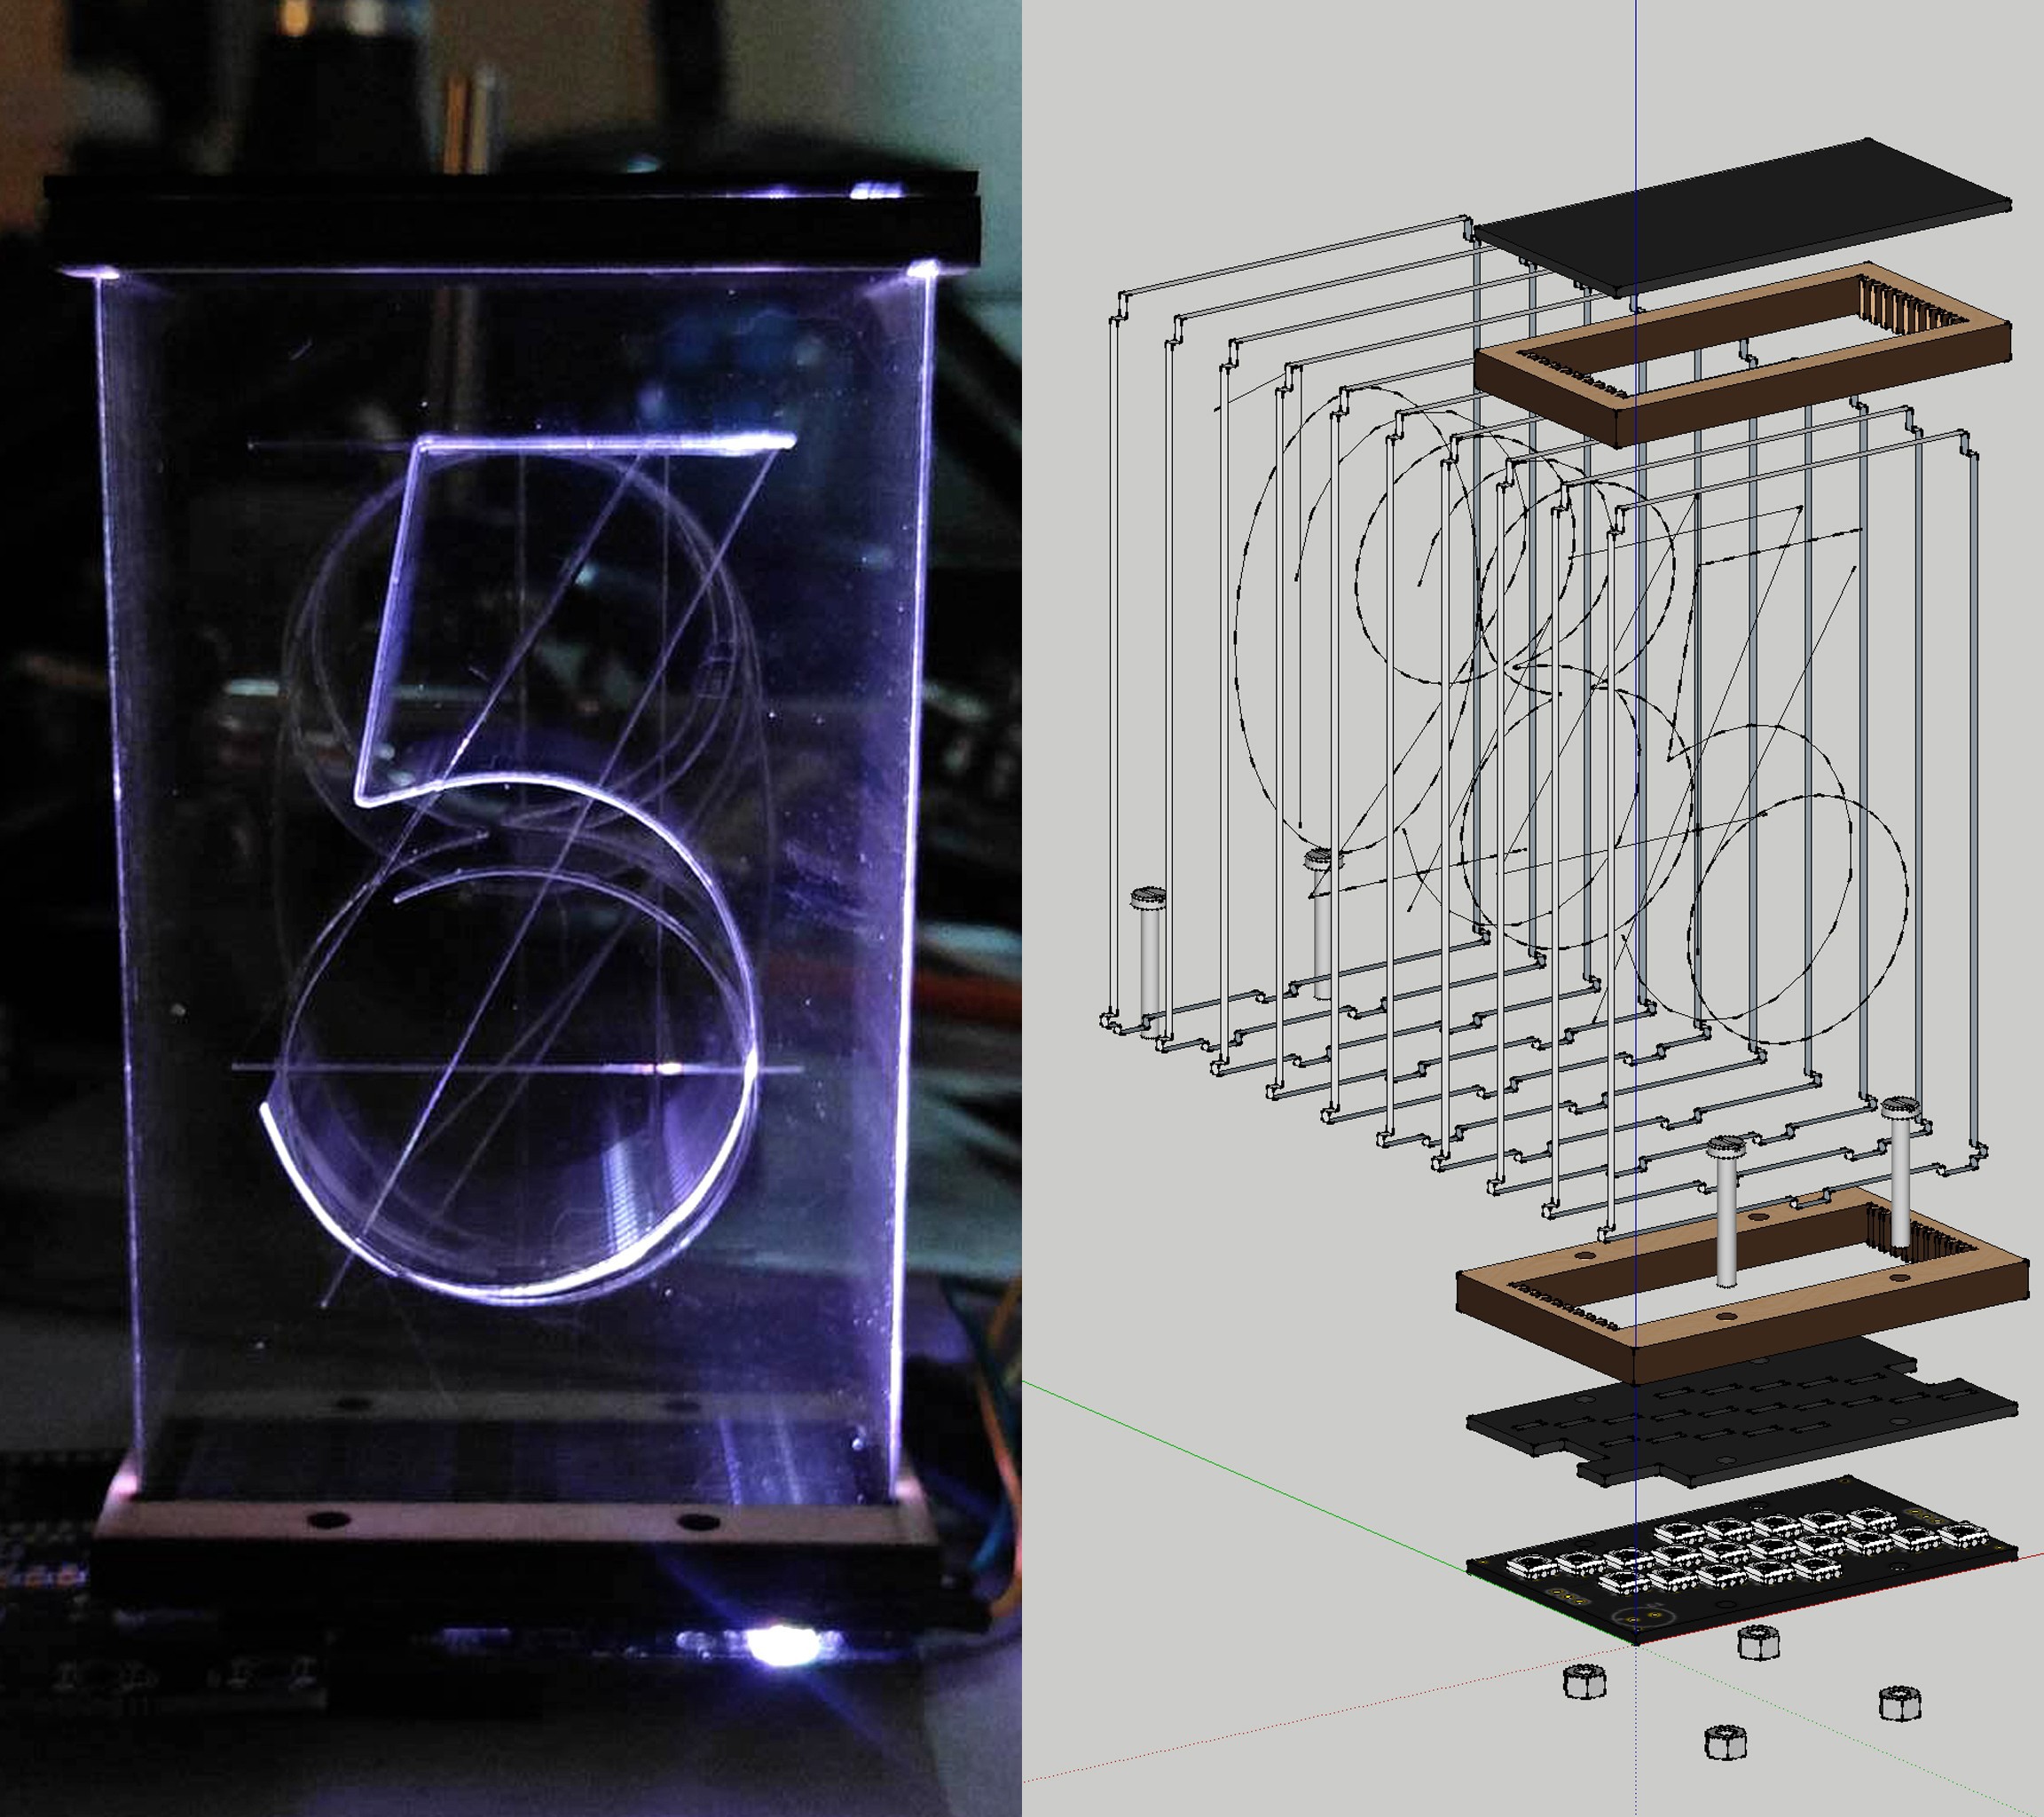
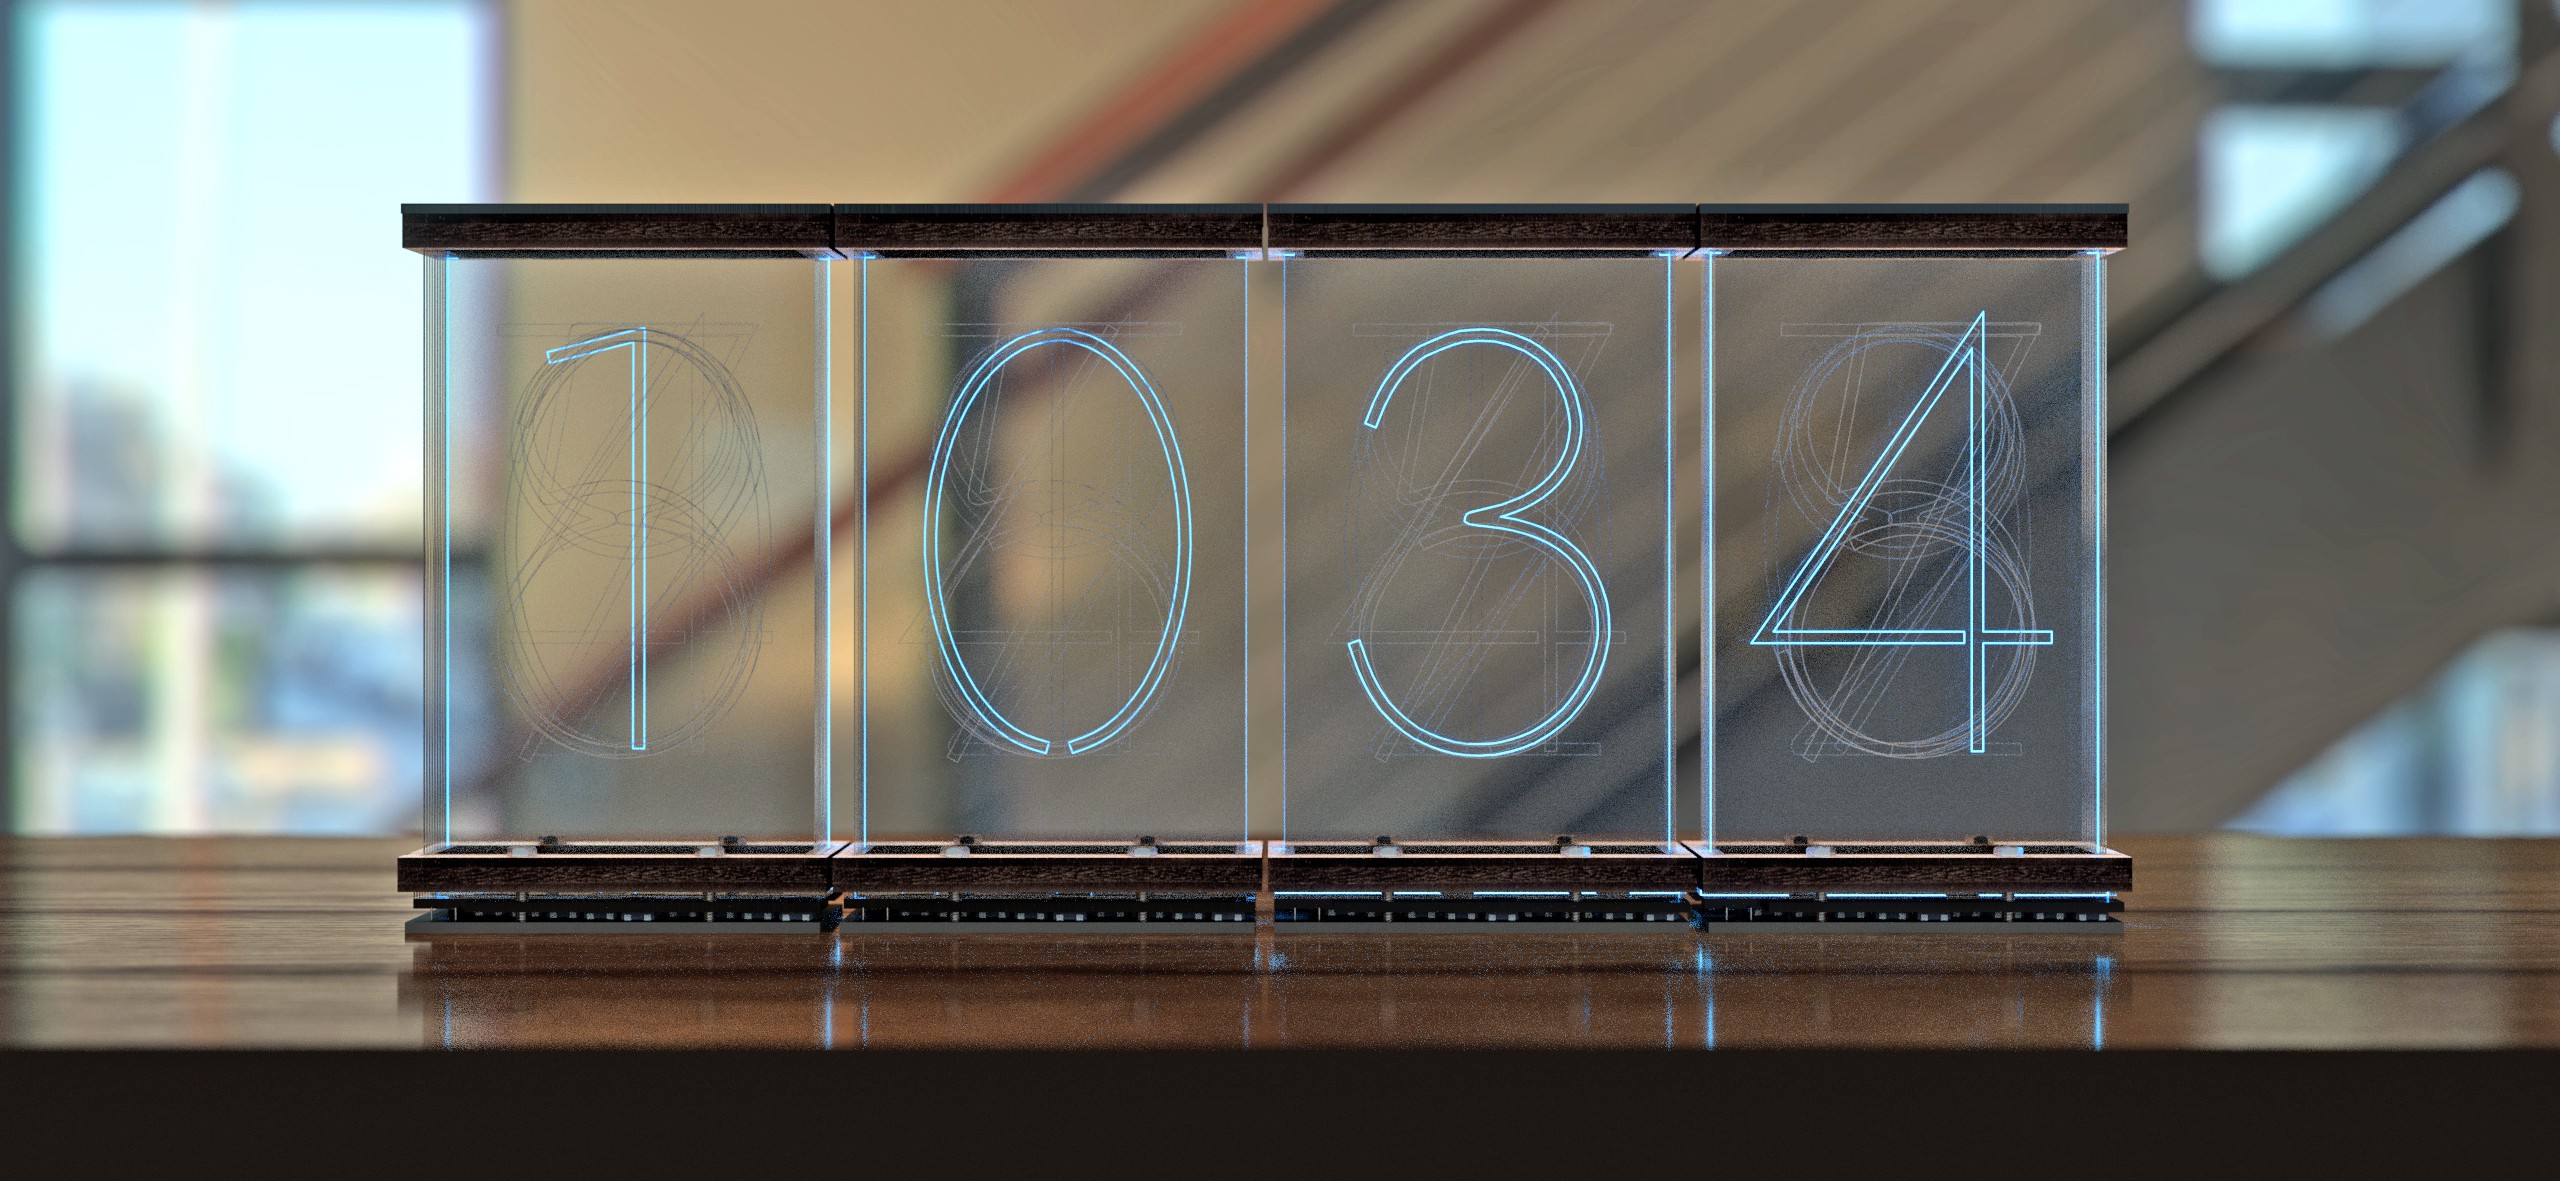
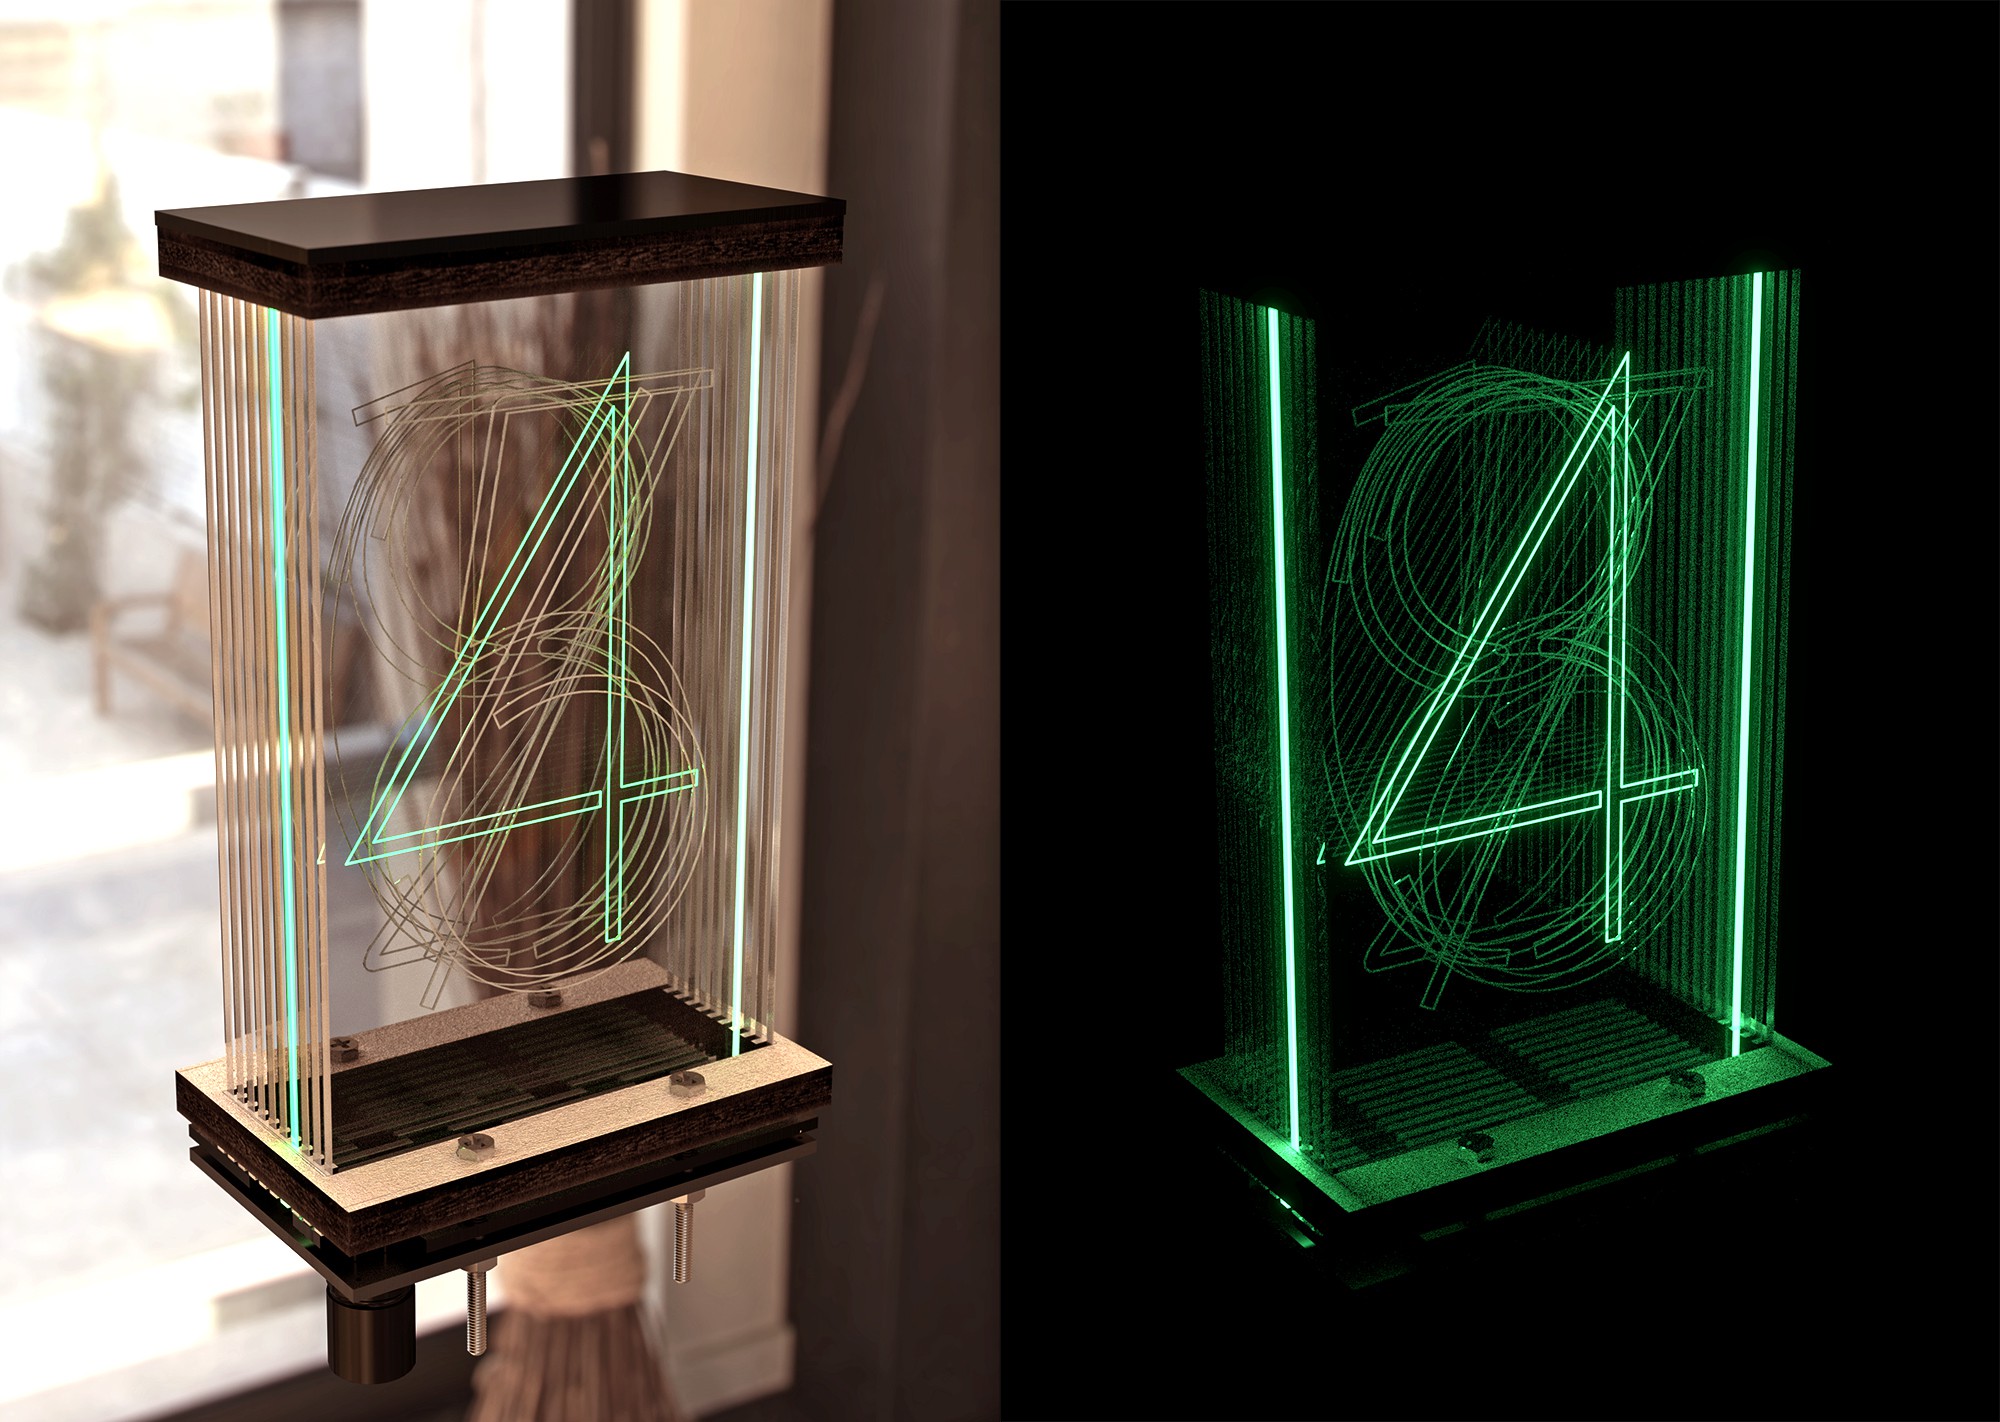
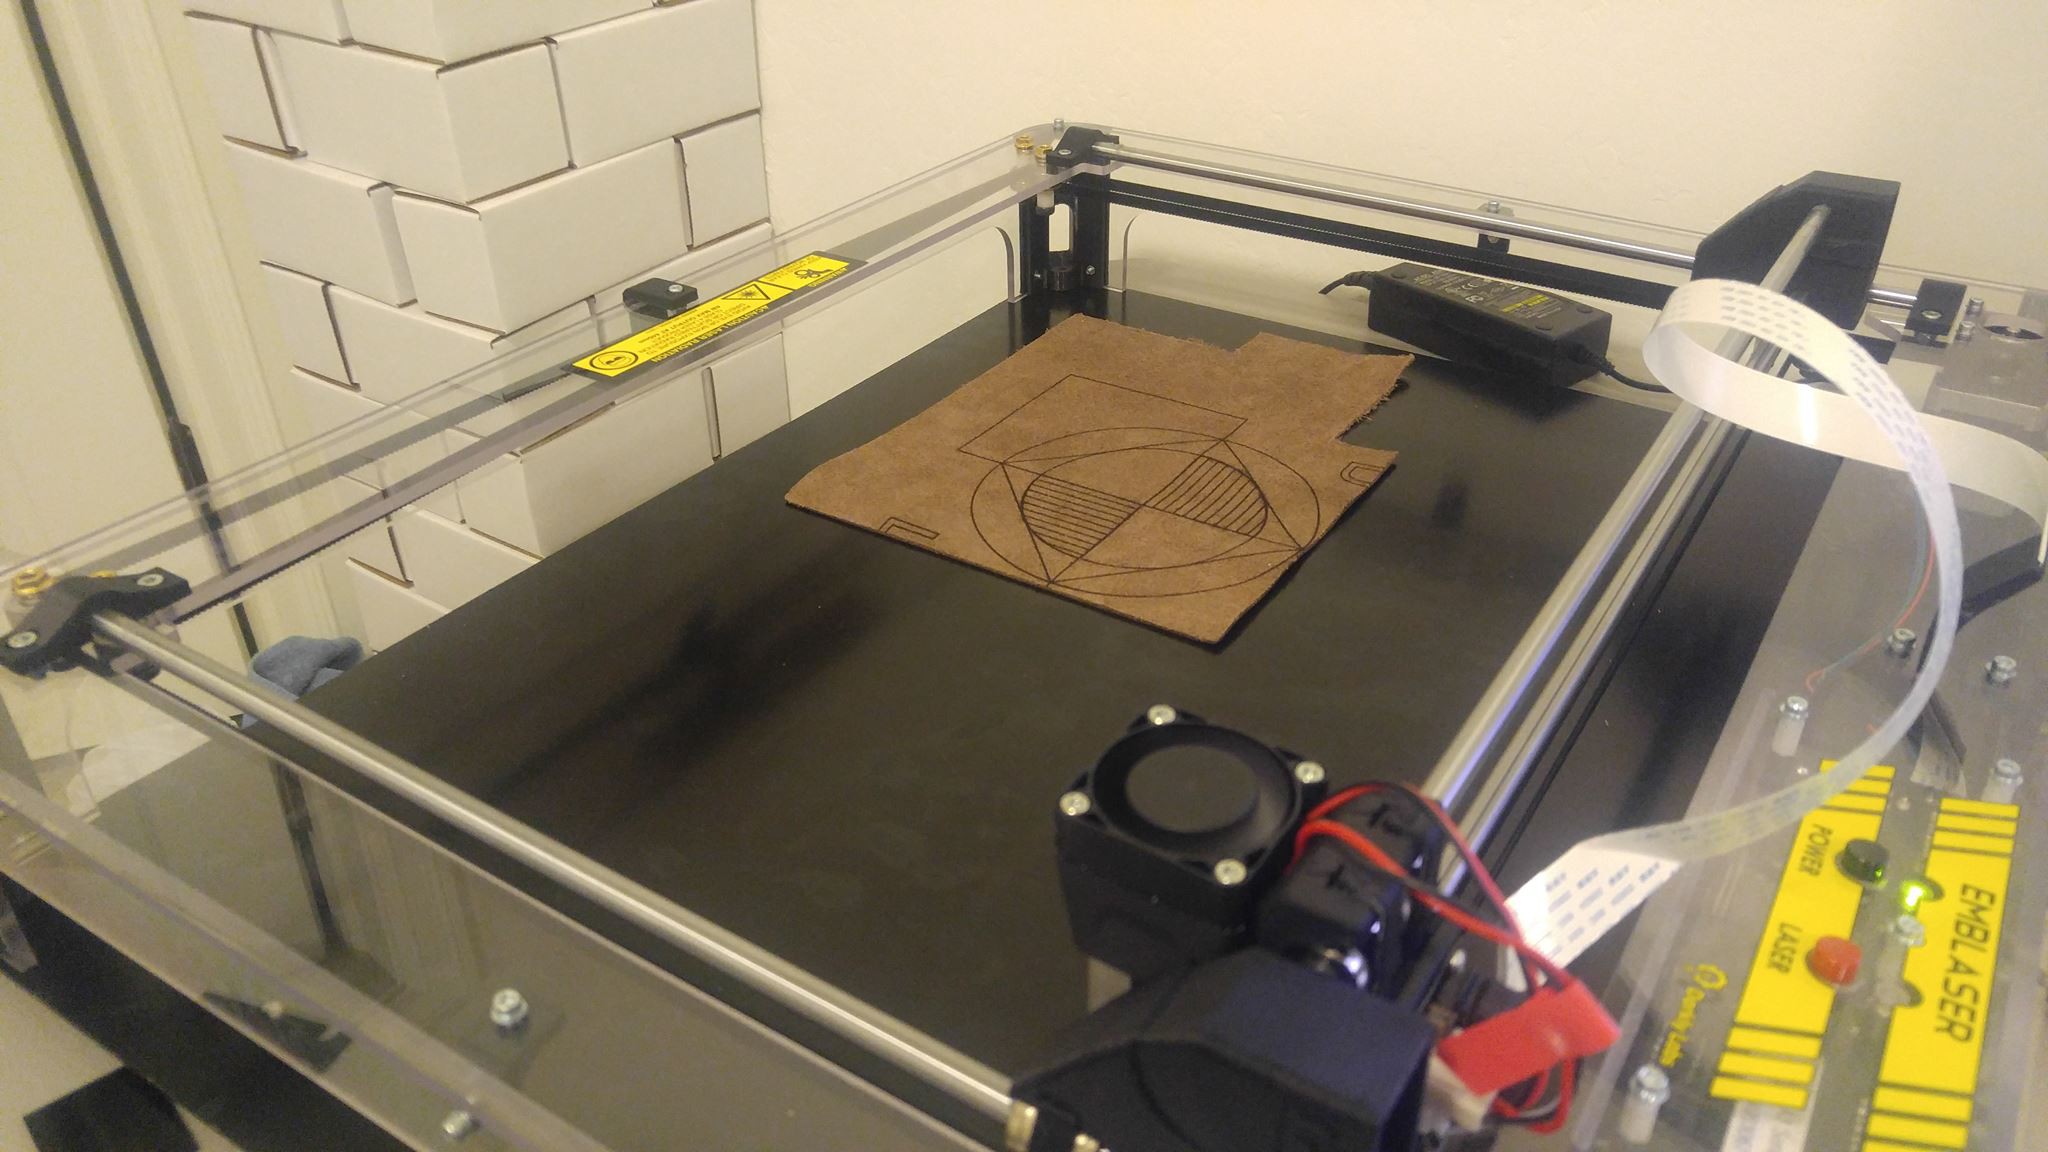
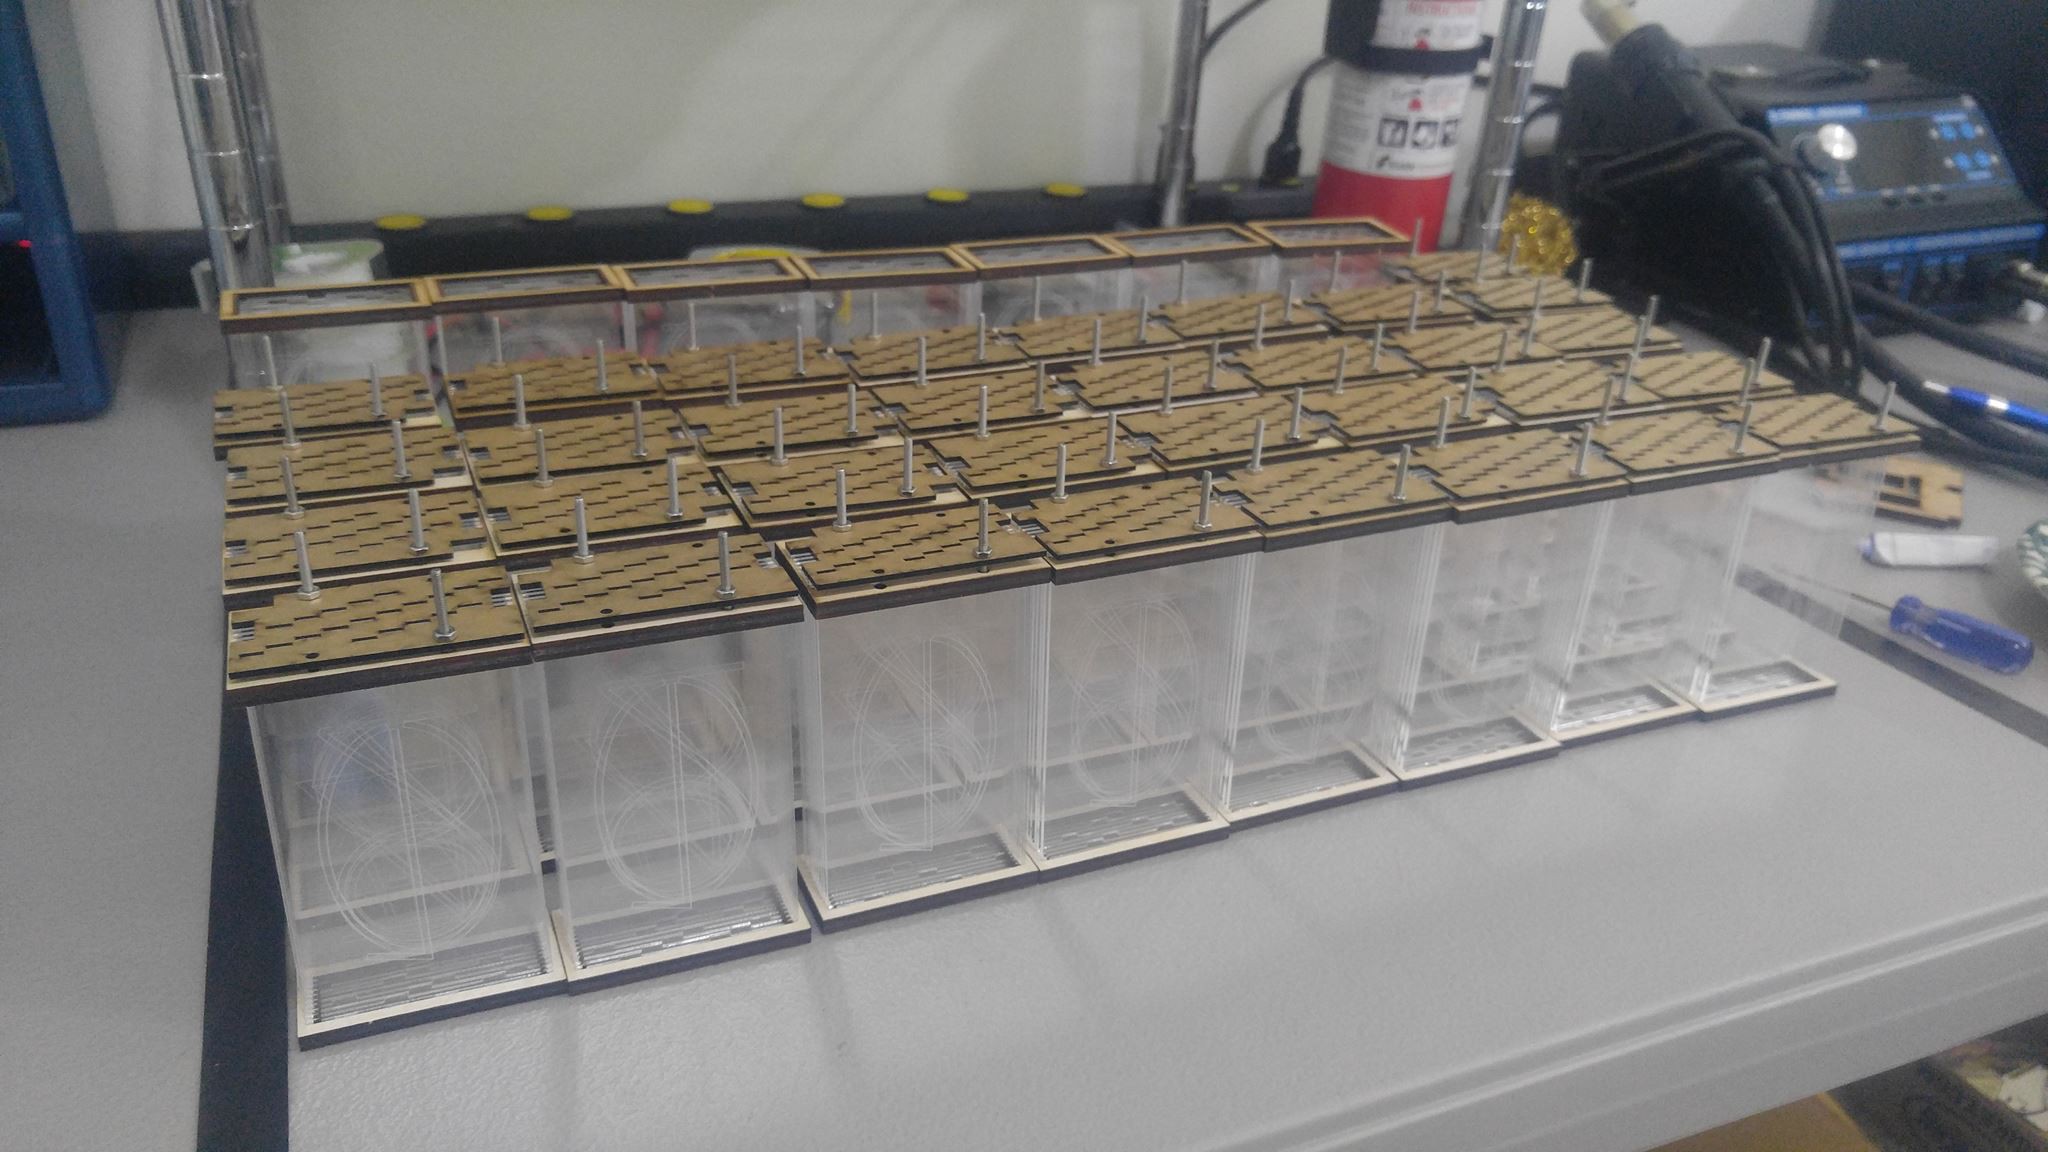
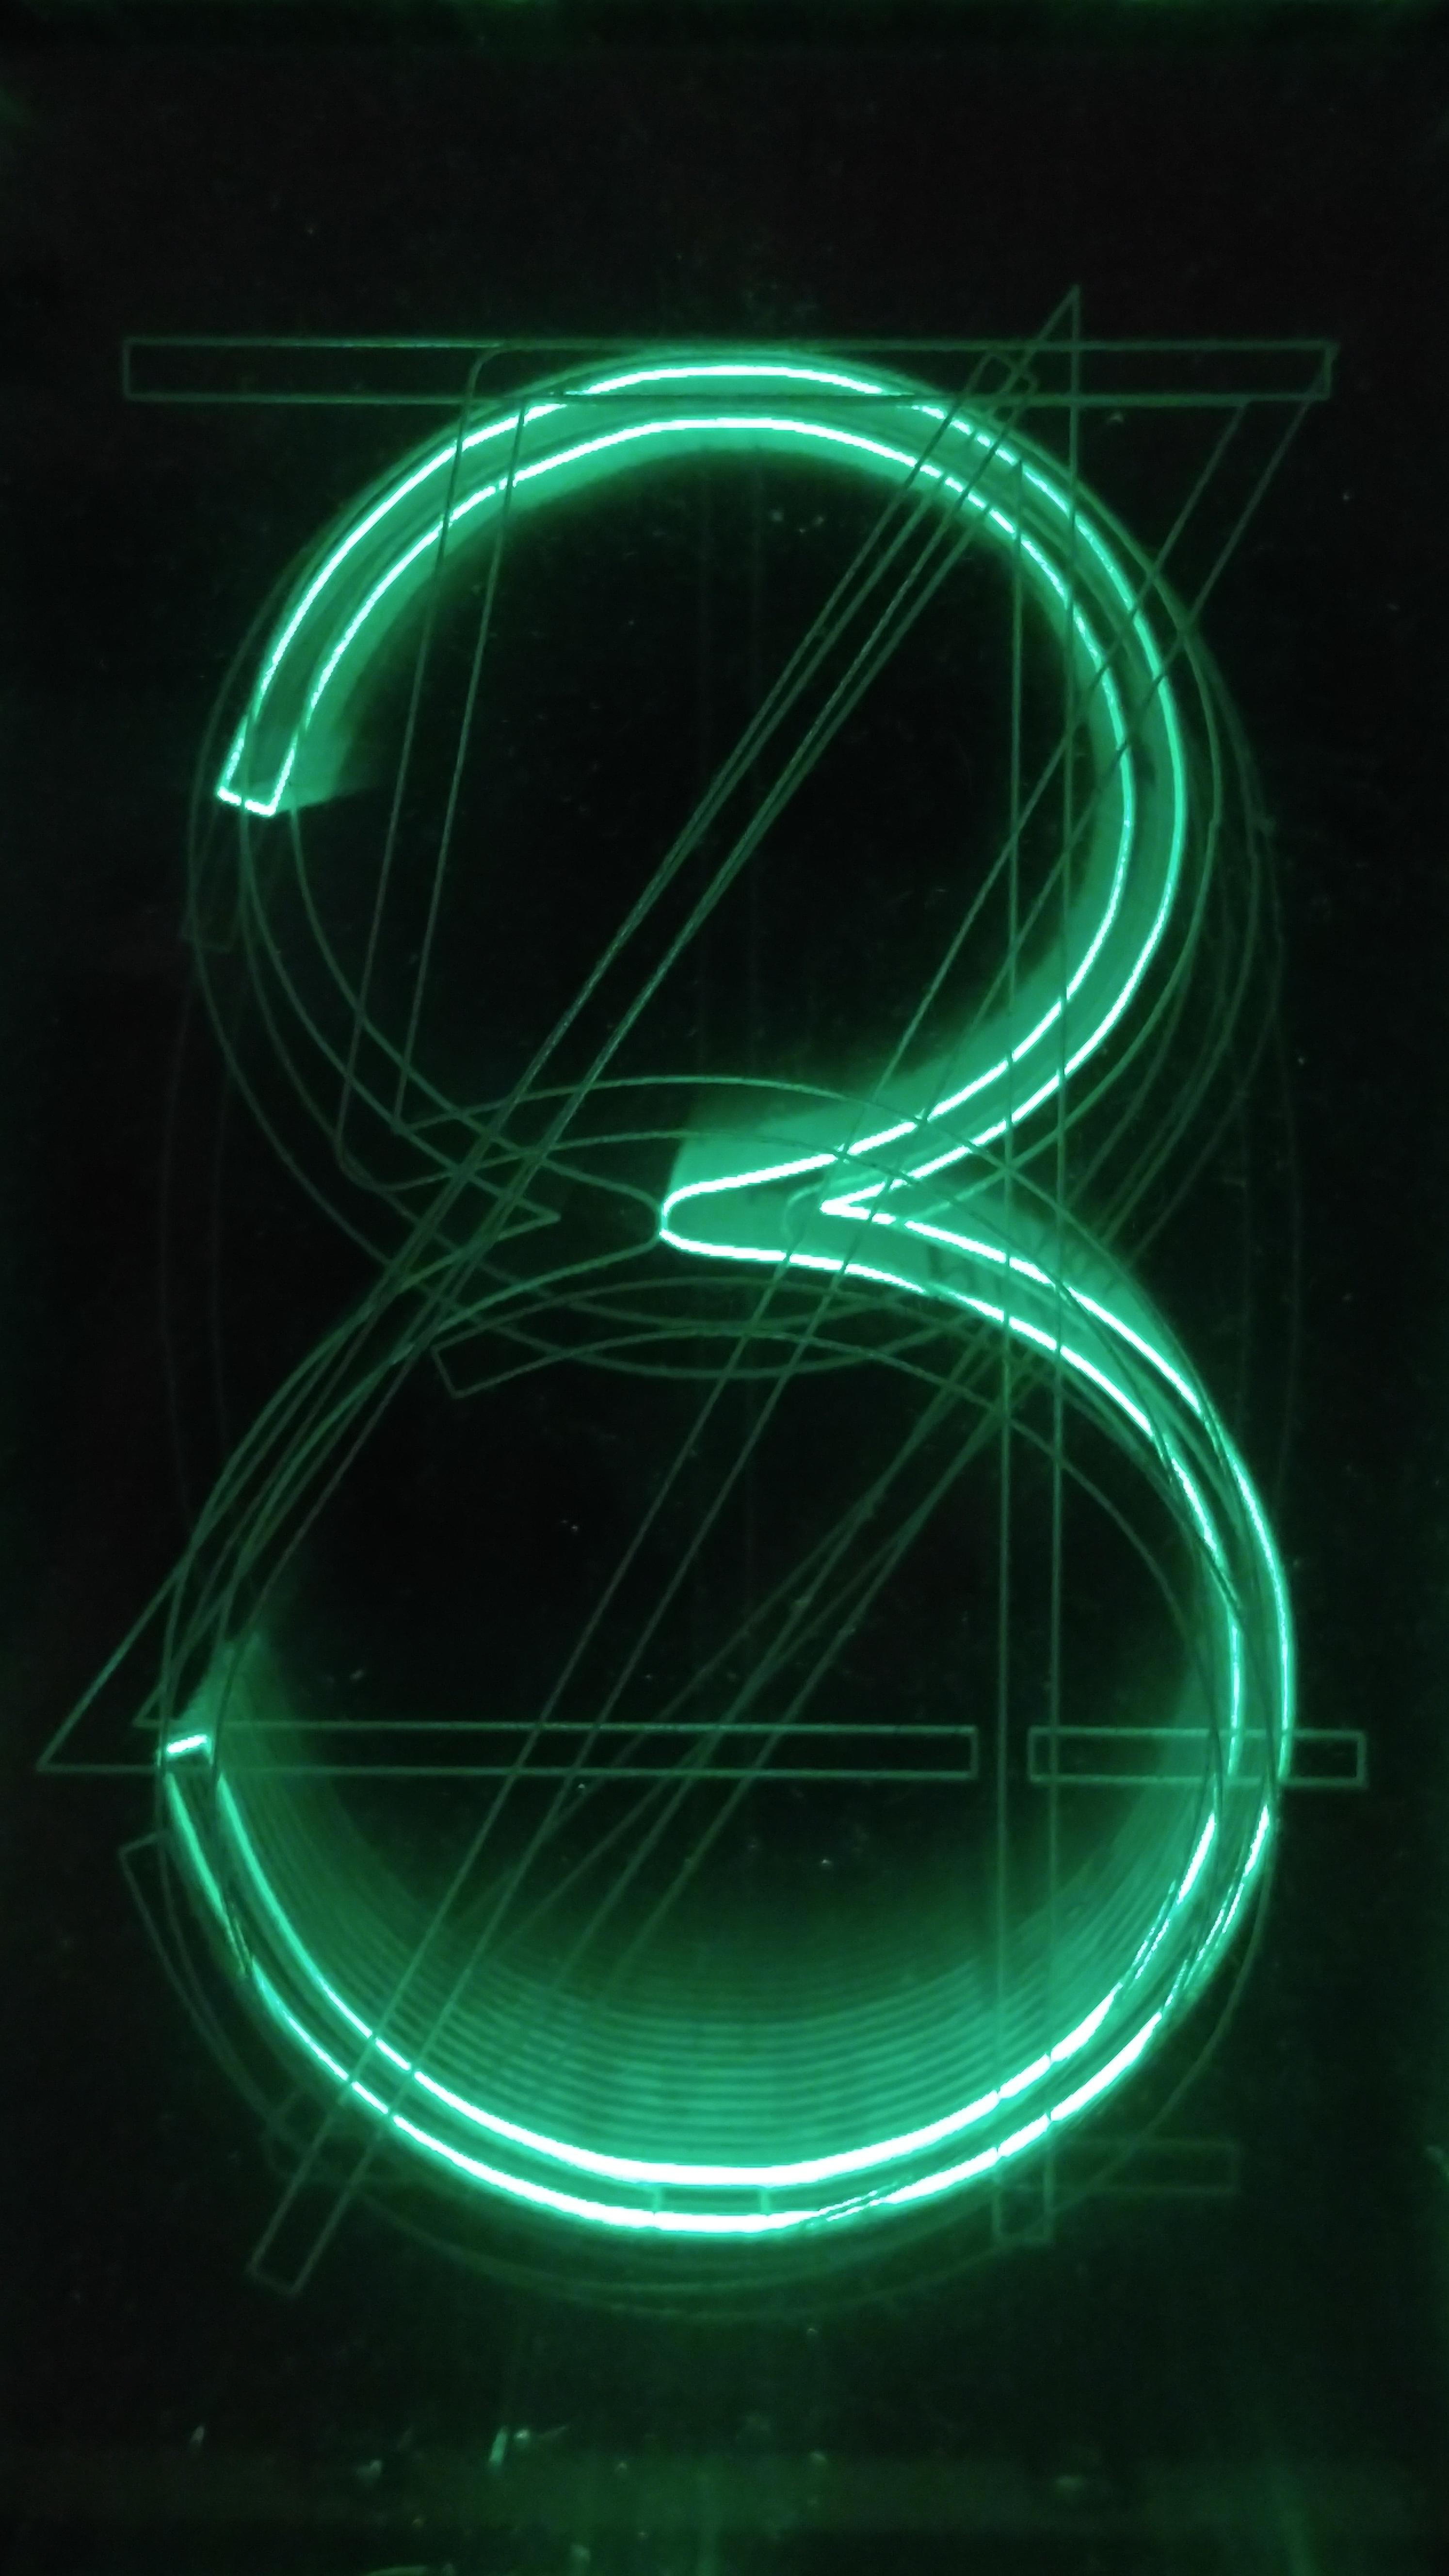
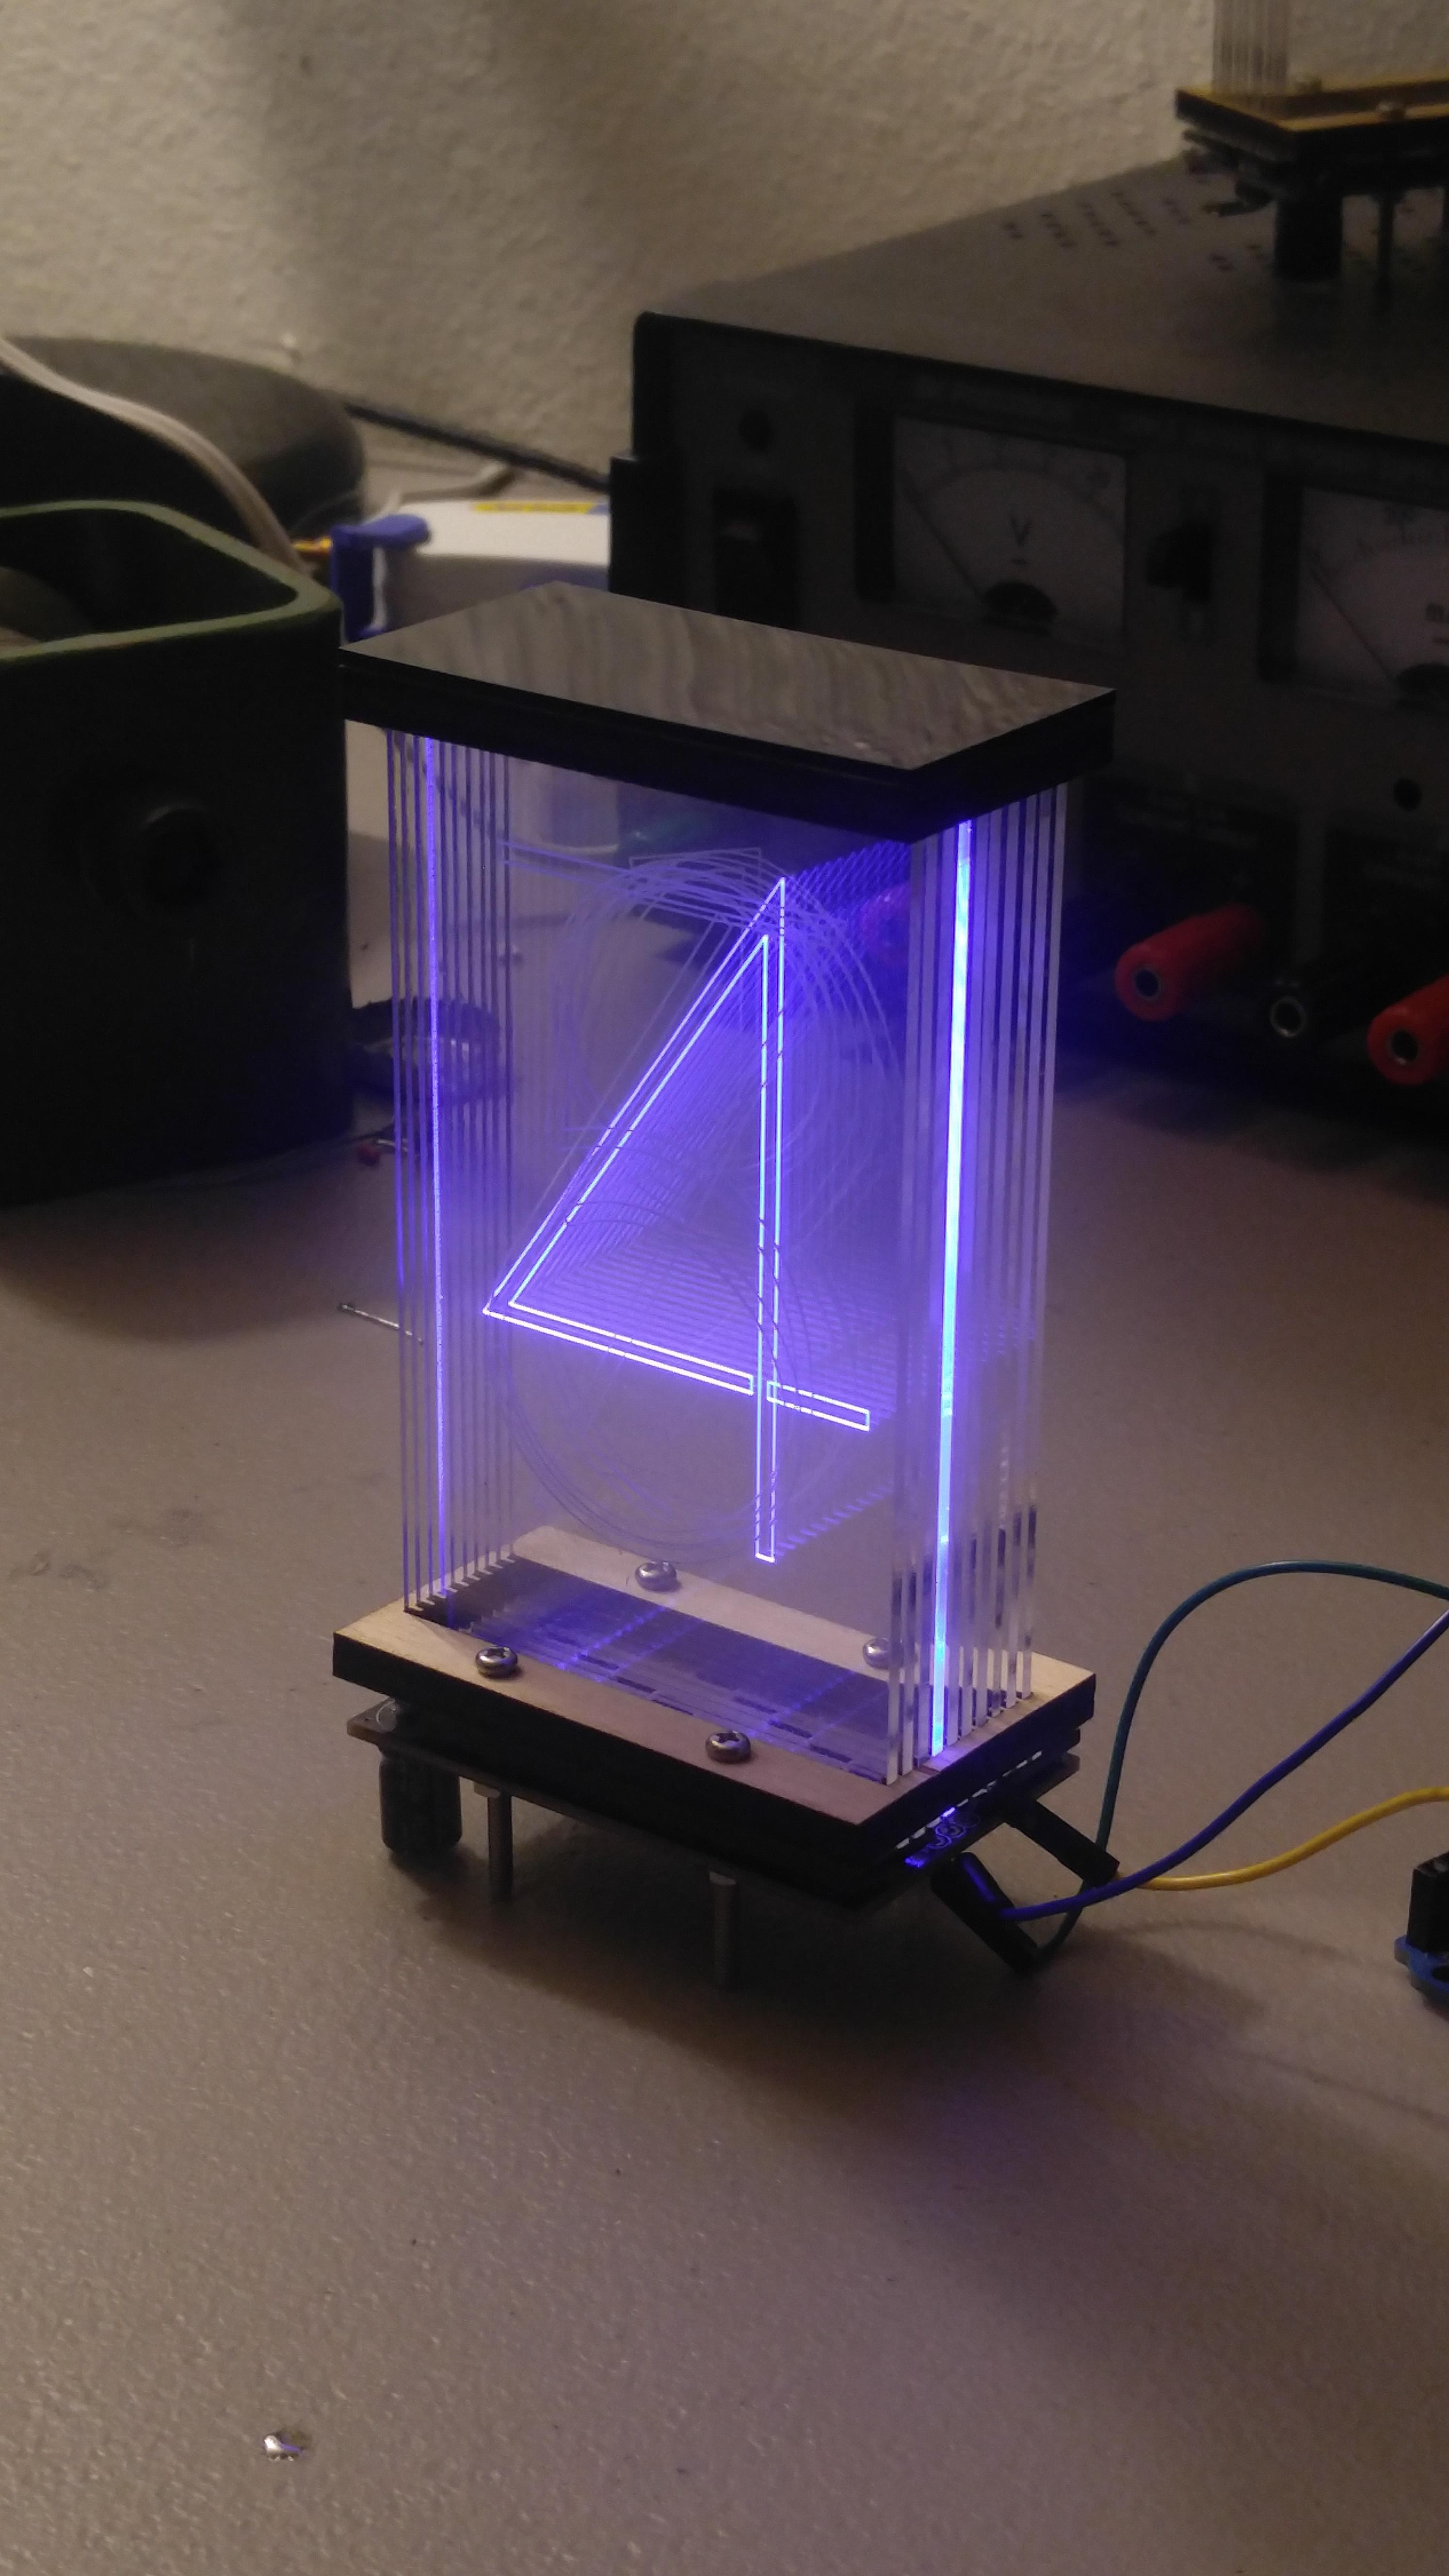
Edge-lighting panes of acrylic etched with a design has been done for decades, but they've always been static information like an "EXIT" sign. If you stack multiple panes of acrylic (each with a unique design) and light them individually, you can change what design the user sees!

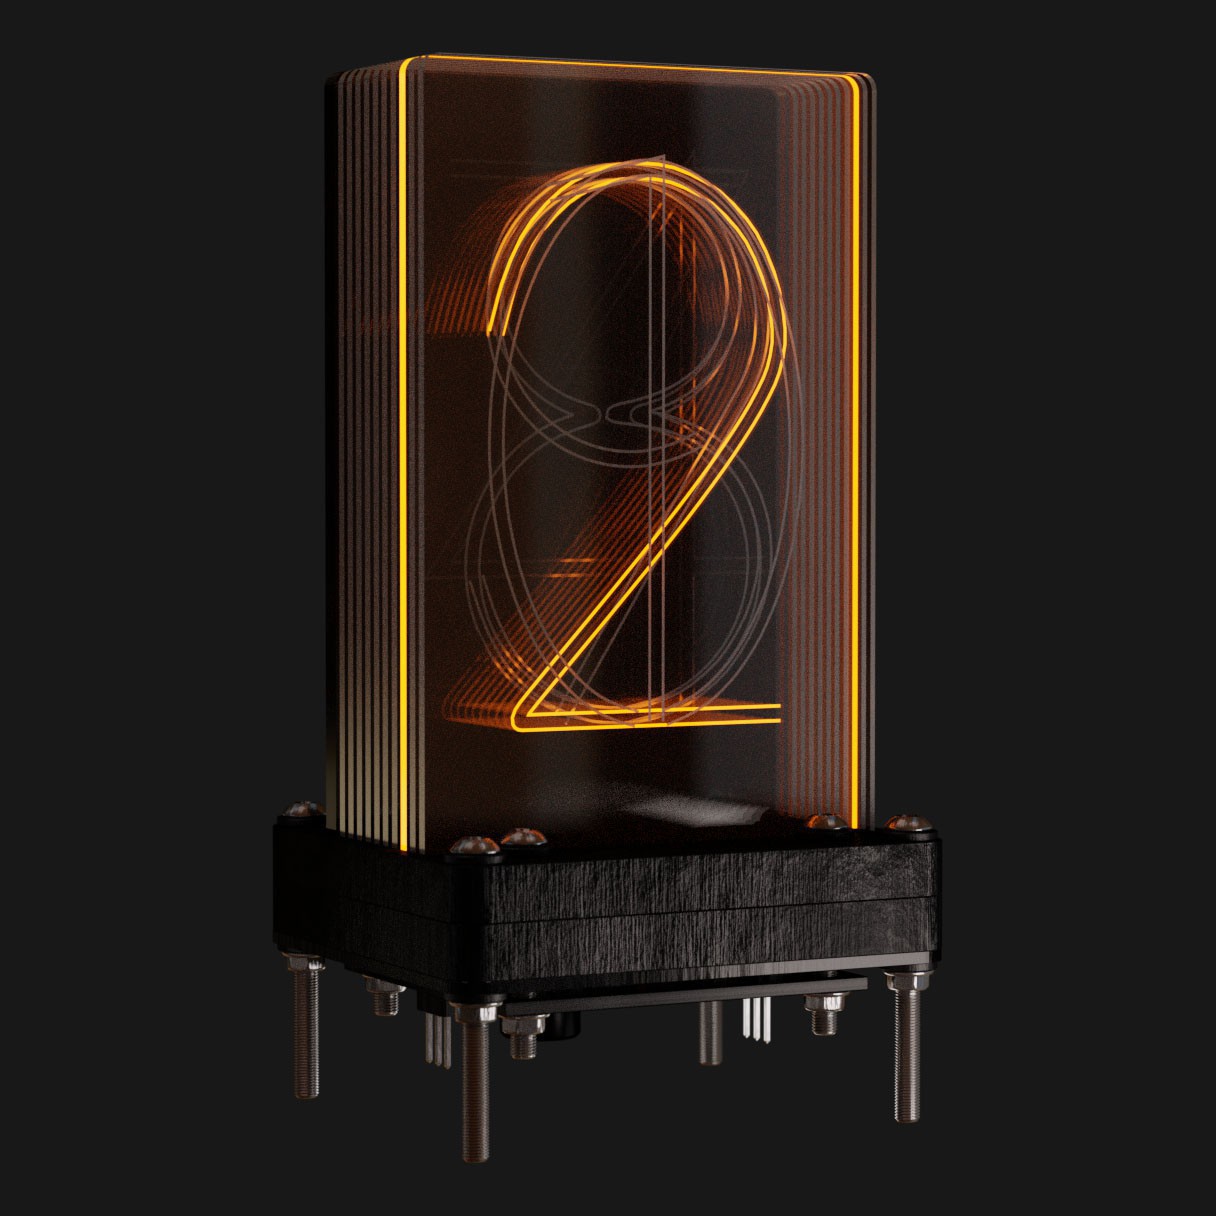
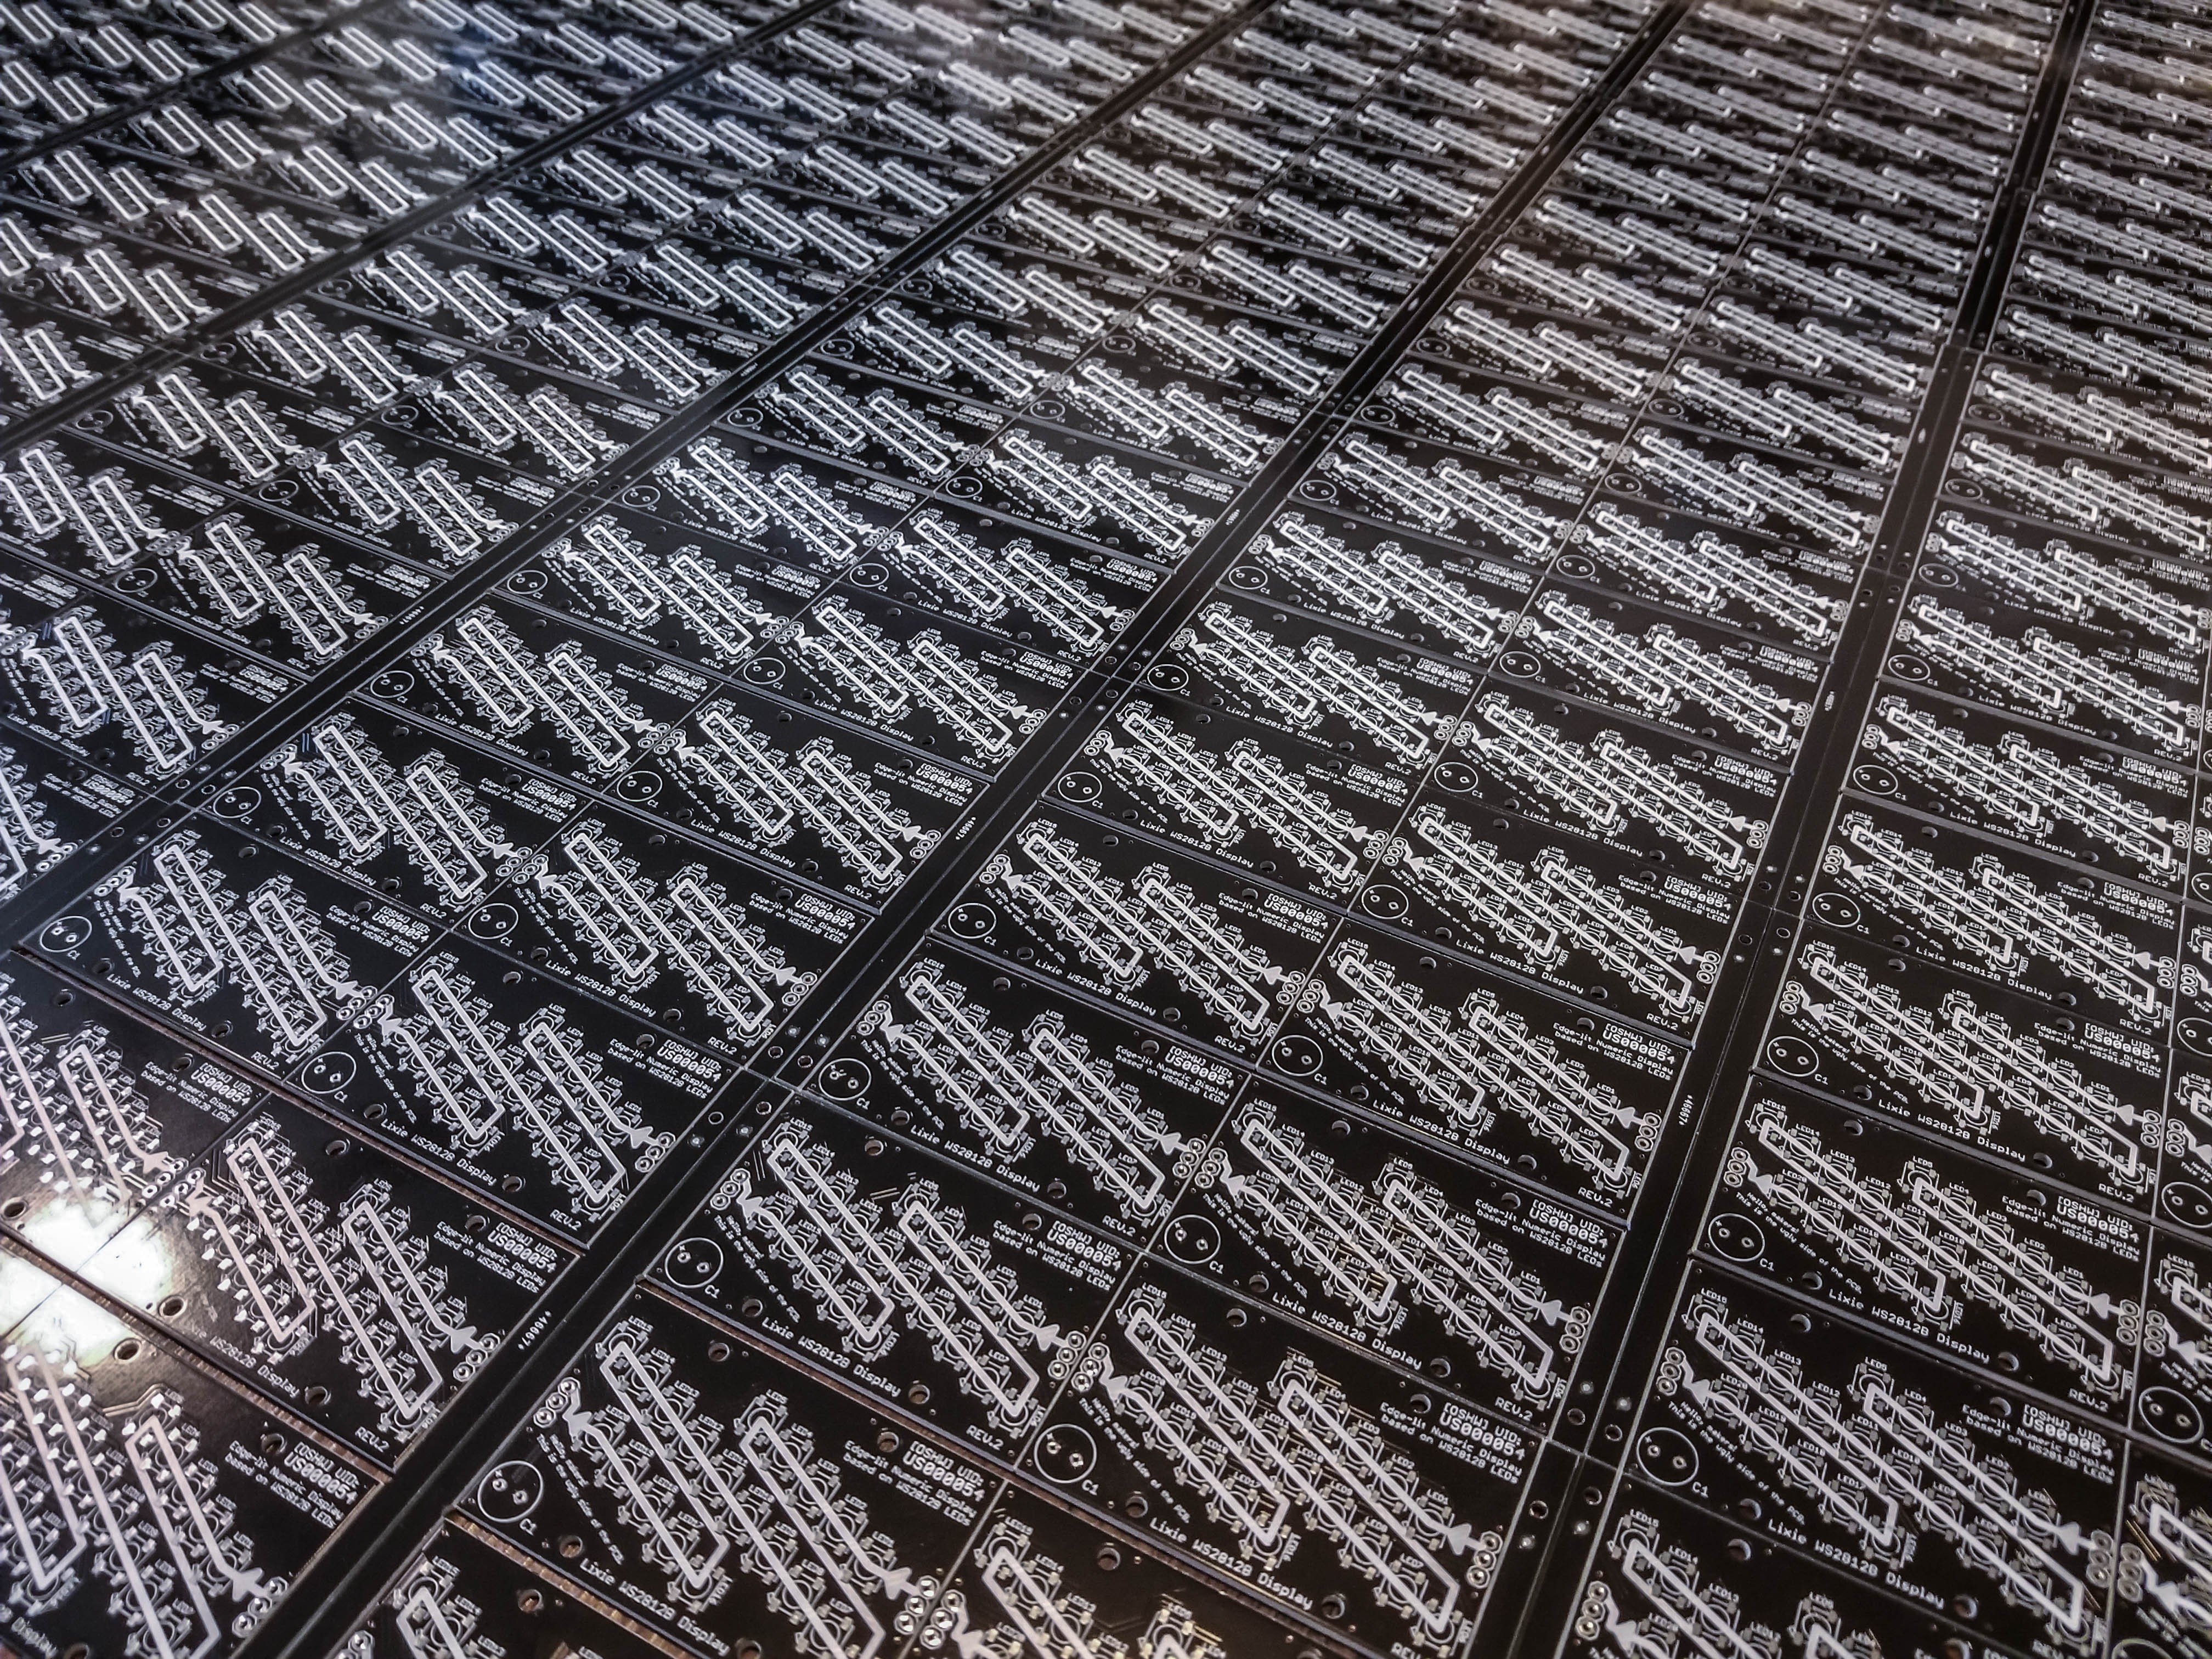
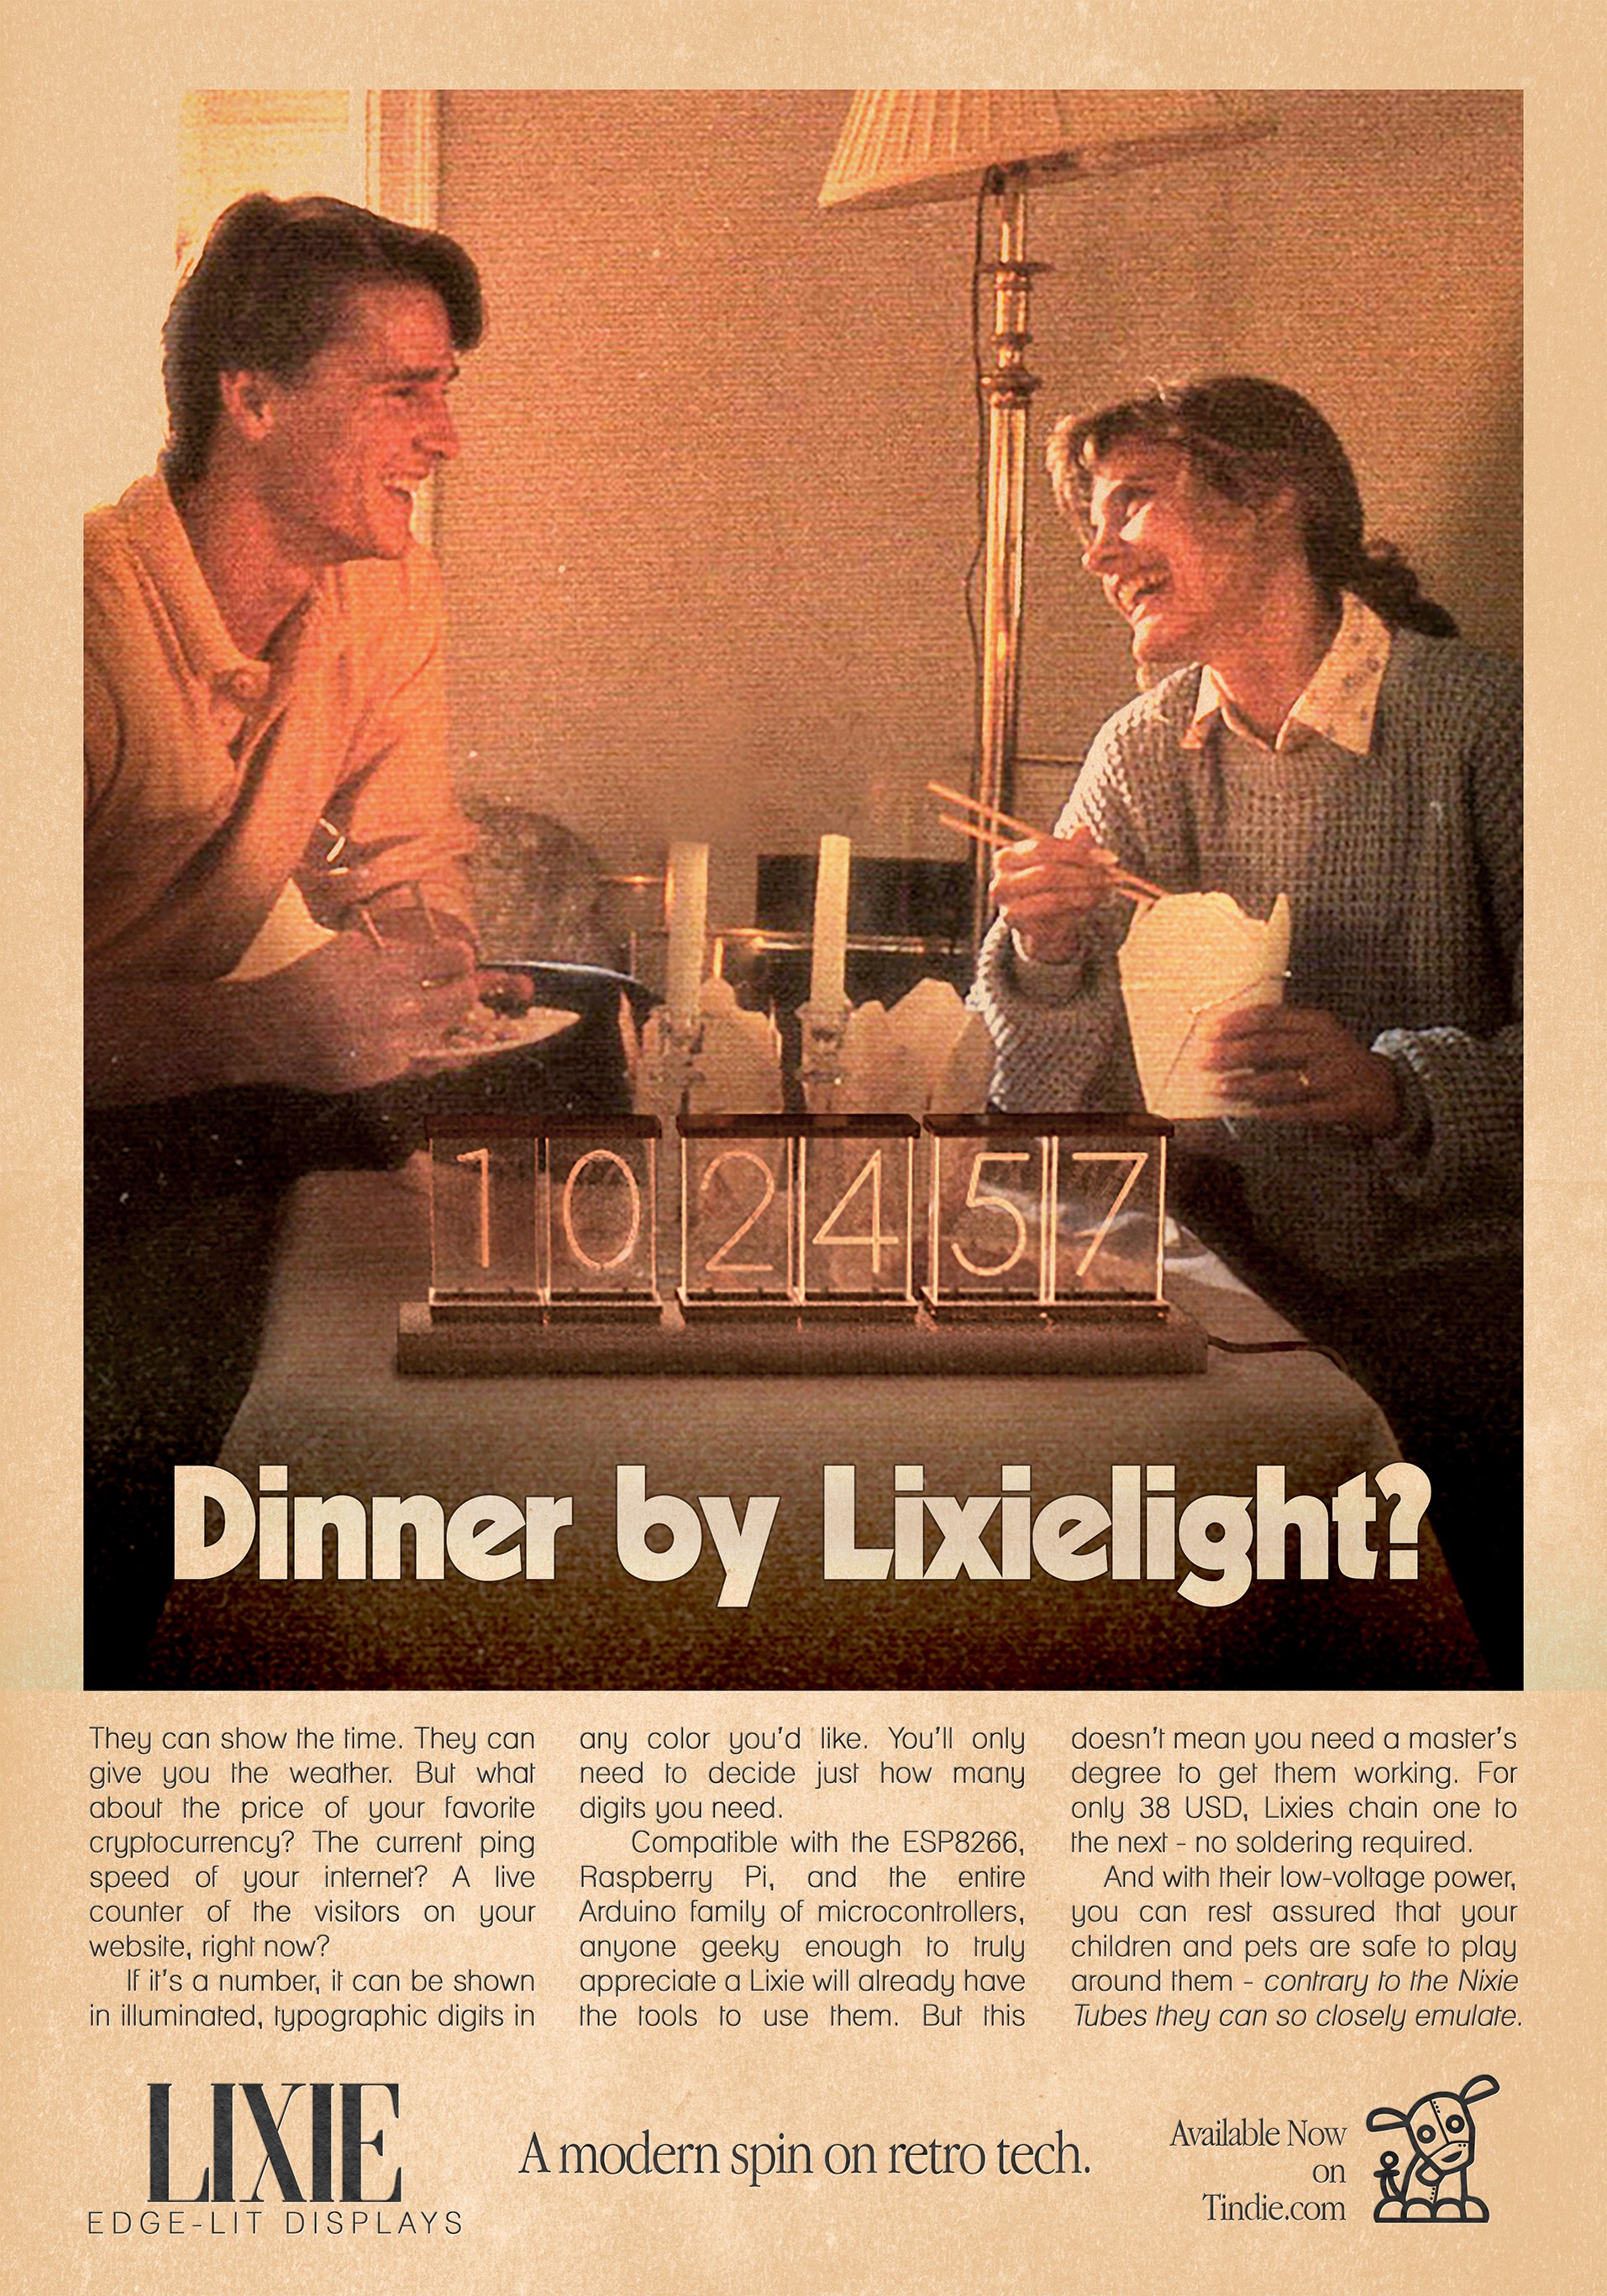
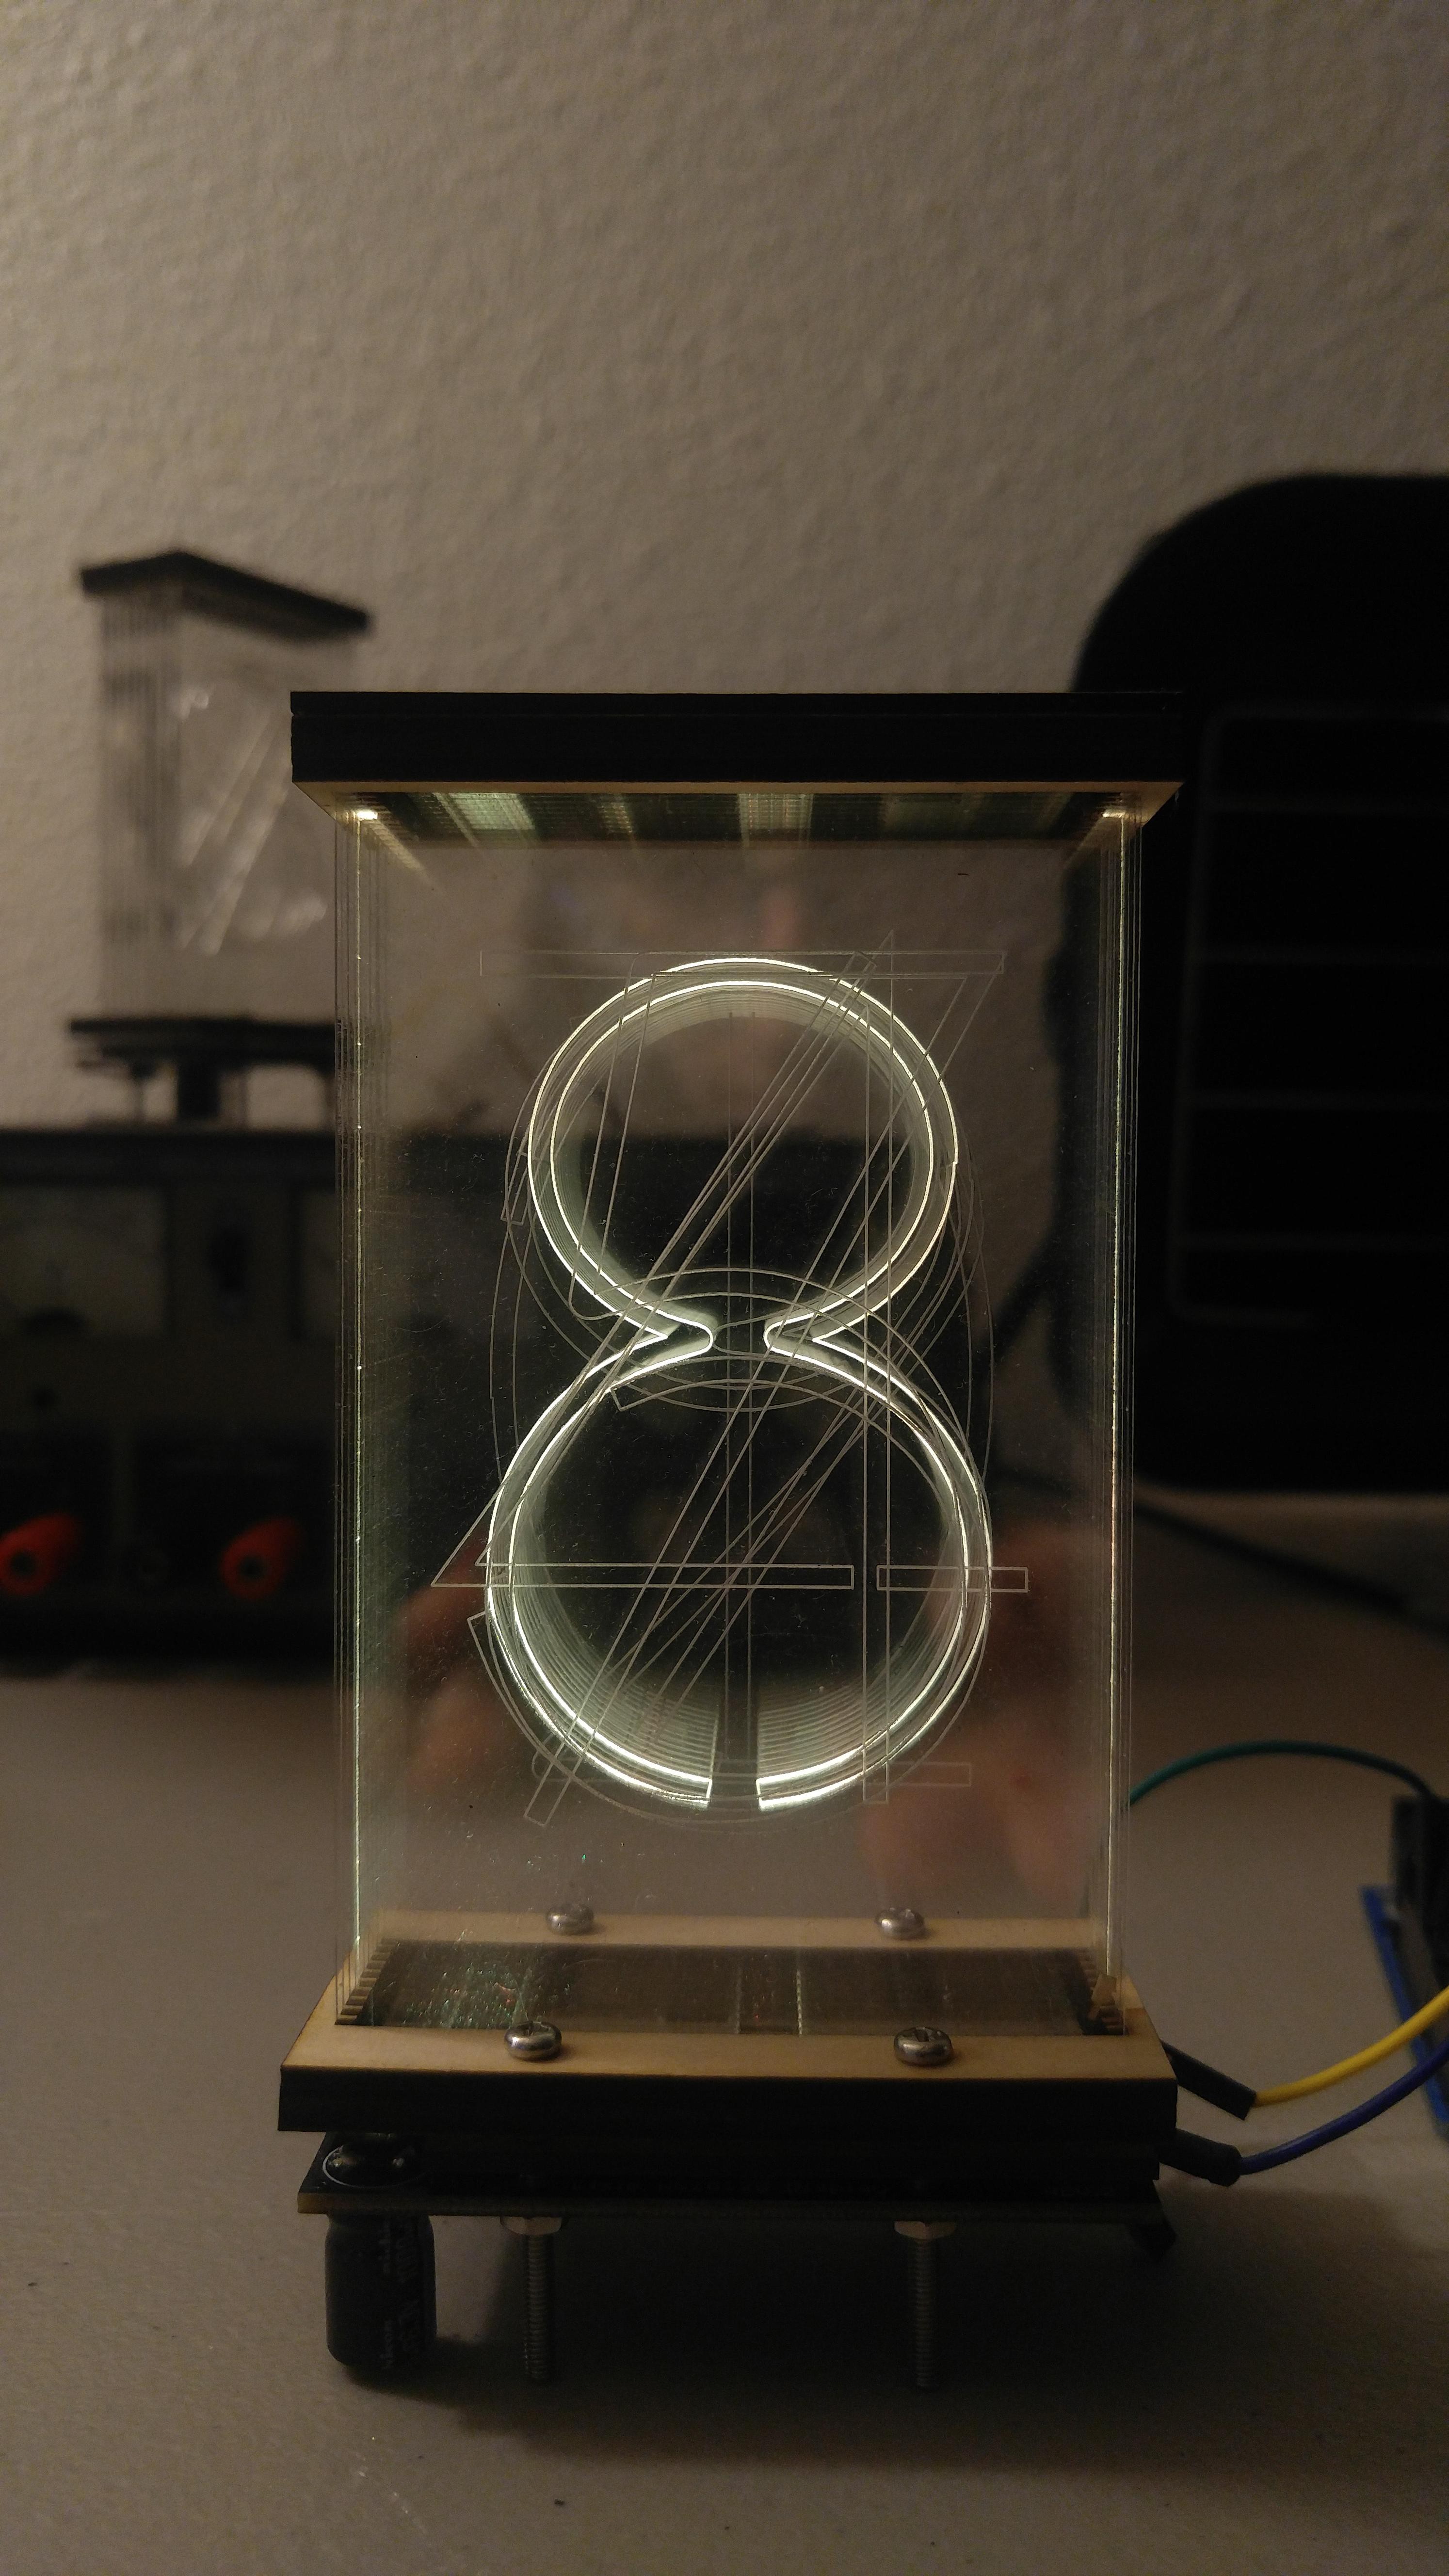
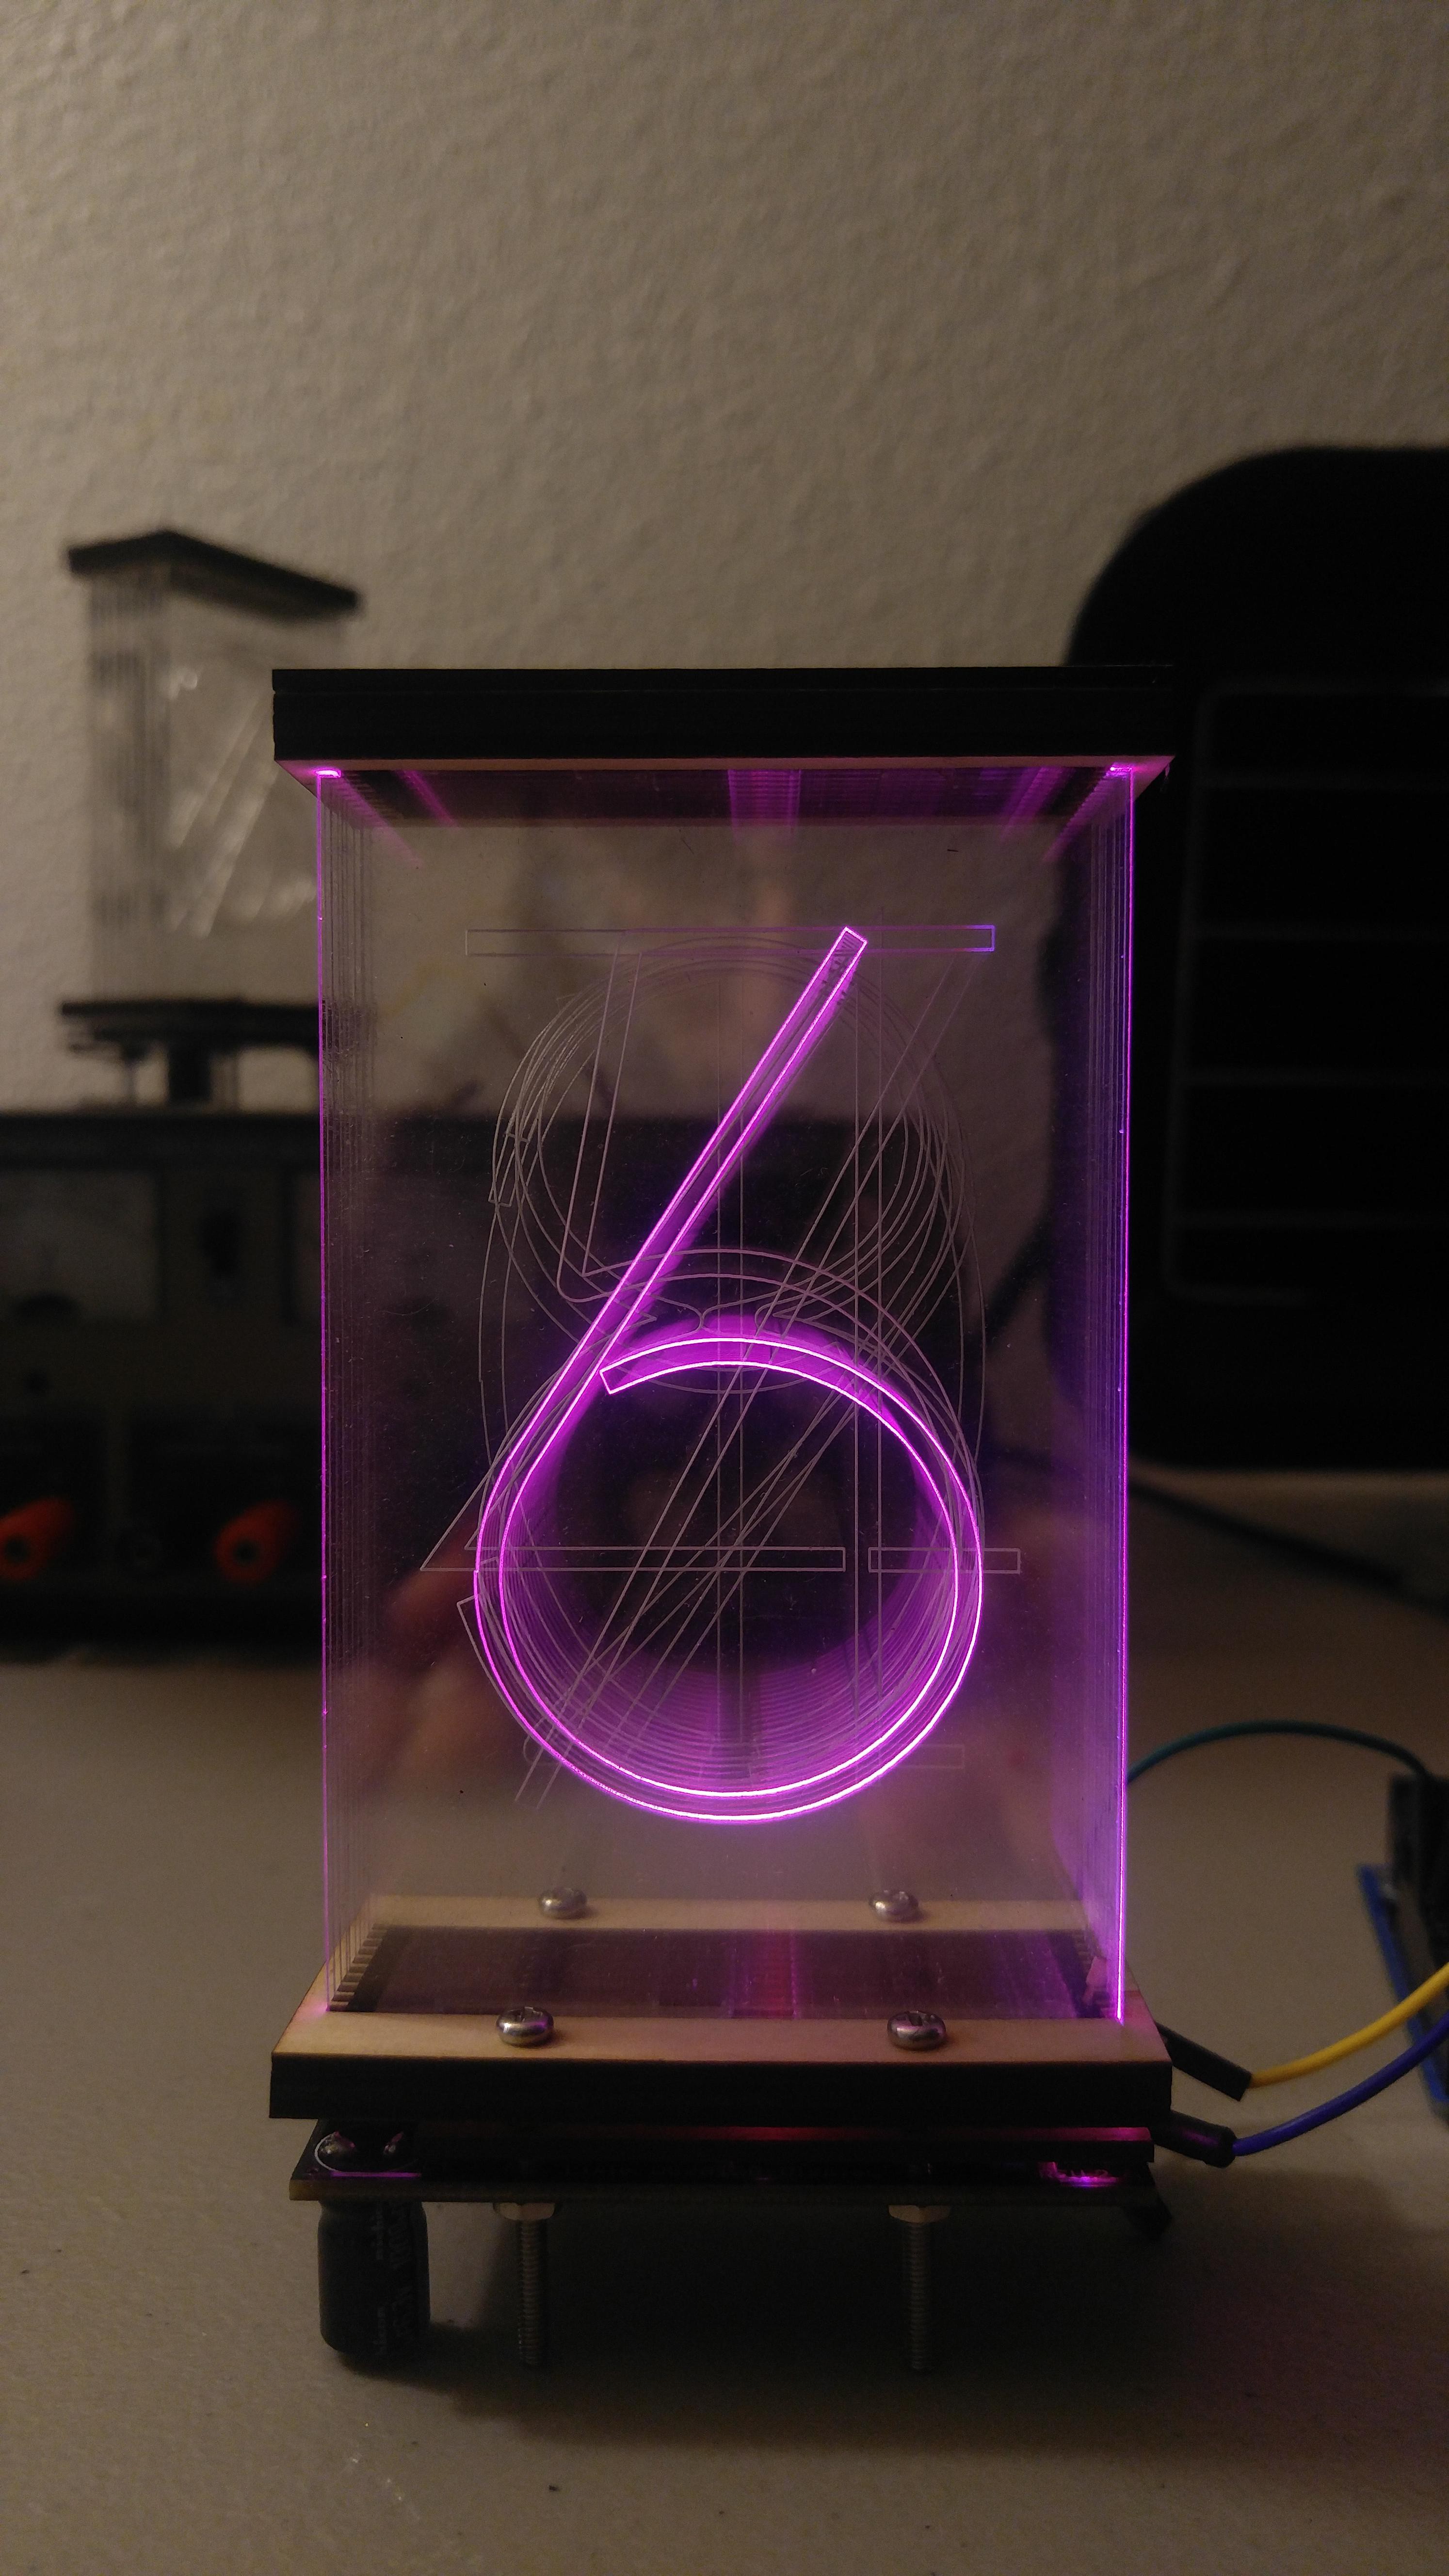
This makes edge-lighting perfect for a numeric display! And since I love the look of Nixies, we'll emulate the typography as well. At the end of the day, what I've made is a beautiful over-sized numeric display using WS2812Bs and a laser cut digit assembly!

We'll call it a "Lixie".

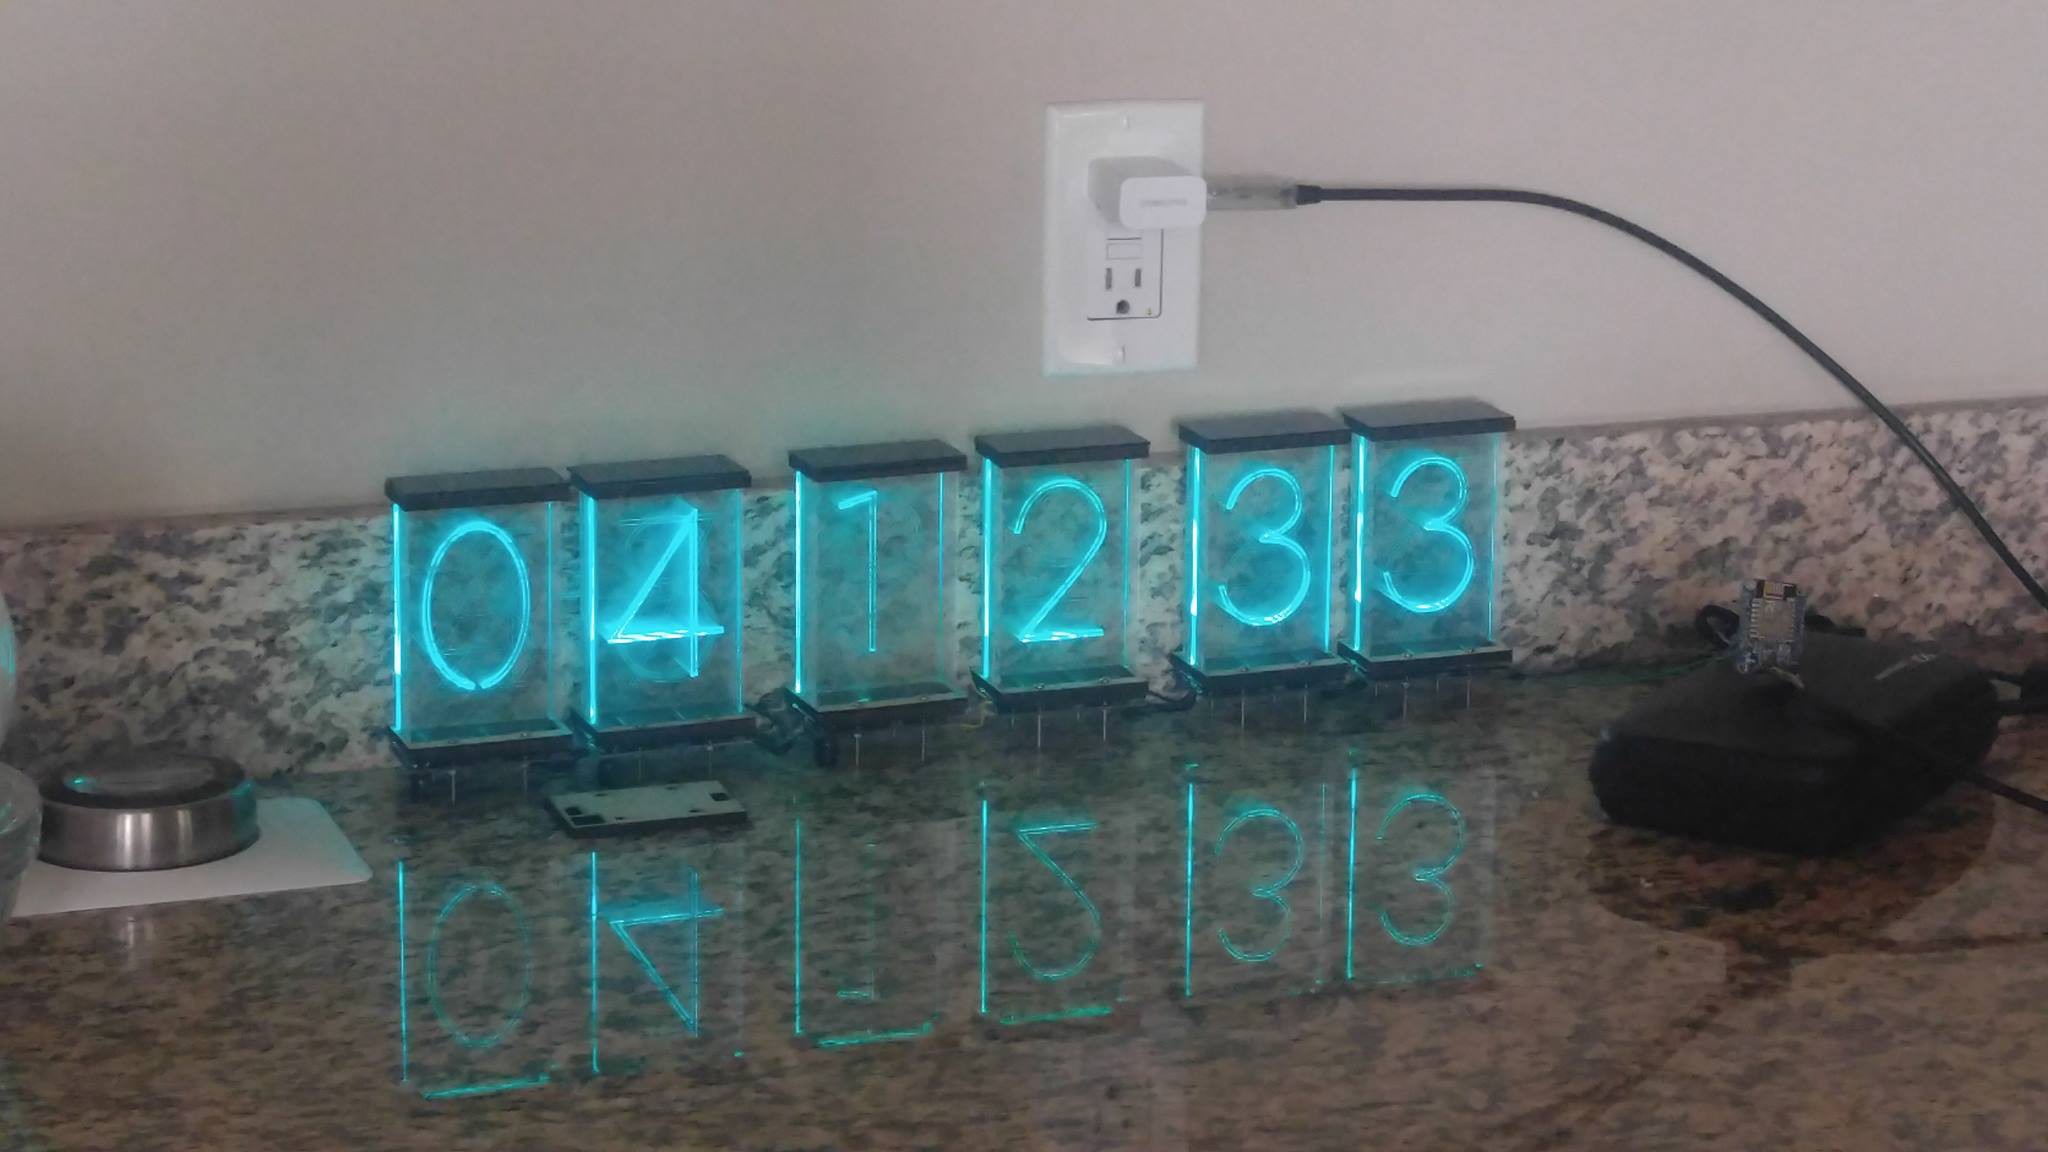
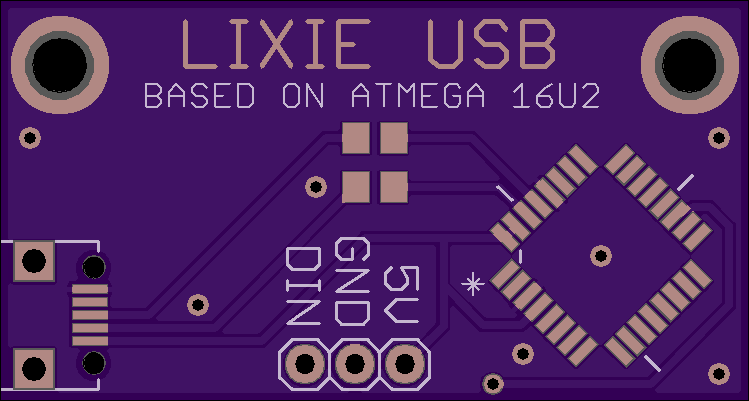
The Lixie has extremely simple setup, just connect the 5V, GND, and DIN pads to an Arduino and use the Lixie library to write a digit to the display! That's it! No HV switching, PCB footprint, or worries!

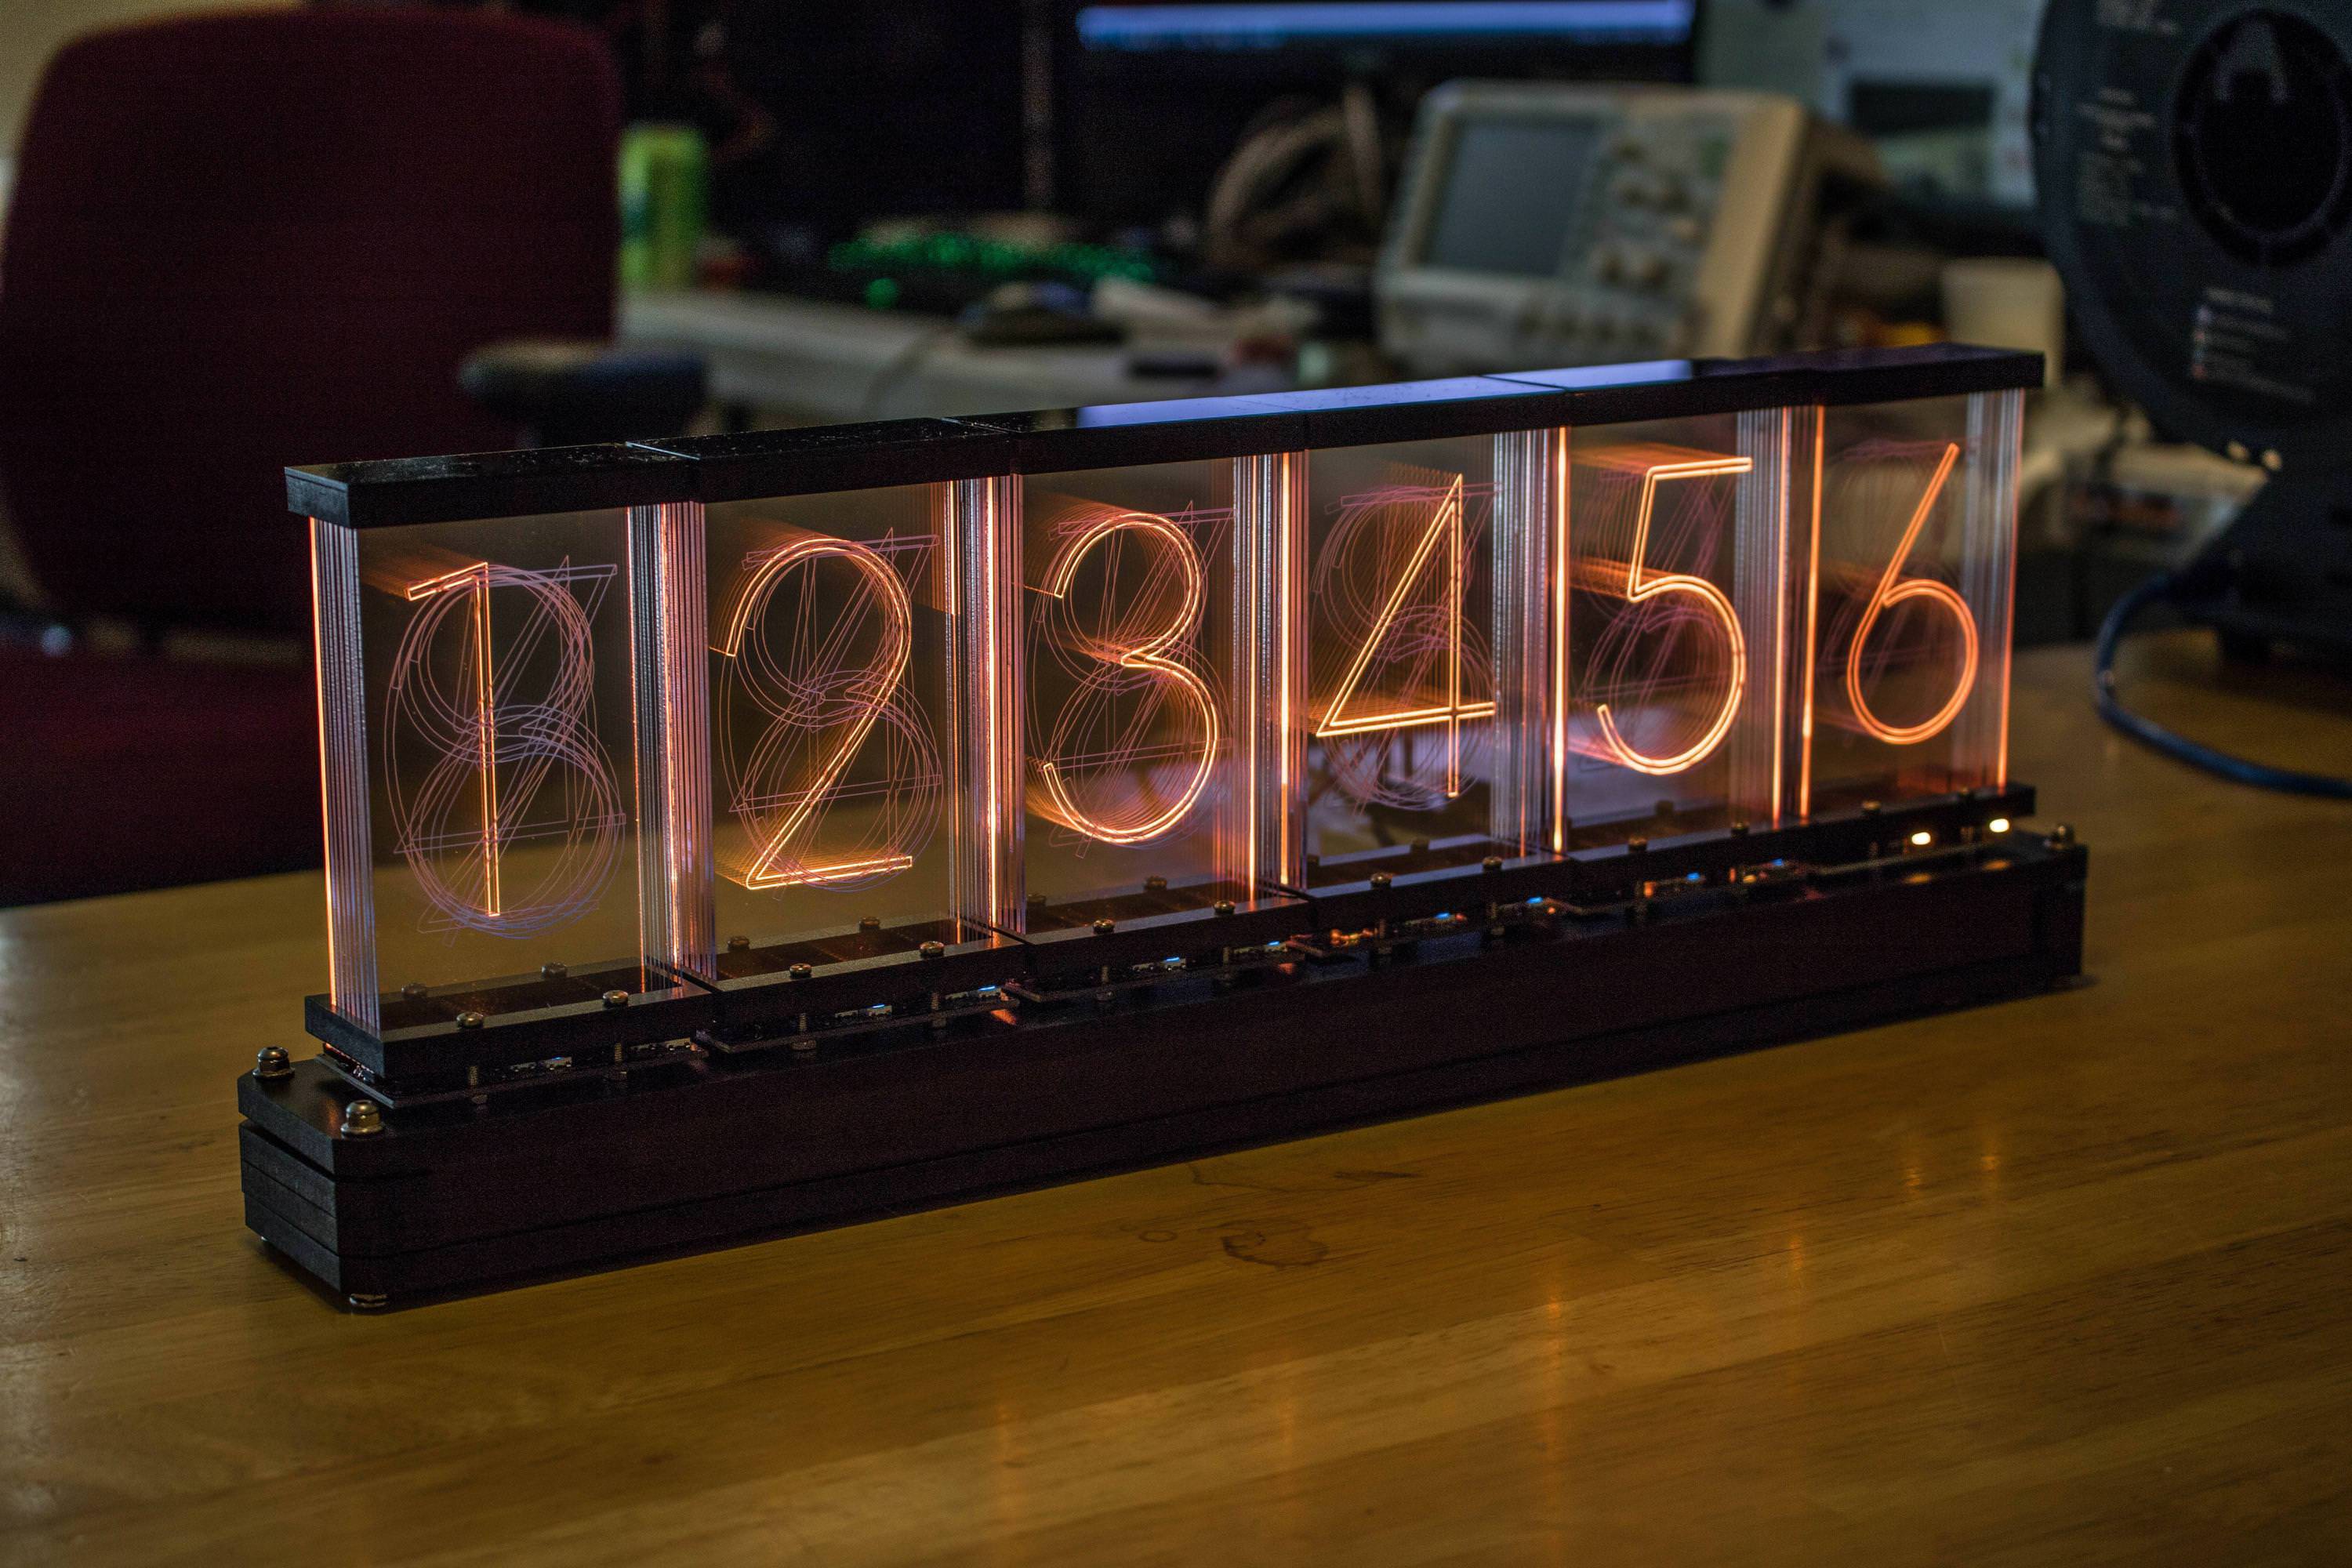
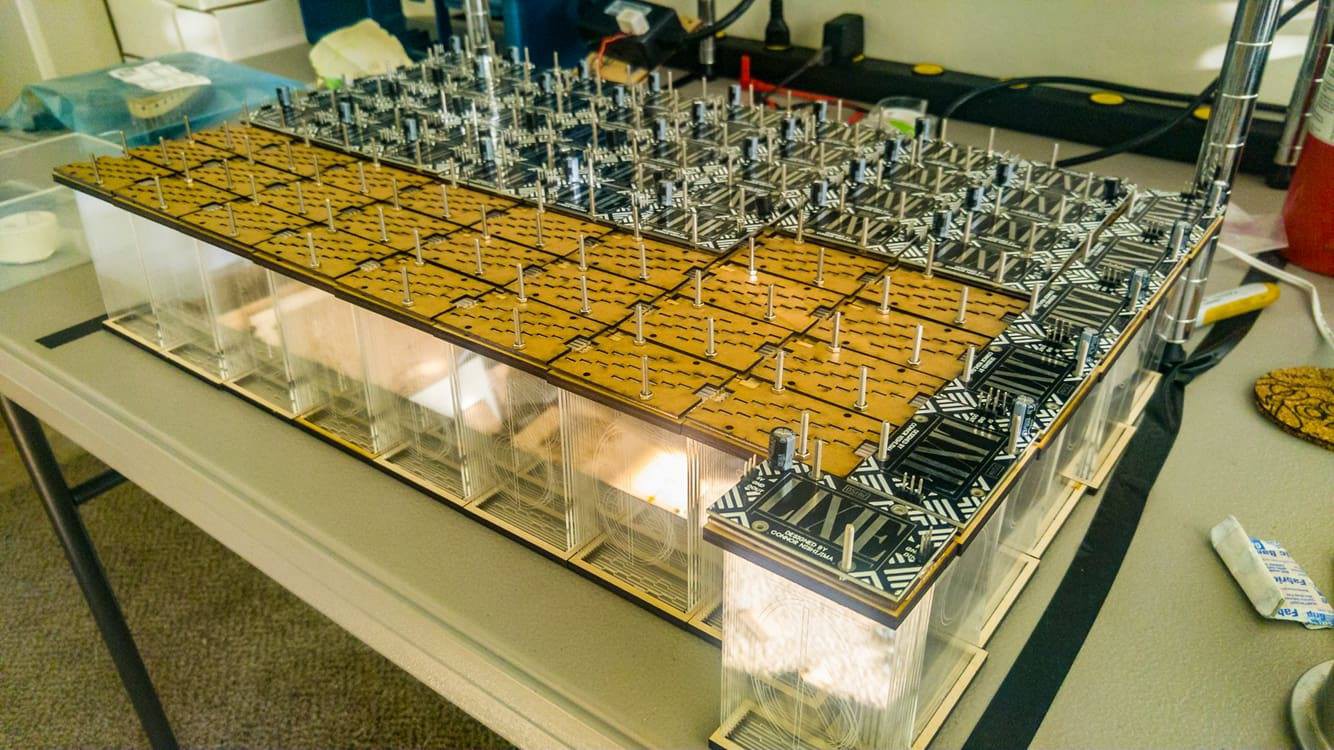
Since the Lixie is just wired like a WS2812B strip, you can connect the DOUT pin of one to the next and show a number as long you'd like!

Here is a video demonstrating the result:

  • 1 × 1000uF Capacitor
  • 1 × Birch Veneer Core (Ponoko)
  • 1 × Black Acrylic (Ponoko)
  • 1 × Clear Acrylic (Ponoko)
  • 4 × M2.5 Nut and Bolt

View all 6 components

  • Lixie is moving!

    Lixie Labs11/02/2019 at 09:07 0 comments

    With the release of the Lixie II (which is wildly different internally) and the maturation of the Lixie 1, I have decided to move all future updates to a new Hackaday.io page centered around the new design! Please check it out and follow development there if you're interested! :)

    LIXIE II - The #NewNixie for Arduino

    https://hackaday.io/project/165079-lixie-ii-the-newnixie-for-arduino

    (Lixie II is available right now on Tindie!)
    https://www.tindie.com/products/connornishijima/lixie-ii-the-newnixie-for-arduino-kit/

  • Dear Lixie Fans... (we have a surprise for you!)

    Lixie Labs08/13/2019 at 18:43 0 comments

  • The Making Of A Lixie (And How Boring It Is!)

    Lixie Labs07/27/2018 at 15:10 0 comments

    It's long, it's blurry, it is the making of a Lixie! (And how boring it is!)

    This video has been long overdue, I just never got around to editing it.

    Today I'll be taking you guys for a trip around my old office, sharing with you my experiences mass-assembling electronics from home, and showing you how Lixies are built from scratch! :)

    To order Lixies on Tindie:
    https://www.tindie.com/products/connornishijima/lixie-an-led-alternative-to-the-nixie-tube/

  • LIXIE IS NOW $34.99 | PRODUCTION UPDATES

    Lixie Labs07/27/2018 at 03:31 0 comments

    Hello, once again! It's been a while since we've updated here on HAD.io, so I'd like to go over a few major notes.

    The first of which is that Lixie has dropped in price, and is now $34.99!
    (Available for purchase right now on Tindie)

    A NEW WOOD, A NEW LOOK

    As some of you may have noticed, Lixies are now built and sold with a 6.3mm black melamine-finished MDF, instead of the 5.2mm untreated birch they originally released with. This change happened for two reasons:

    IMPORT REGULATIONS

    Though I don't have all the details, my material supplier for the 5.2mm Birch had to stop carrying the material, due to a change in import regulation/legislation. I've heard from my guitar-loving dad that sometimes this happens due to deforestation issues. Yikes!

    IT'S JUST A BETTER MATERIAL

    Not only are the new black MDF parts easier to match a color scheme with, they're stronger too. Birch had some infrequent but irritating issues with splintering, especially when a shipping courier had roughed it up. I'm happy to report that since the switch to MDF in February, ZERO reports of splintered Lixie parts have come in!

    A NEW LIBRARY

    Though it isn't quite finished being documented, I have a new Arduino library for Lixie called "Edgelit". It uses a hardware timer to keep the displays updated, allowing for non-blocking animation techniques, and it utilizes what I call an LED "mask".

    THE ANIMATION MASK

    The Edgelit library has two layers of FastLED arrays. "FRONT", and "BACK". (Think of them as a foreground and background layer) Imagine this: you have a function that spits out a fiery orange LED animation on the "FRONT" layer, while keeping the "BACK" layer blank/black. The Edgelit library will create a "mask" that says which LEDs on your Lixies should be lit with either the FRONT or BACK pattern at any given time.

    This way, you could have your Lixies do their usual job of displaying the time, date, share prices, etc., while that fiery animation plays out on the "on" segments.

    PRESET THEMES

    Because of the Lixie's popularity in representing the look of vintage numeric displays, Edgelit includes several preset functions to quickly mimic your favorite retro digits, now including Vacuum Fluorescent Displays:

    void nixie(uint8_t argon_intensity = 3);
    void vfd_green(uint8_t aura_intensity = 3);
    void vfd_blue(uint8_t aura_intensity = 3);

    ANIMATION CALLBACK

    Since Edgelit features non-blocking functions for animation, you can attach a function to be called whenever Edgelit wants to update the displays. This can quickly be used to add something like a "hue += 1" line to make the Lixies constantly cycle the rainbow without having to make sure your main code loop does this on time.

    NOT JUST FOR LIXIE

    Edgelit was written to be expandable to other edge-lit displays like mine, such as the already-supported NixiePipe by John Whittington. If you want to build your own displays, or already sell a similar product, compatibility with any WS2812B-based display is super easy to include. Edgelit.cpp has an array of compatible models that you can add your product to like this: 

    If LED1 on your board pertains to the numeral "3", and LED2 pertains to the numeral "9", and LED3 to "2", etc. then your array looks like this:
    {3, 9, 2, 0, 1, 6, 5, 7, 4, 8, 3, 9, 2, 0, 1, 6, 5, 7, 4, 8,-1,-1} // Lixie 1 - there is space for a 22-LED display for things like decimals.

    If LED1 on your board pertains to the numeral "3", and LED2 pertains to the numeral "9", and LED3 to "2", etc. then your array looks like this:
    {3, 9, 2, 0, 1, 6, 5, 7, 4, 8, 3, 9, 2, 0, 1, 6, 5, 7, 4, 8,-1,-1} // Lixie 1 - there is space for a 22-LED display for things like decimals.

    A WORLD OF LIXIES

    In the last two years, Lixie has shipped to almost every corner of the world. If you plotted every Lixie set sold so far on the map, it looks like this:

    That is an amazing achievement that I never imagined Lixie reaching. (It seems that...

    Read more »

  • Net Neutrality 1991-2017

    Lixie Labs12/14/2017 at 20:09 0 comments

    Net Neutrality is dead in the US for the time being. This means ISPs will be free to throttle or restrict content at their own commercial will, and has set a very bad precedent for the rest of the world.

    This means that in the future you might not be able to access the Tindie store to purchase Lixies without paying [what will probably be a lot] extra, at least from within the United States.

    Anybody have an idea of circumventing this yet so that I can keep my job? Any chance VPNs become illegal in the future? Any insane-scale and awful-but-not-comcast-awful mesh network of routers forming new internets?

    Ugh.

  • "A Modern Spin On A Retro Tech"

    Lixie Labs07/31/2017 at 22:13 0 comments

    Take This Job and Shove It

    Let me start this off by thanking you all for the support and rally you gave for the Lixie. I was able to quit my day job to make these full-time - I can support my family, the amount of time I have to continue development has doubled, and nowadays I have to do my inventory audits in weight instead of exact quantities. I never dreamed any of this would happen.

    Thank you, Hackaday staff and readers.

    A Modern Spin On A Retro Tech

    With the extra time I have after letting Lixie become my full-time job, I needed to make sure the interest doesn't die out any time soon. This new ad campaign is centered around a slogan: "A Modern Spin On A Retro Tech" - as the Lixies are. To compliment the slogan, I'm running every ad using vintage graphic design & pop culture from the mid-50s to the late 90s! A certain decade has had a revival in the last 10 years - especially after the success of things like Stranger Things, Kung Fury, Halt and Catch Fire, and some reboot films we won't talk about. Let's not forget the synthwave we're often hearing in the air. So to start, we're putting Lixie in the 1980s. Don't get me wrong, there are HUNDREDS of advertising and design subcultures from the era, but so far I've only tackled two of them:

    Mid-80s Corporate Electronics Print Ad

    The layout was based on this Casio ad from 1986, the title is Kabel Black, and the slogan typeface is a free alternative to ITC Garamond, which Apple famously modified and adopted as a corporate font from 1984 to 2001 with the introduction of the iPod. (In fact, here's the very first iPod ad - which still used the old font!) This peculiar fake is just that - a fake! Because the Lixie was almost entirely consisting of CAD parts, a 3D model was already made. I've spent the last week building as close of a replica as I possibly could using Blender/Cycles rendering, which led to this result:

    Now I can make videos with impossible angles and settings far beyond my video gear and budget - that are still completely representative of the real product! They can be on a table in 1986, (above) in bright daylight (left) or total darkness. (right) In fact, the header image for this log was also rendered!


    Very Cheesy, But Somehow Extremely Cool

    Shiny beveled titles, hyperspace travel, fast motorcycles, and neon grids. I've always been a huge fan of 1980s sci-fi and their enthusiastic cyberpunk futurism. This video starts out normal, but will become a deliberately over-the-top 80s sci-fi/action/tech commercial! Of course, it's still a work in progress, and more is to come!

    I've just received some late parts from China, and the next Lixie batch will be ready in early August.

  • Lixie is back VERY soon!

    Lixie Labs06/08/2017 at 01:38 2 comments

    Hello again!

    It's been quiet here, but not slow! I've invested profits from the first Lixie batch into my own laser cutter, nearly finished the assembly processes for a new batch of 60 units, and have heard great news from the users in the first batch!

    Laser Cutter

    Yes, I could have gone for a 40 or 50-watt Chinese CO2 laser. But I'm in an apartment, with understandably strict lease terms about heavy tools and toxic fumes. So I took the safe route for now and picked up a 4-watt diode cutter. It works for the birch and black acrylic, but isn't strong enough to work with the clear acrylic digits of the Lixies. I live in Utah, so I'll probably re-purpose it to cutting fancy parchment to make me rich in the rushed-marriage capitol of the world. ;)

    Rolling Order

    Since it's kind of a pain in the ass to wait a month or two between batch releases, Lixie production will be converted to a "rolling order" system. With some properly timed shipping, I can begin releasing 40 Lixies to the wild, every week. The demand is definitely there, considering both the launch and current waiting list have had over 600 units in each!

    But First...

    This next batch will be 60 units. A bit bigger than the last, it'll fund the extra upfront cost needed for the rolling order shipping.

    The next batch of Lixies will be released on June 12th, at 6PM MST!

    You'll be able get some at the usual place, the Lixie's Tindie page. Hang in there, they're coming back!

  • Lixie goes up for sale tomorrow!

    Lixie Labs04/03/2017 at 01:48 0 comments

    Hello again, makers!

    It's been quiet here the last few weeks on Hackaday, but let me assure you that things haven't been slow! I've finished moving into a much larger space, tweaked my shipping needs a bit, and I have great news.


    The first batch of Lixie displays will be available for sale tomorrow on Monday, April 3rd, at 6 PM MST! (UTC-7)

    At first I will be assembling and selling in batches of 60 - leaving my day job once things pick up so that I can fulfill Lixies full-time. I must warn you though - if you want a Lixie now, you're going to have to be ready when it goes live. As of writing this, there are 658 units on the Tindie mailing list, and it grows by about 8-10 units a day. I'll be reaching out to the Tindie staff after launch for confirmation whether or not I've listed the most desired product in Tindie's four-year history. I'm dying to know! Also, I'm going to limit orders of this first batch to 6 units per address to make sure nobody buys half the stock in one go or something strange. (There's a user on the waiting list who wanted 36 digits, sorry man hang in there!) If you order more than 6, I will cancel the order. This restriction will ease up next round, but for now I want to make sure as many people get to try some as possible.

    So - to get you completely up to date with how the Lixie works and how to get one, let me list out some details:

    • Lixies will sell for $38/each for single units, $35/each in batches of 4-5, and $32/each for batches of 6 or more.
    • They can be purchased at MY TINDIE STORE at the time/date above.
    • Lixie has an official Arduino library for control, which is fully compatible with standard Arduino/AVRs, Teensy, and ESP8266. (I highly recommend the latter!)
    • The Lixie control library has a work-in-progress port for Python, allowing use with Raspberry Pi, CHIP, BeagleBone, or any other embedded Linux system that can directly drive WS2812B leds.
    • Lixie, out of box, can be used as a clock, weather station, system monitor, live website visitor counter, and anything you can think of.
    • Lixies are extensively tested before sale, and assembled with nitrile gloves in a clean environment to prevent fingerprints and surface damage to the panes.
    • The boards are reflow soldered with proper temperature profiles for both the solder and LEDs, to ensure maximum LED lifespan.
    • While the Lixies are free of any fingerprints, they may accumulate dust during their travels. The clear section of the display is separately wrapped in polyurethane, just spray an air duster through the side once it's unwrapped and you'll be good to go!
    • They are shipped wrapped in 1 sq ft of anti-static polyurethane foam (plus the foam wrapping the display section) and sent in ULINE "Indestructo" mailers, which are double-walled!
    • For those buying 4 units, they come in four mailer boxes, snuggly fit into a larger 7x7x7" box. Orders of 6 come in an 7x7x11" box, and any other quantities will be a mix or multiple of these.

    Tomorrow, I will be writing a full "Getting Started" guide on Github and sharing it here so that you can get started as soon as it arrives!

    I'd like to thank Katie Stockton for her never-ending support and patience for stacks of Lixie pieces all over the house, David Madison for his extensive work improving the Lixie Arduino Library with me, Hackaday writer James Hobson for sharing my work on the main blog, Donald Bell of Maker Update for the YouTube coverage, Lisa Horn, Content Manager at Ponoko laser cutting for reaching out to get the story, and the 18,000 viewers of these Hackaday.io logs for their supportive interest these last 4 months.

    THANK YOU!

    -Connor Nishijima

  • Here is the final "Lixie"!

    Lixie Labs01/11/2017 at 20:17 0 comments

    A few big things have happened, and the Lixie is better than ever!

    On the left is the original Lixie you all know. On the right is the final model, with two major changes:

    • The numbers are outlines, instead of a stroke. This essentially doubles the light catching area without hurting the final cost.
    • They are now engraved, instead of cut.

    Originally, I doubted the brightness of engraved vs. cut acrylic, and completely cut each digit through. Unfortunately, this only worked when viewed from an angle - the numbers would almost completely disappear when viewed straight on.

    Lixies are also less fragile now that each pane is a solid piece!

    All of you on the waiting list or joining it going forward will be receiving this better version, of course!

    Software Updates

    A wonderful help in the development process, David Madison teamed up with me to deliver an amazing Arduino library for Lixie Displays. Most of the awesome features are in the changelog, but here's some of the most important additions:

    • lix.max_power(volts,milliamps) This is an extension of FastLED that allows you to globally limit brightness of the WS2812Bs so that they never draw more than your power supply can handle! Under normal use, a Lixie can only consume up to 120mA when two LEDs are lighting a digit at full white. But sometimes you might want to flash ALL LEDs for a notification. If you flashed full white on a 6-digit clock, it would draw more than 7.2 amps!
    • lix.color_balance(CRGB c_adj) Sets a color calibration for the LEDs. Supports all FastLED color temperatures, and custom temperatures in the form CRGB(r, g, b). (Default: Tungsten100W / R: 255 G: 214 B: 170)
    • lix.get_leds() Returns a pointer to the CRGB array that holds the color values sent to the displays. The library's show() function overwrites the values in this array, so call FastLED.show() to see any changes.

    The biggest addition David brought was removing the need for a config.h file to define constants. Now that are set from inside the sketch!

    #include "Lixie.h" // Include Lixie Library
    
    #define DATA_PIN   13
    #define NUM_LIXIES 2
    Lixie lix(DATA_PIN, NUM_LIXIES);
    
    long count = 0;
    
    void setup() {
      lix.begin(); // Initialize LEDs
    }
    
    void loop() {
      lix.write(count);
      count++;
      delay(250);
    }
    You can also have multiple different sets of Lixie displays on a single Arduino that can be separately written to.

    Release Update

    Everything is still on schedule for a January release! I'll be ordering 32 units to start, and another 32 immediately after! Feel free to hop on the waiting list to get one on release! :) Thank you again guys for the awesome support and David for all the great pull requests!

    - Connor

  • Putting Lixie to Use!

    Lixie Labs12/28/2016 at 15:17 0 comments

    Hello again, makers!

    This week, I've got an update on Lixie manufacturing, a new accessory in the works, and a bunch of cool code examples!

    Manufacturing Update

    I've ordered the final revision of the Lixie PCB for testing from DirtyPCBs, and as soon as it arrives and passes, I'm committing to a 200-unit run from Elecrow! I've already ordered 50-units-worth of every electrical part, and waiting until my next check to order all the laser cuts, so we're still on schedule for mid-January.


    Accessories

    A new development for Lixie is a daughter board, simply named "Lixie USB". This will bolt on underneath the first Lixie in your chain, and solder through to the input pads. As of writing this, it has an ATMEGA16u2 on board, which can be programmed with the Arduino IDE right over the USB port! You can also power your Lixies with micro-USB with this board. This allows for two types of setups:

    • Program any Lixie code you want straight to the ATMEGA, for a standalone system
    • Program a Serial JSON Parser sketch to the ATMEGA, and control Lixies over USB from a computer, Raspberry Pi, and more!

    Also in the works in an ESP8266 daughter board w/ microUSB for standalone WiFi Lixies!


    Lixie Project Examples!

    Because we're nearing the Lixie launch, I've gone ahead and begun programming a bunch of projects you can use right out of the box!

    NTP Clock

    https://github.com/connornishijima/Lixie-projects/tree/master/ESP8266/NTP%20Clock

    The most obvious use for Lixies is a clock! By driving these with an ESP8266, you can flash this for a self-setting NTP Clock!


    Live Wordpress/PHP Visitor Counter
    https://github.com/connornishijima/Lixie-projects/tree/master/ESP8266/Live%20Wordpress%20Visitors

    This is a live Google Analytics-style counter of active users on your Wordpress/PHP site!


    OpenWeatherMap Display
    https://github.com/connornishijima/Lixie-projects/tree/master/ESP8266/OpenWeatherMap%20Display

    Another good use for an ESP8266 connected Lixie is a live weather display! The temp/humidity/pressure is shown in the numbers, and the weather status (clear/rain/extreme/etc) is shown in the color!


    Ping Speedometer
    https://github.com/connornishijima/Lixie-projects/tree/master/ESP8266/Ping%20Speedometer

    Using an ESP8266, you can have a live network latency monitor! This code pings Google often, and shows you the response time in milliseconds. The Lixies are also colored a range from green to red based on latency good/bad thresholds you set!


    data.sparkfun.com Streamer
    https://github.com/connornishijima/Lixie-projects/tree/master/ESP8266/data.sparkfun.com%20Streamer

    I'll be adding more logging services soon, but for now you can stream a field of your choice from any data.sparkfun.com log! Lixie will show the latest entry of a numeric field, such as temperature, wind speed, CPU load, or any number you can push!


    Nest Thermostat Display
    https://github.com/connornishijima/Lixie-projects/tree/master/Serial%20Parser/Python/Nest%20Thermostat

    This one is a bit different, as it requires the Serial JSON Parser mentioned above, and a Raspberry Pi. Unfortunately, the only way to do more complex internet tasks like OAuth2 is by using a computer like a Raspberry Pi. Pretty soon I'll be porting the Lixie Library to Python so that you can drive a Lixie chain directly from an embedded computer, but for now you'll need the USB-Serial setup.

    Pi > USB > Arduino > Lixie

    This is a script that connects to your Nest Thermostat over their cloud API, and returns the current measured temperature, coloured by the system status: orange = heat, cyan = cool, white = off.


    EOF

    All of the above projects - and there's more every day - are on the Lixie Projects Github Repo. Once again, thank you all for the support, pull requests, and a big thanks to the 83 people on the Tindie waiting list eagerly awaiting the arrival of their Lixie displays!

    - Connor

View all 13 project logs

Enjoy this project?

Share

Discussions

esiako wrote 01/05/2022 at 10:05 point

Czy mógłbyś użyć innego fontu? Chodzi mi o to by pionowe kreski były grubsze.

  Are you sure? yes | no

sasha3050 wrote 03/14/2021 at 19:45 point

What is the method of making symbols? 

  Are you sure? yes | no

crlsktr wrote 06/12/2019 at 18:15 point

Are there some current improvements being researched? Any estimate as to when these will be available again?

  Are you sure? yes | no

techgorilla wrote 06/10/2019 at 04:49 point

When will these be available? i want one now!!!!!!!!!!!!! please 

  Are you sure? yes | no

[skaarj] wrote 02/21/2019 at 10:56 point

Greetings. How small can these lixies be? Is it possible to miniaturize them in such a way that they can go inside a wristwatch? Something like this one:

https://cdn.instructables.com/F50/16J7/IY4Q90Y4/F5016J7IY4Q90Y4.LARGE.jpg

  Are you sure? yes | no

Richard Scales wrote 01/18/2019 at 05:36 point

I should get to grips with the new library, are you sharing the code for the clock in the video with the rainbow effect colour scheme behind?

I have some specific coding questions, what is the best way to contact you to ask?

  Are you sure? yes | no

mwin mwin wrote 11/19/2018 at 22:45 point

hey Connor, I don't know if you'll still see this since you've put this up a while ago. I was wondering what was up with capacitors; your circuit has a single large one as far as I can tell, but all online resources I find about WS2812s suggest to use a small one for _each_ led? So much so that i've even found [this package](https://www.aliexpress.com/item/10-1000pcs-4-Pin-WS2812B-WS2812-LED-Chip-Heatsink-5V-5050-RGB-WS2811-IC-Built-in/32634454437.html?spm=a2g0s.9042311.0.0.51d54c4dXWZ3ae) and thought that might have been what you were using (but probably not as it would add another 1.5mm of width to everything). Thoughts?

  Are you sure? yes | no

James Prince wrote 11/17/2018 at 08:50 point

Is it possible to add a letter 6 letter word? (11 layer of acrylic)

  Are you sure? yes | no

jonas.vlamijnck wrote 07/22/2018 at 17:44 point

What does the 1000uF cap do?

  Are you sure? yes | no

Lixie Labs wrote 07/27/2018 at 08:14 point

It's a decoupling capacitor to help keep the LEDs safe in the case of a power spike, and stop them from glitching in the case of a dip in supply voltage. :)

  Are you sure? yes | no

Dave B. wrote 05/09/2018 at 02:06 point

Copied from my question to Conner via Tindie, which was not answered after a few days:

Hi -- I ordered and received two displays recently (didn't see a 1000uF cap in there though -- no big deal). I want to get them working with my Particle Photon board. I have the "counter" demo, Lixie.cpp/.h in a Particle project. I've made most (not all) of the mods you suggest in the Particle community forum post. The ones that are giving me trouble are where you say to make modifications to the FastLED library. Normally I would just copy the .h / .cpp of a library that I want to modify into my Particle project (I'm using the web-based IDE Particle Build), but that lib has a gynormous number of ancillary files. Did you have to clone the entire github FastLED repo locally in order to make those changes?

  Are you sure? yes | no

palm.hans wrote 02/18/2018 at 12:20 point

Does the input pin require 5V or is it sufficient with 3.3V logic from ESP8266?

  Are you sure? yes | no

Lixie Labs wrote 07/27/2018 at 08:17 point

Sometimes WS2812B LEDs can be picky about logic levels, but in my experience the Wemos D1 Mini and NodeMCU breakouts of the ESP8266 have never required a level shifter. (5V power, 3.3V logic)

However, I *did* experience some issues running Lixies off of a Raspberry Pi B+ GPIO in the past, so not all 3.3V GPIO are created equal it seems.

  Are you sure? yes | no

Jasmine Brackett wrote 11/01/2017 at 03:24 point

Great to see them back in stock on Tindie! 

  Are you sure? yes | no

Lixie Labs wrote 07/27/2018 at 08:17 point

Thanks for all the help Jasmine!

  Are you sure? yes | no

Dan DWRobotics wrote 08/01/2017 at 00:03 point

Wow, great to hear such a success story. Really love the way they look. I'm hoping to do something similar one day, although full size robots are a bit harder to sell!!

  Are you sure? yes | no

Lixie Labs wrote 07/27/2018 at 08:19 point

I haven't seen this comment until now, sorry!

If you haven't tried it yet - I highly recommend a Tindie store. It has built-in traffic from people shopping there, and a high overlap of people already into electronics/engineering.

I'd buy a full-size robot if it means I never have to peel protective paper off of Lixies again! ;)

  Are you sure? yes | no

drechsler1952 wrote 07/13/2017 at 14:27 point

ok, I find it out by myself . The right  DOUT pin on the NodeMCU is pin D1.

And the hight of the numbers is 67mm.

Burkhard

  Are you sure? yes | no

drechsler1952 wrote 07/10/2017 at 07:26 point

Hallo, more than 10 years ago I build a really Nixie clock with russian IN18 and it works until today.  Therefore I am very interested in this project. I have ordered a view days ago 4 Linie modules and wait for it. In preparation I have flashed the Linie_NTP_Clock.ino to a NodeMCU 1.0(ESP12E-Module) with the Arduino 1.8.1 IDE. The IDE Monitor shoes this lines and I think it is ok.:

Starting UDP

Local port :8888

waiting for sync

Transmit NTP Request

us.pool.ntp.org:69.164.202.202

Receive NTP Response

11:06

11:07

11:07

On the pin 5 of the NodeMCU I have connected WS2812BLED's. But there is no result, not DIN signals to the LED stripe. The NTP_Colck.ino is the latest release from GitHub (I hope so) with " #define DATA_PIN 5 " line.

Dear Connor, Have You an idea what can be wrong ?

And one more Question : What is the height of the digit number. I only have found the dimensions  of the Acryl panels , not from the numbers.

Best Regards from Germany

Burkhard

  Are you sure? yes | no

Matthew Potter wrote 06/25/2017 at 02:21 point

Have you thought of doing a 14 segment display style? Each of the panes consisting of a segment that can create an alpha numeric character while lit with certain neighbours?

  Are you sure? yes | no

Lixie Labs wrote 06/25/2017 at 15:56 point

I have some ideas for this - but I've yet to prototype it. The tough part of making this a segment display is that the difference in depth between panes can cause some unwanted distortion to the number/letter being shown. However, with the air-gap between digits removed this can be somewhat mitigated in exchange for some extra light bleeding.

  Are you sure? yes | no

Matthew Potter wrote 06/27/2017 at 20:00 point

I’m thinking to incorporate the joints in each of the segments may be an option… a small overlap in all of the possible variants. Picture a slightly larger circle where the joins would normally be. Planning out the order that best suits angle of view would be key though. Bottom segments at the top, top segments at the back if you’re planning on having it lower than eye height… it would be something to play with and see what works best for sure.

Any reservations in me trying it out if I can get my hands on some spare acrylic? I’ve got everything else handy including access to a laser cutter.

  Are you sure? yes | no

Rob wrote 06/21/2017 at 13:32 point

love em, great modern revival of the idea ... when are the 14-16 segment versions going to arrive??? (looking for text display capability)

  Are you sure? yes | no

Yann Guidon / YGDES wrote 06/13/2017 at 08:39 point

Crazy eBay find : http://www.ebay.com/itm/3x-IND-1803-Edge-Lit-Incandescent-Displays-and-1x-IND-1818-nixie-tube-era-/272709683940


clearly it's 60's technology... I didn't find anything about IND-1803 and IND-1818

Now I want to make my own, to go along with my discrete processors :-D

The catch is that I'd rather have hexadecimal (or at least octal).

  Are you sure? yes | no

nick wrote 03/09/2017 at 16:44 point

Hi Connor, I really like this project and how it looks. I help teach electronics at the local school and I think this would make a great demo of NeoPixels and Arduino/Raspberry Pi etc. Are the laser files available anywhere or are they not going to be public domain perhaps? 

  Are you sure? yes | no

henrique112 wrote 03/05/2017 at 21:41 point

What is the thickness of the acrylic? 2mm? 1mm?

  Are you sure? yes | no

henrique112 wrote 03/05/2017 at 23:36 point

I already found it! Very neat project, op!

  Are you sure? yes | no

Lixie Labs wrote 03/06/2017 at 16:45 point

1.5mm :)

  Are you sure? yes | no

Similar Projects

Does this project spark your interest?

Become a member to follow this project and never miss any updates