Close
0%
0%

Yet Another Reflow Oven

I found a cheap toaster oven. Let's try to turn it into something better than a T-962... and do it cheaper.

Public Chat
Similar projects worth following
There are many, many DIY reflow ovens out there, but there is no one "right way" to do the job, nor could I find a generic kit or set of instructions. So I am building my own, but I really don't have to invent anything from scratch.

I found a used toaster oven for 15AUD (about 10USD) and am now working on making it into something useful for the workshop.

  • There are plenty of other conversions of toaster ovens on the internet. Links in the project logs, or search right here on Hackaday.
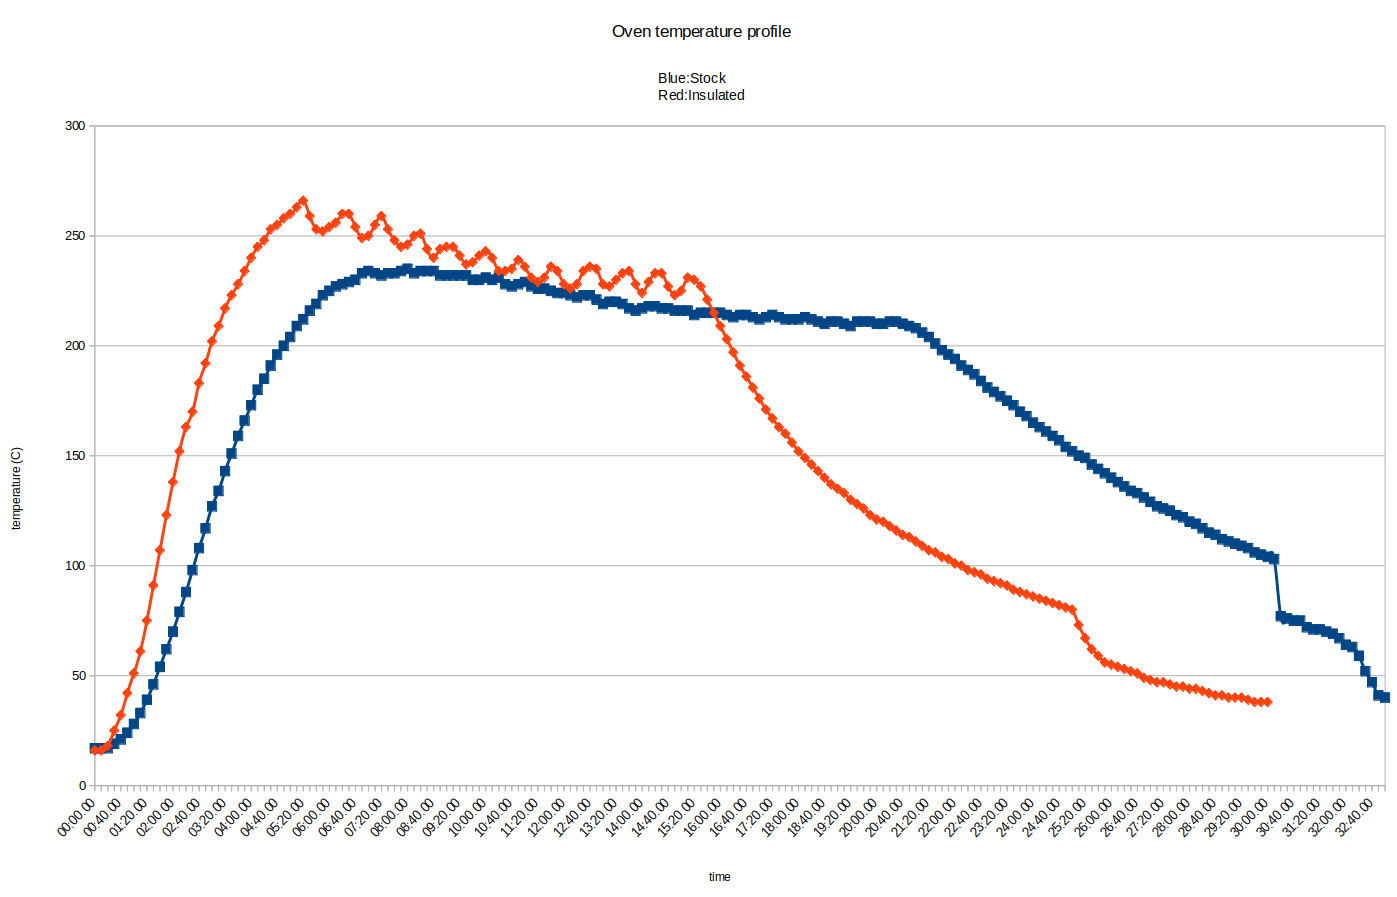
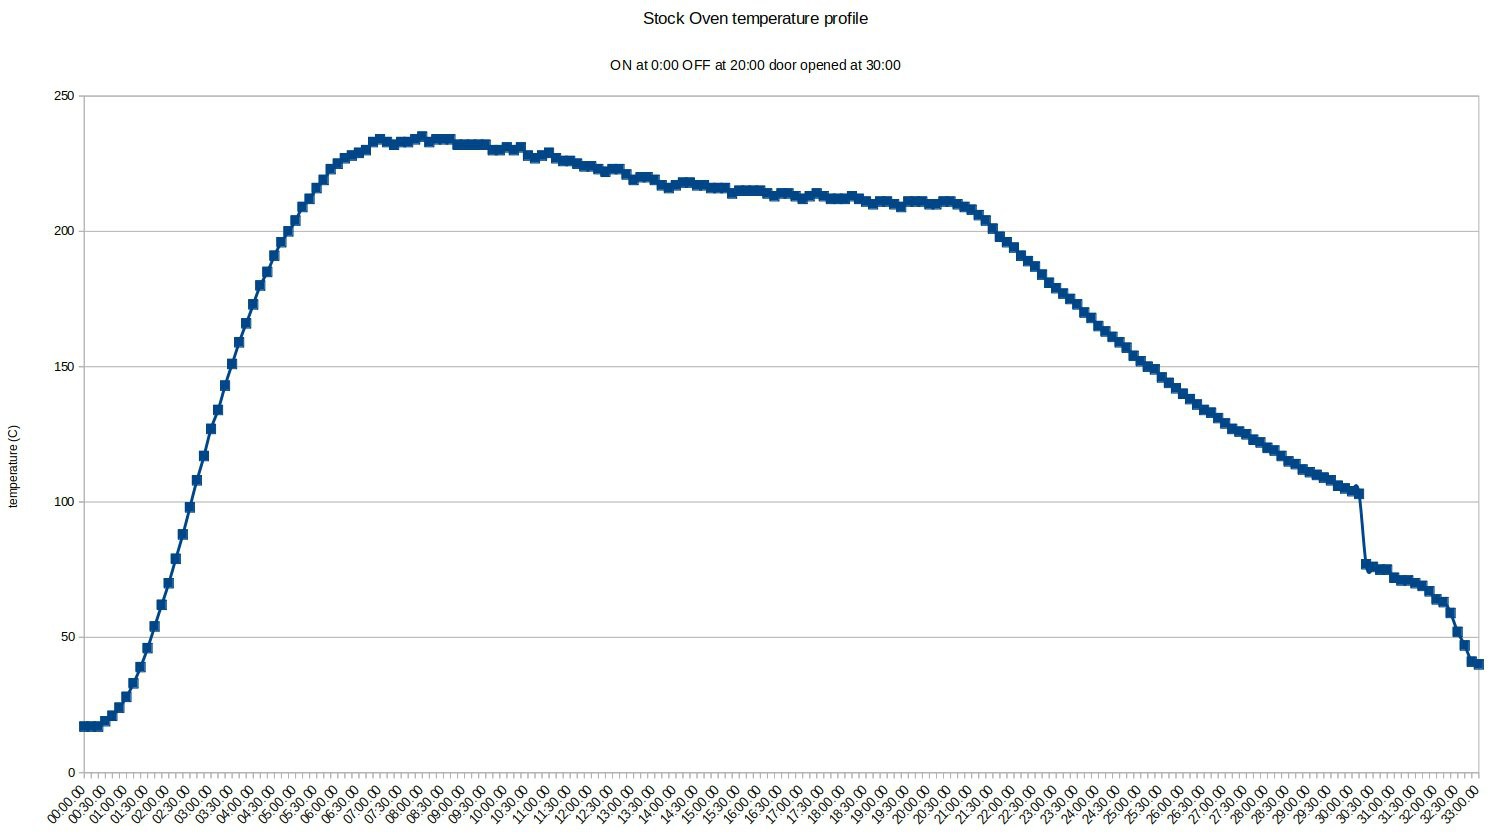
  • I am using a Breville LOV560, which is a 28 litre oven rated at 1380-1650W. This is actually a bit underpowered for its size, but the price was right - 15AUD second-hand, compared to over 200 AUD new!
  • Another option for a home reflow oven is the  T-962, which is a purpose-built SMD reflow oven and can be found for about $200 USD on the usual auction sites. Unfortunately the T-962 has a reputation for some questionable aspects of its design which lead to it needing significant rework to make it useful and reliable. Therefore If I would have to spend time and money fixing the purpose-built device, I might as well roll my own. It will be educational and keep a big piece of electronic equipment out of e-waste.
  • If you do have a T-962 and need to fix it, this Github link is a good place to start: https://github.com/UnifiedEngineering/T-962-improvements

toaster oven stock.ods

performance of the unmodified oven

spreadsheet - 22.38 kB - 08/16/2023 at 01:41

Download

  • Insulation Performance

    nrwest10/08/2023 at 11:44 0 comments

    With 3 sides of the oven now insulated by "fire blanket" material and aluminium sheet, it was time to make another temperature curve. This was also a literal "smoke test" to make sure I hadn't broken anything while fitting the insulation and the power socket.

    There was actually a little bit of smoke but it went away after a few minutes. Probably just some fingerprints or a bit of dirt cooking off the surfaces. Now let's have a look at the temperatures:

    The insulated oven is shown in red. You can see that I got a bit lazy and shortened the test period.  The temperature seems less stable than the uninsulated oven, but these tests were performed using the oven's stock temperature controller, which will be replaced with a K-type thermocouple (or two!) and PID control of the heating elements. The important detail here is that the oven heats up much faster. The insulated oven got to 200 degrees in three minutes, while the stock oven needed almost five minutes to get to the same temperature.

    I can possibly improve the performance a bit more by adding some insulation batts between the outer enclosure of the oven and the inner walls, or perhaps by improving the seal where the door meets the body of the oven... but the performance at present is much improved, and I consider it to have been worth the hassle of almost completely dismantling the oven! Any further tweaks can be made without having to do a complete teardown of the oven, and can therefore be postponed indefinitely.

  • Power socket

    nrwest09/08/2023 at 23:31 0 comments

    The oven has a captive cable for its mains power. I would prefer a socket for a standard IEC cable. This also made it easy to add a fuse and a power switch, by choosing a socket with these features built-in. I used the socket as a template for the cut-out in the metal back panel of the oven. I then drilled 2mm holes in each corner of the cutout and used a cutting disc in a rotary tool to make the cuts.

    Cutting the hole for the IEC power socket
    Holes drilled in each corner, cutting wheel on a rotary tool. This image is taken from the "inside" of the panel

    I tidied the sharp edges with a file. The socket is a tight fit into the hole and is secured by its locking tabs.

    Socket in place
    The power switch fits in the rectangular space on the left-hand side of the black socket. This image shows the "outside" of the panel, which will be visible when the oven is reassembled.

  • Insulating

    nrwest09/08/2023 at 23:22 0 comments

    As I mentioned earlier, I am adding insulation to the oven in the hope that this will allow it to heat up faster. I think that some of the uninsulated panels are also a bit dangerous. The back panel of the oven gets REALLY HOT during use. With the air inside the oven at 250 degrees, the metal panel is at almost the same temperature and just touching it is enough to give you a nasty burn. You might think it is unlikely that you will need to reach around the oven during use, but what if you drop something, or your pen rolls behind there and you need to pick it up? Accidents can happen!

    Furnace insulation or "refactory lining" is available for just this purpose, but was hard for me to find locally. Layers of fibreglass blanket should do the same job, so I bought a "fire blanket" at my local hardware store. This is made of densely-woven glass fibre and can be cut to size using sturdy kitchen shears. I folded over several layers where possible to make the insulating layer thicker.

    I used shiny aluminium sheet over the top of the fire blanket to help keep it in place, and also to reflect radiant heat back into the oven. I got the aluminium from disposable oven trays, which seems like the right balance of rigidity, flexibility, durability and of course, cost.

    Insulating the back panel
    Folded layers of fire blanket in the indentation in the back panel. The blanket is attached to the metal panel with thin wire.

  • Temperature Curve

    nrwest08/16/2023 at 01:40 0 comments

    I set the oven to its maximum temperature of 220C, then turned on the fan and both the top and bottom elements (this is called the "bake" setting on my oven)

    I have made the original spreadsheet available for download. Temperature was measured using a K-type thermocouple attached to my multimeter and logged every 10s. The oven was turned off after 20 minutes, and the door opened and left ajar at 30 minutes.

    While heating, the temperature increases by a maximum of 1 degree per second. This is usable, but faster heating would be desirable. An easy way to improve the performance will be to add some insulation to the heating chamber.

  • Features

    nrwest08/15/2023 at 06:13 0 comments

    What I do want:

    • PID temperature control - for stable heating curves with minimal overshoot
    • Safety shutoff - some kind of timer so if my hardware fails, the oven will switch off after a preset time. I hope to use the oven's existing timer knob for this, because it seems to be mechanical. Therefore it will still turn the oven off even if there's a blackout.
    • Heat profiles for leaded solder, lead-free solder and a "dehydrate" function. This is for humidity sensitive components which need to be gently heated to drive off moisture before soldering. Surface-mount LEDs are often prone to this.
    • Display of which profile is presently selected and whether a job is in progress.
    • Display of "target" temperature and "current" temperature.

    What I don't want:

    • Connectivity. Bluetooth, IoT, none of that. It's just a distraction.
    • Touchscreen. Touchscreens are unreliable, especially in a workshop setting (dirty fingers) or with very resource-constrained microcontrollers (laggy interface) I'd prefer to have no touchscreen than a poorly-implemented touch screen.
    • This one might be contentious... I don't want the heat profiles to be adjustable on the oven itself. Once I have the correct profiles dialled in, I don't really want them to be editable without modifying the source code. This is partly to keep the oven as simple and "appliance-like" as possible, and partly just as a reminder to myself not to spend too much time messing with the UI of this project. All I will need is a switch to choose one of the three profiles, and a big button for "start/stop."

  • Prior Art

    nrwest08/15/2023 at 02:26 0 comments

    Hackers have been modifying toaster ovens to act as reflow ovens for years.

    Nate Seidle himself from Sparkfun describes one example at: https://www.sparkfun.com/tutorials/60 . Sparkfun also developed a (now discontinued) controller PCB designed to make it simpler to modify a toaster oven. Link at https://www.sparkfun.com/products/retired/81

    A more recent, but also discontinued oven controller can be found at https://github.com/botletics/Reflowduino

    There was a PID controller made by "Rocket Scream" which is also discontinued. Hackaday user [Scott] has a nice writeup of his reflow oven using the Rocket Scream PID board at https://hackaday.io/project/18802-home-brew-smt-reflow-oven

    If you prefer videos, here's one recommended by Hackaday in 2019: https://hackaday.com/2019/03/10/diy-reflow-oven-is-heavily-documented/

    A web search will bring up many, many other examples. What I COULDN'T find though was an up-to-date PCB, that is in-stock, that I can use to control a generic oven. So I'll design my own, using a microcontroller compatible with Arduino. I will  be standing on the shoulders of giants with this project, which will hopefully speed the development and give me a better final product than if I were to design and build from scratch. A great starting point is the "Reflow Oven Controller" by 0xPIT on Github: https://github.com/0xPIT/reflowOvenController . That screen with the temperature graph looks great, and 0xPIT has also kindly included some very useful design notes on how to get the most out of solid-state relays, and some other circuit design notes. I can definitely work with this!

    A couple of changes stand out at first glance:

    • I'm not a fan of the Arduino Pro Micro (I prefer a discrete USB to serial bridge instead of the integrated solution on the Pro Micro) so I will use an Arduino Nano instead
    • The Eagle PCB software was OK when it was published by CADSoft, but since the takeover by Autodesk, hobbyist users have really suffered. Autodesk are very hostile towards open-source and have a habit of locking your designs in the cloud. I'm not going to be a part of this and will instead port the parts of 0xPIT's design that I want to use into Kicad...

View all 6 project logs

Enjoy this project?

Share

Discussions

Similar Projects

Does this project spark your interest?

Become a member to follow this project and never miss any updates