 Illinois Space Society AV
Who are we?
We're a team of about 100 undergraduate engineers from the University of Illinois at Urbana Champaign, and our mission is to be one of the first collegiate teams to design, build, and launch a two stage rocket 100km to the Kármán line. We still have a long way to go, but here's a snapshot into just one of our projects from last year. If you'd like to learn more about our organization the Illinois Space Society or our Spaceshot team checkout our website! https://www.illinoisspacesociety.org/
What's TARS MK4?
TARS MK4 is our premier 4th generation flight computer designed to compete in the 2023 Spaceport America Cup. It's capable of live radio telemetry, GPS tracking, autonomous state estimation, and controlling our rocket's apogee through an air brake mechanism that creates drag to slow down and reach a specific altitude for the competition.
Schematics
The first step is to connect all the components together with a schematic. We've included all three of our schematics down below if you'd like to read them in full. The image above is a snippet of our sensor suite.
We use KiCAD for all of our projects because it's one of the best free open source electrical design software suites available. If you're ever working with multiple people we've also included our internal guide for collaboratively working on KiCAD projects. We follow a strict set of guidelines to avoid file conflicts that can very easily appear with multiple editors. If you're new to GitHub we also have a GitHub guide down below as well.
When designing a new system we often also make block diagrams to get a better understanding of the overall system with our favorite free diagramming tool draw.io.
MCU
When working with schematics we usually start by selecting a microcontroller and then designing around it. For our implementation we chose a Teensy 4.1 because it's Arduino compatible, extremely fast, and has a large set of I/O. We also have an ESP32-S3 and an ATmega328P as axuillary MCU for telemetry and power management.
Sensors
The next step is to decide what type of sensors to use. When choosing a sensor we highly recommend ensuring they have SPI or I2C. These are digital communication protocols and how the sensors can talk to the MCU. We choose to primarily use SPI because it usually has a faster polling rate than I2C. Another benefit of these protocols is that they're busses so they mostly can share the same set of wires helping make routing/assembly easier.
We use a combination of barometers, accelerometers, gyroscopes, and magnetometers to perform state estimation. Depending on your level of complexity you may want to choose multiple a low-g and high-g accelerometer to get better data throughout the regimes of flight.
However, if you're looking for simplicity we recommend the MS5611 barometer,BNO0855 9-DOF IMU, and MAX-M10S GPS. These three sensors should cover most of your basic sensing needs.
Voltage Regulators
To power TARS MK4 we use a 2S3P battery pack which means we have 2 batteries adding voltage in series and then 3 sets of them in parallel. We use standard Adafruit 3.7V 18650s which means our battery pack can range from 6V to 8.4V. Since we only needed at most 6V for our servo we decided to go for step down regulators for their relatively high efficiency.
If you're ever trying to design an embedded regulator we recommend checking out Texas Instruments' Webench Power Designer. It's a great tool for helping beginners easily design voltage regulators. If you're not looking to design your own we've also had great experiences with Pololu voltage regulators. We've used them as emergency backups in the past. It's always good to have at least one when designing embedded voltage regulators because if your design doesn't work you may be able to save the rest of it!
Radio
We opted to use a RFM96 with LoRa, because of it's exceptional range and low power usage. We do sacrifice a bit...
Read more »
 Matias N.
 FrazzledBadger
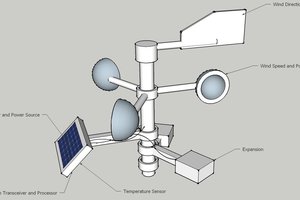
 Ulf Winberg
 Boz
Boz