 jacksonliam
The Intel N100 is a really cool, low power chip. With 4 of Intels latest Alder Lake 'E' cores it performs really well for such a low power CPU. It has a single channel of DDR5 RAM, which helps keep it low power as it would not really see a benefit from dual channel anyway.
Theres a lot of mini PC models with the N100 on aliexpress, a fanless 'router' model (https://www.aliexpress.com/item/1005006036859811.html) was chosen as hopefully the industrial design will mean it is robust, it has 2.5Gbe for network future proofing, a SATA port for the SSD and the m.2 slot is hooked up to 2 lanes of PCI-E 3.0 rather than just one lane seen on other mini PCs. It also has a lot of pin headers on the board for front-panel, serial, etc, in-case they are needed.
The fans in other cheap mini pcs are probably the component most likely to fail, and the 120mm case fan in the HP microserver provides plenty of airflow across the fanless chassis' body.
Hooking up the 4 bay HDD cage in the N54L was surprisingly easy, it connects to the original motherboard via a mini-SAS (SFF-8087) connector. This connector spec can carry 4 lanes of SATA, so cables to split mini-SAS to 4 sata ports are common and is basically all this HDD cage does. Some enterprising Chinese factory has put a mini-SAS connector on an m.2 to SATA card, as 4 SATA ports would be a bit of a squeeze. So all that was needed was to install this £14 m.2 card (https://www.aliexpress.com/item/1005006026982407.html) into the mini-PCs m.2 NVME slot, connect up the drive cage to the mini-SAS port and unraid recognised the drives straight away!
When designing the 3D printed bracket to mount the mini pc in the optical drive bay, it was mounted far enough back in the case to fit the USB boot drive for unraid internally. A hexagon perforated front panel (for airflow) is a hinged door with a print-in-place latch mechanism to provide access to the other USB/HDMI ports.
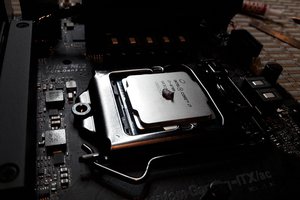
The standard M3 screw locations for 5.25" drives are made using heat set inserts. The HP Microserver has pegs which are screwed into these so the drive can slide into the bay. The bottom, front and rear panels of the metal mini pc case were removed to allow airflow to the other components and just the 'heatsink' top part of the metal case remains. This is already screwed onto the motherboard and thermal pasted to the CPU. Removing the bottom of the case left 4 handy screw holes to mount it to the 3D printed adapter.
One of the 4 ethernet ports of the mini PC has been bought to the rear panel of the HP microserver by a 3D printed half-height PCI slot cover with a 'keystone' mount in it. A keystone RJ45 coupler (from aliexpress) connects the internal CAT6 cable plugged into the mini pc to the external RJ45 socket. If I had a punch-down tool I could've used a standard keystone RJ45 jack instead of the coupler.
The case fan and mini PC are hooked up to the 12V of the existing HP Microserver PSU. The ATX 'paperclip trick' was performed (by cutting and joining the wires) to permanently power on the PSU. The HDDs don't seem to mind being powered on before the mini-PC.
Overall this project was very successful and not only is the server now much faster (it can saturate my gigabit link on downloads, whereas it was limited to around 25% before) and lower power, heat seems much better too and it saved the microsever chassis and PSU from becoming waste. It was much cheaper than buying a new NAS or case and motherboard. Some of the 3D printed parts are a little flimsy, especially the PCI slot adapter, but they work well enough I've no need to redesign them. Files on printables https://www.printables.com/model/775170-drive-bay-fanless-n100-mini-pc-mount-hp-microserve


 Stanislas Bertrand
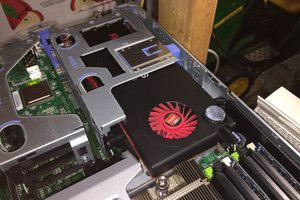
 Kevin H. Patterson
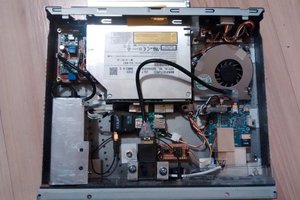
 darth_llamah
 RetroModder
A post just in time since I wanted to upgrade my HP Microserver, but liked the form factor.
I made things a little different :
- I removed the old motherboard and the led and power-on switch assembly, and keep them apart (just in case...)
- I replaced the base of the NUC by two 1/2" aluminum angle, in order to have the same width as a CD reader. I then used a few inches of double adhesive tape and the metal spring that are on one side of the CD cage to fix it firmly enough. The front end of the NUC is just outside the face of the Microserver. So I had every socket at hand.
- the NUC is powered by the socket on the former CD power cable.
- I didn't use a adapter, but made an RJ45 cable pass through the former VGA plug hole (I only need one Ethernet port), since I only need a meter long cable to the internet box.
- I soldered a three wire adapter (to send 5V to the fan, it's enough) and a switch (to power on/off the PSU) on an salvaged motherboard power socket. The switch is fixed on one of the remaining holes at the end of the Microserver, so I can easily turn off the power to the disks
- last but not least, I used the protection foam of the NUC packaging to block the front grid under the hard disks cage and the original PSU. The air is then forced through the disks and around the NUC only. The NUC is totally cold even when using heavily the server.