 David
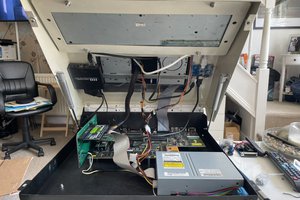
DavidConstruction started by removing all the foam from the flight case and stripping it back to the bare shell.
A design consideration was to have everything in the case and be able to close and lock it for transport, so each item had to be carefully placed.
The motherboard is bolted the bottom of the case using stand-off posts from the junk box.
The Power supply is bolted to the right side using an "L" shaped plastic bracket to hold in place and and "L" bracket on the bottom to stop sliding.
The monitor is bolted into the lid using the VESA mount points with some generous sized washes to hold in place. Monitor supports VGA and DVI, however only VGA is needed for the motherboard.
The power, reset and indicators were taken from an old PC case destined for recycling and bolted to the left side
The HDD was bolted onto the front of the case.
230VAC is routed into the case using a "Y" adapter and powers the PSU and monitor so keeping everything nice and safe.
The first version was completed in Aug 2015 and served for six months before undergoing some "upgrades"
In 2016 the PC in a flight case had some upgrades!
The HDD was replaced with a SSD for speed and moved to the side of the case to allow the keyboard and trackpad to fit better, the original motherboard from an old PC was removed as it was needed for a server and replaced with another recycled board. Finally the power supply, being too noisy (feedback from my wife!) was replaced with a silent version.
Total cost of the build = £130 (all parts sources from eBay)
Flight case = £20 inc postage
Monitor = £15 + £5 postage
PSU = £15 inc postage
SSD = £50 (yeah expensive, but nice and fast) inc postage
Motherboard, CPU and RAM = £25 inc postage
If in the future I want to upgrade this can easily be done by replacing the Motherboard, etc.
Design objective achieved.
 Mjnurney
 jacksonliam
 Alan Kilian
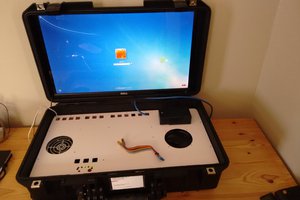
 David Brown