Close
0%
0%

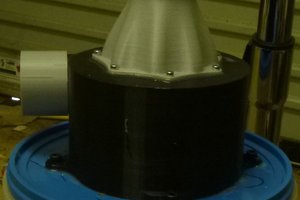
Entropy Wheel Heat Recovery Ventilator

Rotating perforated disk counter-flow heat exchanger maintains indoor temperature while exchanging fresh outdoor air.

Similar projects worth following
The entropy wheel or enthalpy wheel (latter denotes humidity exchange) is a high efficiency (up to 90%) heat exchanger typically seen in commercial buildings that have legal requirements for rapid fresh air exchanges. Fresh air exchange would otherwise mean wasting a massive amount of heating/cooling energy, but heat recovery ventilators assist in recovering that energy that would be lost. Counter-flow and cross-flow heat exchangers are the type typically available in the consumer housing market - one of first exchangers I saw in my research was the coroplast-based cross-flow heat exchanger on makezine.com. My research led me to believe a thermal wheel could boost the efficiency in a smaller space. My target is to fit in a 12" high, 22" wide joist cavity, a thermal wheel ventilator. Instrumented to measure results and prevent condensation calamity, the unit can estimate energy recovery and perhaps even predict weather!

Video entry can be found here: 

  • 1 × Coroplast Sheet, Home Depot Model # WC4896-10 Plastic Cardboard they call it. Stuff I received was black on one side and white on reverse. 4 ft x 8 ft sheet, 10 piece minimum, $110 minimum order but only $11 each. You will need 2 sheets just for wheel. Enclosure box TBD.
  • 1 × Cypress PSOC 4200 proto board, Digikey 428-3344-ND, $3.99. Super low cost with Cortex M0 coupled to programmable digital logic and programmable analog. And raw chips are just $1 direct from Cypress!
  • 2 × Nordic Semiconductor RF module Available from many vendors such as Sparkfun or eBay direct from China/Hong Kong.
  • 1 × Arduino Uno or whatever you have on hand - receive hub. An Uno should be the entry level. Attach Ethernet shield and NRF24 module.
  • 1 × Arduino Ethernet shield.

View all 13 components

  • No news is no news...

    Bryan Williams08/30/2015 at 02:25 0 comments

    Looks like the project has been getting some attention lately, more by others than by me... I've been busy with this insane FPGA contract project as well as job hunting/job finding/prepping to move to the new job 2300 miles away. I probably won't have the best environment in Arizona to test the condensation mitigation/monitoring I had planned.

    It did get me thinking about a solar-powered "water from air" device to see how much water could be extracted from dry air on a 250W solar power budget. A couple of years ago I worked briefly on an experimental, industrial-sized WFA meant to solve logistics problems in Iraq. Dessicants and heating/cooling loop could produce several gallons of water per gallon of fuel, an advantage for locations where liquid water didn't exist and the fewer truck trips the better. Wouldn't ZERO gallons of fuel be perfect? I keep thinking of projects I don't have the time to complete.

  • A brief update... belt sanders and brushes, oh my!

    Bryan Williams02/24/2015 at 07:21 0 comments

    Appears I might have the unevenness of the end faces dealt with, picked up a big honking belt sander over the weekend and that appears to do the trick. It does tend to melt the plastic a bit so I need a wire brush to reopen all the tubules. I hope it's that easy. I was alternatively thinking of using a power door planer to finish the ends, shouldn't have the melty bits that way.

    I was thinking about where to get a brush assembly like they use on some 19" rack cable entry holes to block air but allow inserting cables with ease... but those were conceptually right but not quite the size needed. I had bought a $1 broom at the dollar store I was planning to cut off bristles and "glue" using 3D printer "ABS glue" acetone/plastic mix to bind the bristles, but I do imagine that could have become a mess, and the bristles would need to be frayed to make them less stiff.... then I notice the door where I work....

    So now I have a source for long, fairly cheap brushes that should be great. At about $3.35 per foot, available as 3, 4, or 6ft lengths from Zoro.com, a couple of brands: "Value Brand" A626A-36 for 3ft, $10.01, Zoro P/N G0373642. Another option there is PEMCO 45061CNB36, similarly priced. I want to see some CAD drawings for this to be sure I know what I'm getting, but they look promising.

    The brush fits in the midline of the heat exchanger, separating the top (outdoor air) from the bottom (indoor air exiting) and preventing most of the leakage from happening. The brush allows the cylinder to spin freely. The aluminum frame holding it should allow slightly bending also, as the ideal shape allows for the air to "purge" before the blower reverses the direction of the air as the Coroplast tubules cross over from hot to cold side.

    Still looking for good ideas on brushless motors, inexpensive and 10000 hour bearing life. I'm going to prototype with bathroom vent fans, but those are constant speed. That leaves the cylinder turning motor to wrap up. I'm going to prototype that with a stepper motor, but I imagine that will be too loud for normal used. I've seen motors & drivers optimized for quiet mode using motors with less cogging at the expensive of max torque. The drum needs to spin in the 20-60 RPM range. Air velocity will interplay with that.

    On another note, I'm thinking of creating another, similar project for clothes dryers. A mechanical/manufacturing engineer I used to work with talked about a venting scheme he had for his dryer (I'm thinking his was gas) that draws in outdoor air to the laundry to prevent negatively pressurizing your house and creating cold drafts. Ever consider the negative pressure issue? For electric dryers, you don't get to burn the incoming air so you need a heat exchanger to recover exhaust heat to make a real positive impact on the electric bill. Moisture condensation becomes the key to the design, so to solve this I'm thinking a cross-flow HRV pitched at 45 degrees will allow a gravity-flow condensation path, mounted above the washer drain for a pump-less solution. Auto turn-on based on temperature in the exhaust manifold. One ingress booster fan since the exhaust has a powerful blower already. Intake air could feast on preheated attic air (my laundry is upstairs, realizing most are not, YMMV) assuming that isn't a major building code problem (yes, filtration will be considered).

    Of course, you COULD avoid the hassle by buying one of the new ventless, condensing dryers... essentially my goal here is to make a condensing add-on for existing dryers. Admittedly, the safety considerations here are considerable and static electricity will be present in copious amounts....

  • Long time no update... some words on glue...

    Bryan Williams01/26/2015 at 05:47 0 comments

    The clips are definitely the way to go here... I have finally completed the original glued wheel (just the wheel, not the whole prototype) and it's quite the chunk of plastic, 10" cylinder x 14" long, almost two full 4x8ft sheets. The glue is messy (3M High Strength #90) and slow owing to the tack time between layers. Took 3 cans and that means $40-45 just for adhesive. Not to mention the special cyanocrylate I bought that was even more expensive, and have yet to use. Disadvantages beyond cost is that it leaves "boogers" blocking some tubes owing to the squeeze-out, and layers vary in length a bit, which is bad for air sealing. I need to cut off a tenth of an inch or so from either end to clean the boogers & even it up. HOW to do that is going to be a trick as it needs to be neat and perpendicular and my bandsaw doesn't have a 10" capacity. The belt sander might work to even things up, but I know it will friction-melt and perhaps clog openings more. The there's the issue of mounting it in a balanced fashion so it spins easily with a small motor.

    I'm still trying to work out the best type of motor. Stepper-sized BLDC's I have seen run very expensive, like $80. I might initially use a stepper but I expect that to be much too loud. Not sure a hobby BLDC would be much better as they "cog" also and typically use non-sinusoidal coil excitation, unlike brushless servo motors that run with sinewave drive instead. If you have sourcing suggestions, please message me!

  • Thingiverse Creations Abound!

    Bryan Williams10/02/2014 at 06:21 0 comments

    See my Thing on Thingverse with the glue-less clip-together assembly parts. http://www.thingiverse.com/thing:485101

    And also a cutting tool for rapid, safe cuts of Coroplast! http://www.thingiverse.com/thing:482141

    Still need  a high-reliability BLDC drive motor-- have a little brush motor for now, needs a frame to stand on and also to suppose the other parts. Oh yeah, and software/drive electronics. This is going to take a while, but you'll have about 72 hours of 3D printing to do to make all the parts anyway!

  • First prototype 3D printed assembly clip.

    Bryan Williams09/02/2014 at 04:20 0 comments

    My first attempt at using OpenSCAD to design a "comb" to hold the coroplast layers together. Looks very promising. First prototype is a bit tight, accumulating a bit of tension over the 7 layers I tried. I still have to devise how to tie these together with a printable frame and tie to a central bearing - might leave that to SketchUp.

  • Sensors and connectivity

    Bryan Williams08/19/2014 at 20:09 0 comments

    This project was something I began working on before the Hackaday Prize was announced, and sensors and connectivity were always part of the plan. At the very least, temperature and relative humidity need to be measured as condensation can be a problem without a drain to send it to. In certain circumstances, shutting down fresh air input to function as exhaust only would allow it to function as a ventilator but drawing fresh air into the home through the normal leakage points. For R&D purposes, the temperature sensors allow me to estimate efficiency and understand how things are working. Pressure sensors can detect other situations: filter blockage and fan speed compensation (if I find a BLDC fan solution) and also wind/venturi effect compensation -- or weather prediction via barometric pressure.

    Other thoughts would be passive IR motion detection/presence sensing and perhaps LED lighting to go with it. Options of nightlight level or full 10W LED lamp at about 800 lumens.

    Connectivity to the unit itself will be via low-cost, long-range, low bit rate Nordic Semiconductor 2.4GHz NRF24L01+ modules. The Cypress PSOC 4 I an eyeing as the embedded processor has just 32KB of program FLASH and 4KB RAM, so Wifi would be hard pressed to fit and overkill for the application. Since I have plans for many nodes constrained by minimum cost & minimum power, collecting sensor data I think would be best served by a bridge device with Ethernet or Wifi connectivity, be it Arduino, Raspberry Pi, BeagleBone Black, etc. Optimally, integration into a whole-house automation & alarm system would be the final goal.

    With the sensor package and wide range of potential usage preferences, the short packet exchanged would carry sensor readings from the heat exchanger and also carry configuration information to the embedded controller. Example configuration would specify things like motion activation activities (fan on, light/nightlight on), timed auto turn-off, scheduled activation, filter alarms (timed or back pressure-based), and whatever else I can think of. Spooky noises mode Easter egg?

  • For those with energy savings in mind...

    Bryan Williams08/19/2014 at 15:59 0 comments

    The Panasonic FV-04VE1 is the benchmark I am competing with. These are commercially available via Amazon and other distributors. The Panasonic design is based on a "capillary core" heat exchanger. A 40CFM unit is just under $350 and consumes 23W. I believe the Panasonic makes use of BLDC motor drives for quiet, reliable operation - something I'd also like to incorporate, for filter blockage compensation/pressure changes. Accessories for the Panasonic, such as Y-fitting ducts to retrofit existing exhaust ports, could be used in my project. They combine incoming and outgoing air in a single duct in such an application - side benefit of being a counter-flow heat exchanger by coincidence. The Panasonic units are made for bath fan retrofit/new installs, as opposed to whole-house ERV's. Given the price, it might take a while to recoup costs, if ever... not that my R&D unit would be any cheaper!

  • A make-one-of-your-own kit...

    Bryan Williams08/19/2014 at 05:30 0 comments

    Also on the drawing board is a 3D-printable razor guide to easily and SAFELY perform all the cuts needed. A guide insert to guide the blade dead-center of the coroplast "tubules" and maybe a lower piece to cover the exposed blade. This way you can insert the guide in right tubule and make a perfect slice in seconds. Thinking of devising a "guide comb" to help identify the tubule positions to begin cutting, and a guide to assist in slicing the huge 4x8 ft panels down to 16" strips. One must pay attention to the orientation of the tubules when cutting.... 

  • About that polypropylene Coroplast...

    Bryan Williams08/19/2014 at 05:19 1 comment

    Some lessons learned with coroplast. This stuff prefers mechanical binding methods, as very few glues will stick to this "low surface energy" material. 3M Hi-Strength 90 is ok, but you will need at least 2 cans @ $13 each to make the wheel, possibly more. I also have a specialty cyanocrylate type adhesive, Tech Bond BP Blue. This stuff is expensive, but should be much less messy and cause less thickness buildup, as the 3M #90 goes on rather like wood panel glue or caulk. 

    So a better choice might be a mechanical clip with barbs to insert in the ends. This can also serve to bind the pieces to the center hub and support ball bearings. Working on a design, trying to learn Open SCAD. 

View all 9 project logs

Enjoy this project?

Share

Discussions

anthony.a.douglas wrote 12/28/2023 at 13:54 point

I posted a wikifactory article on printing a small thermal wheel https://wikifactory.com/@adouglas/printable-erv .  If you just upsize that with a creality ender 5 you would basically have what you are seeking, here.  It's not that cheap to make but it's the only way to get a mini enthalpy wheel.


I tried sprinking silica gel in there and it works pretty good, I measured the water vapor capture with AHT10 sensors and it went way up, looked like I was getting pretty close to the maximal recovery you could get with silica gel.

Zeolite 3A will probably last longer, silica gel tends to adsorb other stuff and become inactive as the adsorption sites get clogged, while 3A zeolite doesn't have that problem, that's what they use in commercial wheels and you can buy little jars of it on amazon.  Just put it through a coffee grinder, put the thermal wheel (just the wheel part) in a garbage bag and shake it to get it in there!  Then clean off the excess, maybe weigh it to see how much zeolite you go  in there and put it all back together and boom.

  Are you sure? yes | no

Bryan Williams wrote 01/05/2024 at 13:26 point

Cool tip about the Zeolite. From my reading (8 years ago) the moisture exchange was key to high efficiencies. IIRC, the goal is to keep the outdoor humidity outdoors and the indoor humidity indoors, assuming ideal humidity is achieved by the HVAC system. Silica gel I believe has to be raised to a much higher temperature to release its moisture, so it only works to dehumidify in this use case, and as you mention, it saturates. I once worked with a water-from-air system designed for use in the Iraqi desert - I believe it was silica gel used there, but it used large heating coils to cook out the moisture it captured from the very dry (RH ~5%) air. The system supposedly could produce 3 gallons of water from 1 gallon of diesel fuel, so for a remote base in need of water, one diesel truck replaces 3 water trucks, solving a logistical problem.... making some very expensive water! I will look into the Zeolite.

  Are you sure? yes | no

Bryan Williams wrote 03/12/2015 at 07:03 point

Ah, looks like my project was dug up in the lead-in to HADP2015. Well maybe I'll complete it sometime before the sun burns out. I'm hoping this pans out as a way to drive cost to the "improves my life" point. Ever notice that all the energy saving or labor-saving devices ever marketed always price themselves to exactly the energy savings + cheap shit alternative's price so the BEST you'll ever do is break even and part with a lot of money for "saving the world"?? And of course, as with CFL's and LED lights, the "10 year bulbs" last 9 months or less. Oh well, Cree is shipping me a crate full of replacement bulbs, but another died today. Is there a body count associated with energy efficiency yet? I'm in a Fight Club mood w.r.t the insurance adjustment cost. My LED light bulbs should not MELT. I have thermo cam pix! 208F on a Cree heatsink. Noticed that there are no light fixtures for LED bulbs? My recent trip to Home Depot yielded some designed-for-fixture LED's that replace the whole fixture as a means to solve the thermal issues. 1100 Lumens for a $20 fixture that is supposed to last 45 years. Has a better shot than Cree at this point. 

  Are you sure? yes | no

Eric Hertz wrote 03/12/2015 at 07:49 point

Cool about the HADP thing!

Yeahp, every CFL I bought for *years* never lasted more than a few months. They were *expensive* at the time, and introduced near-infinitely more mercury into the environment than my old incandescents. LED flashlights promised 100,000+hours, but the designers never put in current-limiters... The list goes on. I *definitely* dig the trying to be green but not believing everything they claim to be green really is... How on earth can someone claim a 45 year life-span on something that's only existed in research-form for less than a couple? When did ideal-physics become an accurate and marketable measure of reality? Hey, I have a car for yah that'll drive infinity miles on less than a few teaspoons of gas (or heck, a few AA's) on level terrain! Oh yahknow, this one broke my heart when I thought of it, though I haven't done the math, but hybrid cars... Man I loved that concept when they came out... but the batteries alone have to be replaced every 5ish years... that's a LOT of physical (and expensive) toxic-waste-(management?). It may be cheaper to run than an old 70's junker pick-up truck, but is it really *green*er to *build* a *new* vehicle to replace one that's still running and/or fixable with parts that can be found already-built in any junk-yard? That, my friend, is green with a twist, and a little bit of historic-preservation as well ;)

(Also, I'm pretty certain they don't consider the carbon-footprints of the designers'/manufacturers'/CEOs' lives while creating these "low-carbon-footprint" things, yet they absolutely should.)

Though, I think, if nothing else, I don't really understand the physics, but if there's a way to achieve more air-flow than hot/cold-air-exchange, it doesn't matter how green this thing may be, or even if it's an energy-hog, it sure beats both drafts and suffocation, that's a good thing. If it's an energy-hog, it still may be better for the environment, in cases where a physical structure needing its benefits would otherwise have to be knocked-down and rebuilt not-to. By my standards you win the right to call this thing environmentally-friendly. (Now, if someone built a place with the *intention* of requiring such thing, that's another story.)

  Are you sure? yes | no

Bryan Williams wrote 03/12/2015 at 08:08 point

yes, lots of good points. I'm driving a Toyota Highlander hybrid 2006 still on its original battery. Replacements are over $5k, so I got insurance. Still does OK given its weight but is only 20-26mpg in this semis mountainous area. On a new Highlander, I've seen reports putting it at the worst, needing 260k+ miles just for break even based on price!

  Are you sure? yes | no

Eric Hertz wrote 03/12/2015 at 08:39 point

Woot! I think that battery-yearage you're getting is way better than advertised...(?) Maybe Toyota used the ol' IC-spec-sheet method... yahknow, these are the absolute-min/minimum/reliable/guaranteed specs. Wouldn't that be nice if things were advertised that way?

Maybe your CFL's lifespans are shortened so your car-battery's can be extended... (having a discussion elsewhere about relativity). Either way, sounds like a good deal, hope I haven't jinxed it for you. Actually, that inspires a little bit of hope. Like I said, it broke my heart when I came to that conclusion. Now you're saving the environment by restoring hope in others!

And, you've probably seen, someone managed to squeeze *quite a bit* more life out of their hybrid's batteries by discovering the dead-battery(?) signal was nothing more than the result of corroded battery terminals... a bit of wire-brushing!

  Are you sure? yes | no

Bryan Williams wrote 02/22/2015 at 10:11 point

I bought a new leaky house thanks to crappy builders, well, new in 2003 anyway. The wiser neighbors asked for Tyvec wrap, builder wouldn't do it because they figured all the neighbors would think they were getting it for free. GRRRR! Building codes need to mandate good technologies. They put in propane heat, too. Propane at $1.35/gal was bad enough, propane at $4/gal would've meant a $3000 per month heating bill based on first winter in new house. First winter was unusually cold, went through 400ish gallons of propane in 3 weeks. Worked out to about $1000/month at the $1.35/gal rate. We switched to heat pump soon after. Some neighbors still have propane. We're a rural subdivision, so we sit on acre lots (if you're thinking an acre is a lot, like I used to living in a denser zone, the acre is for septic field + backup septic field for when the first fails around 30 years or less), plenty of room for ground-source heat pumps. Ground source still works great when you dip to -3F, where air sourced is useless. Resistive electric backup costs 2.5x what heat pump would. So.... my main heat pump picked a good time to have a reverser valve failure, so it froze into about a big ball of ice... service tech put it in aux heat mode for a couple weeks, and it probably spent 3+ weeks in the frozen state before we caught on to the problem. So... electric bill of $860 this month. Utility Co. says we use 3x other efficient comparable size houses with heat pumps.... 

  Are you sure? yes | no

Adam Fabio wrote 02/23/2015 at 06:25 point

Ugh - sorry to hear about your heat pump woes - those reversing vales always pick the worst time to fail. Is there any way to defrost the pump quicker?

  Are you sure? yes | no

Adam Fabio wrote 02/21/2015 at 04:23 point

With houses becoming tightly sealed, air exchange is a big issue in the winter - Myself and a few of the other Hackaday Staff were just talking about this the other day. With residential HRV systems costing thousands to install, your project could be just what we need!

  Are you sure? yes | no

zakqwy wrote 02/21/2015 at 14:10 point

Alternative: buy an old, leaky house. Yay drafts!

  Are you sure? yes | no

Eric Hertz wrote 02/21/2015 at 23:48 point

Glad I saw your message in my feed. I needs me something like this, didn't even know such thing existed.

  Are you sure? yes | no

Similar Projects

Does this project spark your interest?

Become a member to follow this project and never miss any updates