 ric866
This project started some months back. I was given two projectors, one with a bulb, one without. Not wanting to scrap either unit, equally not wanting to spend £100 on a bulb that would be prone to shock and likely to fail, I decided a more serious adjustment than bulb replacement would be appropriate. So after using the original bulb to ascertain the projector worked before I hacked it to bits, I started working on fitting it out with an LED light-source.
I have seen projects attempting to get this to work in the past, usually resulting in either massive light bleed from the unit, something unusable in a real environment (with additional trailing wires, boxes and similar), or something with seriously underpowered LED's or overheating high power LEDs.
With this in mind, I create a few constraints and targets I wanted to avoid / achieve, the unit needed to:
1) produce enough light to be usable in a darkened room at 4 - 5 feet (giving a 1m ish image)
2) occupy its original footprint, and have no additional external connections (for power or similar)
3) switch on and off as originally intended (not run the bulb at all times)
4) work for hours at a time
5) not bleed an unacceptable amount of light.
After a bit of tinkering (shining a 10w head torch into the light aperture) and getting my hands on a service manual, it seemed feasible that the projector could be usable when finished, though the light source would need to be much brighter.
I decided on a 100w LED (£8.99) , and appropriate 240v driver (£20). On arrival I couldn't help but hook it onto an old Pentium 4 heatsink and try it out. I spent the next 2 hours with a flashing purple spot in the centre of my vision... Be wary, a 100w LED is seriously bright. You can feel the heat in the light from 6 inches away.
Anyway, I located a more appropriate heatsink for the LED, that with a little cutting fitted into the old lamp area of the projector, and allowed then LED to be held tight up against the light input aperture.
At this point some heavy mod's took place to the projectors housing. I cut a hole in the side of the case to exhaust heat, and removed all of the pegs and mounting points from the original bulb.
I also removed and split the power supply unit. Thankfully, the NEC unit is very modular and bolted together making it easy to dismantle and rebuild. I split the supply and found 2 boards inside, one for the main projector, the other dedicated to driving the bulb. That came out, and after a bit of measuring and checking the LED driver board took its place.
I decided on a 5v - 240v relay to activate the LED (£2). The original bulb had 4 control wires from the main board, 3v, ground, bulb on, and bulb OK. So I soldered bulb OK to ground at the main board, meaning it always turns on. I used the bulb on wire to trigger the relay (it was only 3v but seems fine) and took a 5v feed from the power supply to drive it. This switches mains to the LED driver. In the picture the LED driver is the bigger board with 1 x Red LED, the smaller board with 1 x Red & 1 x Green LEDs is the relay switch board. Seeing as all the filters are missing from the unit (It's got quite a bit of dust in there) I decided to bypass all the filter and access cover micro-switches, to allow the unit to run regardless of cover state (this is not something you want to do when using the original 5Kv lamp, of if you are likely to touch something mains related).
The 240v supply for the LED driver is taken off the input for the projector power supply. The driver has its own fuse. Once the soldering was complete I popped it all on the desk and ran it up for the first test. The picture attached it the first test. It ran up OK (after I reconnected the fan I had forgotten about) and the LED is powered on / off in accordance with the projector state.
It's now all built back into the original footprint, I just need to attach a cooling fan (I did some testing last night and found an old AMD fan to be capable of keeping the temperature...
Read more »


 blinkingthing
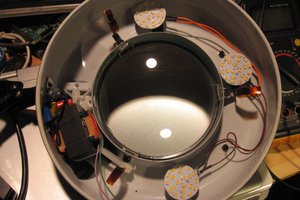
 theonetruestickman
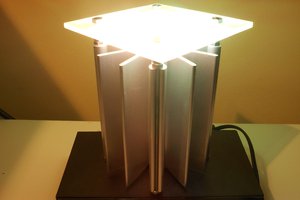
 Enrico
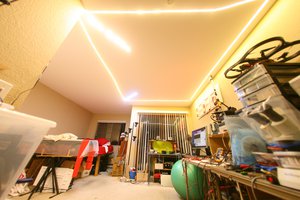
 lion mclionhead
I really liked your project and I want to realize the same using vt-440 beamer..!! could you please send more pictures of the project to know how you made connections..?