Close
0%
0%

LoBSTAS: Underwater Camera + Sensor

Keeping an eye on the seafloor (especially shellfish)

Similar projects worth following
A project to make low-cost benthic weather stations to monitor seabed dynamics with Raspberry Pi cameras and sensors. If this works well in dark, turbid, cloudy waters, it'll work great in clear waters! Plus, it has a computer.

Currently, base cost to build a unit is about $100 USD.

Did you know fish can suffocate underwater? When dissolved oxygen in the water drops below a certain level (a condition called hypoxia), they become stressed and in extreme cases - die. While a number of studies have looked at coastal water quality changes (e.g., hypoxia), we still don't really know how the drivers of hypoxia and benthic processes are linked. So the LoBSTAS's goal is to learn about hypoxia in relation to pictures and videos of the benthic environment.

How is the seafloor changing? What are the currents like? Any 'storms'? How are the plants and animals doing down there? Are they thriving or surviving? Is human activity and waste damaging the coastal environment?

"But don't we already have professional equipment that do these stuff?" Well yes, but they're very expensive. That's why a key goal is to make this project as CHEAP and EASY to build as possible, so that people with limited finances or tech experience can study the seafloor too.

*If you're curious, LoBSTAS stands for Low-cost Benthic Sensing Trap-Attached System. It's a mouthful, I know!

  • 1 × Raspberry Pi Zero W ($10) Switched to this from the Pi3 because of its smaller size and lower power consumption.
  • 1 × Camera Module with Fisheye lens ($15-20) I recommend the Sainsmart NoIR Wide Angle FOV160° Camera Module where you can easily adjust the lens focus and swap out different lens. I got mine from Sainsmart.com.
  • 1 × Anker USB Phone Charger 5200 mAh ($20) Or you can also use a power bank with larger capacity llike 15600 mAh
  • 1 × Schedule 40 Standard PVC Pipe 2" If you want a bigger unit, use 3" pipes instead of 2".
  • 1 × Female PVC Connector 2" Protects the window and acts as second waterproof layer.

View all 10 components

  • Setting up the RasPi3 Core

    Ellie T03/27/2019 at 01:36 0 comments

    Followed some online instructions to setup the 'headless' Raspberry Pi 3's Raspbian Lite OS (I forgot if it was the Jessie or Stretch version) in an 8GB SD card. But I didn't have a HDMI cable with me, so tried to connect to the Pi over Ethernet or Wifi using secure shell (SSH) with a software called PuTTY.

    When I connected the Pi to my Windows 10 via an ethernet cable, the supposed IP address I got from IPCONFIG or any network properties tabs were not correct. Tried some forum suggestions to set a static IP within cmdline.txt which was in the Pi's SD card but it didn't work. Created 'SSH files' in the boot drive (which should enable SSH according to online forums) but that didn't work too. Tried disabling firewall as well....

    Read more »

  • First Housings and Leak Tests

    Ellie T08/11/2018 at 18:34 0 comments

    Note: The project actually started two months ago, so I'm trying to organize and compress logs from my Evernote journal to Hackaday!

    There are tons of underwater housing made with PVC everywhere, so my challenge was: can the design be easier or cheaper? Can the parts be easily obtained and cut with tools that most small workshops would have?

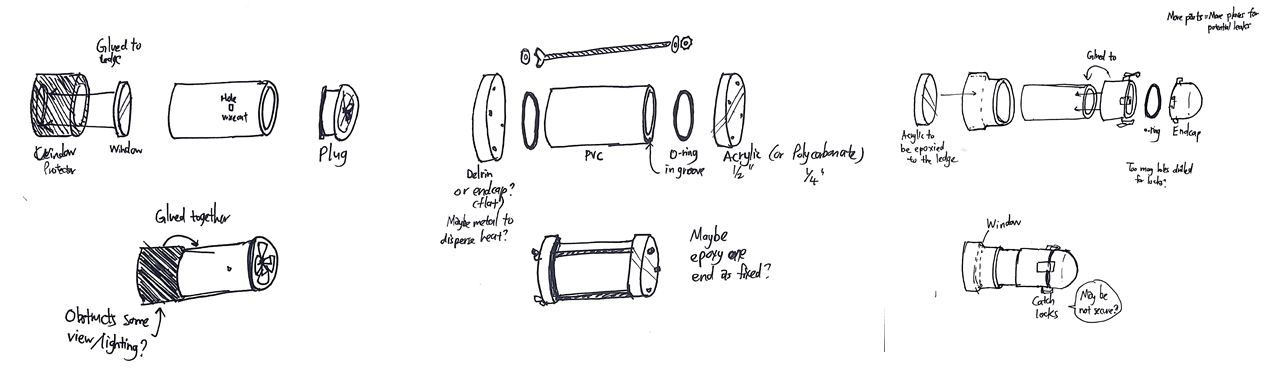
    (The middle and right design were inspired by MBARI's SeeStar and Jonathan Bergshoeff's low-cost housing design.)

    In the end, after brainstorming with the team a bit I decided to choose the simplest design on the far left with 4 parts: a end cap/plug, main body, window, and window frame. I didn't have the tools to easily cut circular grooves on the PVC for the O-ring to sit in for the middle design, and the latches on the right design seemed like extra work and parts (I really the easiness of opening and closing it tho).

    Read more »

View all 2 project logs

  • 1
    Make (and test) Housing

    When you've decided if you want a standard sized 3" or the Mini 2", you'll need to cut three things: the PVC body, the window frame, and the round window.

    Tools I used: Chop saw, jigsaw, random orbit sander
    Materials needed: PVC Cement (and primer), plus all the PVC components

    ---------- more ----------

    1.1 BODY
    Choose a length that your power bank/battery pack and sensor can fit in. I recommend choosing 6-9". I used a chop saw with a circular blade, but you can use any saw/cutter you have to cut the PVC.

    Important: make sure one end is as flat as possible for best contact with window! Use a sander/sandpaper for this.

    Image: Cutting extras of the coupling after the body is done.

    1.2 WINDOW FRAME COUPLING
    Check the coupling, there should be a ledge in the middle on the inside. If one side is flat and the other is not, the flat side will be facing the window. The other side will be facing the open sea, so cut off the extra length until 0.5" (1.3cm) from the center ledge is left.

    The extra 'frame' outside the window may come into the picture of your camera, especially if it has a wide viewing angle.

    1.3 THE ROUND WINDOW
    This is the hardest, as you need to cut round lines with a jigsaw (unless you have a special saw). Place the body on the Acrylic/PVC sheet and trace a circle. Cut the circle with the jigsaw and use the sander to make it round.

    o This takes the longest time to do well!

    Important: As you sand off extra bits, keep checking how well the window matches the body and how well it fits the coupling frame. Test it by putting the body, window, and coupling together.

    1.3 GLUE TIME
    Put PVC primer on ALL contact surfaces, then smear the PVC cement glue generously as well. Make sure there is lots of glue on the contact between the body and the window!

    Important: Work fast, PVC cement dries fast. You might have to press the parts together REALLY HARD to get the window and body all the way into the coupling.

    1.4 LEAK TEST

    After an overnight or 1-2 days (depending on what glue you use and how much you smeared on),stick some dry tissues in the housing, tie a rope and some weights to your housing unit and drop it into the water! Try various depths so that you can tell where and when it leaks. Some leaks are slow, so it's good to leave it in the water a couple of hours or overnight.

  • 2
    Setup Raspberry Pi Core

    Install OS on Raspberry PI and make sure you can connect to it over Wifi.

    https://hackaday.io/project/160192/log/160964-setting-up-the-raspi3-core

    More detailed guide coming soon!

  • 3
    Setup Camera and Lighting

    More detailed guide on codes and Python scripts needed coming soon!

View all 5 instructions

Enjoy this project?

Share

Discussions

Chris Knight wrote 08/19/2018 at 00:58 point

Nice project, have been looking for options for a waterproof outdoor webcam.

Something that might work: https://www.shoppopdisplays.com/11045/2-d-x-375-thick-round-acrylic-display-block.html?st-t=adwords&vt-k=&vt-pti=254874467990&gclid=CjwKCAjwh9_bBRA_EiwApObaOK14a86N0dFBcRXkVfa6BS1tF3AyMgIAUaeT77dsf41ELV6EsVs8kRoCBx4QAvD_BwE

shipping cost might make it less attractive ...

I may try a local plastics shop, but I'm guessing it'd also be a costly custom cut.

Or a hole saw without the pilot drill bit: https://www.youtube.com/watch?v=VE3CWW6ZYZU

  Are you sure? yes | no

Ellie T wrote 08/19/2018 at 02:32 point

Wow those round acrylic display blocks sure would make the job easier! If I had access to a proper hole saw that would be my ideal tool for cutting the round window.

  Are you sure? yes | no

[deleted]

[this comment has been deleted]

K.C. Lee wrote 08/19/2018 at 02:21 point

May be look at inductive charging so you won't need to directly connect a cable.  The charging side could be encased in potting compound/epoxy.

  Are you sure? yes | no

Ellie T wrote 08/19/2018 at 02:36 point

@Neon22 I have seen projects where they use POE and run live video footage to a computer or website - the cheaper way to seal a cable would be to drill a small hole on the housing and use lots of epoxy/silicone or other kinds of marine sealant. Risky though!

@K.C. Lee Underwater inductive charging is an interesting idea! I think US Navy scientists have been working on that recently. But since they'll be encased in a potting compound maybe a simple potted cable would be cost-effective for a stationary camera? But if there's a fleet of cameras I can see how wireless charging can be very useful as you make rounds to recharge all of them without hauling up any cameras, opening it, and swapping the batteries.

  Are you sure? yes | no

K.C. Lee wrote 08/19/2018 at 03:35 point

Those Qi charging modules are around $10 US a pair.  The transmitter is less than $3 for the single coil, so if the potting leaks or wire breaks, it is a throw away piece. The camera side aren't as disposable.

https://www.aliexpress.com/wholesale?catId=0&initiative_id=AS_20180818192527&SearchText=qi+charging+diy

https://en.wikipedia.org/wiki/Qi_(standard)

  Are you sure? yes | no

Neon22 wrote 08/19/2018 at 11:13 point

seedstudio had a number of those kinds of charging units. I have some somewhere... Good idea. But I do want the video feed live and a cable to get it to the surface seems best.

  Are you sure? yes | no

Similar Projects

Does this project spark your interest?

Become a member to follow this project and never miss any updates