Close
0%
0%

80's style BASIC Computer with Terminal-BASIC

This Arduino-MEGA based microcomputer has a DIY hardware terminal and runs Terminal-BASIC!

Public Chat
Similar projects worth following
Remember those 70’s and 80's professional computers? Yes, those with the green screen and a keyboard, no mouse. Only businesses and universities could afford them back then.
Now, we can revive that 80’s feeling by making a computer with the BASIC programming language.
The “80’s style BASIC Computer” that I constructed is comprised of 2 modules:
1. A “Dummy Terminal"
2. A "Host Computer"

1. The “Dummy Terminal" consists of:
>A Screen, computer monitor with a COMPOSITE input (or TV set).
>A "Computer Terminal Board" based on the “Video Terminal and Keyboard/Serial Interface”, a great project by Grant Searle of Wales.
>A PS/2 Keyboard.

2. The "Host Computer" consists of:
>An Arduino MEGA2560 loaded with the excellent “Terminal-BASIC” interpreter by Andrey Skvortsov.
>A standard microSD-card module, common in Arduino projects; it's

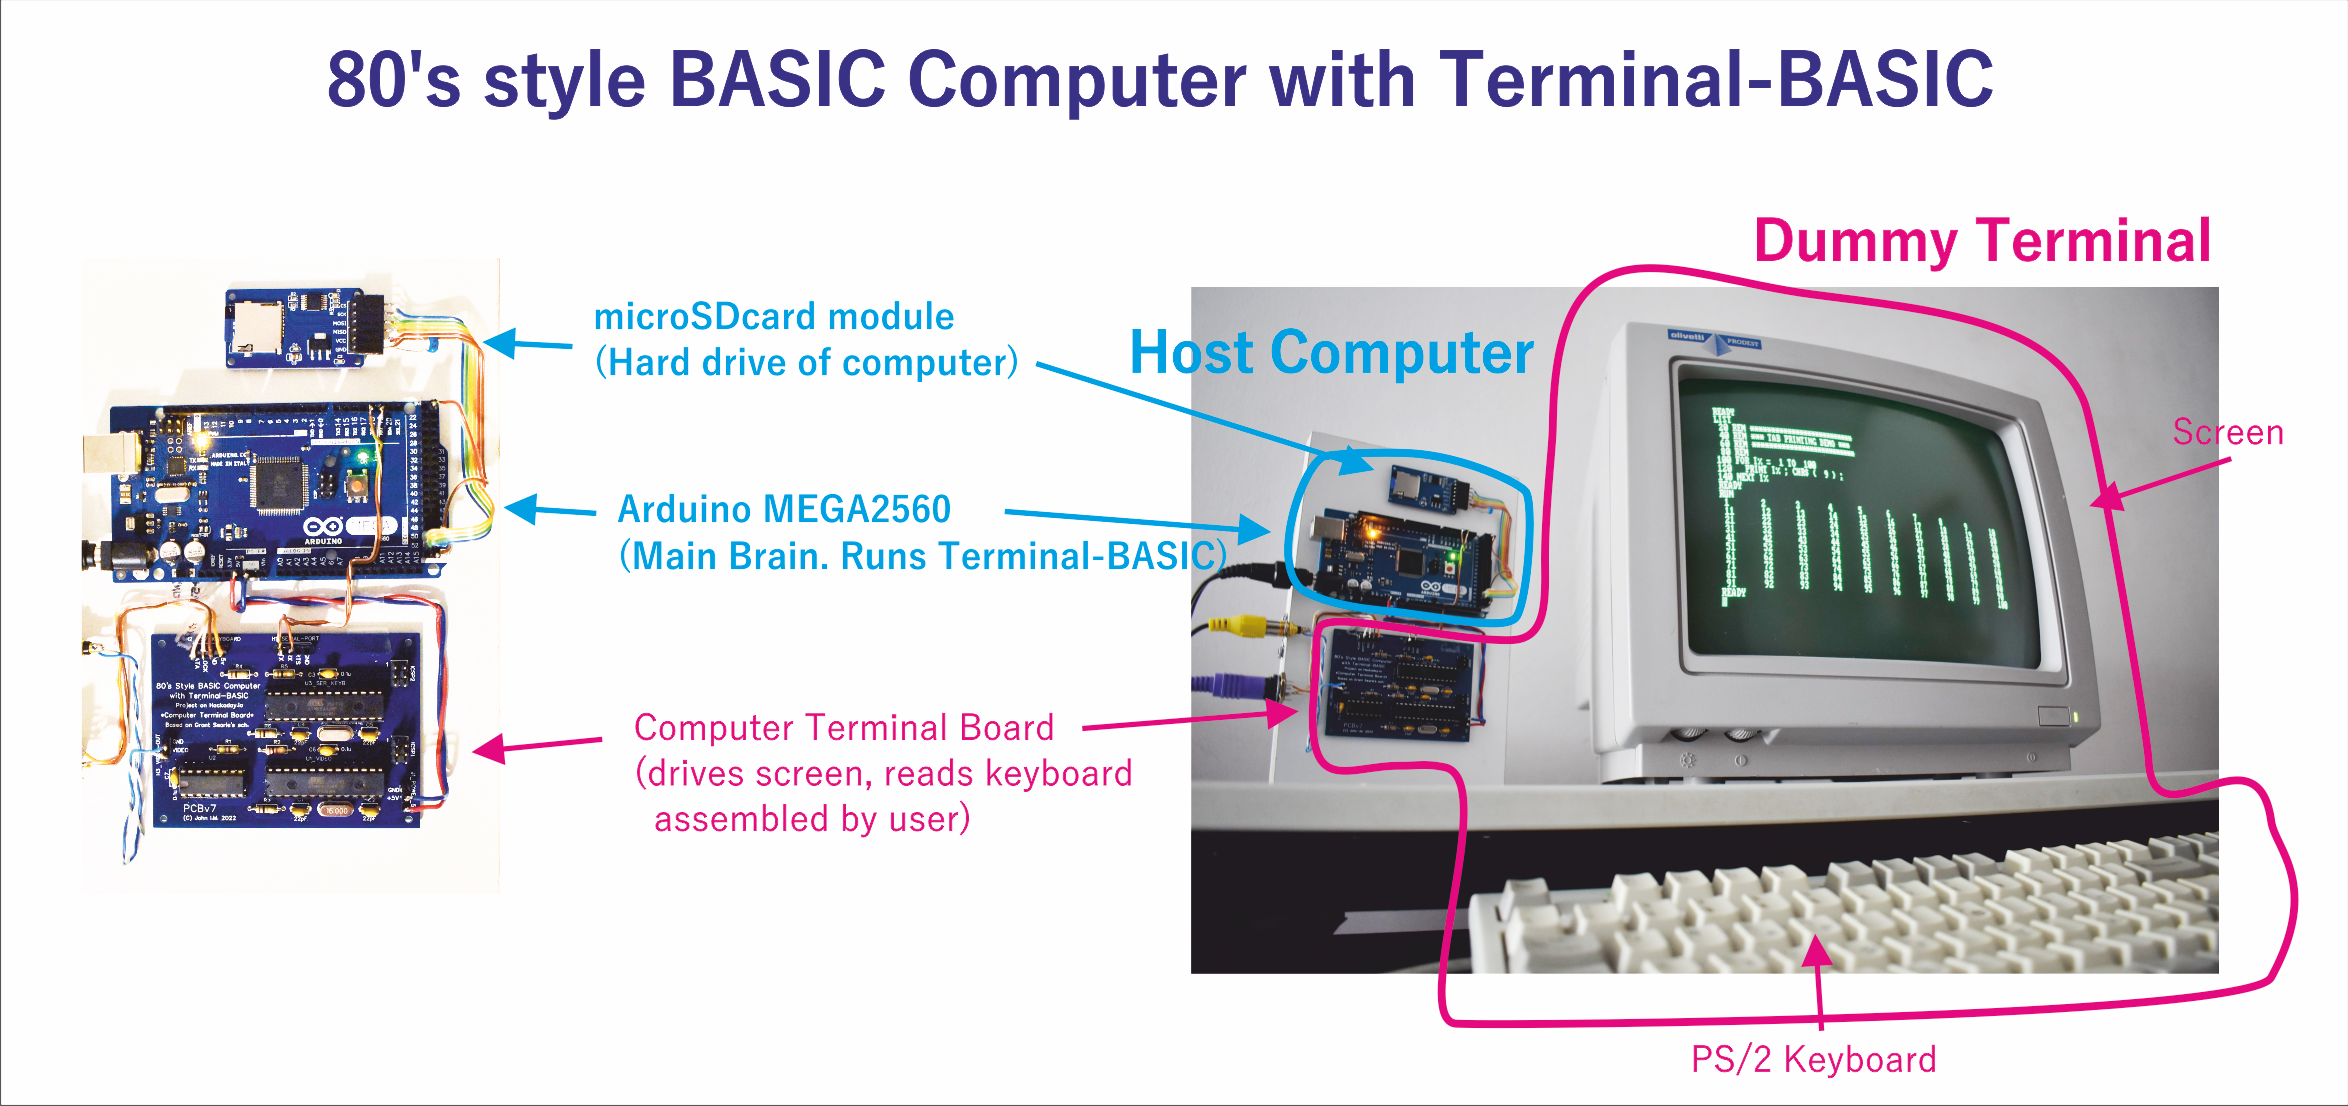
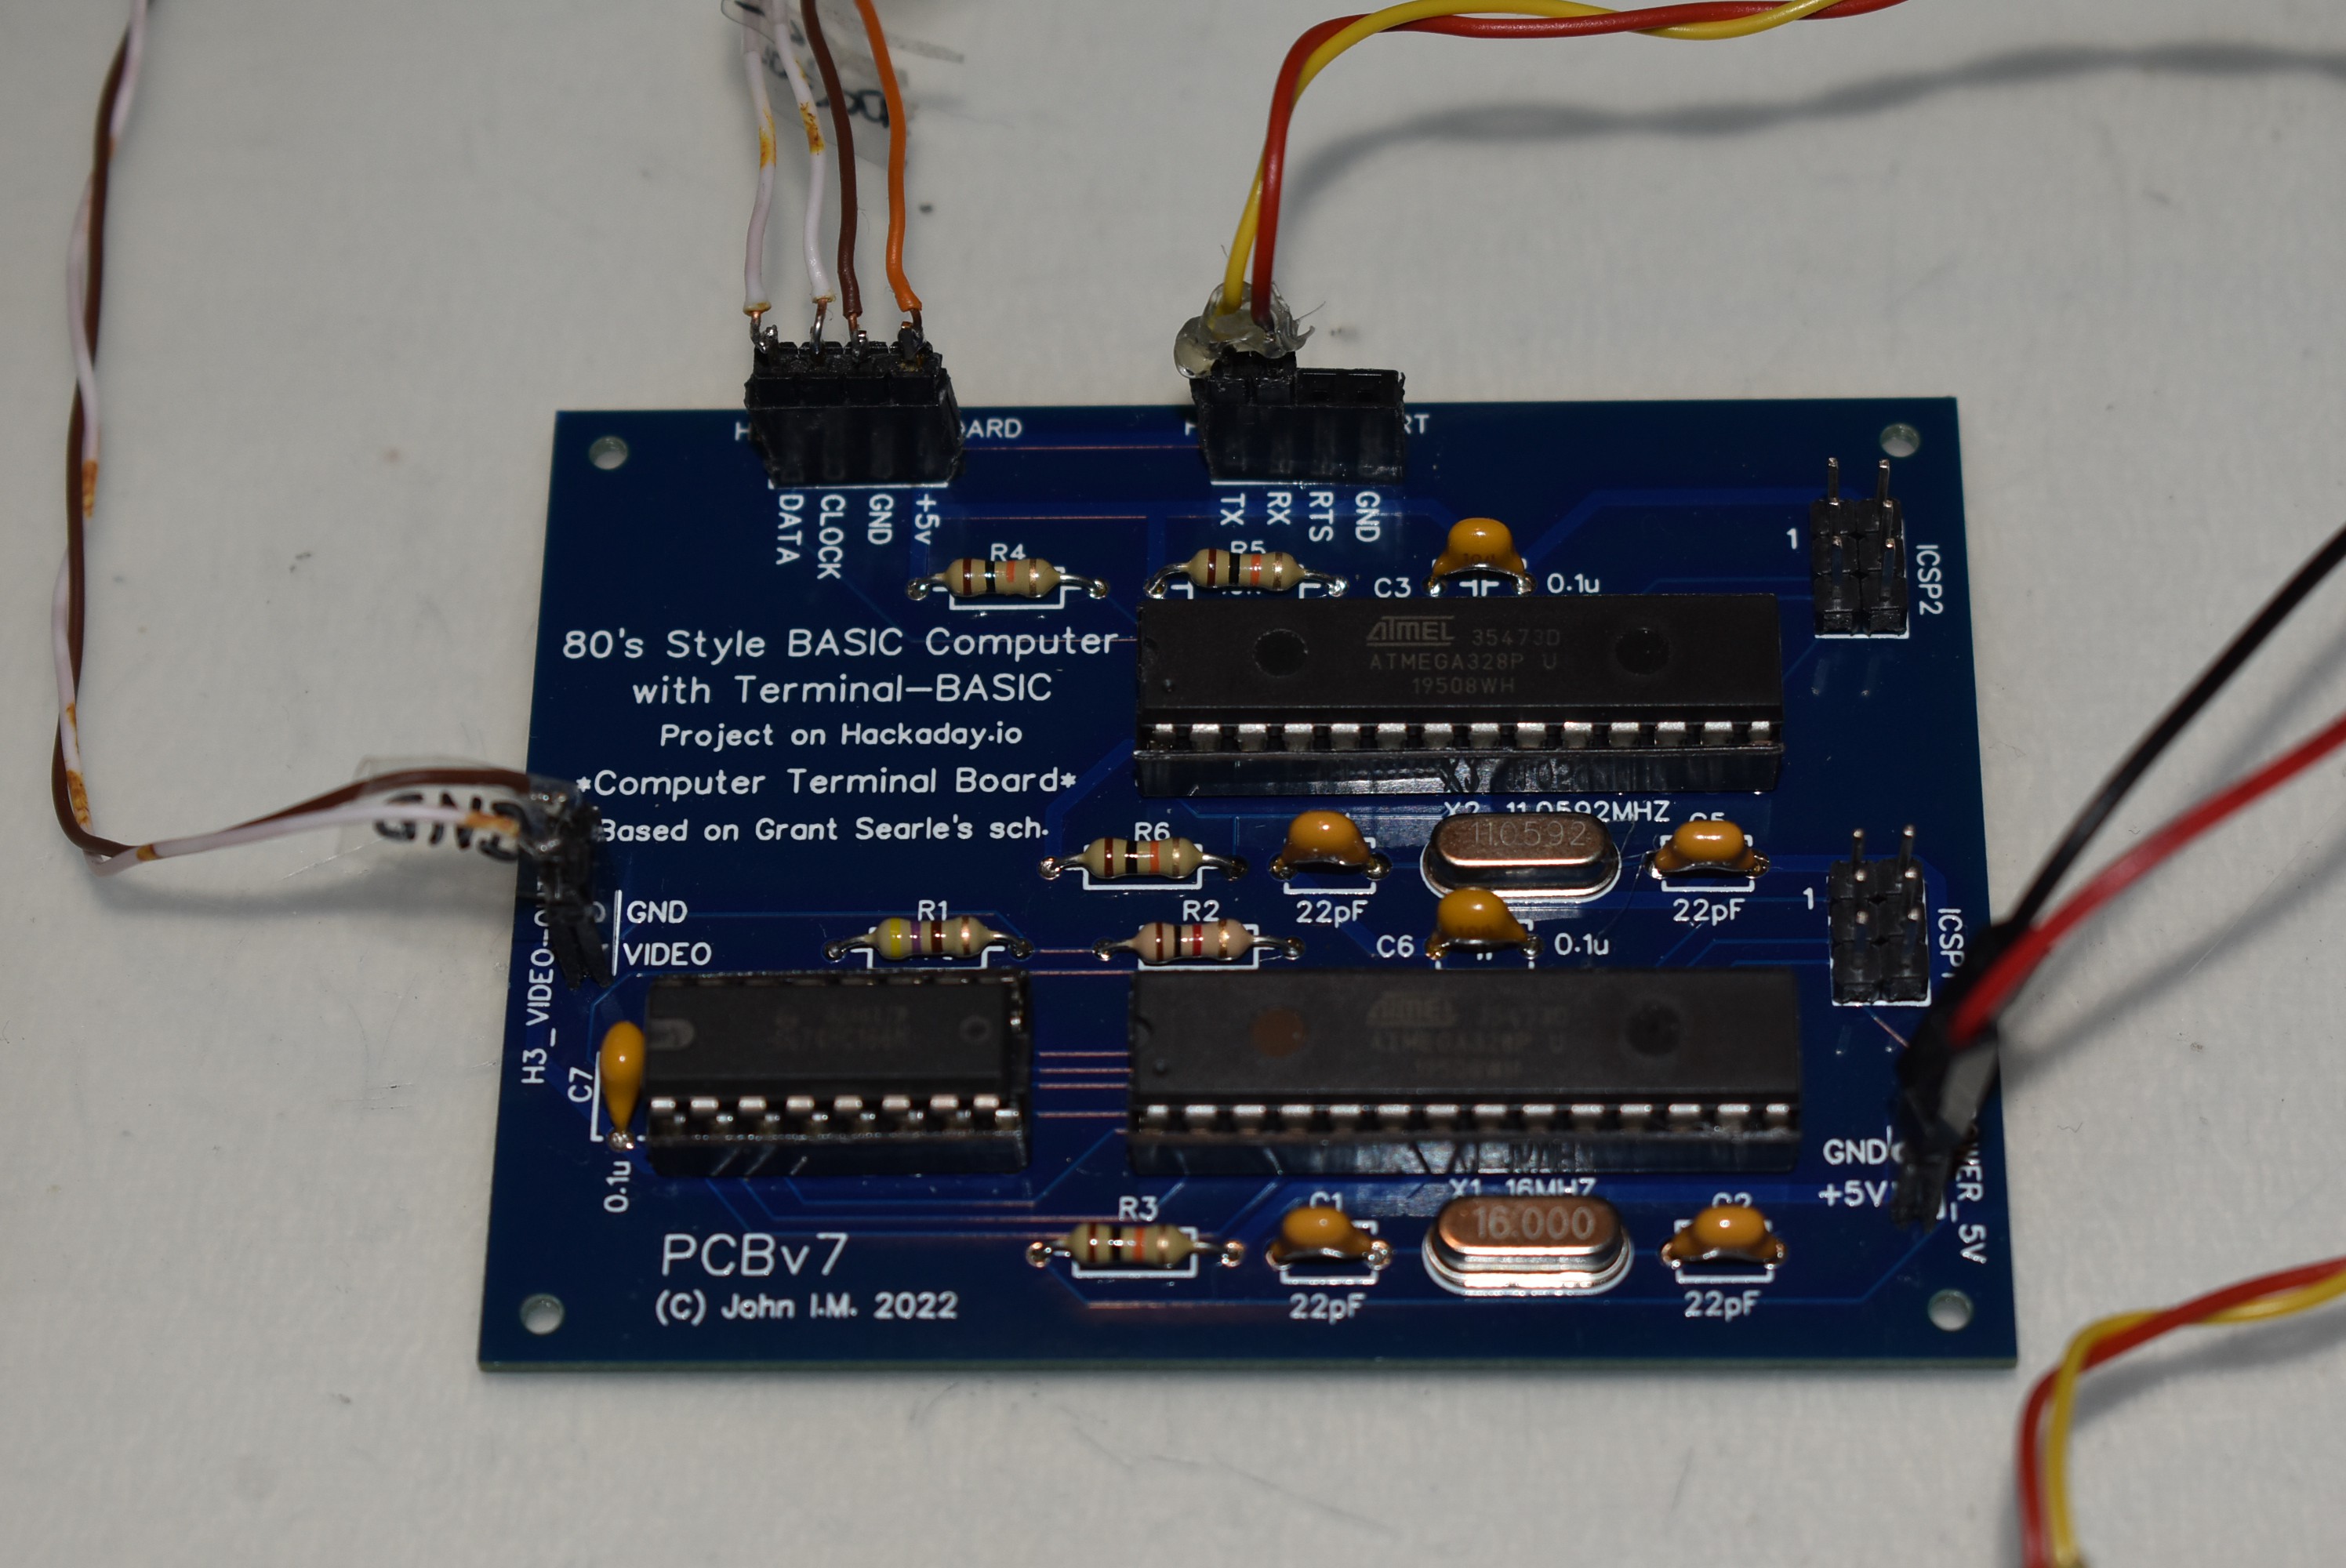
Credits: My project uses two already existing projects by other authors so I didn't reinvent the wheel. Namely, Andrey Skvortsov's "Terminal-BASIC" interpreter on an Arduino MEGA 2560, and Grant Searle's "Video and keyboard interface".  This project started when I ran into "Terminal-BASIC" and I thought that it would do justice to Andrey Skvortsov's BASIC interpreter to use a real hardware terminal. Fortunately, Grant Searle's "Video and keyboard interface" seemed to fit the purpose. So, I set out to combine them into one standalone computer.
I have links to both authors' pages for technical details, schematics and downloads. Full credit is given to both for their excellent work.


                                                                             DETAILS
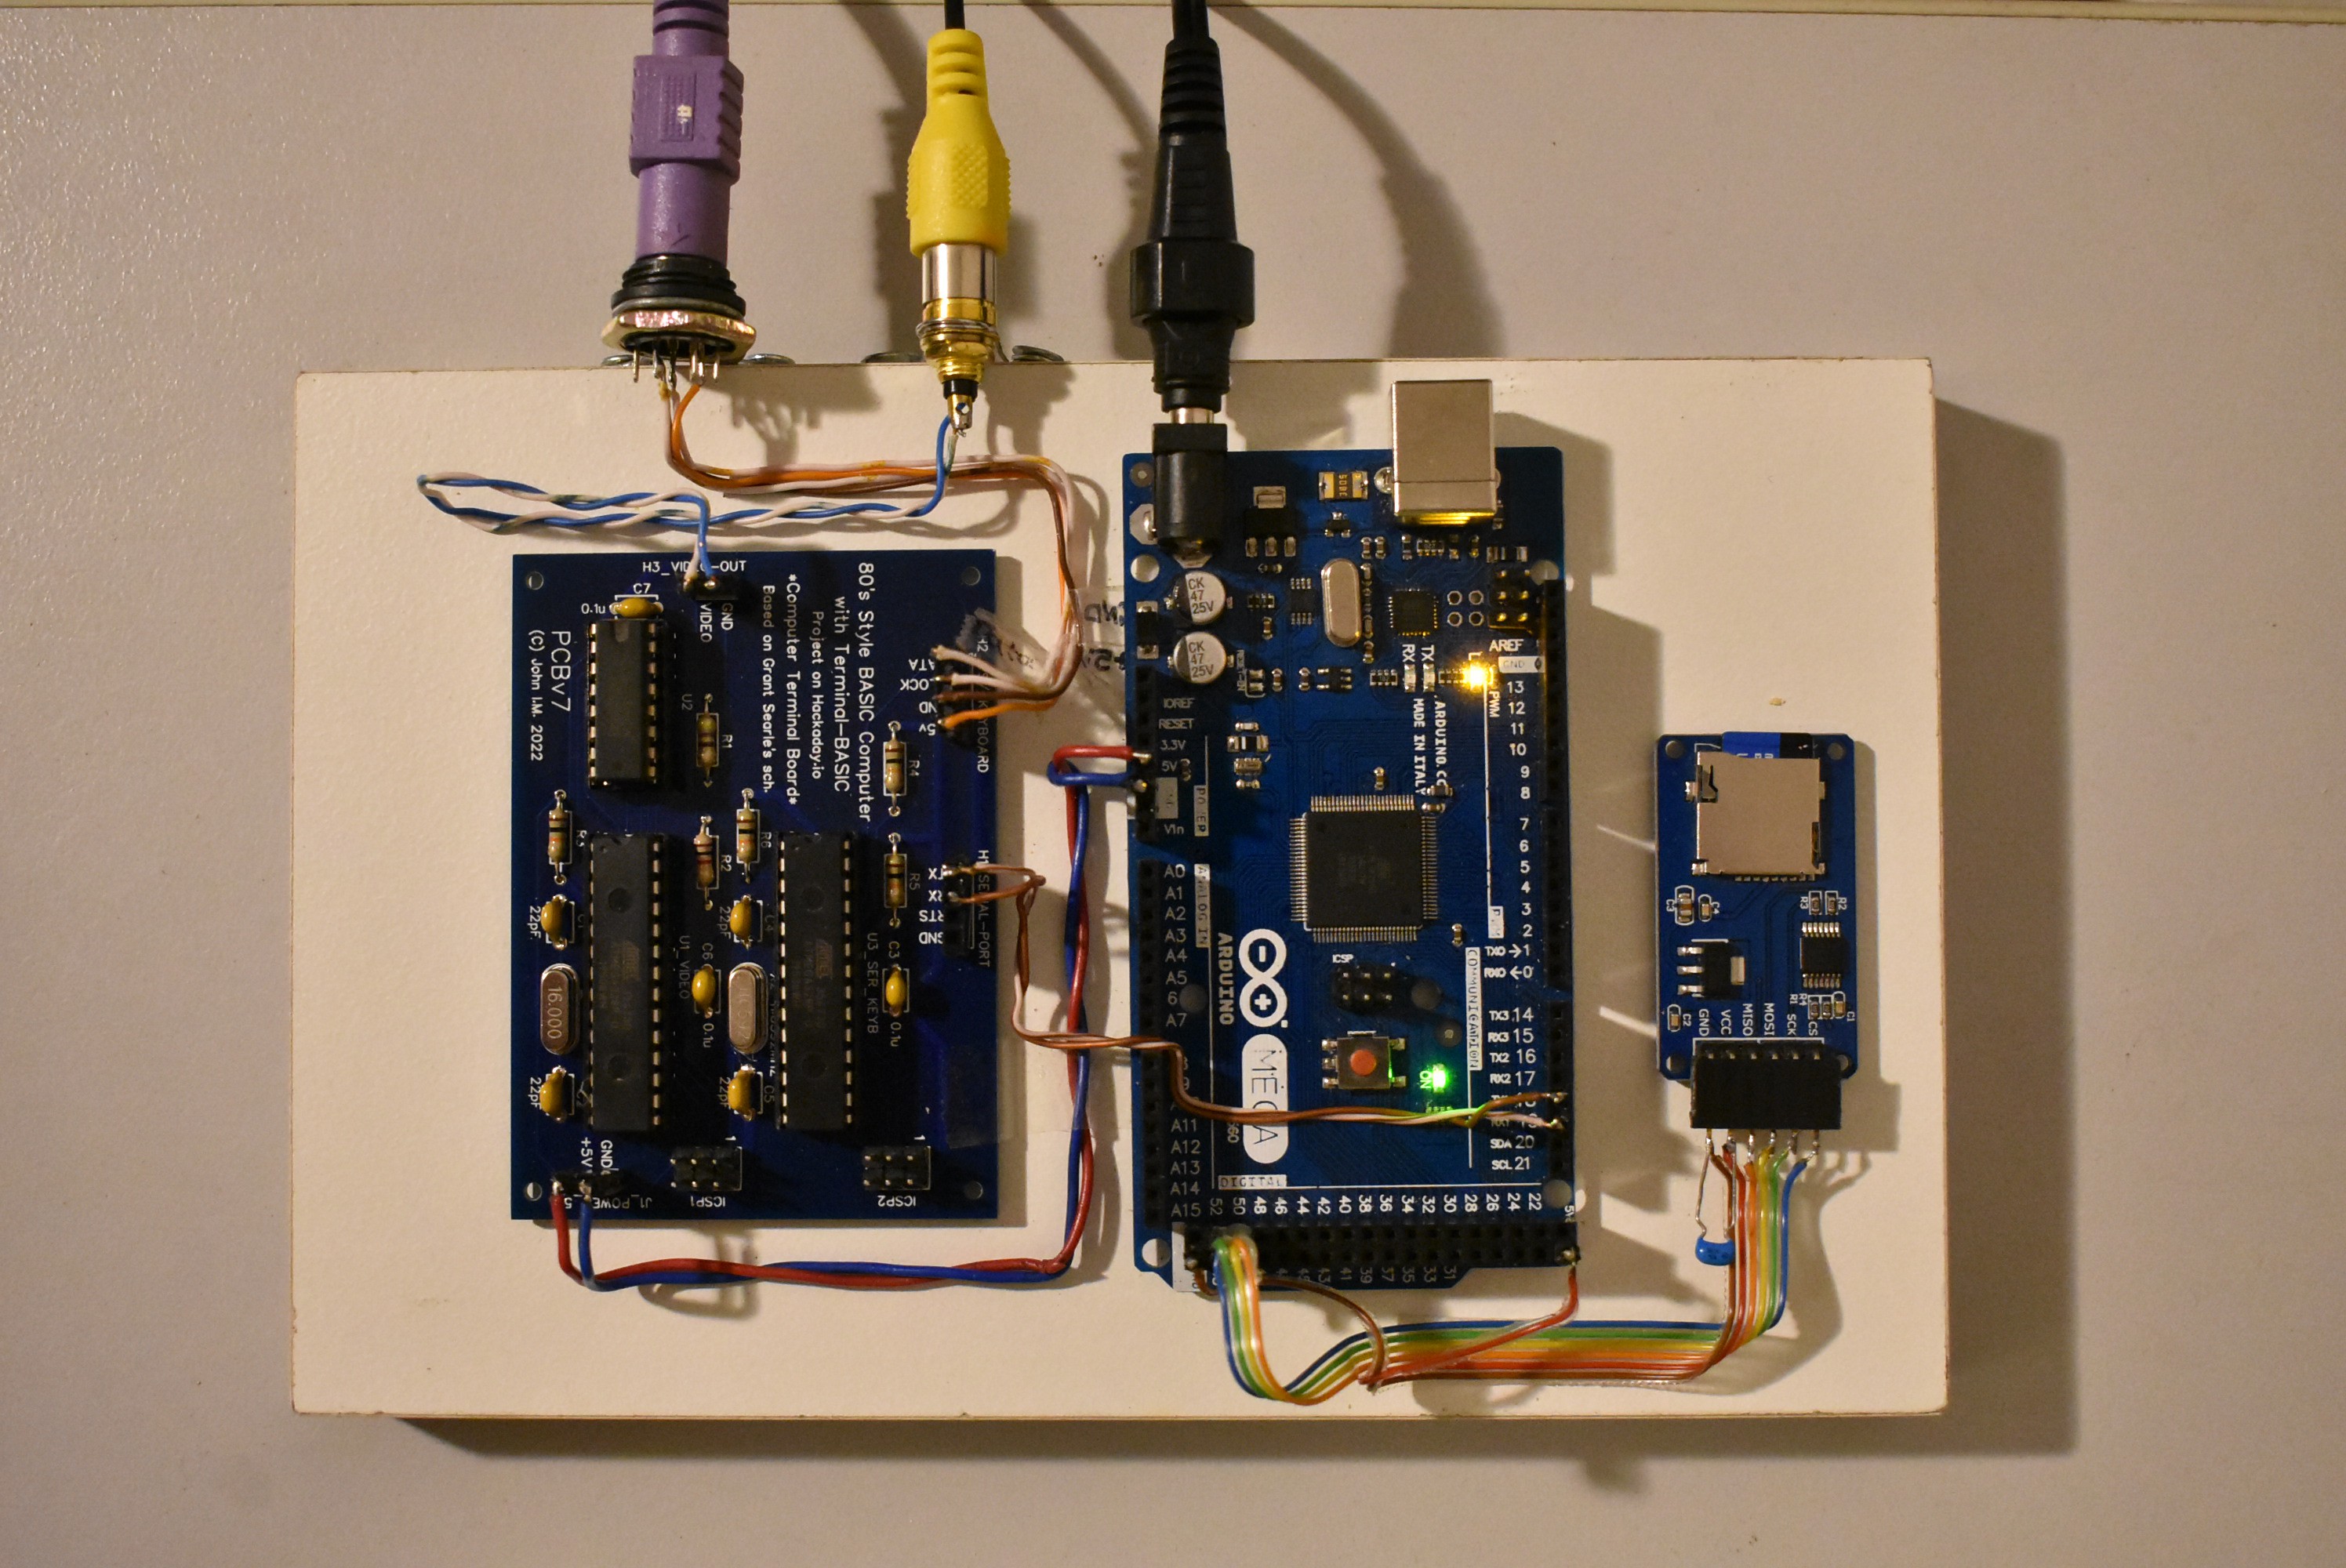
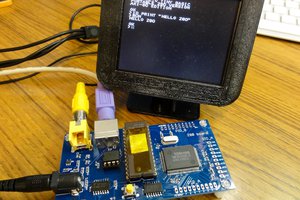
The "80's BASIC Computer with Terminal-BASIC" is comprised of  two units as seen in the diagram above: 1. Dummy Terminal and 2. Host Computer.
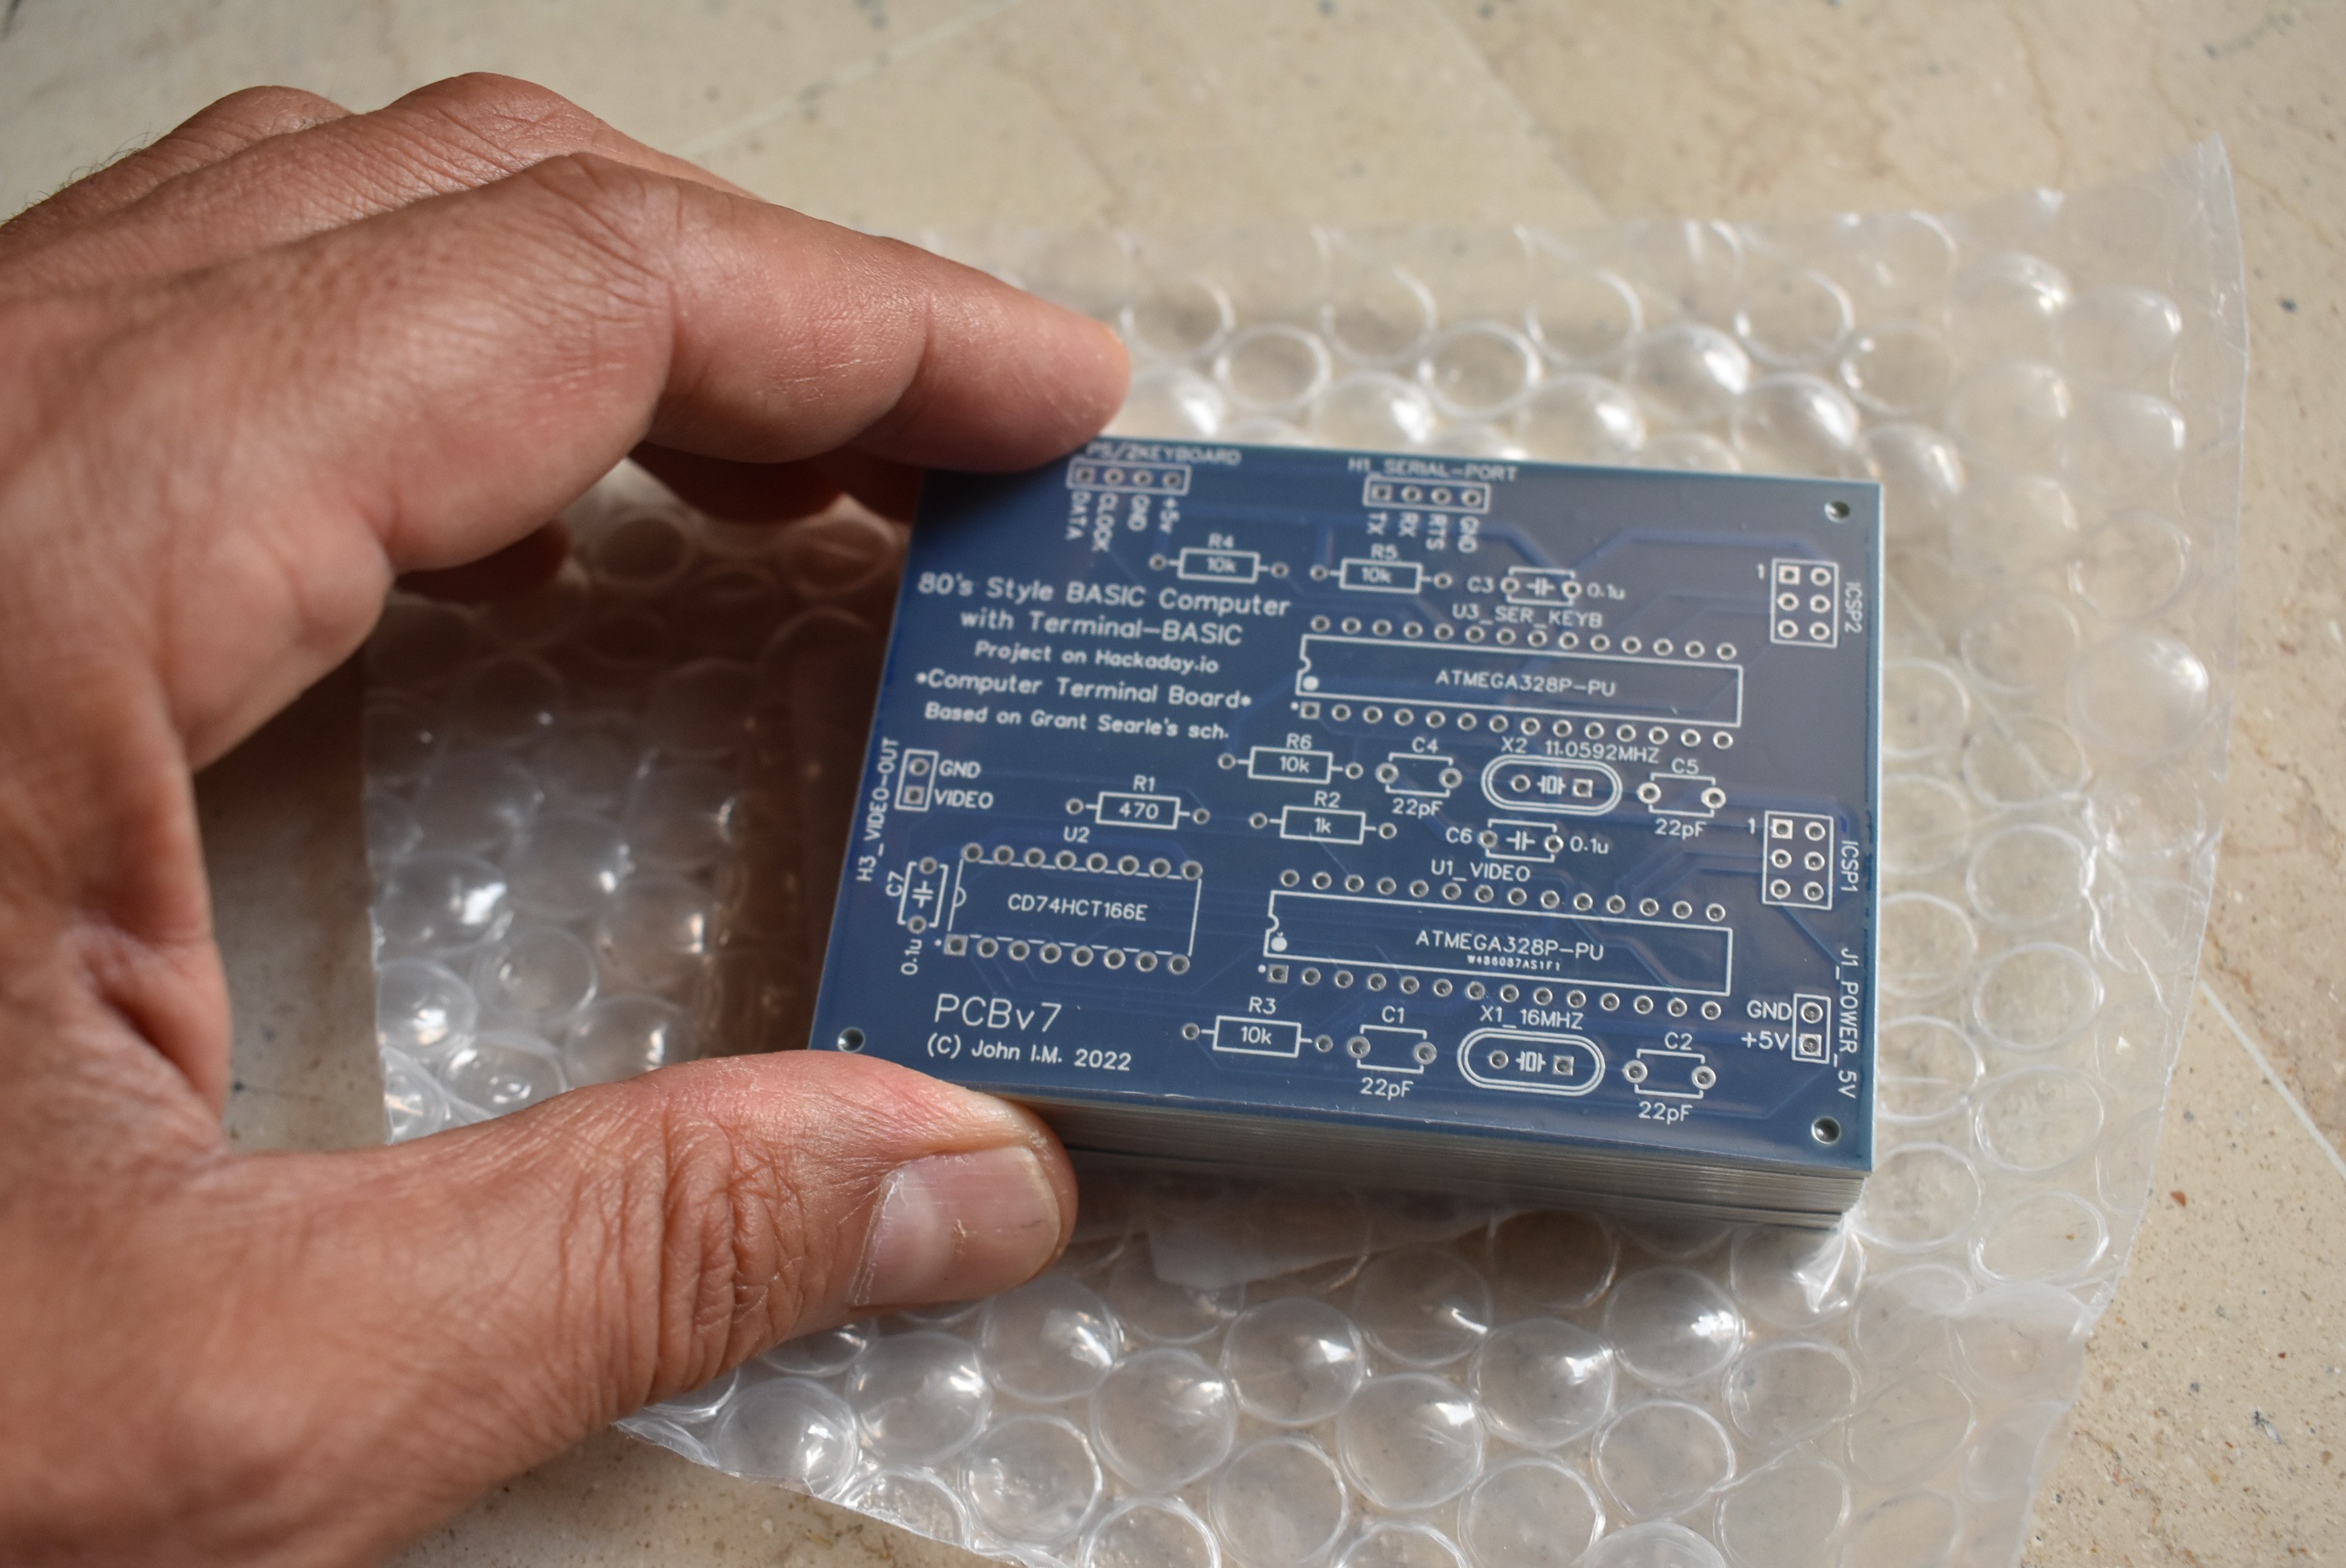
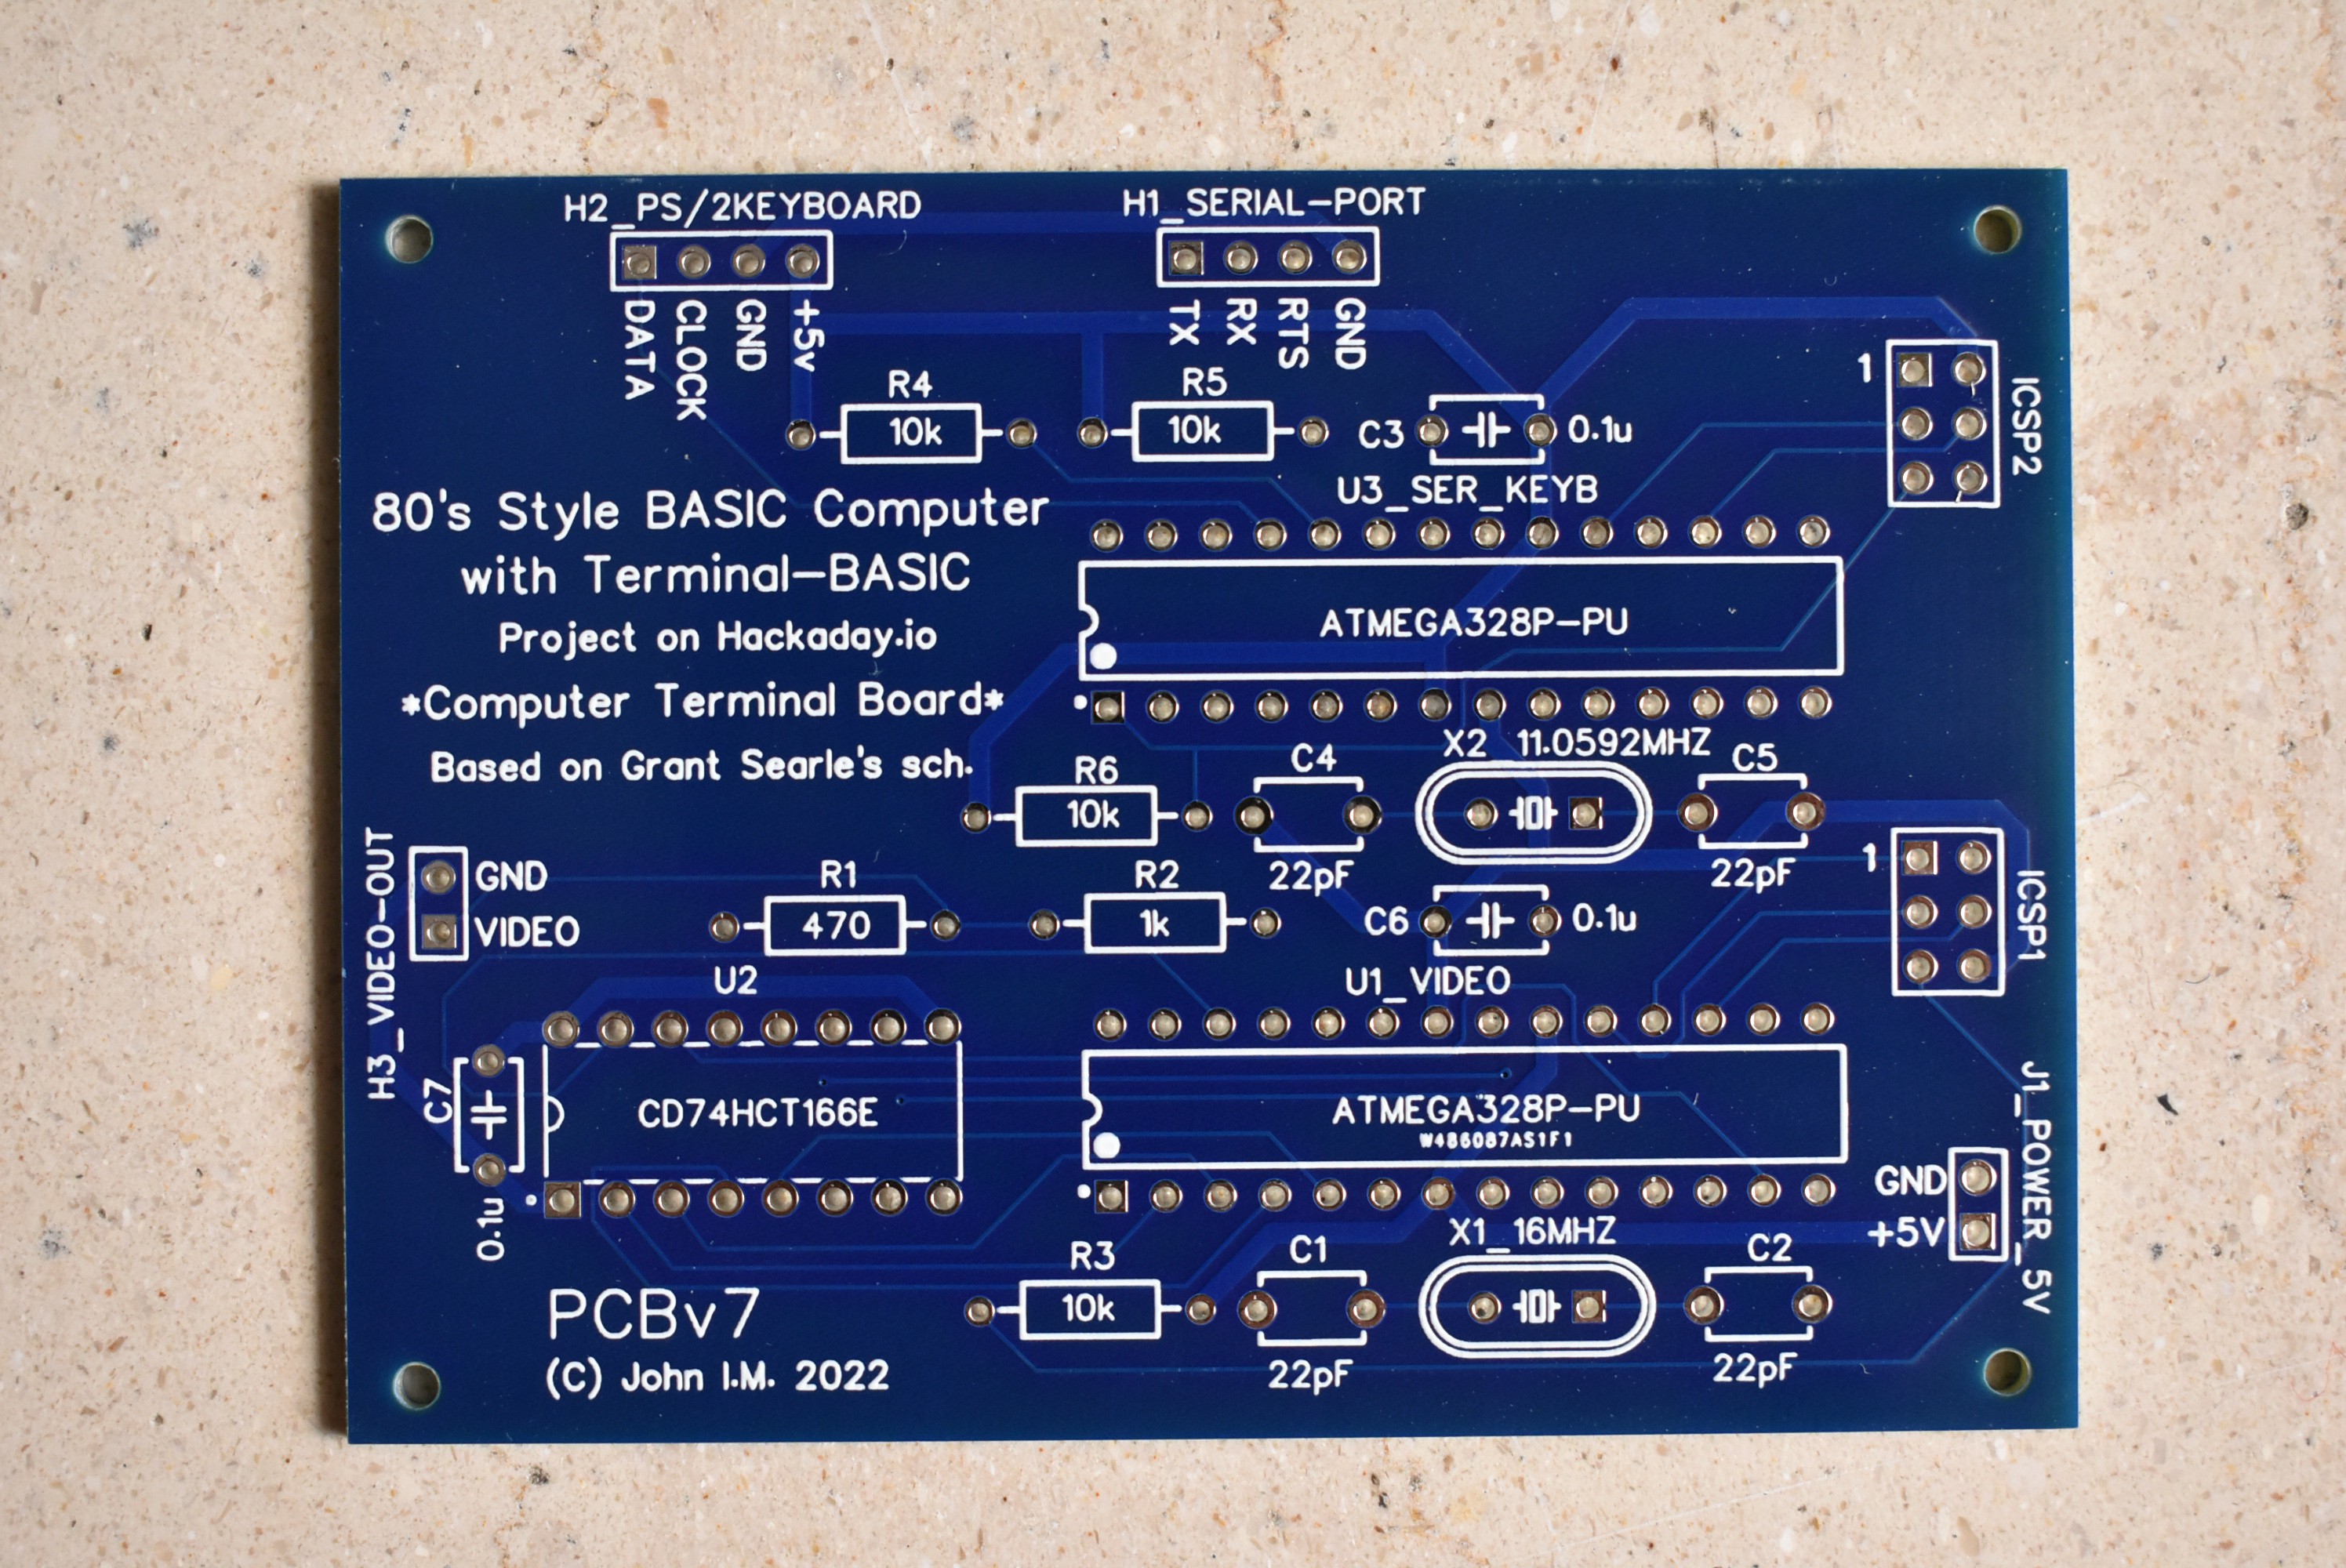
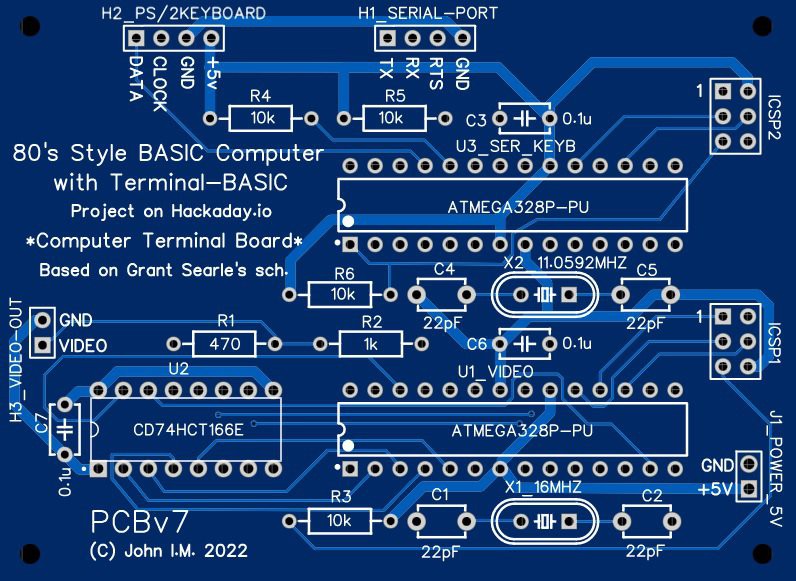
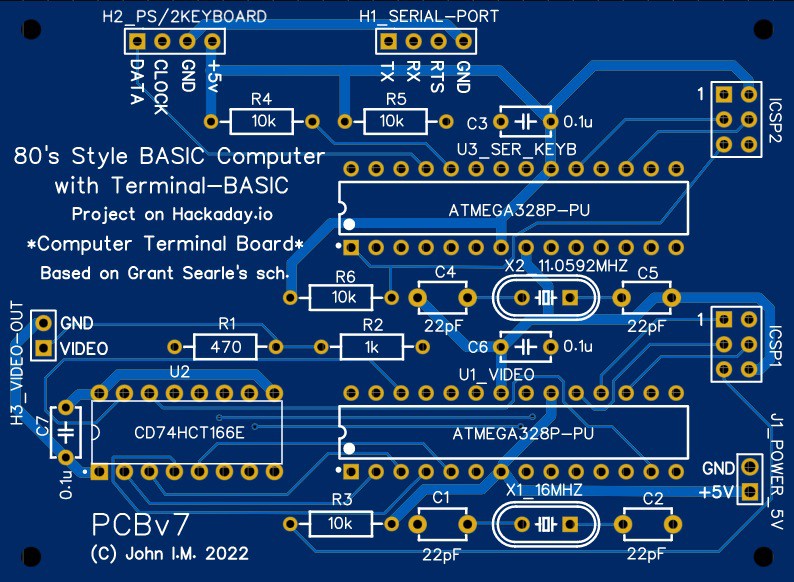
1. The "Dummy Terminal", which is the first part of the system is made up of three parts: 1. A Screen, computer monitor, 2. A PS/2 Keyboard, 3. The  "Computer Terminal Board". This a slightly modified version of the  "Video and keyboard interface" by Grant Searle (check link), Initially constructed on 2 breadboards, now it is assembled on a proper printed circuit board or PCB. These 3 parts make up a complete physical computer terminal.
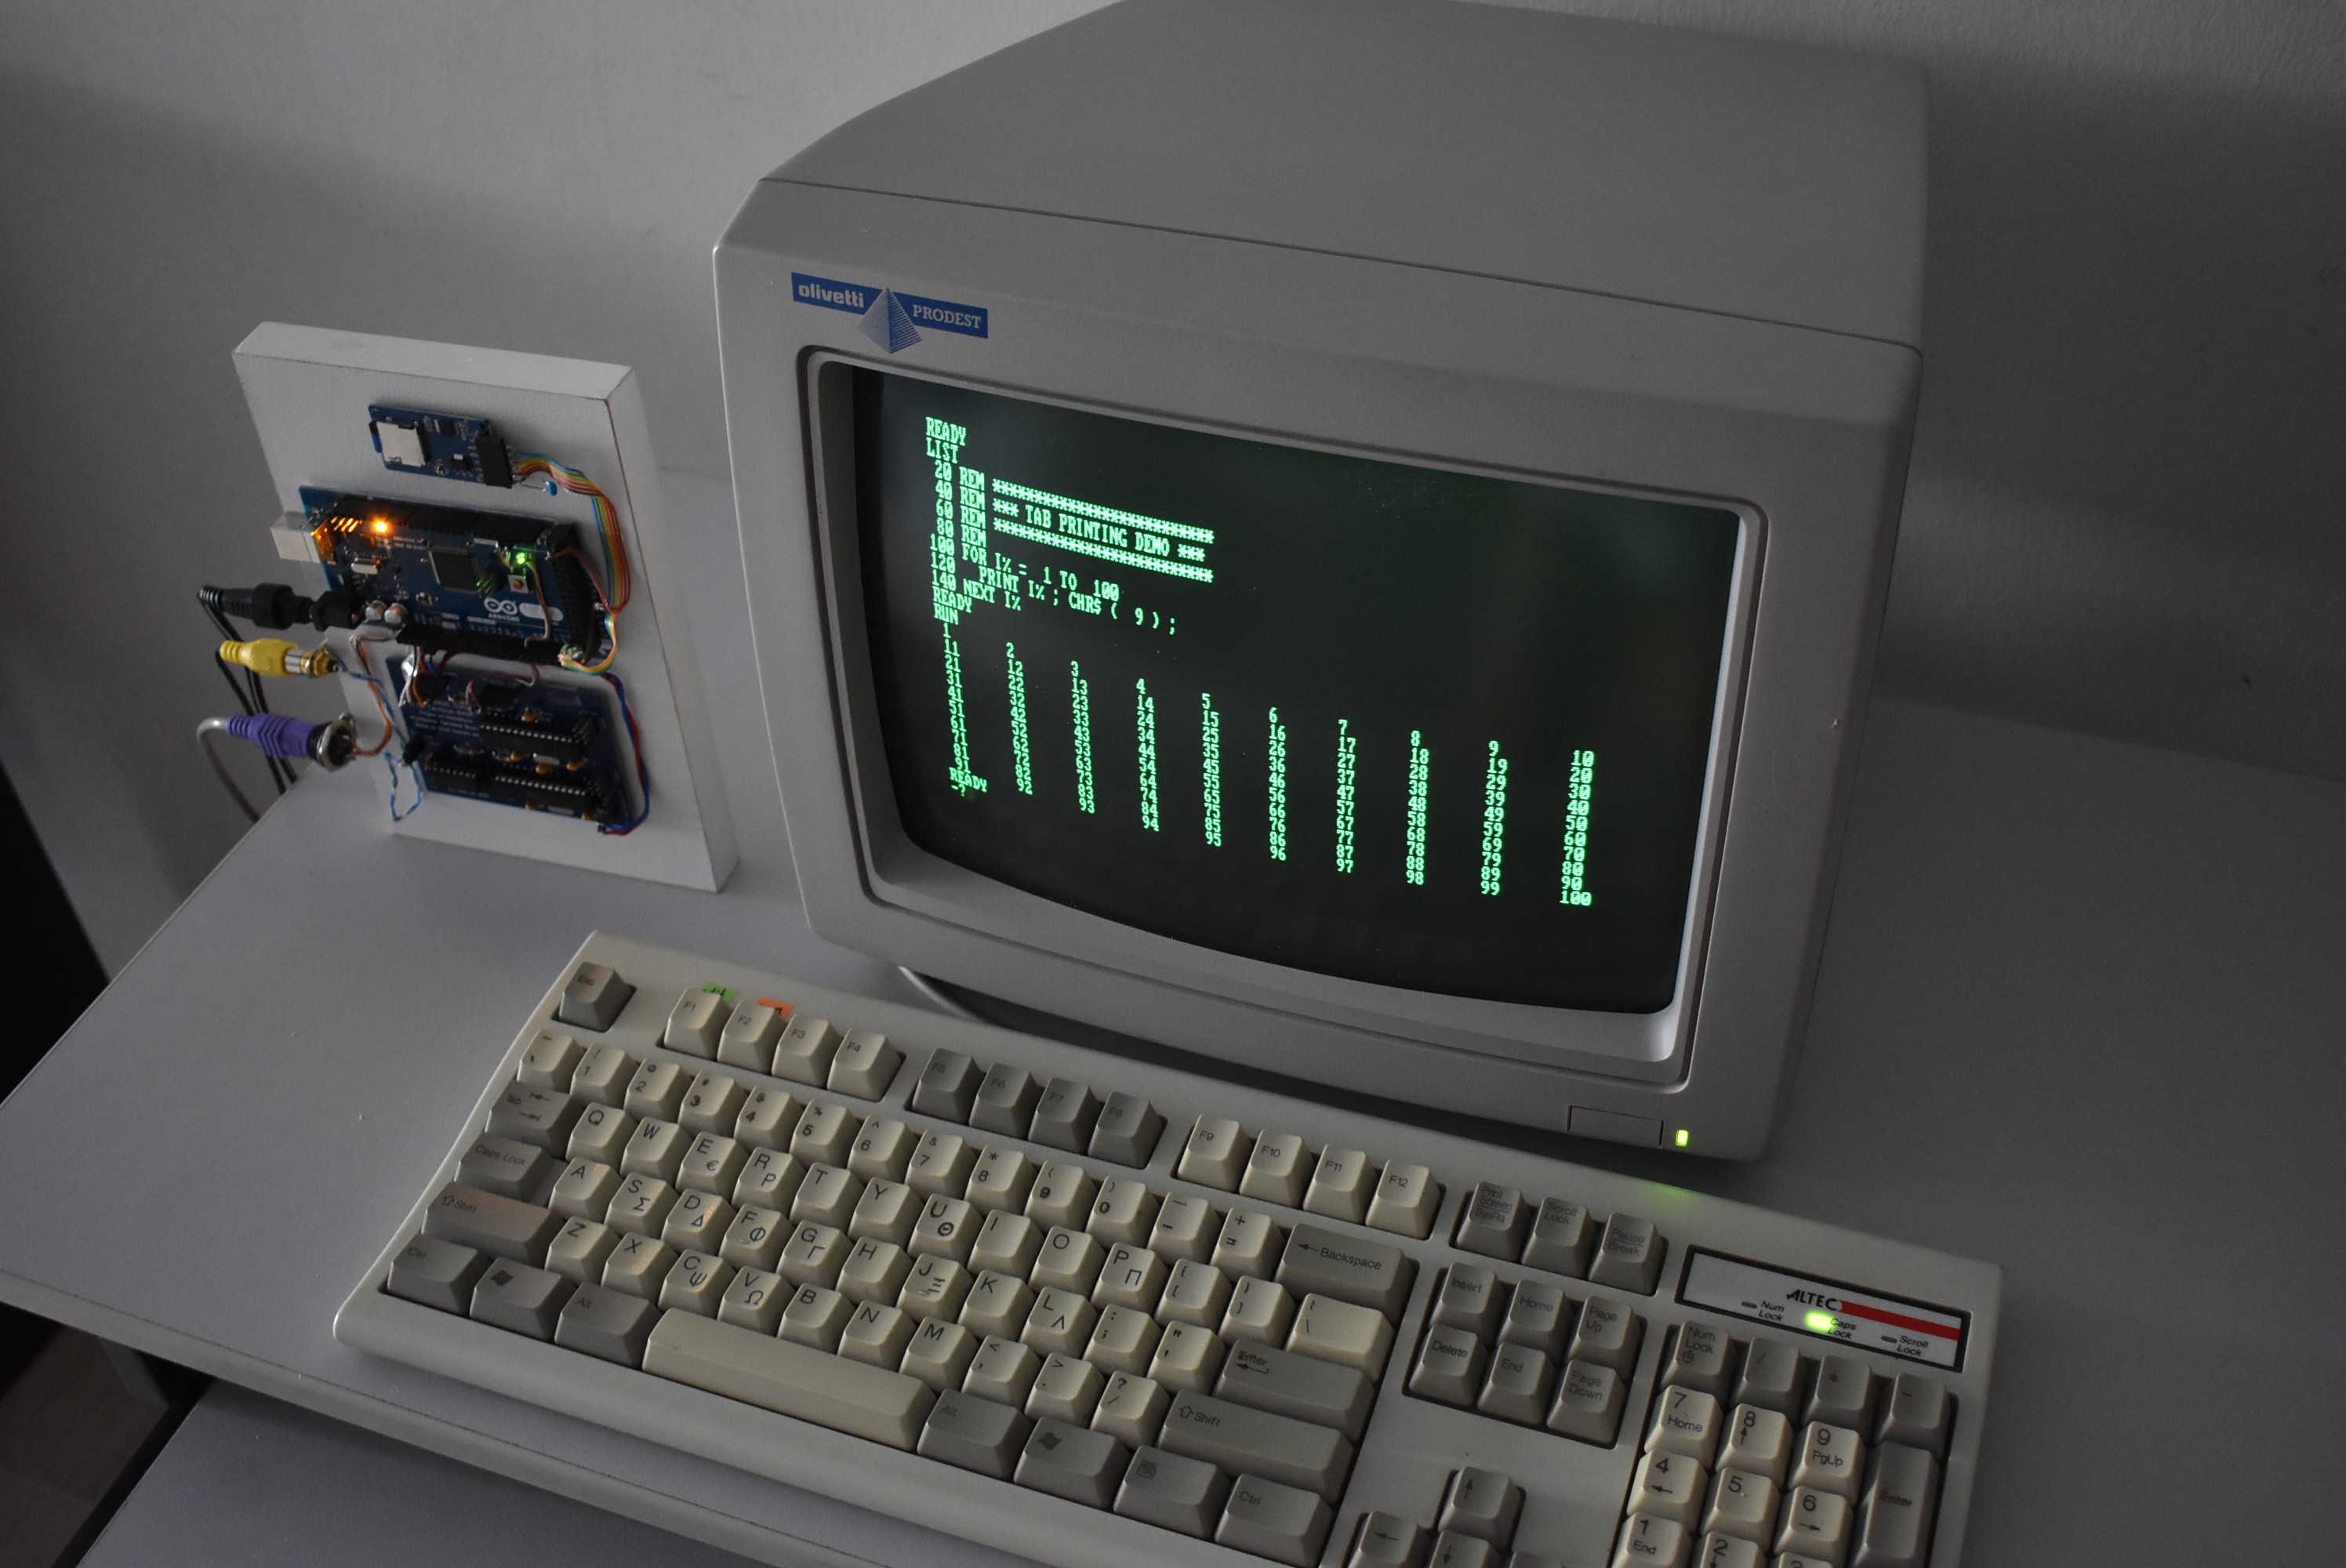
Now, this is a "Dummy Terminal" because it can only: a. read the keyboard and b. display characters on the screen; no processing of data takes place in it, hence the term "dummy". The terminal has a 80x25 characters resolution, which was the professional standard of the 80's computers, and just right for our purpose.

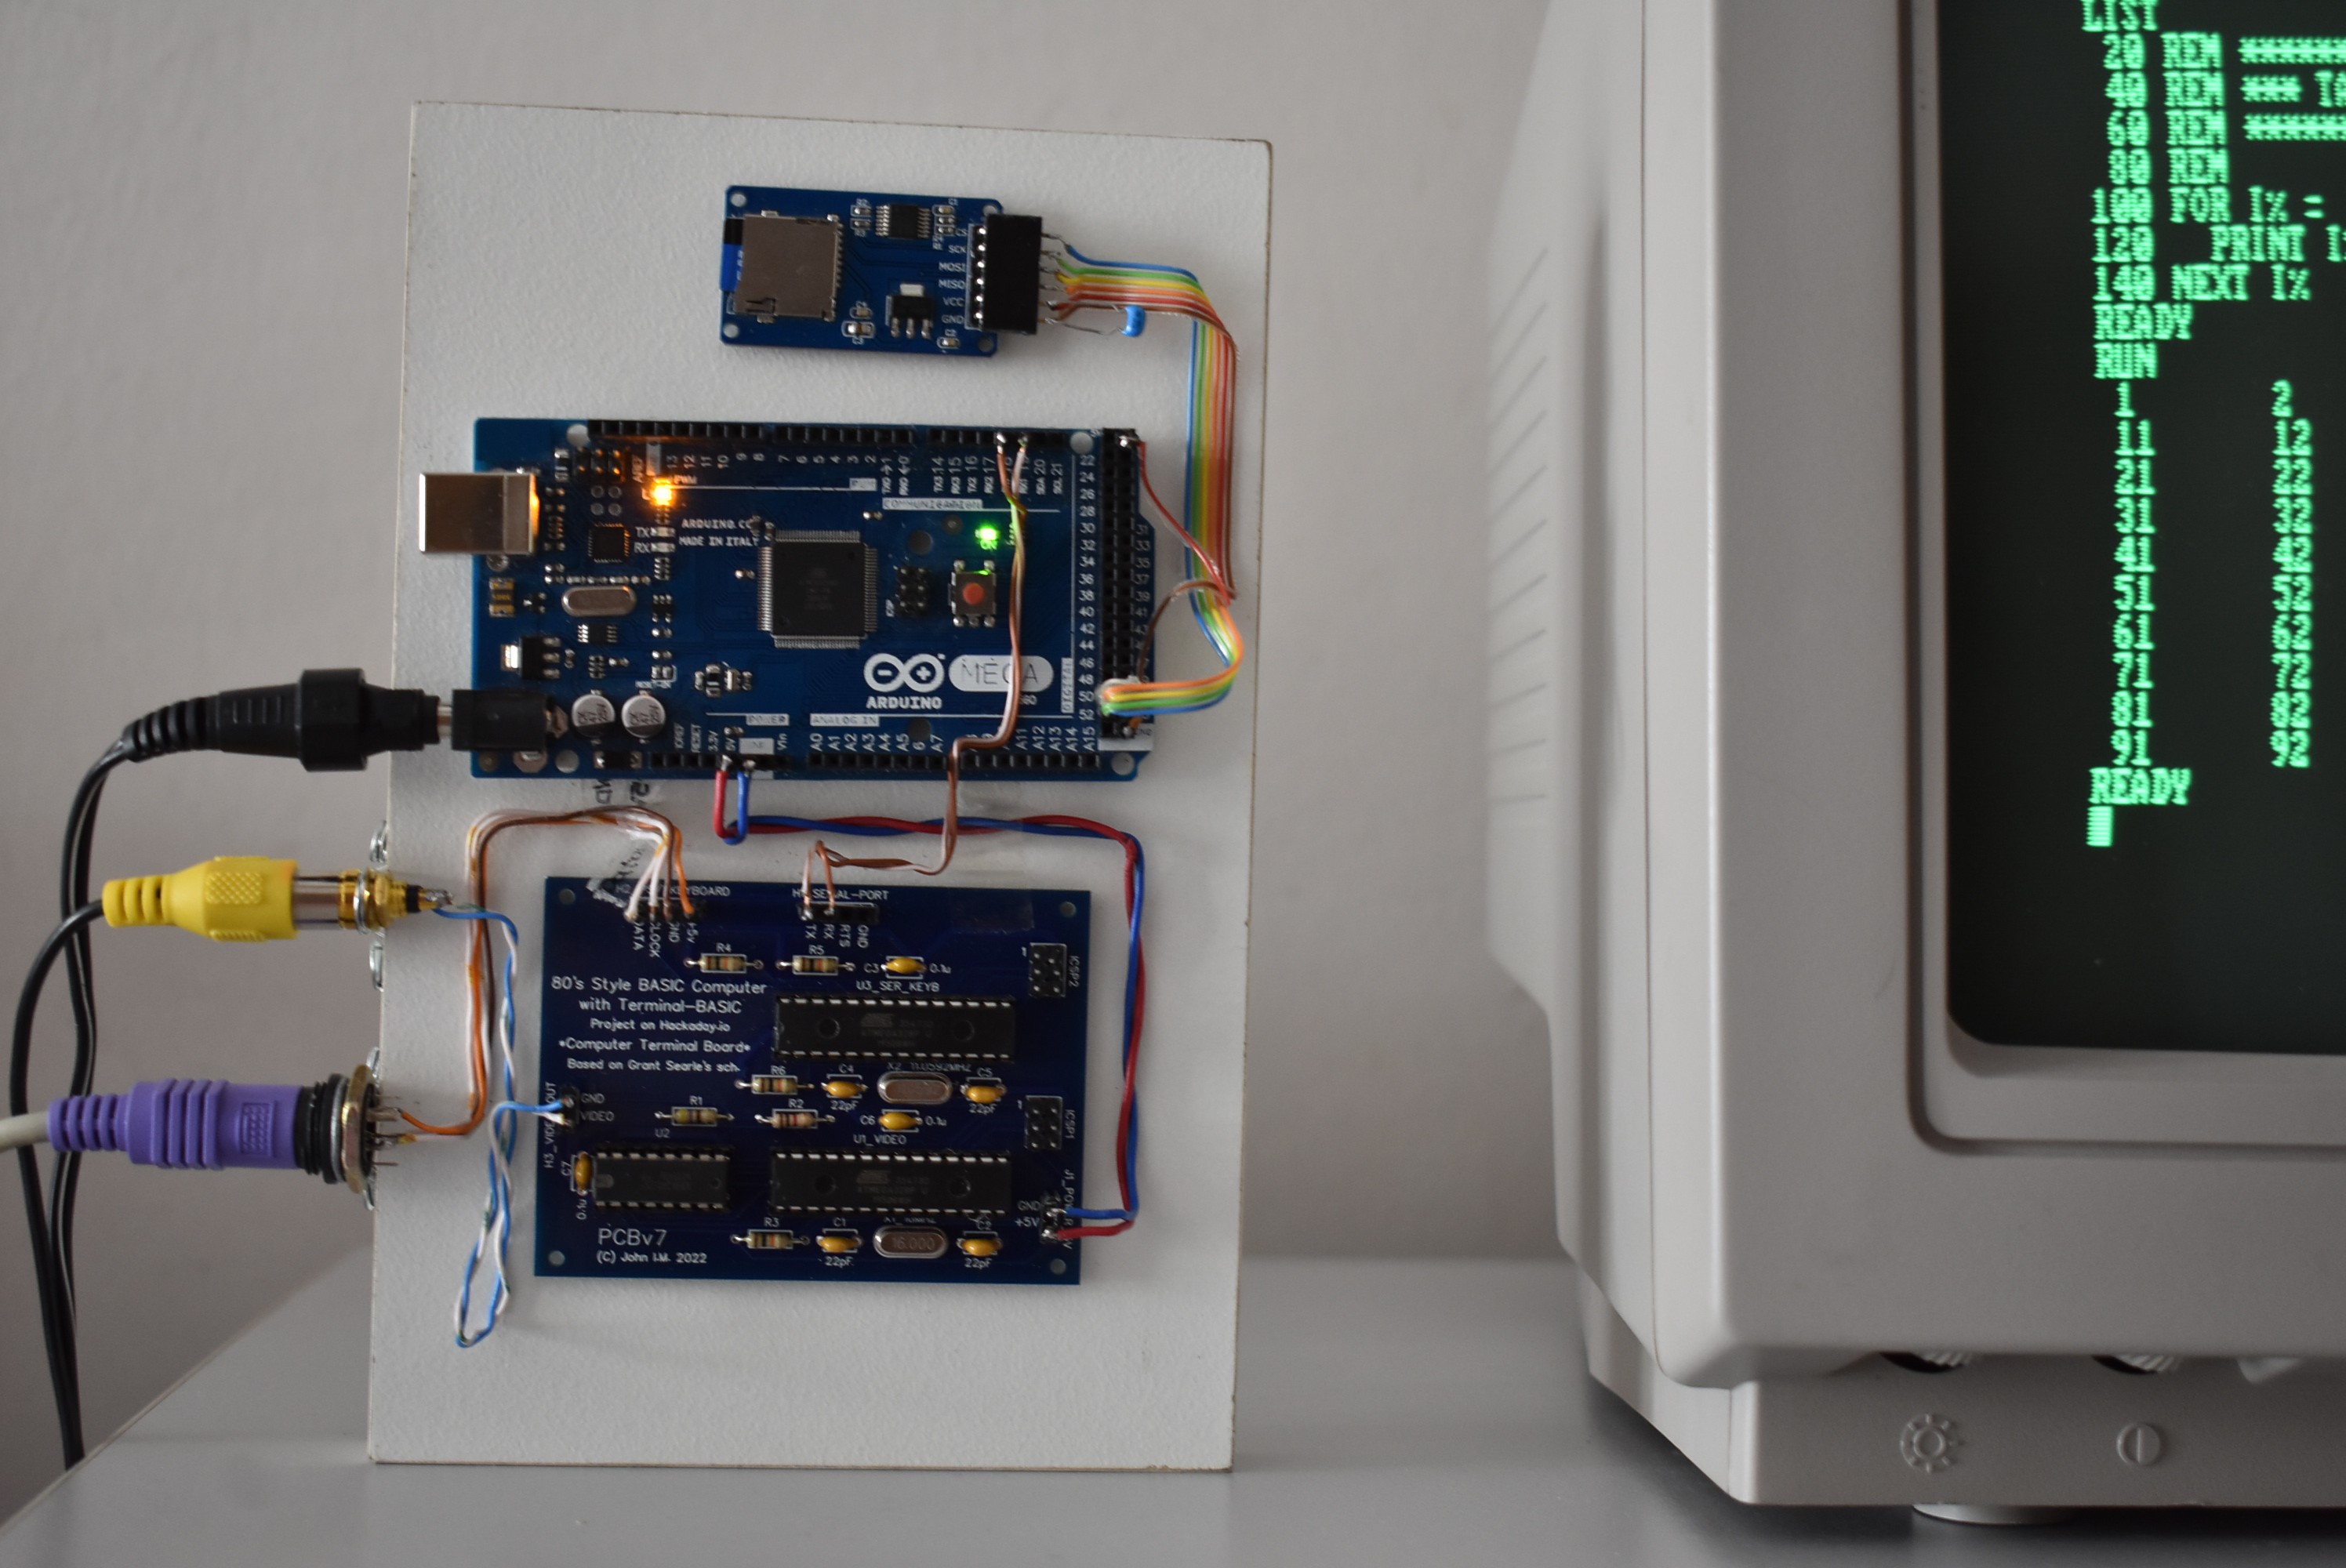
2. The "Host Computer" is made up of two parts: 1. The Arduino MEGA 2560, 2. A microSD-Card module. The Arduino MEGA runs the "Terminal-BASIC" language interpreter (by Andrey Skvortsov, check link). As soon as the MEGA boots up, the BASIC programming language is there and running. You can see the bootup message displayed and a  cursor waiting for you to type somethin in.
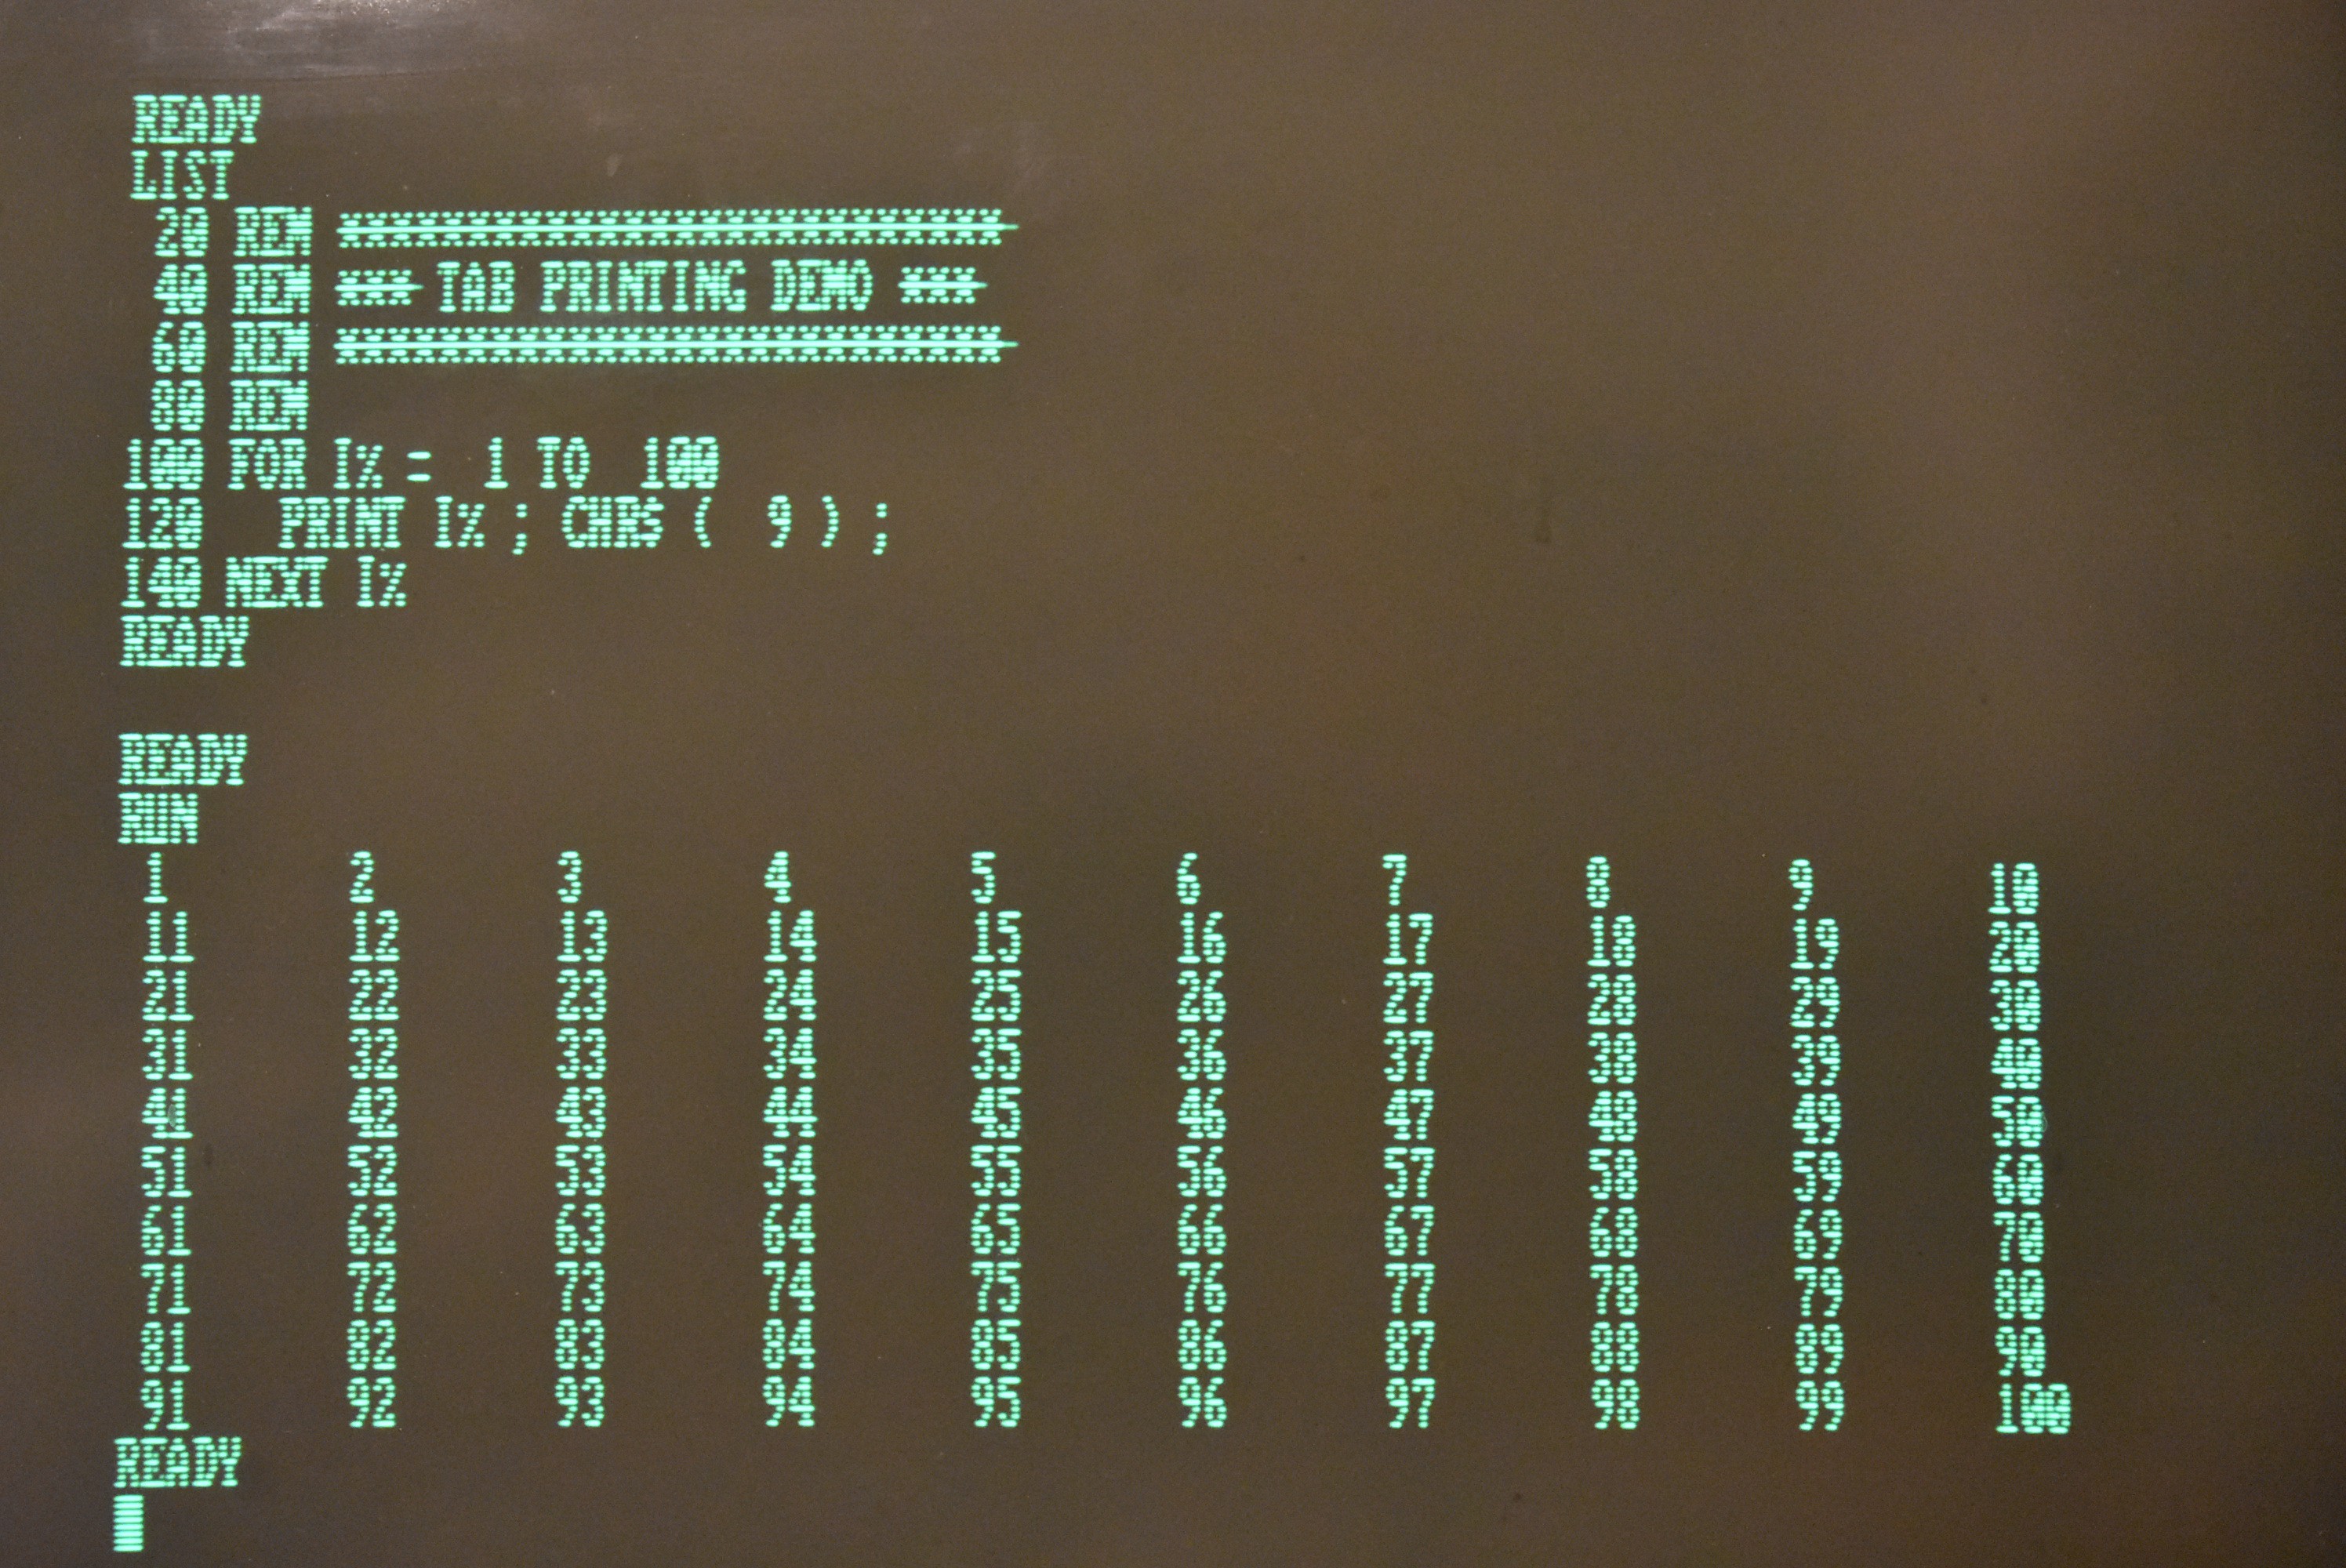
BASIC, in general, is a very straightforward and user-friendly programming language. Terminal-BASIC, in particular, which is used here, has a treasure of features.
The SD-Card module is the "hard disc drive" of the computer.
During the prototyping, I consulted Andrey Skvortsov several times to get help for setting the various config options; many thanks go out to him for being kind and eager to help.

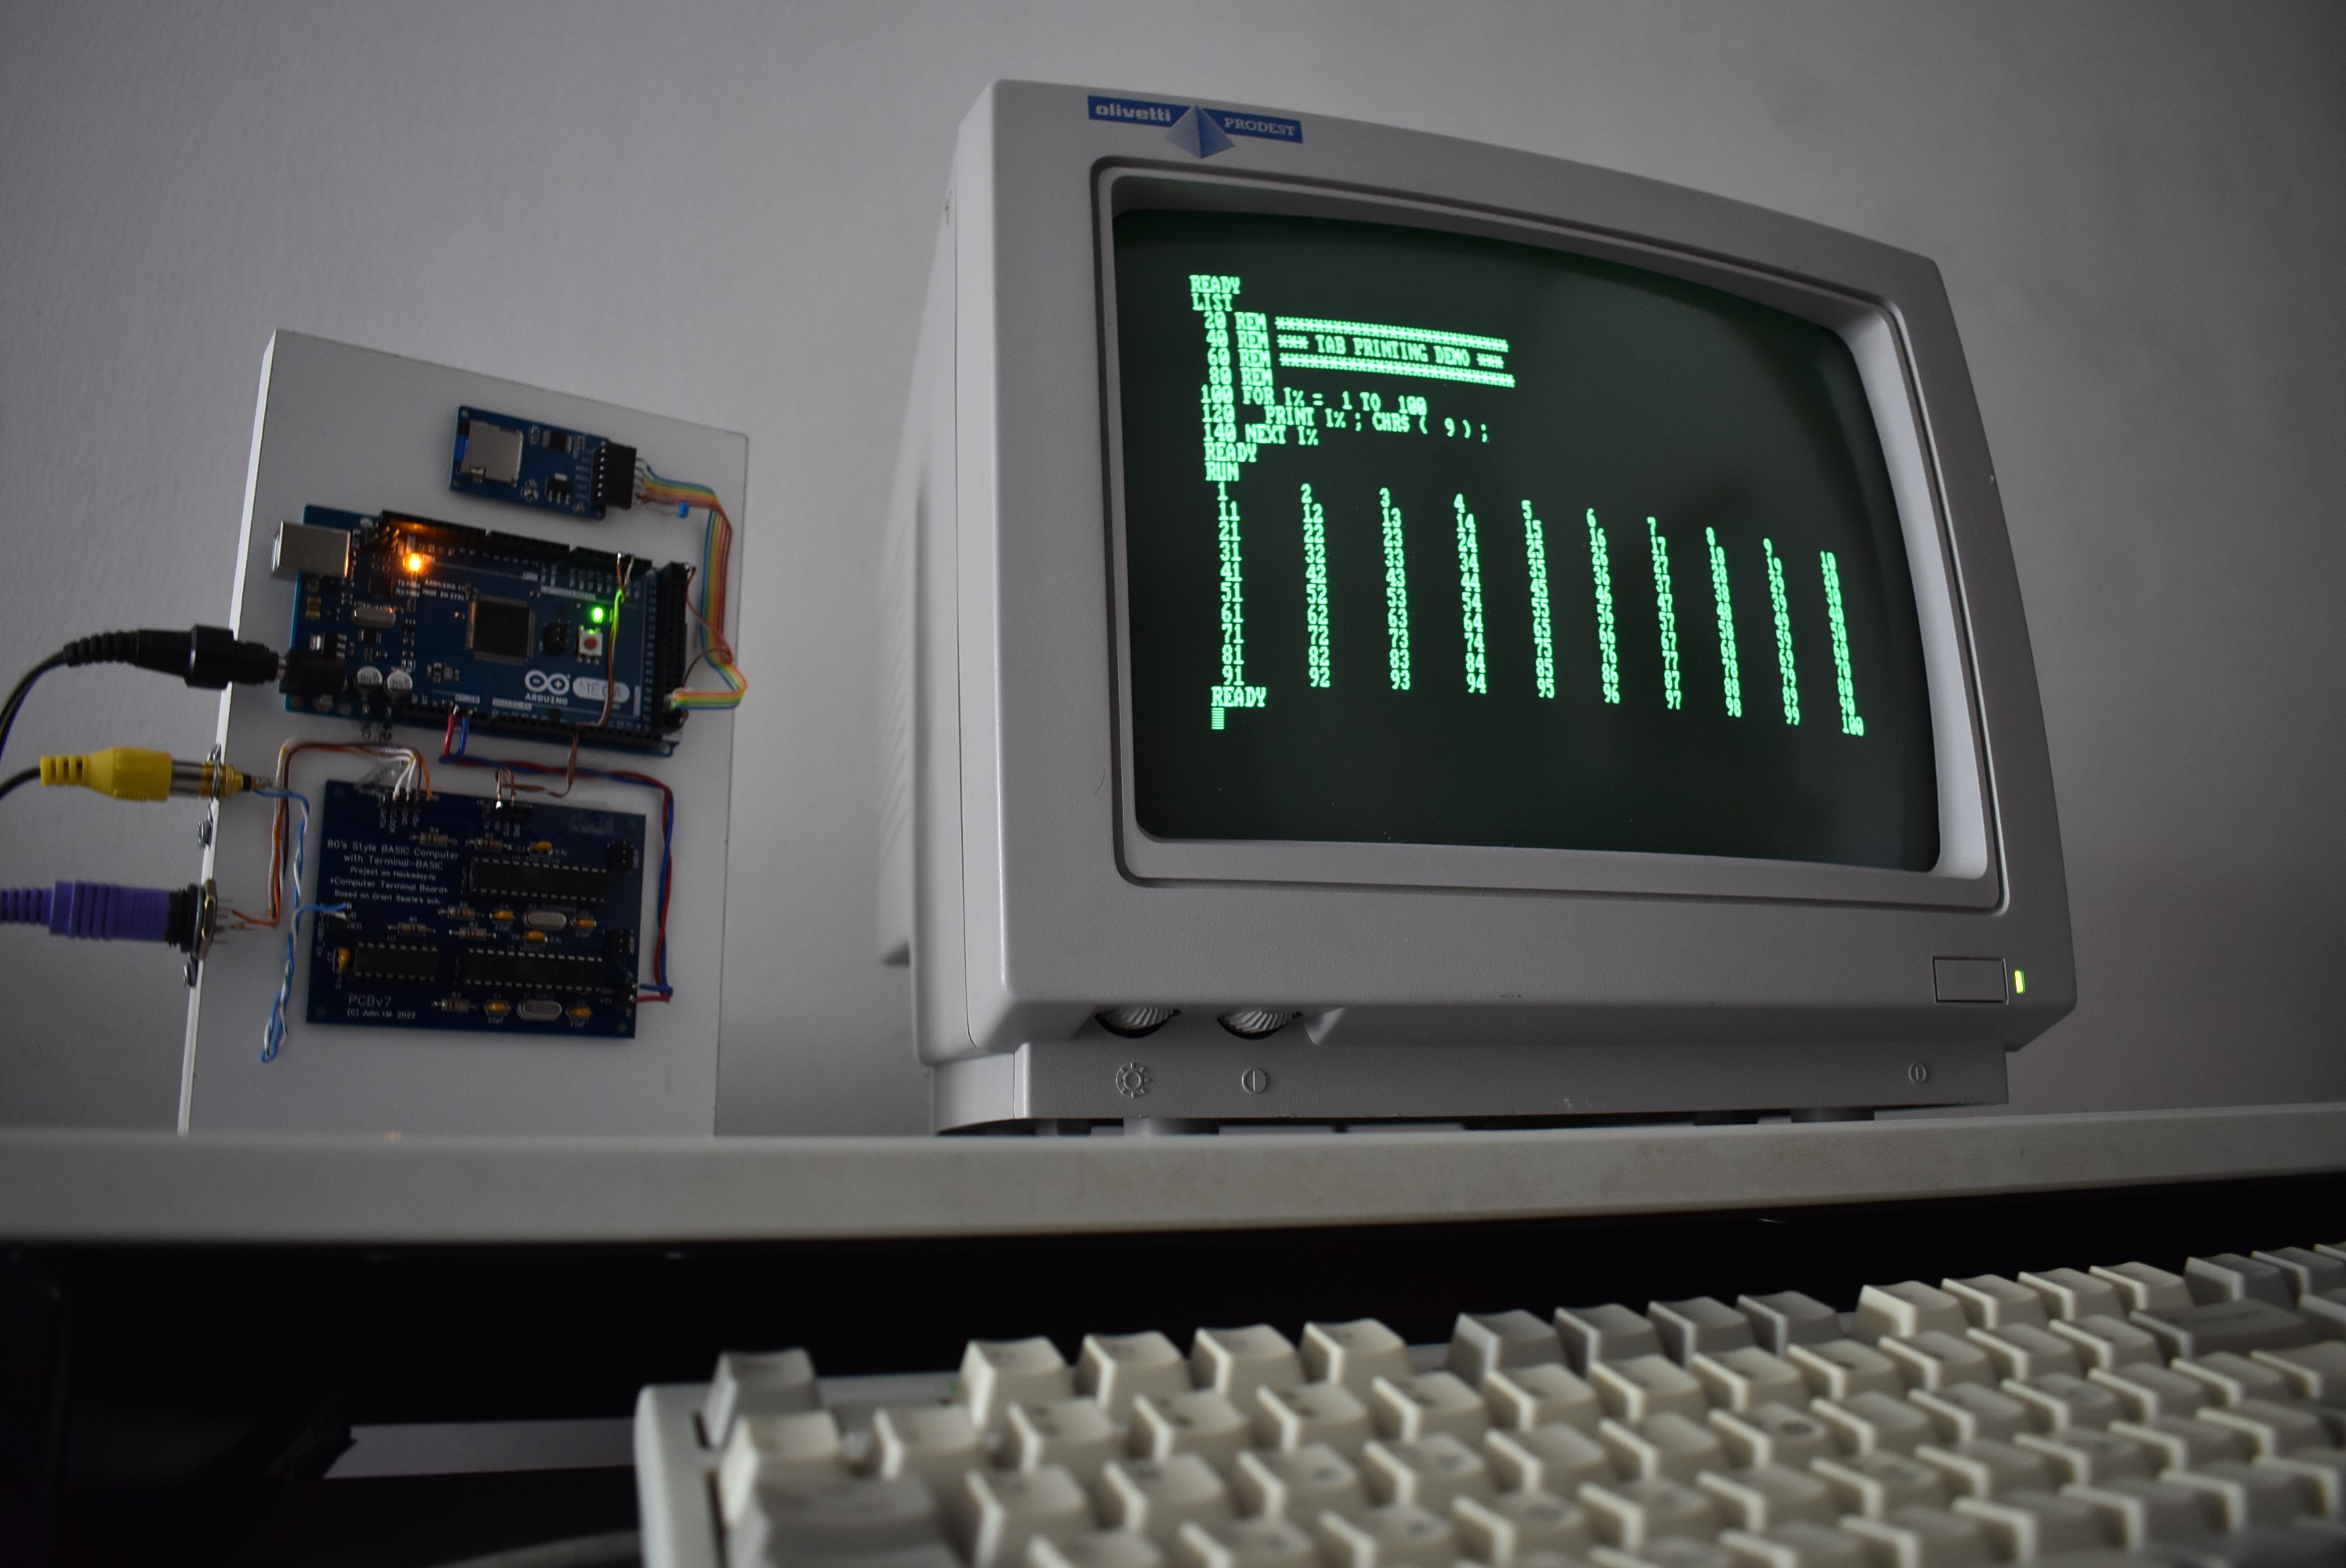
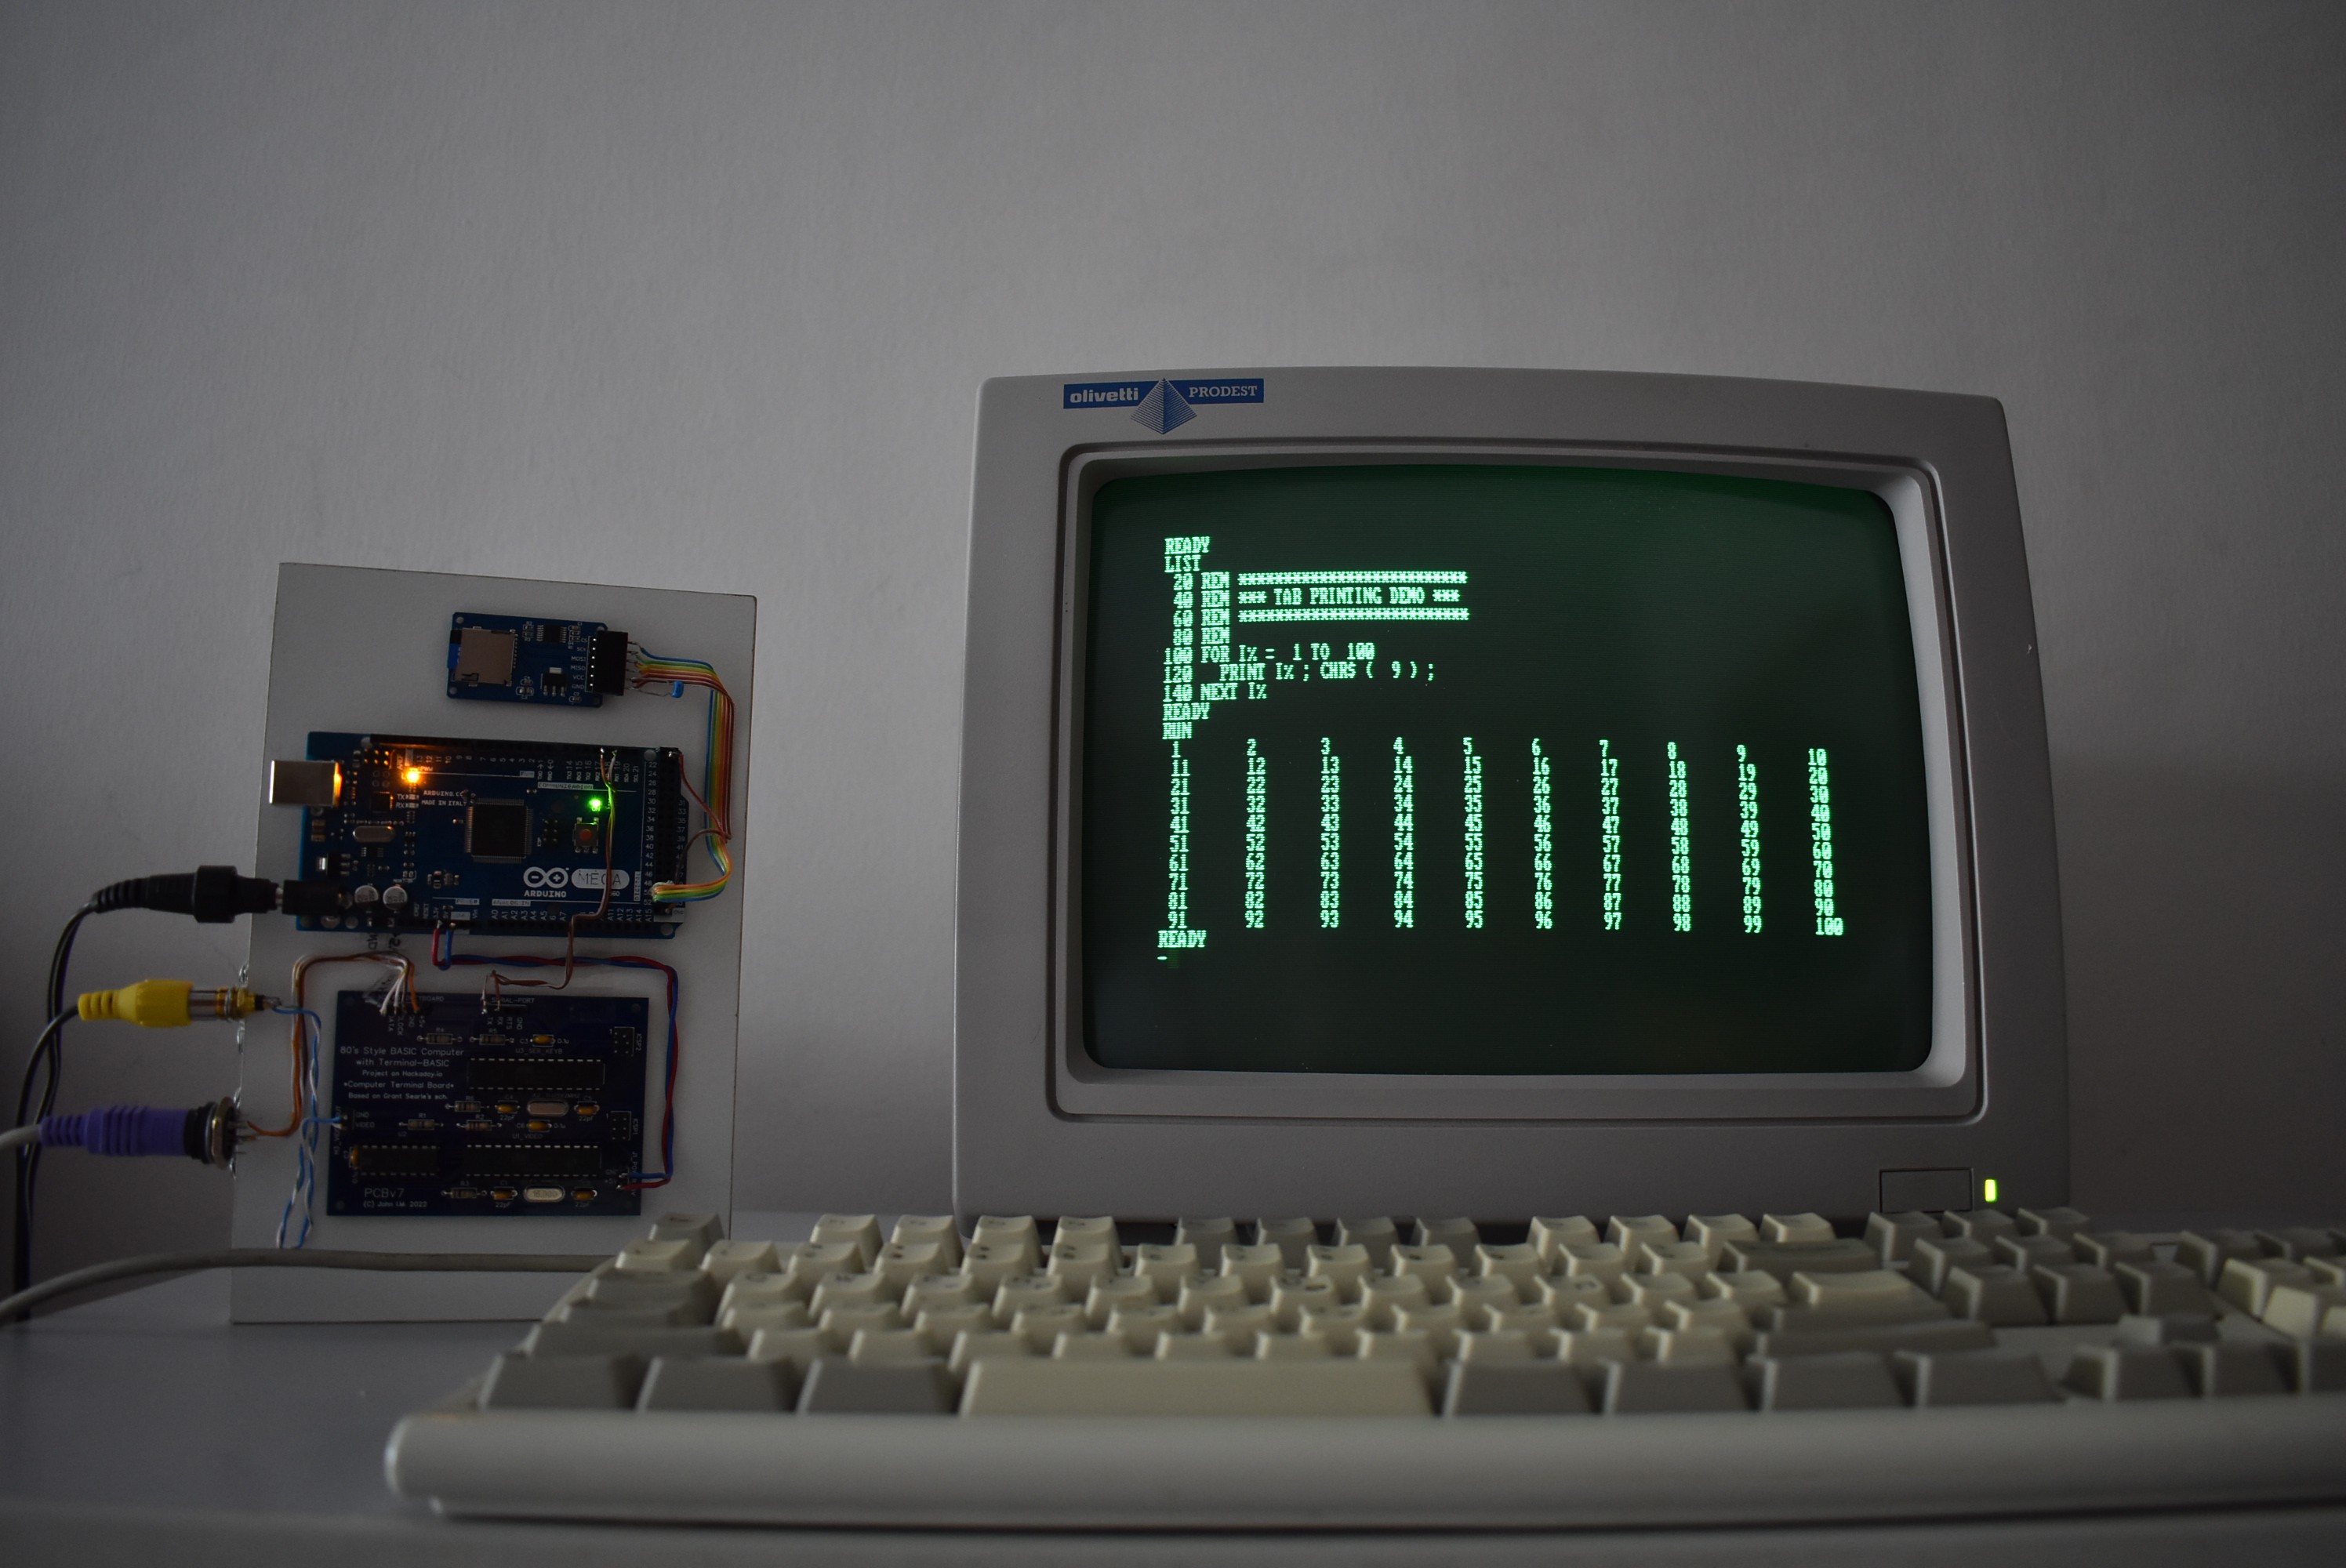
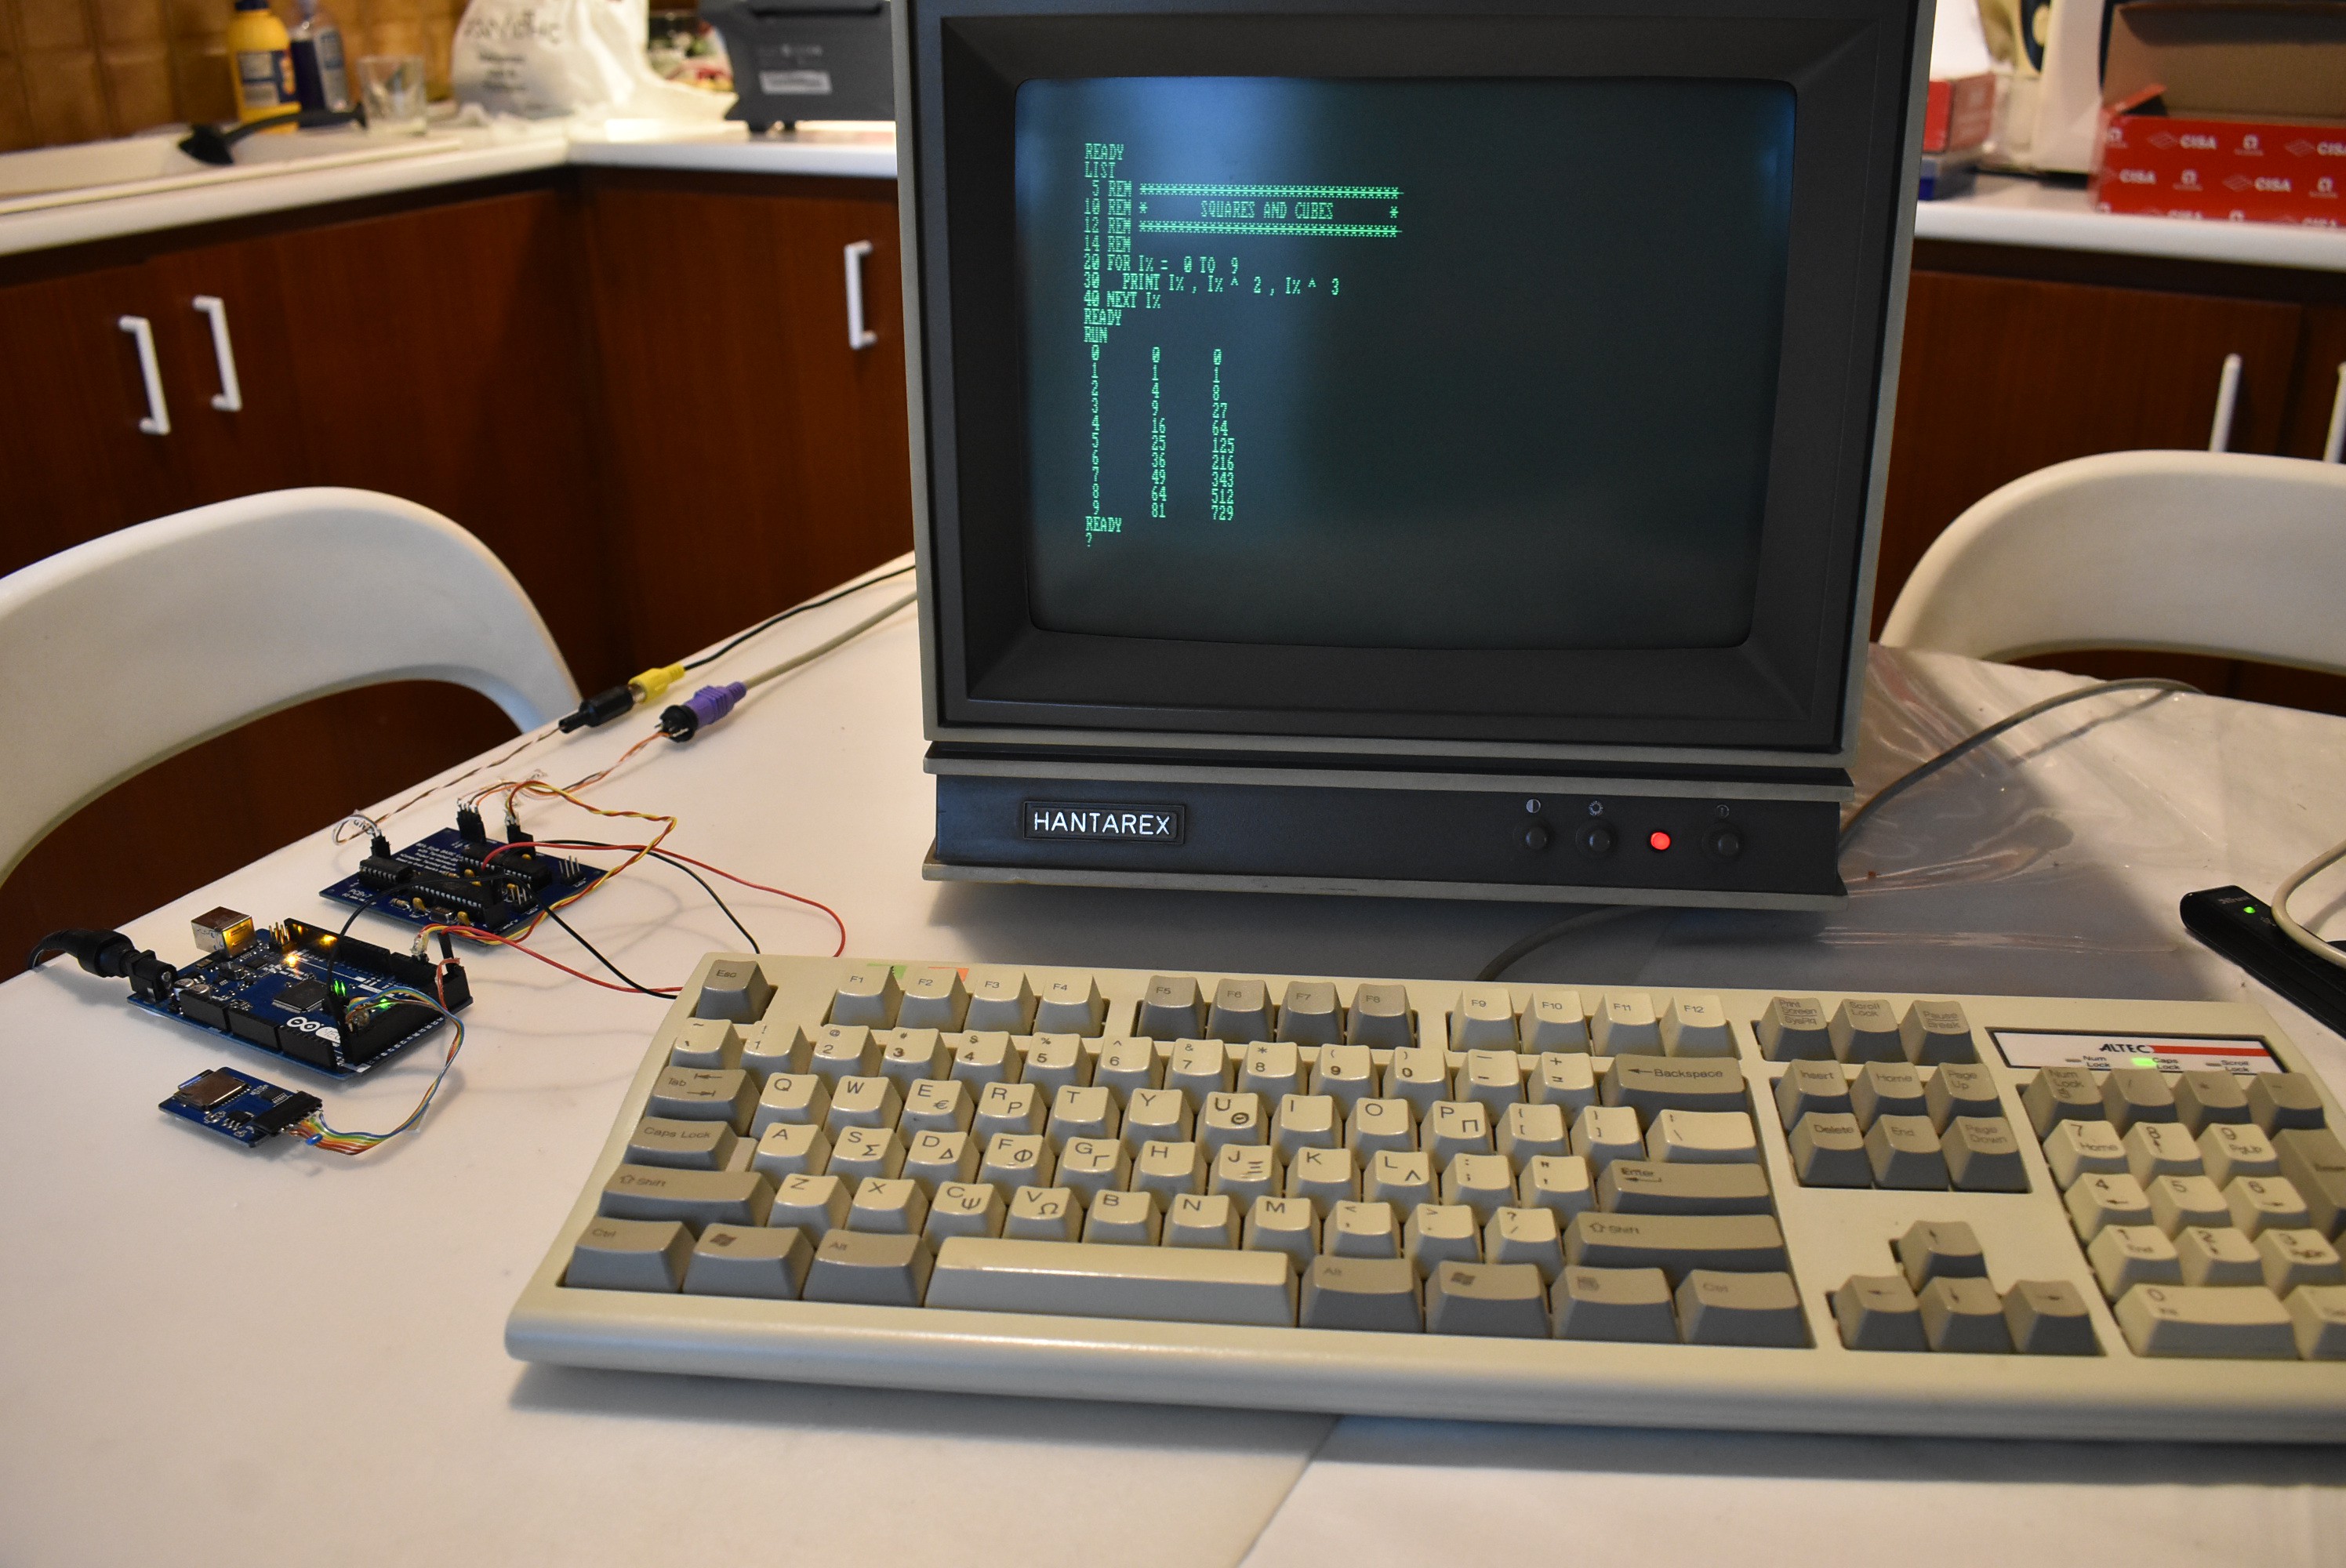
About the screen: The Screen used is a green-phosphor computer monitor, as seen in the pictures., and typical of the 80's era. The monitor sports a Composite-Video-Input RCA connector (or "cinch" connector)  that connects to the "VIDEO-OUT" of the "Computer Terminal Board. In case you don't have a computer monitor with a Comp Video Input, no worries: your modern LCD Smart TV has such an input, too. Look on the back side. Either it's a yellow RCA connector stating "VIDEO IN" or "COMP IN" (commonly next to a red RCA and a white RCA Audio connectors), or a green/yellow RCA (as is the case with my TV) next to a red RCA and a blue RCA; you only use the green/yellow RCA input in the latter case. Or, there may be a SCART connector with the typical trapezoid shape, which is good, again. You only need a "SCART to RCA" adapter. One more alternative is to use a CRT TV with Comp Video Input.

About the keyboard: A good ol' PS/2 keyboard is also used and this connects to the "PS/2KEYBOARD" connector of the "Computer Terminal Board". Important: Keyboard layout of the terminal is the original Searle UK layout, so the Quote symbol is Shift+2. Doesn't matter if your keyboard has the Quote symbol on the same key as the Apostrophe (next to the Enter key); you still need to press Shift+2 to get...

Read more »

  • Testing the BASIC Computer on Olivetti monitor and Altec keyboard

    John08/07/2022 at 20:58 0 comments

    I also tested the completed computer on an Olivetti monitor (that I own), and also a different PS/2 keyboard. Results were equally satisfying.
    I have to say I enjoy using the "Terminal-BASIC" programming language (by Andrey Skvortsov) which is the initial reason I put together the whole project of the "BASIC Computer"; it's user-friendly and quite versatile in its features.

    The Terminal-BASIC startup message greets you when you boot up the machine:

    The total hardware of this computer is really minimal: just 3 boards. The only board that needs to be assembled is the "Computer Terminal Board" (lower one of the three). The other two are out-of-the-shelf parts: microSD-Card module and Arduino MEGA2560 .


    More details on programming the chips for the "Computer Terminal Board" and assembling the board later. For now,  just take a look at the pictures and feel some magic of the 80's !  :-)

  • Assembling the PCB of the "Computer Terminal Board" and testing

    John08/07/2022 at 20:39 3 comments

    I started assembly of the board as soon as I had some free time: the next day after delivery. The necessary electronic parts are common and, anyhow,  I already had those from the breadboard prototype, which was dismantled to bits.

    The finished assembled "Computer Terminal Board" (with wire connections for the subsequent testing) can be seen below:

    Some testing was done (on the kitchen table!), as soon as I put together the whole system; that involved connecting the Arduino MEGA2560 (in the middle) to the microSD card board (on the right) and to the Computer Terminal Board I had just assembled (on the left). The colored plugs, in the upper part of the photo are, from left to right: 1. PS/2 Keyboard (purple) 2. Video Out (yellow) 3. Power input 7.5V (black)...

    ... and there you have it:
    The complete, working, "80's style BASIC Computer with Terminal-BASIC" ! 

    The computer monitor pictured here is a HANTAREX.
    The assembled "Computer Terminal Board" worked nicely as you can see in the photo; the picture on the monitor screen looks crisp and solid.

  • PCB's arrived !

    John08/07/2022 at 20:08 0 comments

    PCB's finally arrived  a couple days ago! I ordered them at:

    This is the first time I ordered PCB's from them. And it was a wise choice.
    The merchantise was carefully wrapped in foam plastic foil and the PCB's were nicely stacked and vacuum packed.

    The quality of the PCBWay's boards is really high! All tracks, vias and pads are perfectly reproduced; I especially stress the vias because they are a very delicate kind of pcb tracks. Moreover, I know that the boards go through a continuity test at the factory, to verify that all connections work as expected.  So I had peace of mind I wouldn't need to worry about any such defect; and this is great! Before I go on with populating the board, lemme show you what the actual bare board looks like:

    And this what I expected to see, according to my design (this is a preview from the CAD app):

    The real thing looks exactly as it should have,  according to the Gerber files I uploaded on their web site. So, very accurate fabrication of my design.

    I must also mention that the whole process of ordering from PCBWay and tracking the package was simple and swift. Boards arrived within a few days.
    I definitely recommend PCBWay for quality manufacturing of your own pcb's.

  • A Printed Circuit Board (PCB) for the project

    John07/14/2022 at 17:22 2 comments

    So, I decided to design a PCB for my project. This PCB hosts the "Dummy Terminal" circuits and is referred as "Computer Terminal Board" on the PCB. I used Grant Searle's schematic of the "Video & Serial/Keyboard Interface" (named "Video&Keyboard,SerialBoard" in the project Details section), with just minor modifications:  1. I added two ICSP ports for programming the microcontrollers without physically removing them from the circuit. 2. Decoupling capacitors were added to all 3 ICs.

    This particular design of the PCB is double-sided with vias.

    As soon as I receive the actual boards I'll post some update. Hopefully, this PCB will give the "80's Style BASIC Computer with Terminal-BASIC" a more robust "body" after the successful testing of the project on breadboard.

    P.S. About the ICSP headers: The need to add ICSP (InCircuitSerialProgramming) headers on this board was realized when I tried to modify the software in the ATmega328P's (specifically, the "Video" ATmega328P) in the breadboard prototype. Each and every time, I had to remove the chip from the breadboard and insert it into a separate programmer (STK500); this proved to be cumbersome. The other alternative is to leave the chip on the PCB and use ICSP programming; for that, you use only 6 pins of the IC, which are broken out to the ICSP header. Just connect a serial programmer to the ICSP header (I used the STK500) and program the chip in place.

View all 4 project logs

Enjoy this project?

Share

Discussions

Andrey Skvortsov wrote 06/01/2022 at 11:34 point

A little example for inspiration :)

  Are you sure? yes | no

John wrote 06/01/2022 at 15:14 point

Impressive thing. How old is that?

  Are you sure? yes | no

Andrey Skvortsov wrote 06/01/2022 at 18:16 point

This is a first USSR personal computer ДВК (Dialog Computing Complex), created around 1981.

It consists of a microcomputer unit and terminal 15ИЭ-00-013 with interfaces simlar to RS-232/RS-422

  Are you sure? yes | no

John wrote 05/31/2022 at 22:15 point

I heard stories of eye strain with really old tech monitors. Maybe those screens weren't well designed, eyesight-wise. The screenshot photos I have here, though,  are from a late 80's quality monitor. I should remind readers that back in the eighties, popular home computers came without a screen; they were standalone compact boxes with integrated keyboard. Those "personal computers" had to use your home TV set as a monitor (connected to the antenna input on the back). So, connect computer to TV and start typing away. Well, imagine how (not) easy that typing was on someone's eyes: Your eyes had to change their focus from the 40 cm's distance when you looked at the keyboard to over 2 meters  when you looked at your TV; imagine doing this repeatedly for hours. Not good. Best solution was to buy yourself a green monitor and give your eyes a break. Me, after using my ZX81 and ZX Spectrum home computers daily for a couple years (on a TV), I did exactly that: went for a green monitor. We had European brands offering good CRT monitors (no TFT back then). I bought an Italian HANTAREX  - still running smoothly- and more recently I got an Italian Olivetti on ebay. These are both very good quality and comfortable for the eyes. The screenshot photos I posted here are from the Olivetti.
Having said that...
Yes! The look of Terminal-BASIC on a green CRT monitor is magical, indeed! :-) 

  Are you sure? yes | no

Andrey Skvortsov wrote 06/01/2022 at 11:30 point

Yes, I'm sure, that CRT's quickly become relatively safe during it's progress in 60s-70s. May be early ones have significant parasitic rays of electronic beam and secondary radiation. Especially when you have weak eyes and should look at monitor very close.

  Are you sure? yes | no

Andrey Skvortsov wrote 05/31/2022 at 09:34 point

That green CRT screen with running BASIC looks absolutely magical!

But old time monitors weren't soft and tender that times. I know an outstanding programmer, who worked with at least 3 generations of computers from late 60's till now. And in 70's he got a serious eye disease after spending endless hours working with small green luminophore CRT monitor of Soviet IBM360 clone.

  Are you sure? yes | no

Similar Projects

Does this project spark your interest?

Become a member to follow this project and never miss any updates