-
Sensing the RF
08/21/2014 at 02:18 • 0 commentsIn my project I have to detect presence of short pulses sent by the transmitter. The detector must be robust, must be able to automatically adjust to changing signal and noise levels, and provide a mechanism for recording geographic coordinates of the location where the signal was detected. After quick scan of available GnuRadio modules I decided to implement the detection myself, because none of the existing modules was able to do the job.
My implementation is split into three blocks, that can be connected together to form a pulse detector. Each of the blocks can be used independently of the other.
Computing stream statistics
The detection method I chose uses comparison of the momentary signal level to the threshold computed dynamically based on mean value and standard deviation of the input signal. Classic formulas that can be found in the books assume that the statistics is calculated for all samples. Since I am interested not in overall statistics of the signal, but in the conditions at most k samples earlier (where k is the window size in samples), I had to find a way to calculate statistics over a finite window.
Computing average value over a window is pretty simple, however standard deviation is much more challenging. After a long search I found this post. Although the math may look intimidating at the beginning, the principle is very simple: the value of variance of the signal is computed using partial sums updated for each sample. As new sample is coming, its value and a square are added to the partial sums, and the values and squares of the sample from k steps away are subtracted. With this simple trick each of the partial sums contains only values for samples between time moments n-k and n.
Detecting the pulse
[TBC]
Logging the data
[TBC]
General structure of pulse detector
![]()
-
Architecture of the box
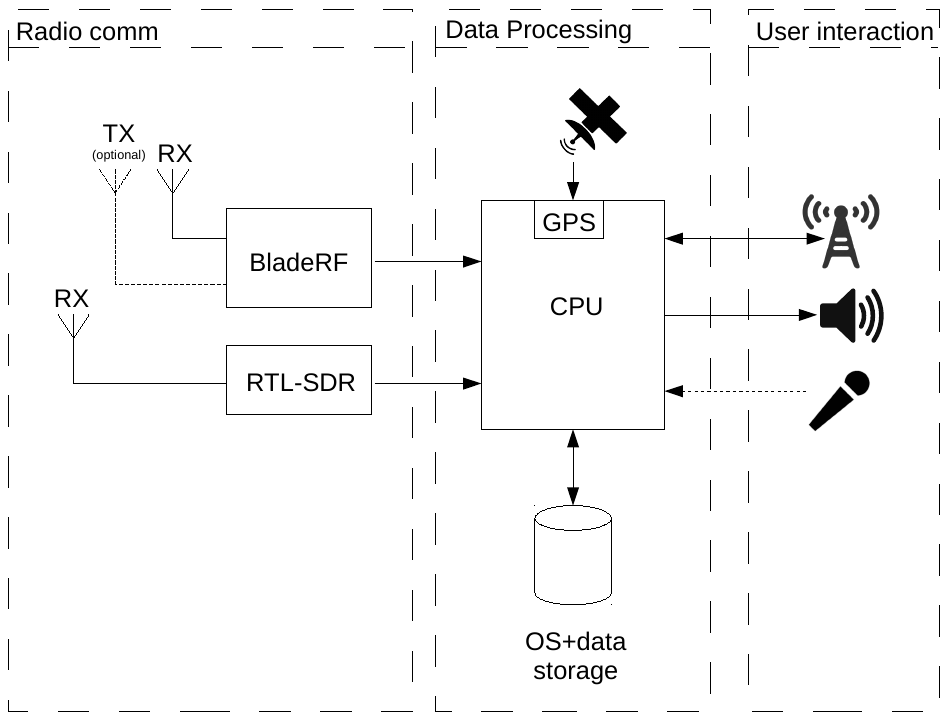
08/21/2014 at 01:16 • 0 commentsMy goal in building The Box was to have a universal and portable platform for experiments with software radio. The other goal was to only use components that I had at home. These two conditions shaped the overall hardware architecture of the system.
Hardware design
At the center of the is the processing unit. Since I was going to use GnuRadio as the application building platform, and the system was supposed to be able to work unattended, linux was an obvious choice for the operating system.
I was going to use a low-power ARM board, however initial tests had shown that DSP applications will be too computationally intensive for a small processor. Since I had at home an Intel Atom micro-ATX motherboard, it become the heard of the system.
The radio interface contains two receivers: one is a cheap RTL dongle, the other is much more capable bladeRF.
Since the system will not have external HMI devices (keyboard, mouse, monitor), there must be a way to access it remotely. First I was planning to use serial-to-bluetooth adapter to access the console running on serial port, however it quickly found it too limiting. Since data transfer over cell network was not an option (slow, expensive, limits on amount of transferred data, no incoming connections), use if wifi looked like the most promising idea. Since I am going to use the system away from places with wired networks, I had to install an access point inside the box and allow other devices to connect to it. I could either install the access point as a separate box, or use hostapd to run the access point on the main system. After searching the web and confirming that my wifi dongle supports AP mode, I decided to use the latter method.
![]()
Software architecture
For a device that is supposed to be a universal platform, it's difficult to discuss software design in details. For me it is an RF sensing device, for somebody else it can be a wideband radio scanner or GSM base station.
I started to describe details of configuration of the operating system and tricks I used to make life easier (installation of OS using Virtual Box, using non-standard configuration of GPS receiver with gpsd) and I will be adding in the future more tutorials summarizing what I learned while building the project.
Configuration files will be published in project's github repository.
-
How to convince gpsd to talk to your GPS
08/18/2014 at 06:09 • 0 commentsgpsd is a wonderful tool. It allows many programs to talk to one GPS device, without problems with resource allocation conflicts. The library linked to user apps takes care of parsing all the information and outputs easy to digest numbers.
As awesome as the software is, it has several disadvantages. The most annoying of them is how the program handles detection of speed on serial port. The authors insist on not allowing to inform the daemon about bit rate and auto-detection not always works as it is supposed to work.
I had a misfortune of dealing with one of such cases. The GPS was sending data at 115.2kbps and gpsd was insisting on talking to it at 4800 or 9600 bits per second. The workaround for this problem was simple: set the port speed to 115200bps and add it to the running daemon:
stty speed 115200  </dev/ttyUSB0
gpsdctl add /dev/ttyUSB0
While this method can be used in interactive work, in embedded system which has to work unattended, adding device manually is completely unacceptable. In this case all the work must be done by the startup scripts.
What are the startup scripts? These are small programs that are executed in a specific order when the OS boots and perform all operations necessary to prepare the computer for work (configure network, start sshd for remote logins, start graphical environment, etc). In the past these used to be small shell scripts, but as systemd replaces the old BSD or SysV style scripts, the startup scripts are replaced by configuration modules, which do not look at all like a piece of executable code.
The advantage of the new method is flexibility and configurability. No more manual coding of order of execution, independent services can be started in parallel speeding up the start of the system, starting services when they are needed, however all those goodies come at the cost of increased complexity of configuration.
The systemd unit that would add the gps to gpsd has to meet the following criteria:
- be executed after gpsd successfully started,
- set serial line speed,
- add the gps to gpsd.
Using dhcpd script as a template I came up with the following configuration:
[Unit]
Description=add gps device
After=gpsd.service

[Service]
ExecStartPre=/usr/bin/stty speed 115200 -F /dev/ttyUSB0
ExecStart=/usr/sbin/gpsdctl add /dev/ttyUSB0

[Install]
WantedBy=multi-user.target
The most important parts are the After line in Unit section and the entire Service section. The After statement tell the dependency resolver to start our new unit after service gpsd is ready. No more messing with priority levels, systemd takes care of executing configurations in proper order.
The Service section is a bit tricky. The most important line (and for many units the only line in this section) is ExecStart statement: This command starts the main service. However, there is a catch: the action listed here must be a single command, specified with absolute path. No chaining commands with semicolon is allowed ("sh -c" trick might work, though). This means that the two commands have to be run by a separate script (ugly), or I could execute command started before the main statement, using ExecStartPre. There can be many ExecStartPre statements, all of them have to complete successfully. if any of the commands fails, the whole unit fails immediately. There unit can also start post-execution statements started by ExecStartPost (to clean up after the main program), but I don't use this feature here.
The configuration unit has been saved in /etc/systemd/system/add-gps.service file and added to the list of units executed at startup with
systemctl add gps-add
More information about configuration statements can be found in systemd service reference manual.
-
Using VirtualBox to install OS for an embedded system
08/17/2014 at 23:19 • 0 commentsEmbedded systems are fun to play with, but installation of the OS can be a real pain. In my case the OS was not a big problem (I'm using a plain, old, boring PC hardware, after all), but as usual, the devil lurks in the details. In my case none of the monitors I have at home was able to display the video signal from the board (23" Dell LCD went just blank, while 17" LCD at least showed a message about unsupported video mode.) The only device that worked properly was a projector. Being a lazy brat as I am, I decided to not to stand at the projector holding the keyboard in one hand and the board in the other, and hack the entire process without touching the target board at all. Enter VirtualBox, a full PC system in a small window on the monitor.
The advantage of using virtualized environment is that I can use a system that is very similar to my target environment from the comfort of my desk, without a need to touch the target board until the software is ready to use. This also allows to do most of the time-consuming tasks, like compilation of big software packages (gnuradio in my case) on a fast machine, avoiding the pain of cross-compilation if the target OS is different than the one I have on my computer.
The disadvantages of this approach arise mostly from the fact that the emulated system is not identical to the one on which the software will be running.
The system I decided to use is Fedora 20, however most of the steps are OS-agnostic and the process can be applied to pretty much any PC operating system. I will also assume that the reader has VirtualBox installed and is familiar with basic operations, like creation of a virtual machine or booting and working with VMs.
The machine that we'll create should be as similar to the target system as possible. This includes width of the CPU word (32/64 bit) and amount of RAM. If the virtual machine does not support some of the peripherals we have on the board, the lowest common denominator should be used (e.g. use basic VGA graphics mode instead of higher-end accelerated graphics that would be used on the target board.) VM-specific drivers must not be installed in the system, as they may cause big problems in the target environment.
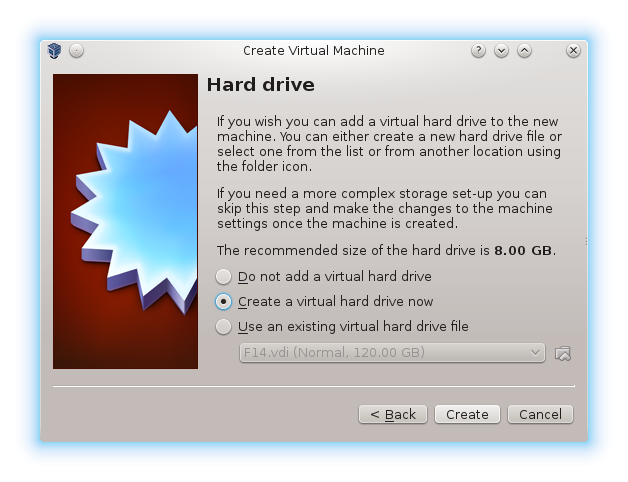
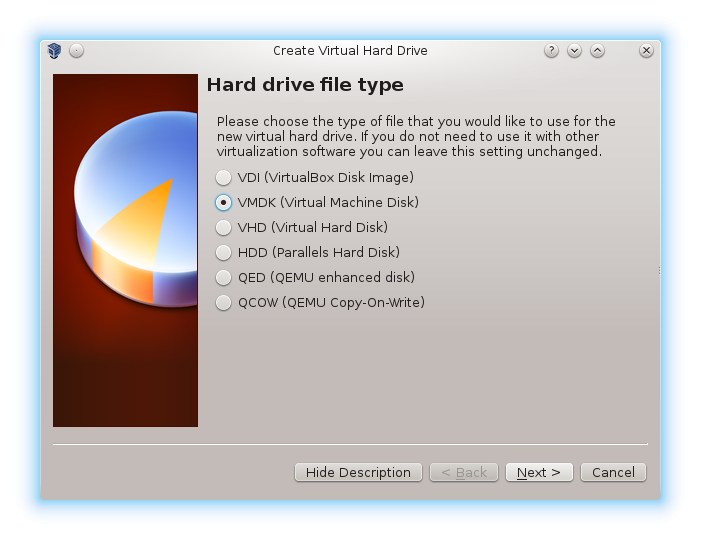
The goal of the process is to end up with a bootable disk, from which the embedded system can boot. While other virtual environments, like KVM, allow to use raw block devices with the virtual machines, VirtualBox gives no such option. The workaround I used was to create the virtual disk in file and then convert to raw image. For easiest conversion, the disk should be saved in .vmdk or VirtualBox' native .vdi format.
The interesting part of VM creation starts when the VM creator asks about the hard drive. For out system a new virtual hard drive should be created.
![]()
As mentioned above, the image should be stored in .vmdk or .vdi format. I will be using Qemu image converter, therefore I'm choosing .vmdk.
![]()
No need to save disk space by dynamically allocating storage, the disk should have fixed size. All modern file systems can deal with big files, so there is no need to split the image into small chunks.
![]()
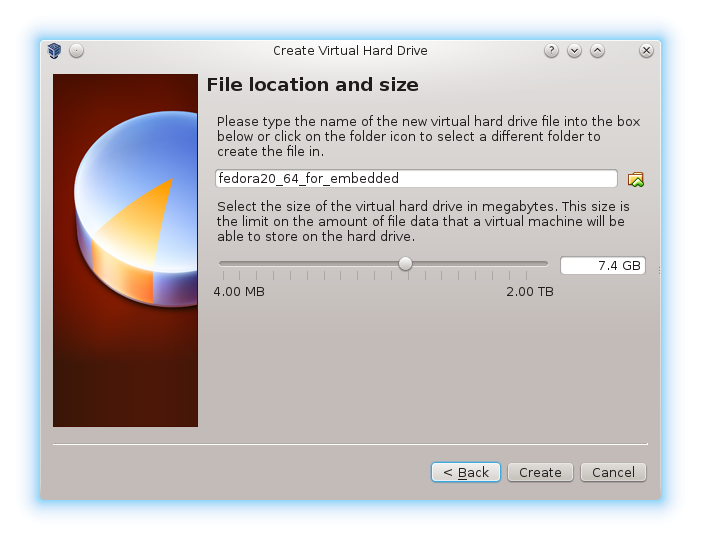
Here comes the tricky part. Disk manufacturers like to brag about size. For each marketing department, the bigger number they can can print on the label, the better. Probably everybody knows that the mega, giga and terra multipliers used to describe disk capacities are decimal (mega is 10^6, giga - 10^9, etc.) For this reason International Electrotechnical Commission (IEC) came up with new set of symbols denoting binary multipliers (Mi for 2^20, Gi for 2^30, etc), however they are still not very popular and VirtualBox sticks to the old terminology, using binary meanings for the prefixes. This means that the 8GB disk image that you create for your virtual machine will be too big on your 8GB flash drive. In my case I had to create 7.4GB virtual disk to make it fit on a 8GB flash disk. The actual size of the disk in bytes will appear if you hold the mouse cursor over the disk size text field (the one with text "7.4 GB"). You should pay attention to the name of the file and directory where the image will be saved. This will save a lot of time when you will have to find the file for conversion. Don't forget about such silly detail as creating the image on a disk with enough space. The directory can be changed by clicking on the folder icon on the right side of the file name field.
![]()
After hitting Create button the file with disk image will be created and after a short time our new virtual machine will be ready to use.
Since the installation process is different for each operating system and distribution, and the final image should be tuned to application (e.g. headless system most likely will not need GUI packages, like window manager or GUI tools), I will skip description of this step.
After the system is installed and ready to go, it's time for the last operaiton: preparation of the boot disk for our embedded system. This is a two-stage process: first, we have to convert the virtual disk to a raw image and then the raw image has to be written to the target disk.
The conversion process looks slightly different depending on the image format chosen. For VMDK disk you'll have to use qemi-img tool from Qemu package:
qemu-img convert -f vmdk fedora20_64_for_embedded.vmdk -O raw fedora20_64_for_embedded.img
With disk in VDI format you'll have to use VirtualBox' disk cloning tool:
VBoxManage clonehd fedora20_64_for_embedded.vdi fedora20_64_for_embedded.img --format raw
I tested only conversion using qemu-img. Conversion command for VDI image is based on the advice from OpenStack manual.
The last operation that we have to do is to transfer the image to the destination disk.
YOU SHOULD PAY VERY CAREFUL ATTENTION TO WHICH DEVICE YOU WRITE THE IMAGE, SINCE IF YOU CHOOSE INCORRECT DISK, YOU MAY LOOSE ALL YOUR DATA!
I work with Linux, so I'll use dd to write image. If you have different OS on your computer, feel free to use any tool for writing raw disk images that you are comfortable with.
My flash disk is registered as /dev/sdi and I instructed dd to copy data in 10240000 bytes chunks
dd if=fedora20_64_for_embedded.img of=/dev/sdi bs=10240000
At this point we're ready to go. If you use a hard drive, just connect it to the motherboard and proceed as usual. For USB flash disks you should choose to boot from USB hard drive.
Good luck and happy hacking!
-
Installation of WiFi antenna next to GPS antenna is a bad idea
08/16/2014 at 19:01 • 0 commentsFirst real test came. Battery charged, receiver antenna connected to bladeRF, application started, waiting for a GPS fix.
5 minutes passed, still waiting for GPS fix.
10 minutes passed, still waiting for GPS fix.
What about unlugging the WiFi dongle?
1 minute passed - GPS' got the fix!
WiFi antenna has to be moved from top of the box to another spot, further away form the GPS.