Close
0%
0%

MOLBED 2 Modular Low cost Braille Electro Display

An improved version of the 2016 project, aimed to develop a low cost and modular refreshable Braille system

Similar projects worth following
The goal of Molbed 2.0 is still to create an electronic Braille system that is affordable and can make this technology available to everyone. The initial requirements were:
• must use as many parts that are already commercially available
• should be made up with the lowest parts count possible
• custom parts must be easy to prototype, easy to scale up (injection molding)
• power must be not needed to keep the state of the pins
The first version I designed had with a magnetic retaining system that had a really low parts count, easy to reproduce/ scale up for production.
After some testing in collaboration with the Italian association for people with impaired vision, feedback and new requirements surfaced.

Now a new version is being designed: Molbed 2.0.
The main difference is in the way the pins are moved: Flexinol actuators will be used instead of the coils used on Molbed 1.0.
Additional requirements were added after feedback from early users.

How does the first iteration work?

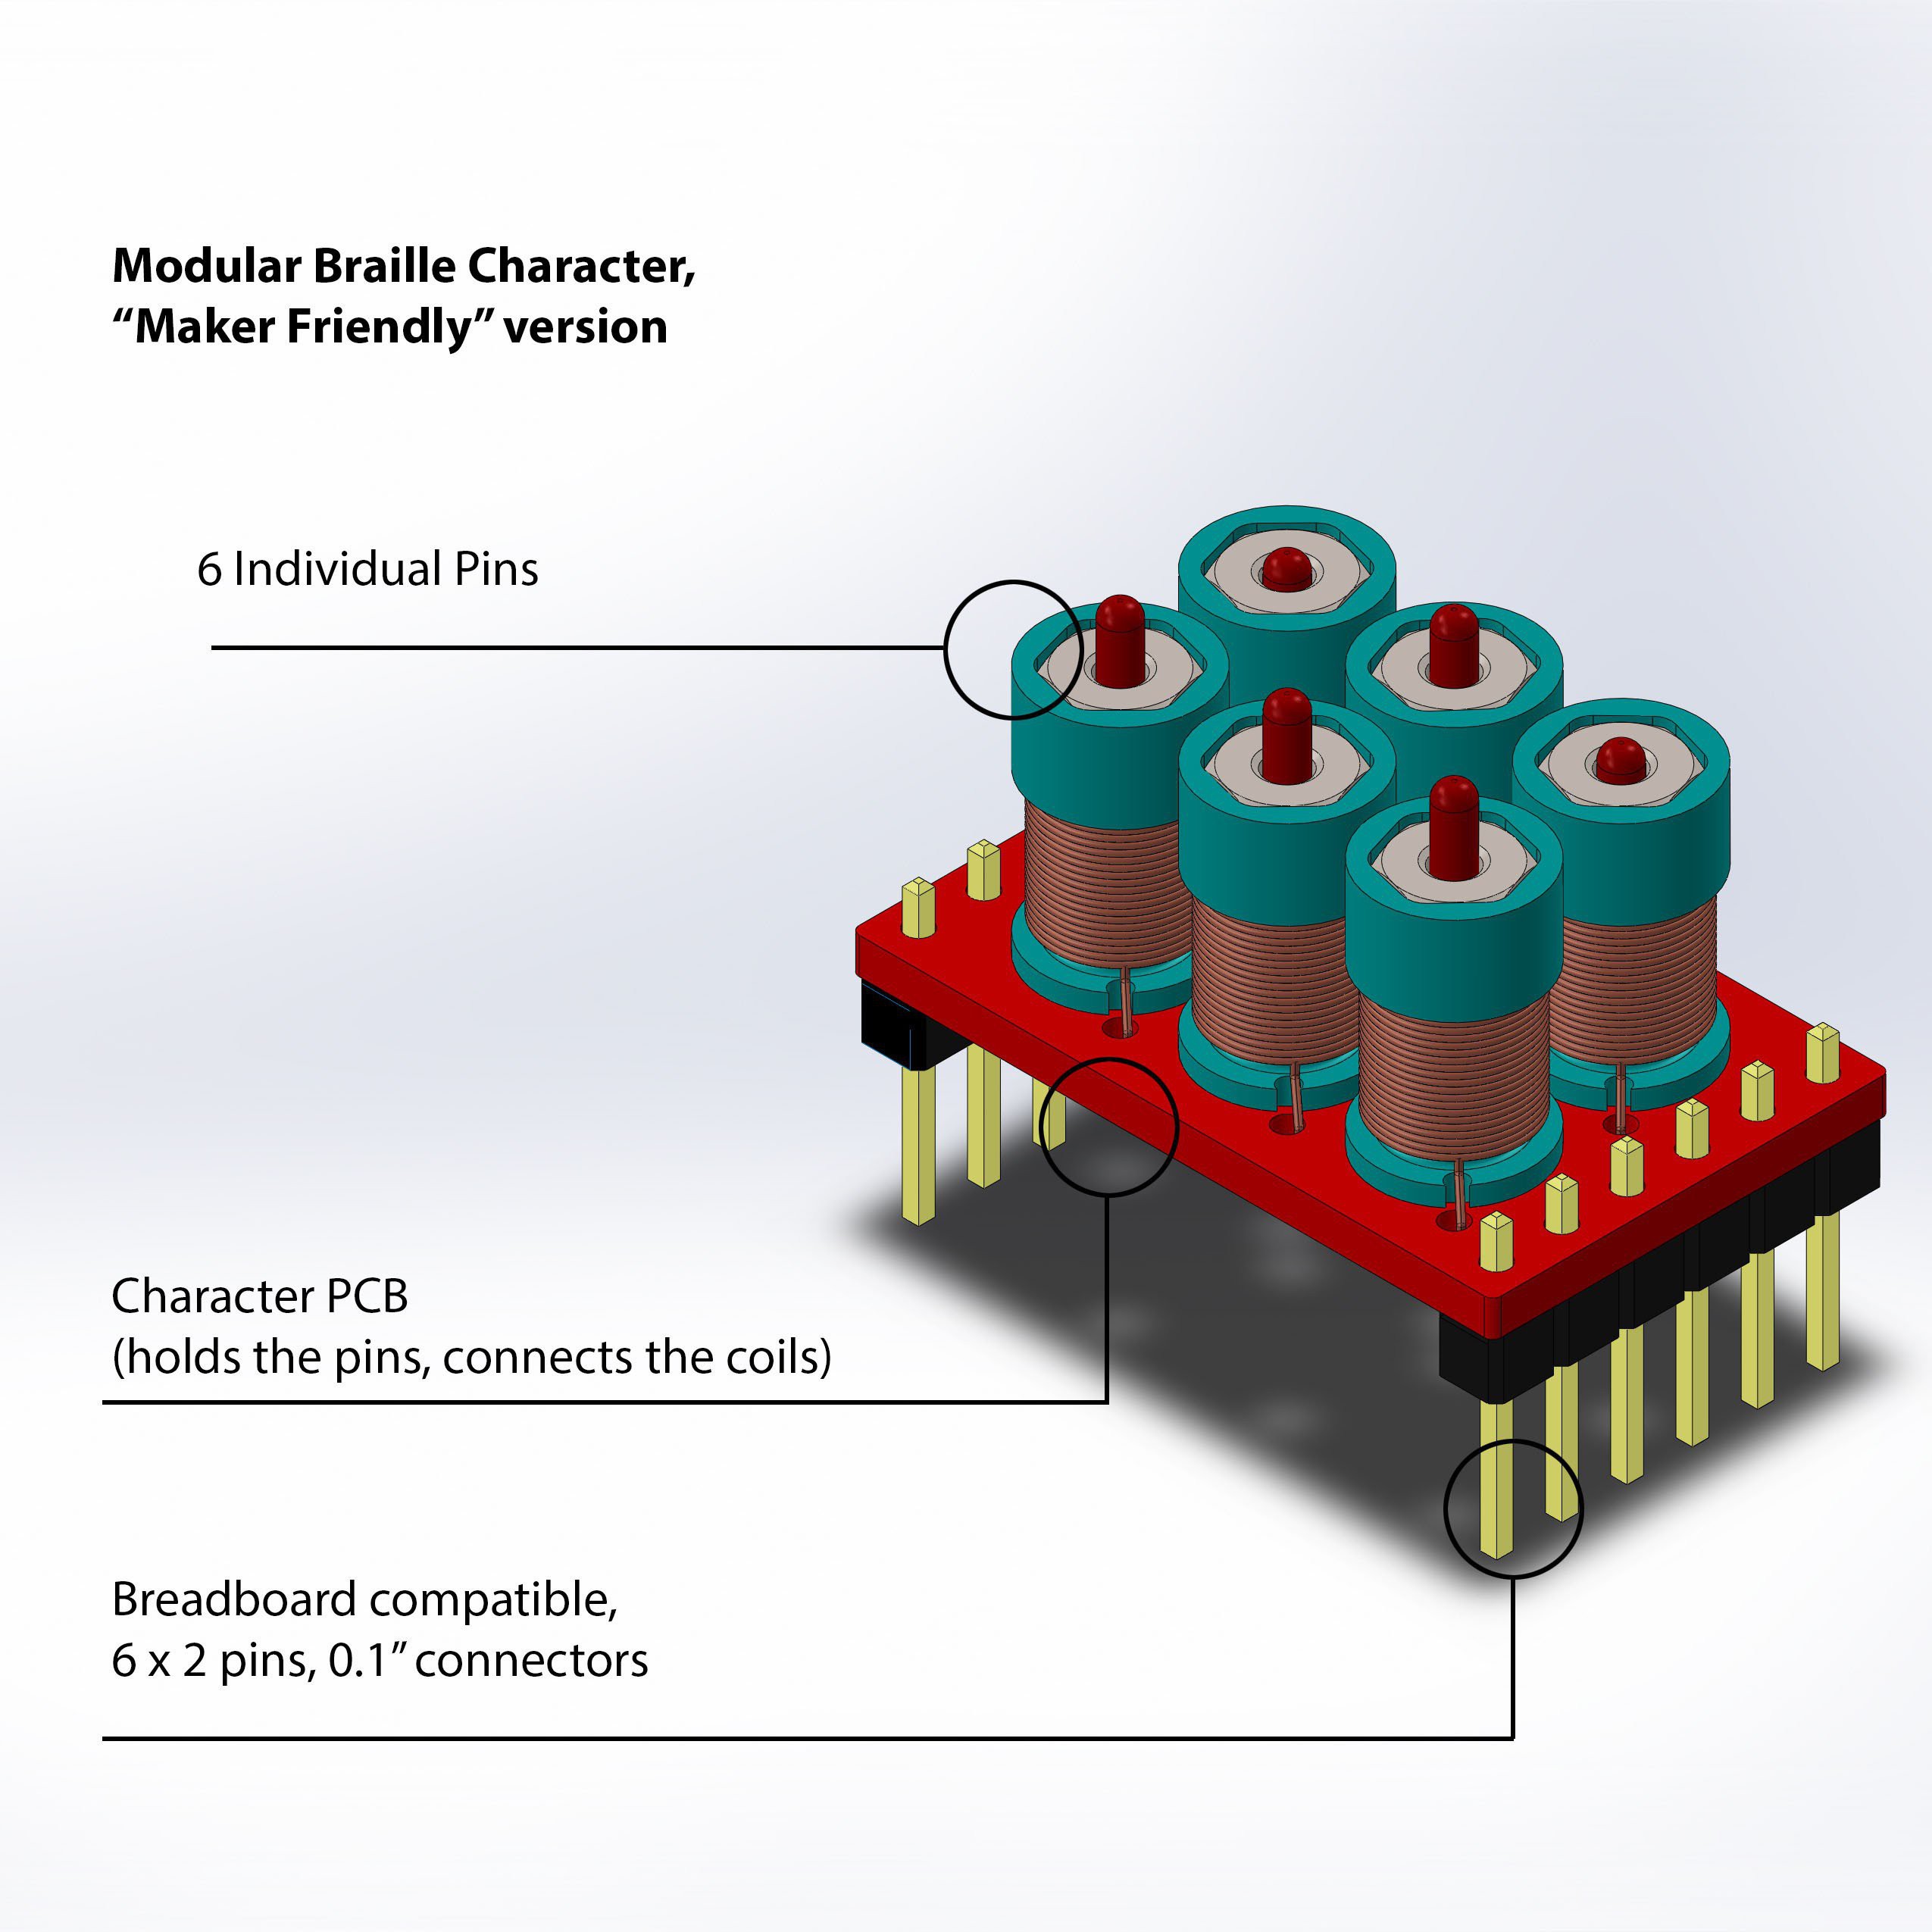
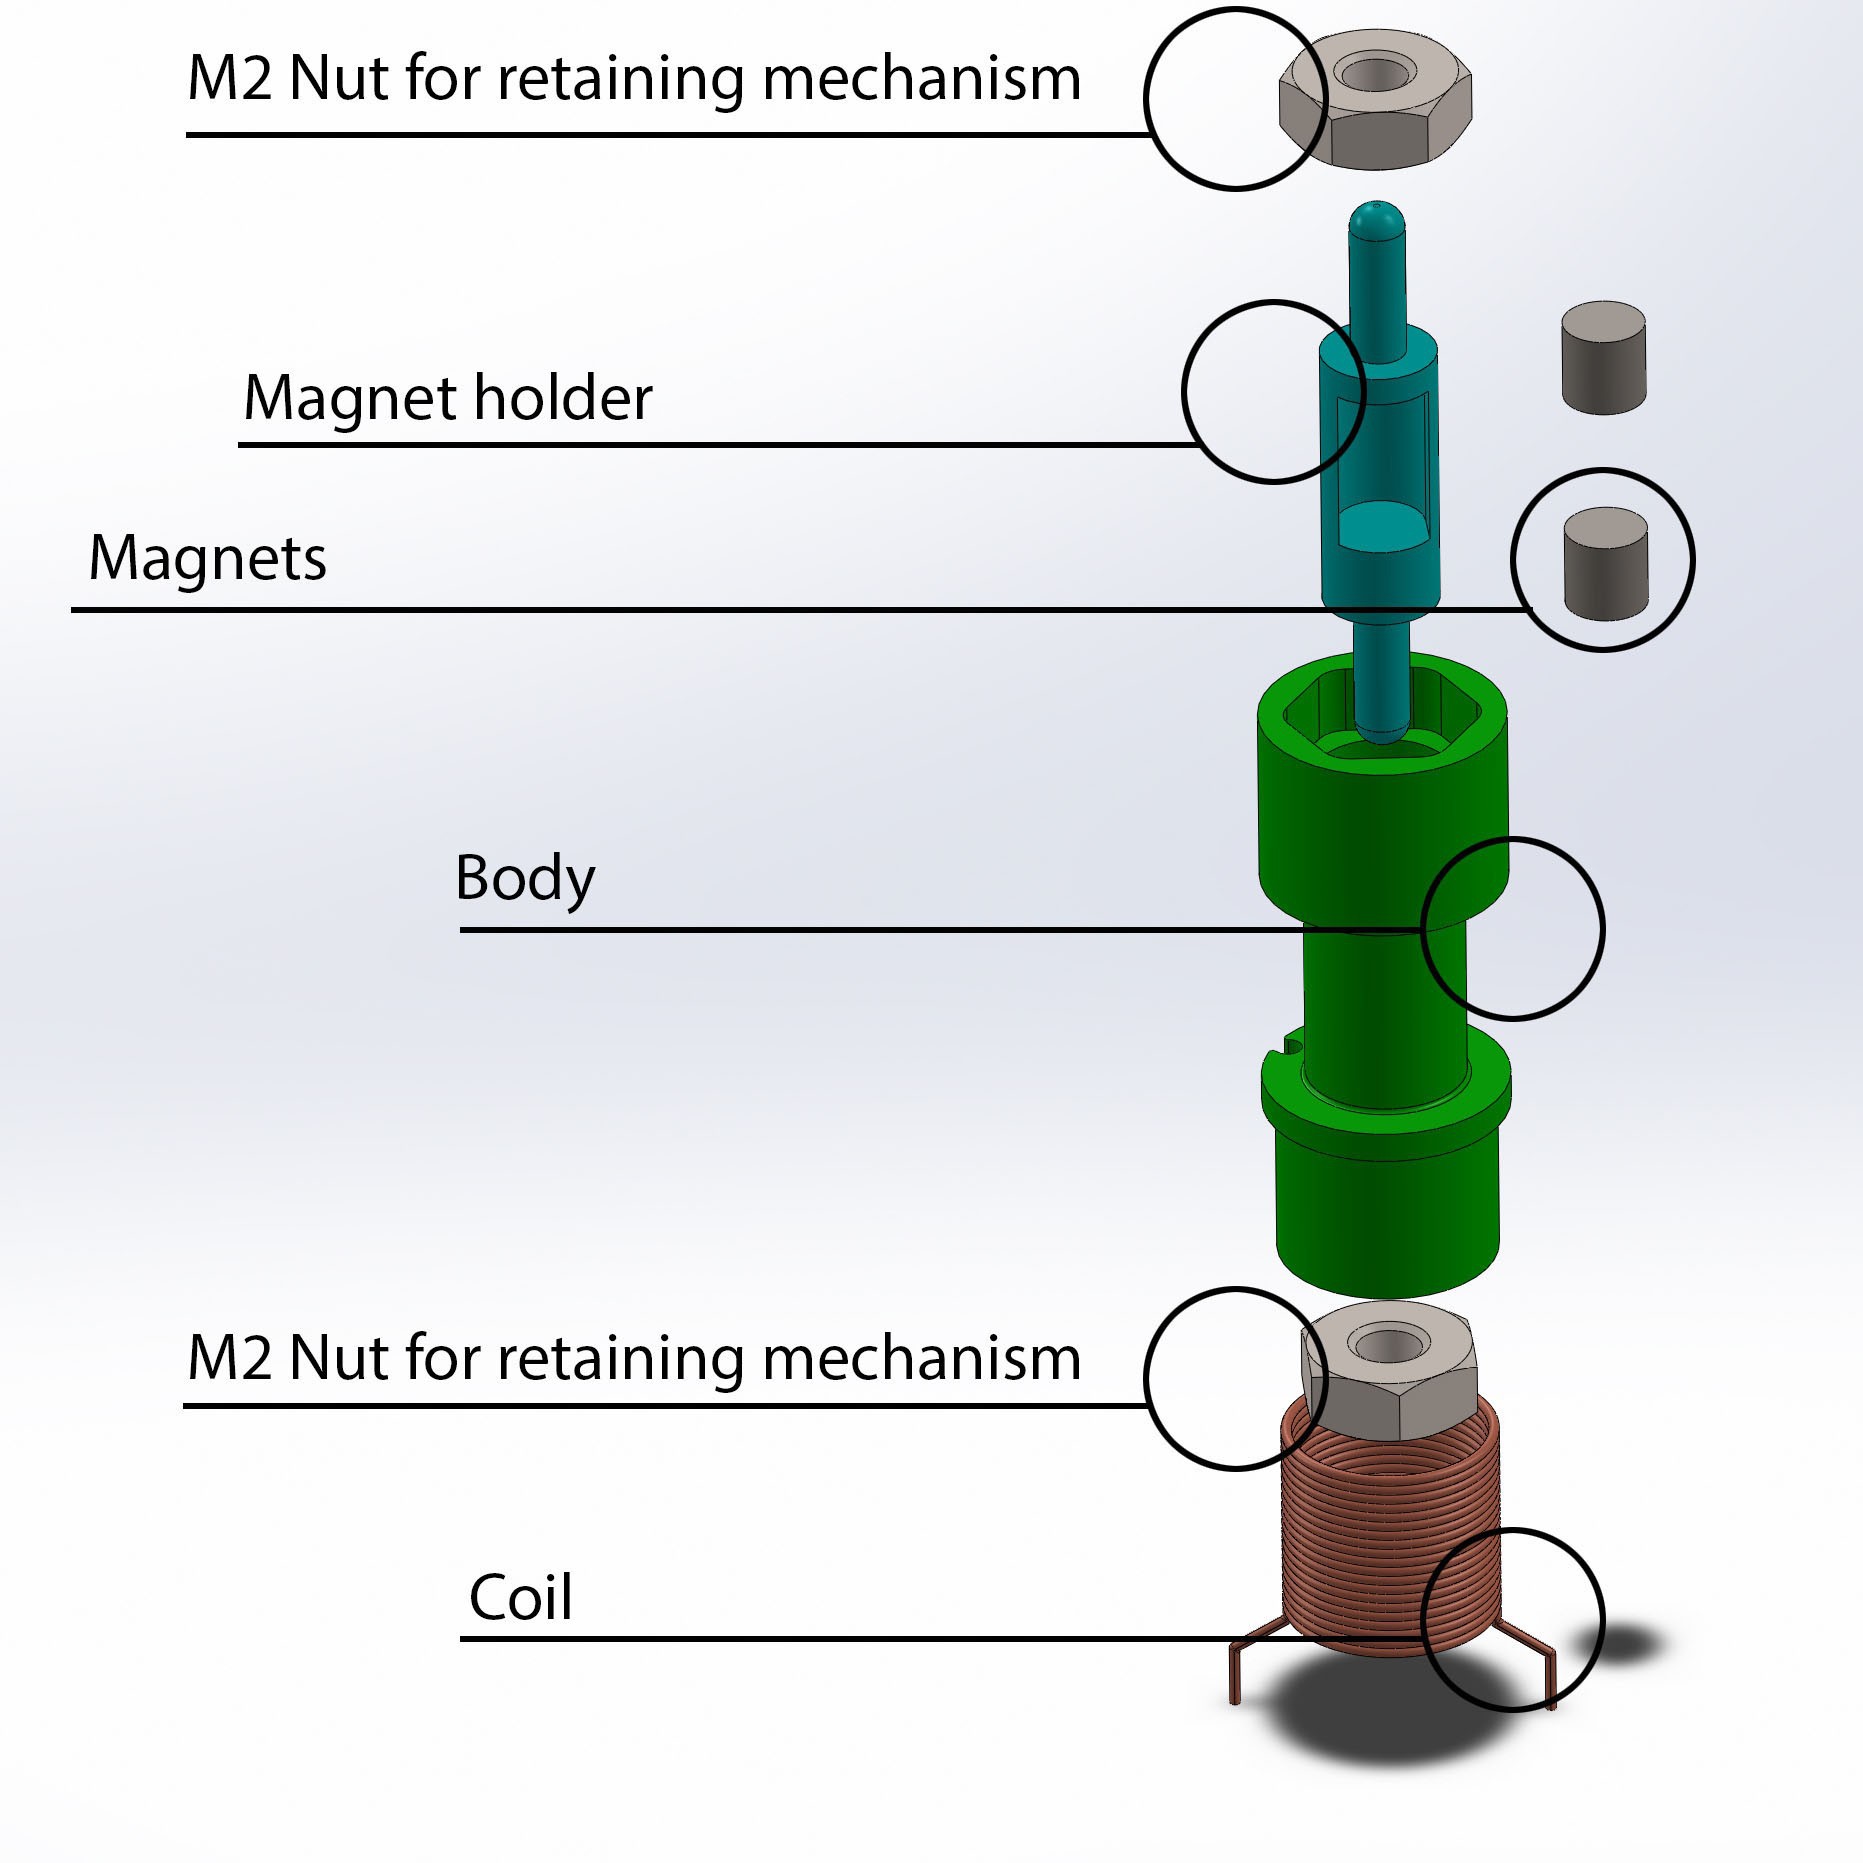
With the current design, each "dot" on a character module is made up of 2 3D printed parts (Body and Magnet holder), 2 M2 nuts, 2 magnets, and 0.1mm enameled wire. A controlling PCB also hold the bodies. This design uses a really low parts count, and efforts have been put to use parts already available, such as the M2 steel nut; this design allows for a very low cost per character.

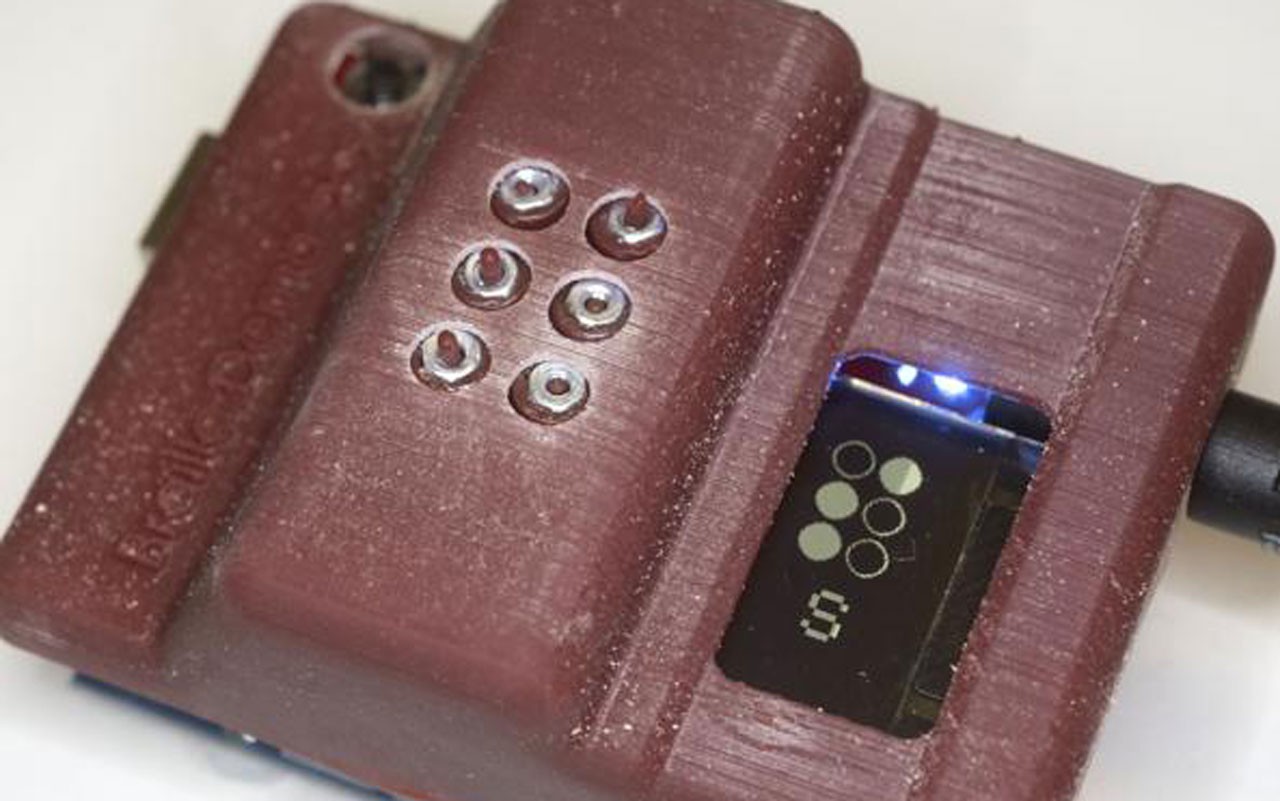
The first prototype, that was able to show some words in Braille, one character at a time:

The testing characters were working well; finding the perfect balance was still under progress, and a lot of optimization of the pins has yet to be done.

Three different testing boards were made designed as Arduino Uno Shields, for easy testing of the characters. Two of them have a small embedded Oled display for showing the corresponding letter and debugging. I even designed a 3d modeled cover for it ;)

ArduinoShieldWithOled.zip

Molbed 1.0: This is the latest version of the demo board for testing characters. It is designed as an Arduino shield for Arduino Uno. Zip files already used for production of the PCB (Gerber, drills, etc).

x-zip-compressed - 63.07 kB - 09/04/2017 at 14:22

Download

Test_DemoBoard_Uno_Oled_FILMS.ino

Molbed 1.0: This is a sample Arduino program. It will show letters "F I L M S" as shown in the video. Requires an Arduino Uno Board and the "Arduino Shield with Oled" PCB.

ino - 13.43 kB - 09/04/2017 at 14:21

Download

BrailleChar3.zip

Molbed 1.0: This is the PCB for one character, Zip files already used for production of the PCB (Gerber, drills, etc).

x-zip-compressed - 11.10 kB - 09/04/2017 at 14:21

Download

  • 16 × 0.5mm dia. Flexinol wire

  • Molbed 2.0: improvements

    Madaeon09/04/2017 at 13:56 1 comment


    The idea of the new Molbed: Flexinol actuators instead of the magnetic actuators.

    Activating the coils on Molbed 1.0 posed some problems: the "kickback" of the magnets moving was sometimes strong enough to affect nearby pins, and reducing the power was sometimes not strong enough to activate them.

    To avoid this, a flexinol wire can be used; modulating current can be used to shrink its length by approx 0.5%; for each pin, two wires of approx 24mm will be used; they will provide 1mm of movement that is amplified with a lever mechanism.

    Most of the parts will be 3D printed, with a high definition resin 3d printer. The pins will be probably metal 3d printed, and the base of each character will still have electonical connections, breadboard friendly.

  • The first working prototype unit: Molbed 1.0

    Madaeon09/04/2017 at 13:55 0 comments


    The testing characters in this unit works well; finding the perfect balance is still under progress, and a lot of optimization of the pins can be done. I have redesigned the character PCB, with smaller pads for easier soldering of the enameled copper wires.

    I have made 3 different testing boards, designed as Arduino Uno Shields, for easy testing of the characters. Two of them have a small embedded Oled display for showing the corresponding letter and debugging. I even designed a 3d modeled cover for it ;)

  • Testing of the first prototype and feedback

    Madaeon09/04/2017 at 13:52 0 comments

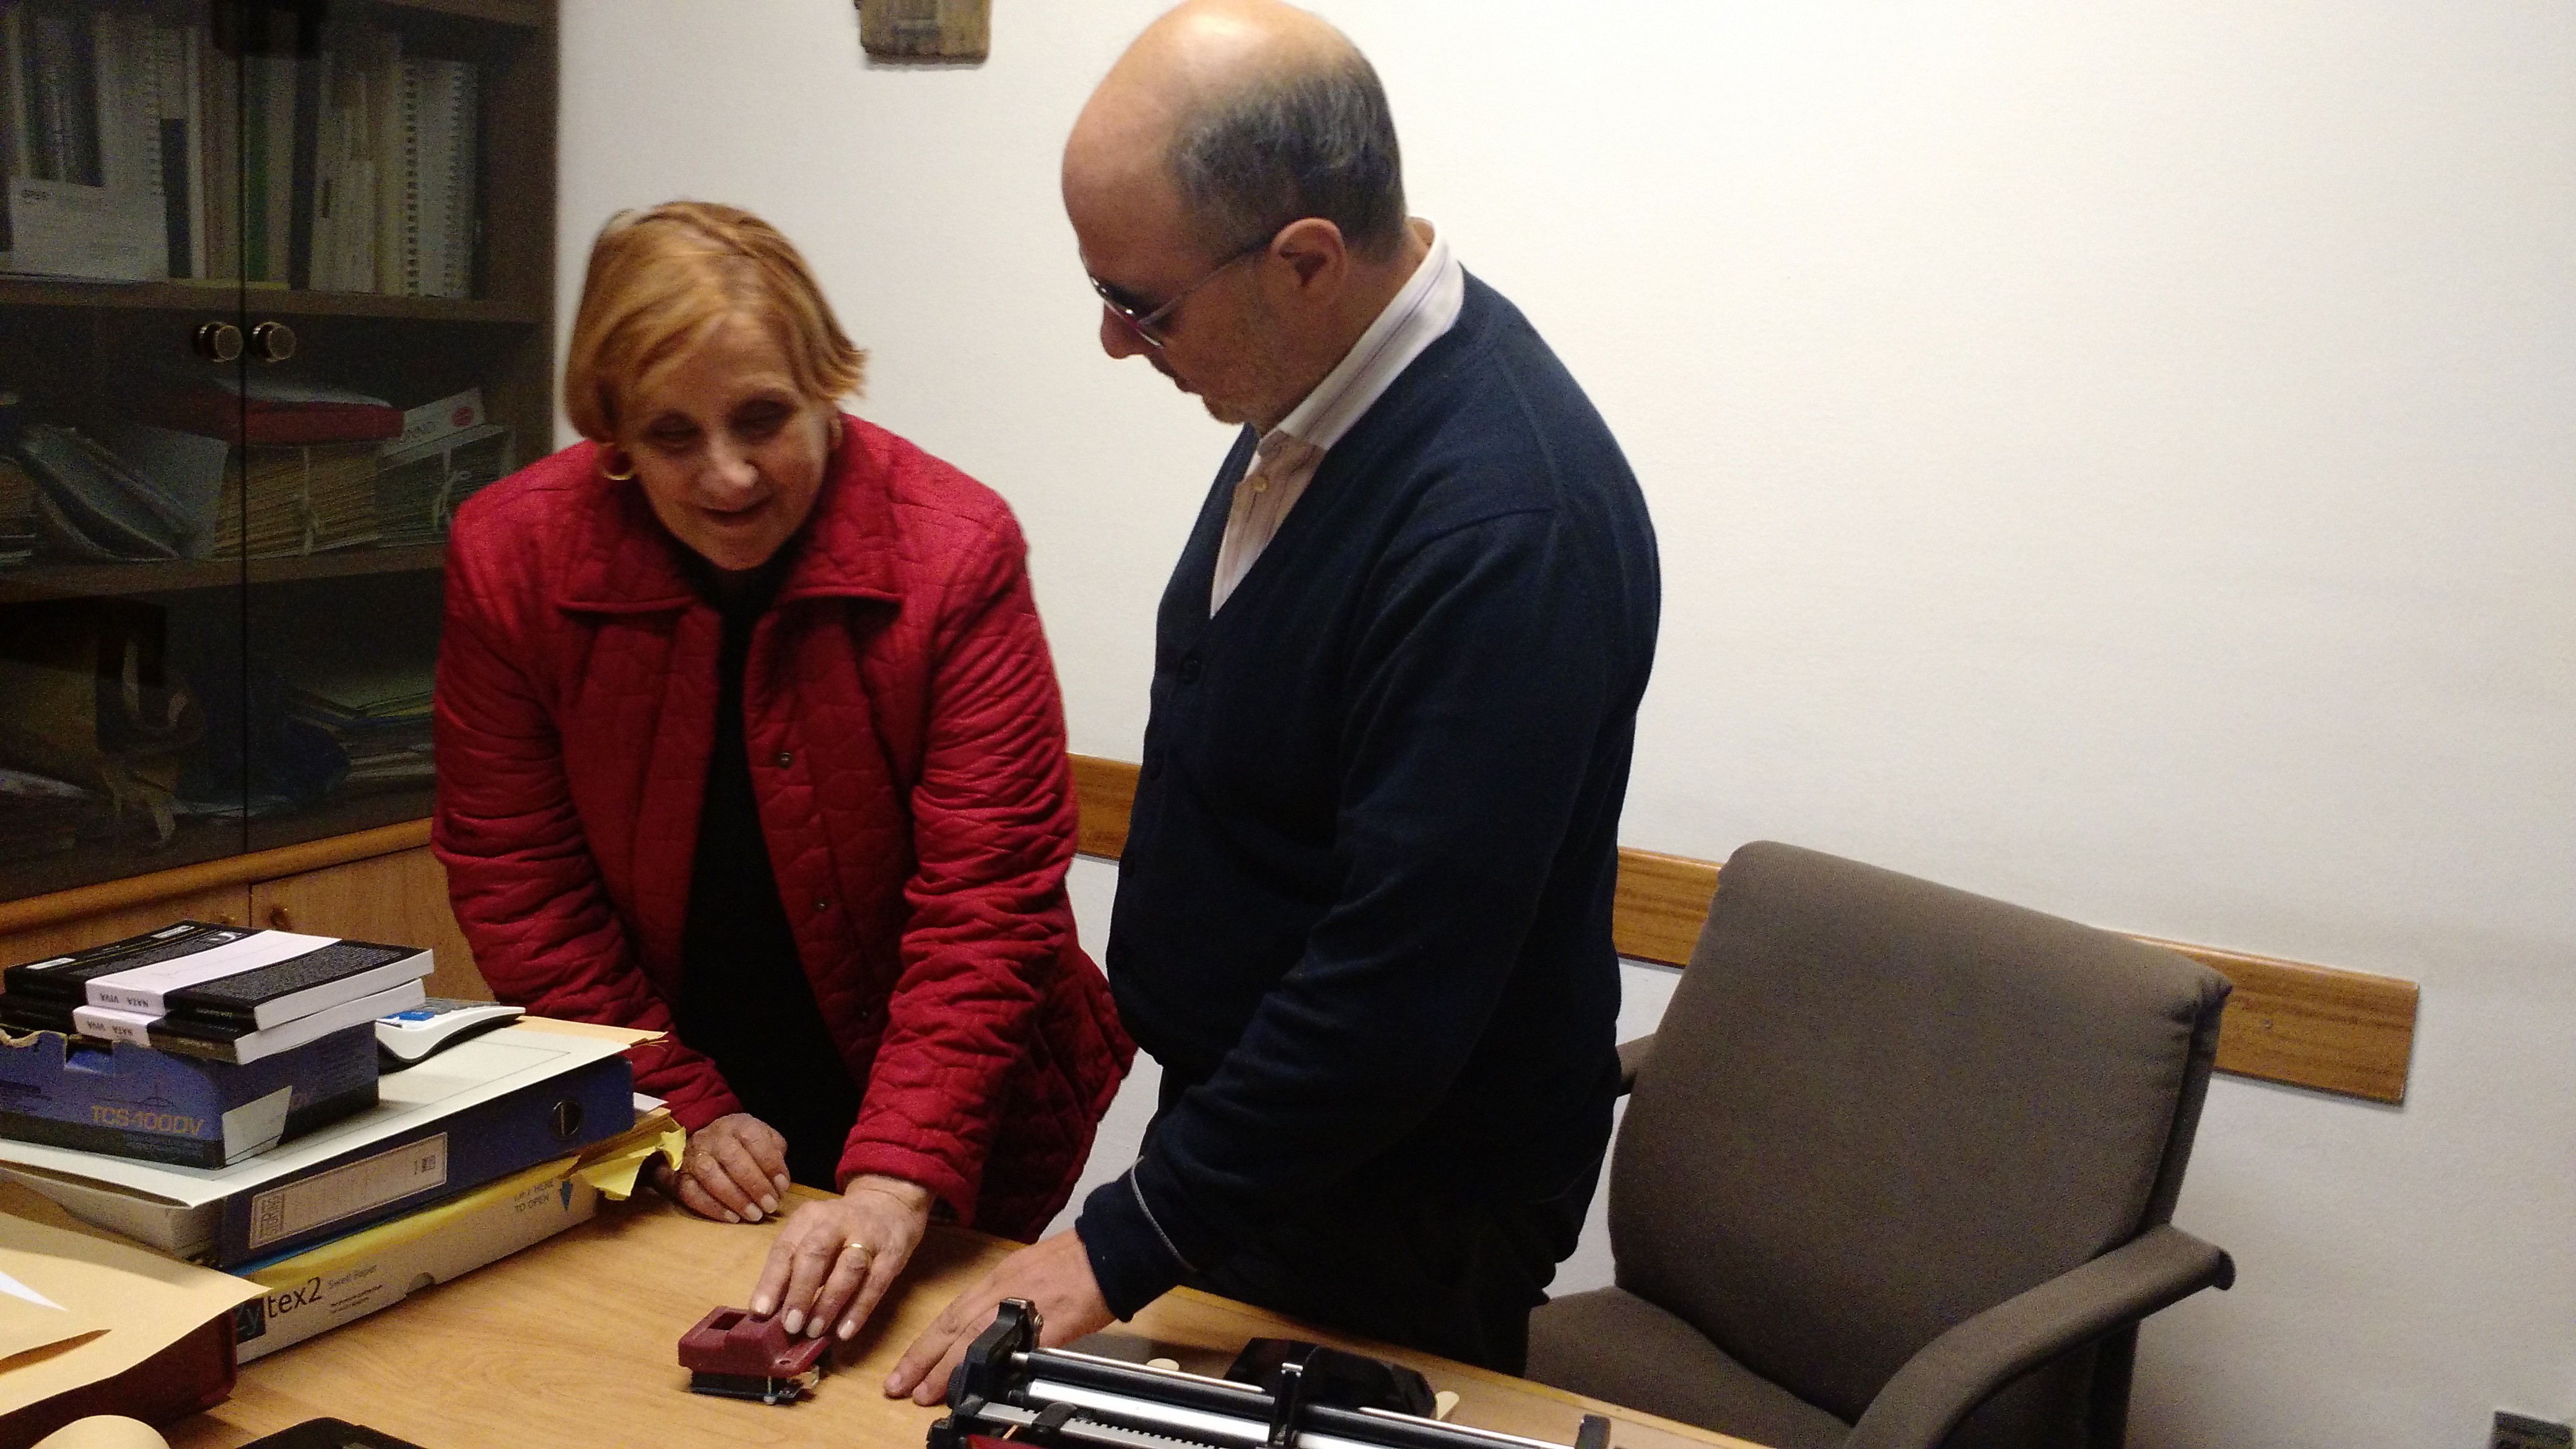
    The first prototype has been tested thanks to the Italian association for visually impaired people.

    Their feedback can be summarized as follows:

    Pins and characters must respect size and dimensions as defined in standards like the US and California

    "Communication Elements and Features includes items for communicating information to persons wit
    h hearing and visual impairments. Section 703".

    One line of characters can be enough, if it can refresh with a decent speed.

    8-pins character cells are a must if Molbed has to work with PC or other digital devices.

    Molbed has been also one of the 13 finalist (not winner, unfortunatey!) of Make to Care within the last maker Faire in Rome, Italy. We received a lot of feedback there also, and many people were interested in the idea of a low cost refreshable Braille display.

  • The first iteration

    Madaeon09/04/2017 at 13:46 0 comments

    This is the module of the first iteration. 6 pins, Breadboard friendly connection.

    The main idea behind the project is quite simple: For each pin, one coil can move move some very small magnets from one end of a cylindrical body; at each end, two small pieces of ferromagnetic material will hold the pin in position. With this design, power is not needed to keep the state of the pins.

View all 4 project logs

  • 1
    How to assemble Molbed 1.0

    3D Printing the body and magnet holder

    The body and magnet holder file are available in STL file format and can be printed with a resin-based 3D Printer. Part thickness is down to 0.3mm in some points, but it still printable, and after UV curing the part is strong enough.

    Assembling the magnet holder

    Once you have 3D printed the parts, it is necessary to assemble them. This video shows how the different components of one pin are assembled for the current prototype.

    Coil winding

    I assembled a simple machine to automate the coil winding. It is controlled by an Arduino.

View all instructions

Enjoy this project?

Share

Discussions

xushenghui2020 wrote 05/18/2021 at 02:28 point

NICE JOB!!! I am working on a project to help blind go without blind cane.

  Are you sure? yes | no

Similar Projects

Does this project spark your interest?

Become a member to follow this project and never miss any updates