Ben Brooks
-
On The Road
10/23/2022 at 23:44 • 0 commentsFinally took the roaster on the road and had some unexpected bad results; the ESP-32 kept seeming to randomly reset while in the middle or roasting. I initially thought the adjustable voltage regulator had dropped too low from it riding in the trailer while driving, but this proved to not be the case. Then it dawned on me... "I wonder if it times out when it can't connect to my Home Assistant instance?" Some quick googling and I confirmed that by default, ESPHome has a 15 minute timeout when it can't connect. Adding a single line to my 'code' to set this to zero fixed things and I've been successfully roasting coffee while on the road! Huzzah!
-
Exhaust Vent Upgrade
09/15/2022 at 16:14 • 0 commentsWhile the weather where I live (central US) is currently pretty pleasant, it gets quite hot (and of even more import, quite cold) at times. Not really wanting to have to clear snow off of my table outside just to roast some coffee, combined with the fact that I'm not sure that the roaster could hit the proper temps having to heat COLD air, I decided a while ago that I wanted the option of roasting inside. While the extra heat isn't a problem in the winter (and the smell isn't particularly unpleasant), the chaff that comes off the beans makes a bit of a mess even when outside. A quick visit to a hardware store (and the salvaging of an extra soup can) as well as designing and printing up a simple slide to allow me to keep the window mostly closed and voila: I have a simple setup that allows me to roast inside but vent the exhaust air outside.
![]()
As an extra bonus, it was able to achieve my roast temp more quickly/accurately than before (there's normally been a little slowdown in the temp rise as it gets close to the roast temperature). My guess is it's the reduced airflow due to not sitting it on an open table (the air inlets are on the bottom of the roaster) and/or the restriction of the vent hose. Regardless of the exact cause, it gives me more precise control over the roast which is an unintended benefit!
-
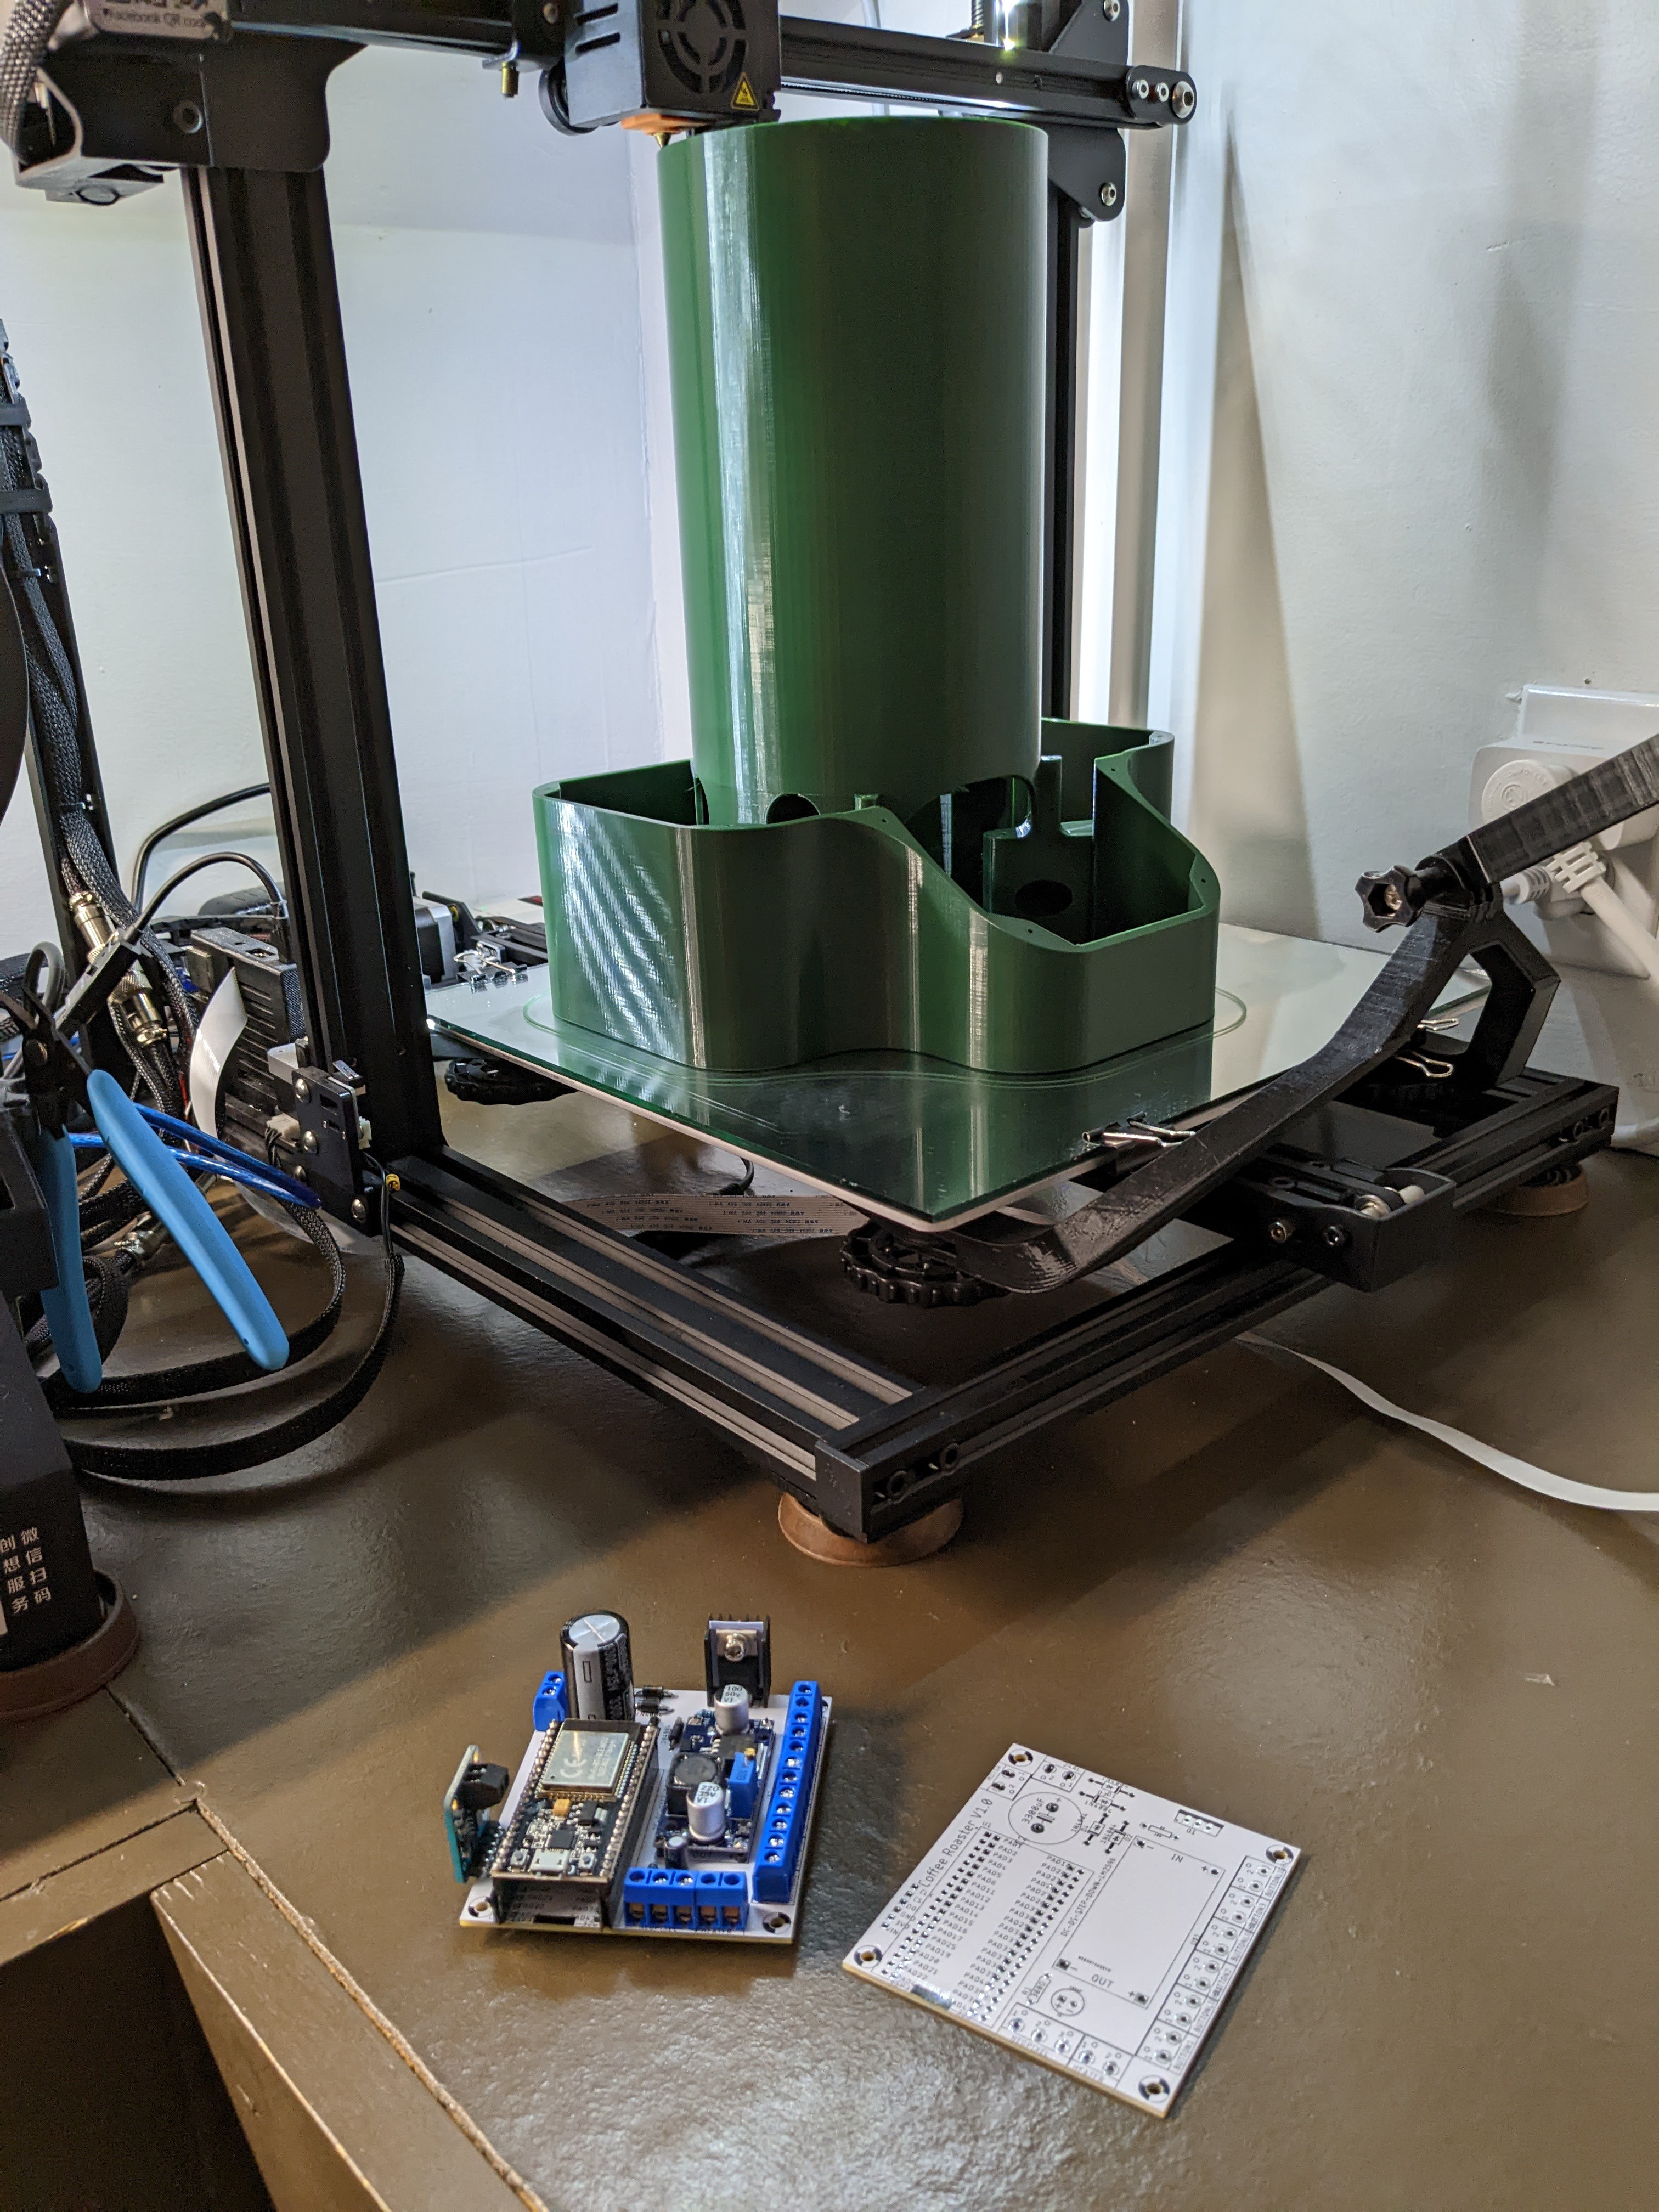
It's Alive!
09/03/2022 at 14:27 • 0 commentsThe enclosure finally finished printing yesterday afternoon, and the day before the PCB arrived in the mail! While printing the lids, I was able to install and wire everything up last night too.
![]()
Soldered up the PCB last night while the enclosure finished printing While my initial test runs with no beans were less than great (I had to drop the fan speed to 4% to even be able to hit roasting temps), I decided to add some beans anyway this morning and give it a go even at the low fan speed. As expected, it didn't mix the beans very well at such a low speed and I actually ended up burning some before I even got to my 'pre-heat' temperature. I ended up bumping the fan speed to 65% and got much better mixing and went ahead and tried ramping it up to roasting temp; to my surprise, it didn't have any problems hitting it! Obviously having the beans in the chamber slowed the airflow down enough to allow it to hit temp, I just didn't expect it to make such a significant difference. Ended up getting a pretty decent/even first-roast and while waiting a day is 'how it's done' I couldn't resist brewing up a cup this morning. While it's not at the level of my favorite local roaster, it's WAY better than Folger's! I'll be curious how it tastes tomorrow.
![]()
-
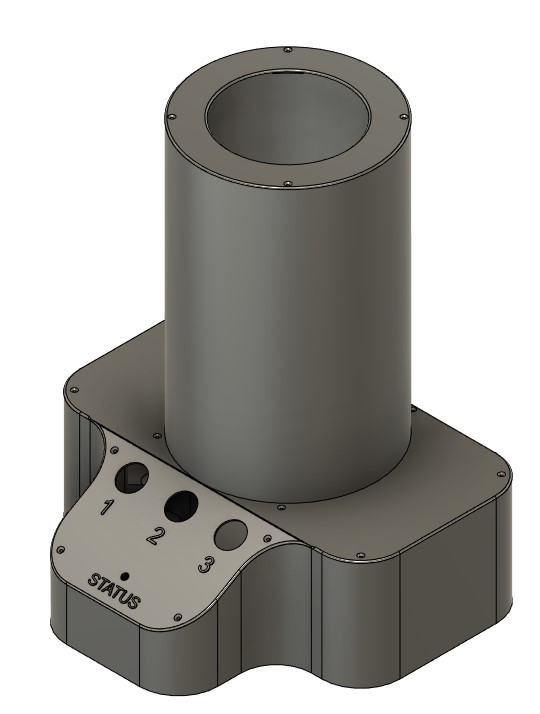
Enclosure Designed
08/29/2022 at 18:31 • 0 commentsFinished up my design for the enclosure. It's decent size, and while I'd considered breaking it into a couple of pieces (minus the obvious lids, etc.) it fits neatly on the bed of my CR-10s, so I opted for keeping it in one piece. Normally I tend to print these types of things in an exciting color, like black or gray. With this being both a large print and something that's more akin to a consumer appliance, I decided to buy a roll of filament just for it (Cura says it should take just over half a roll). Opted for a dark green color; once it arrives I'll start printing and hopefully not to long thereafter the PCB will arrive.
![]()
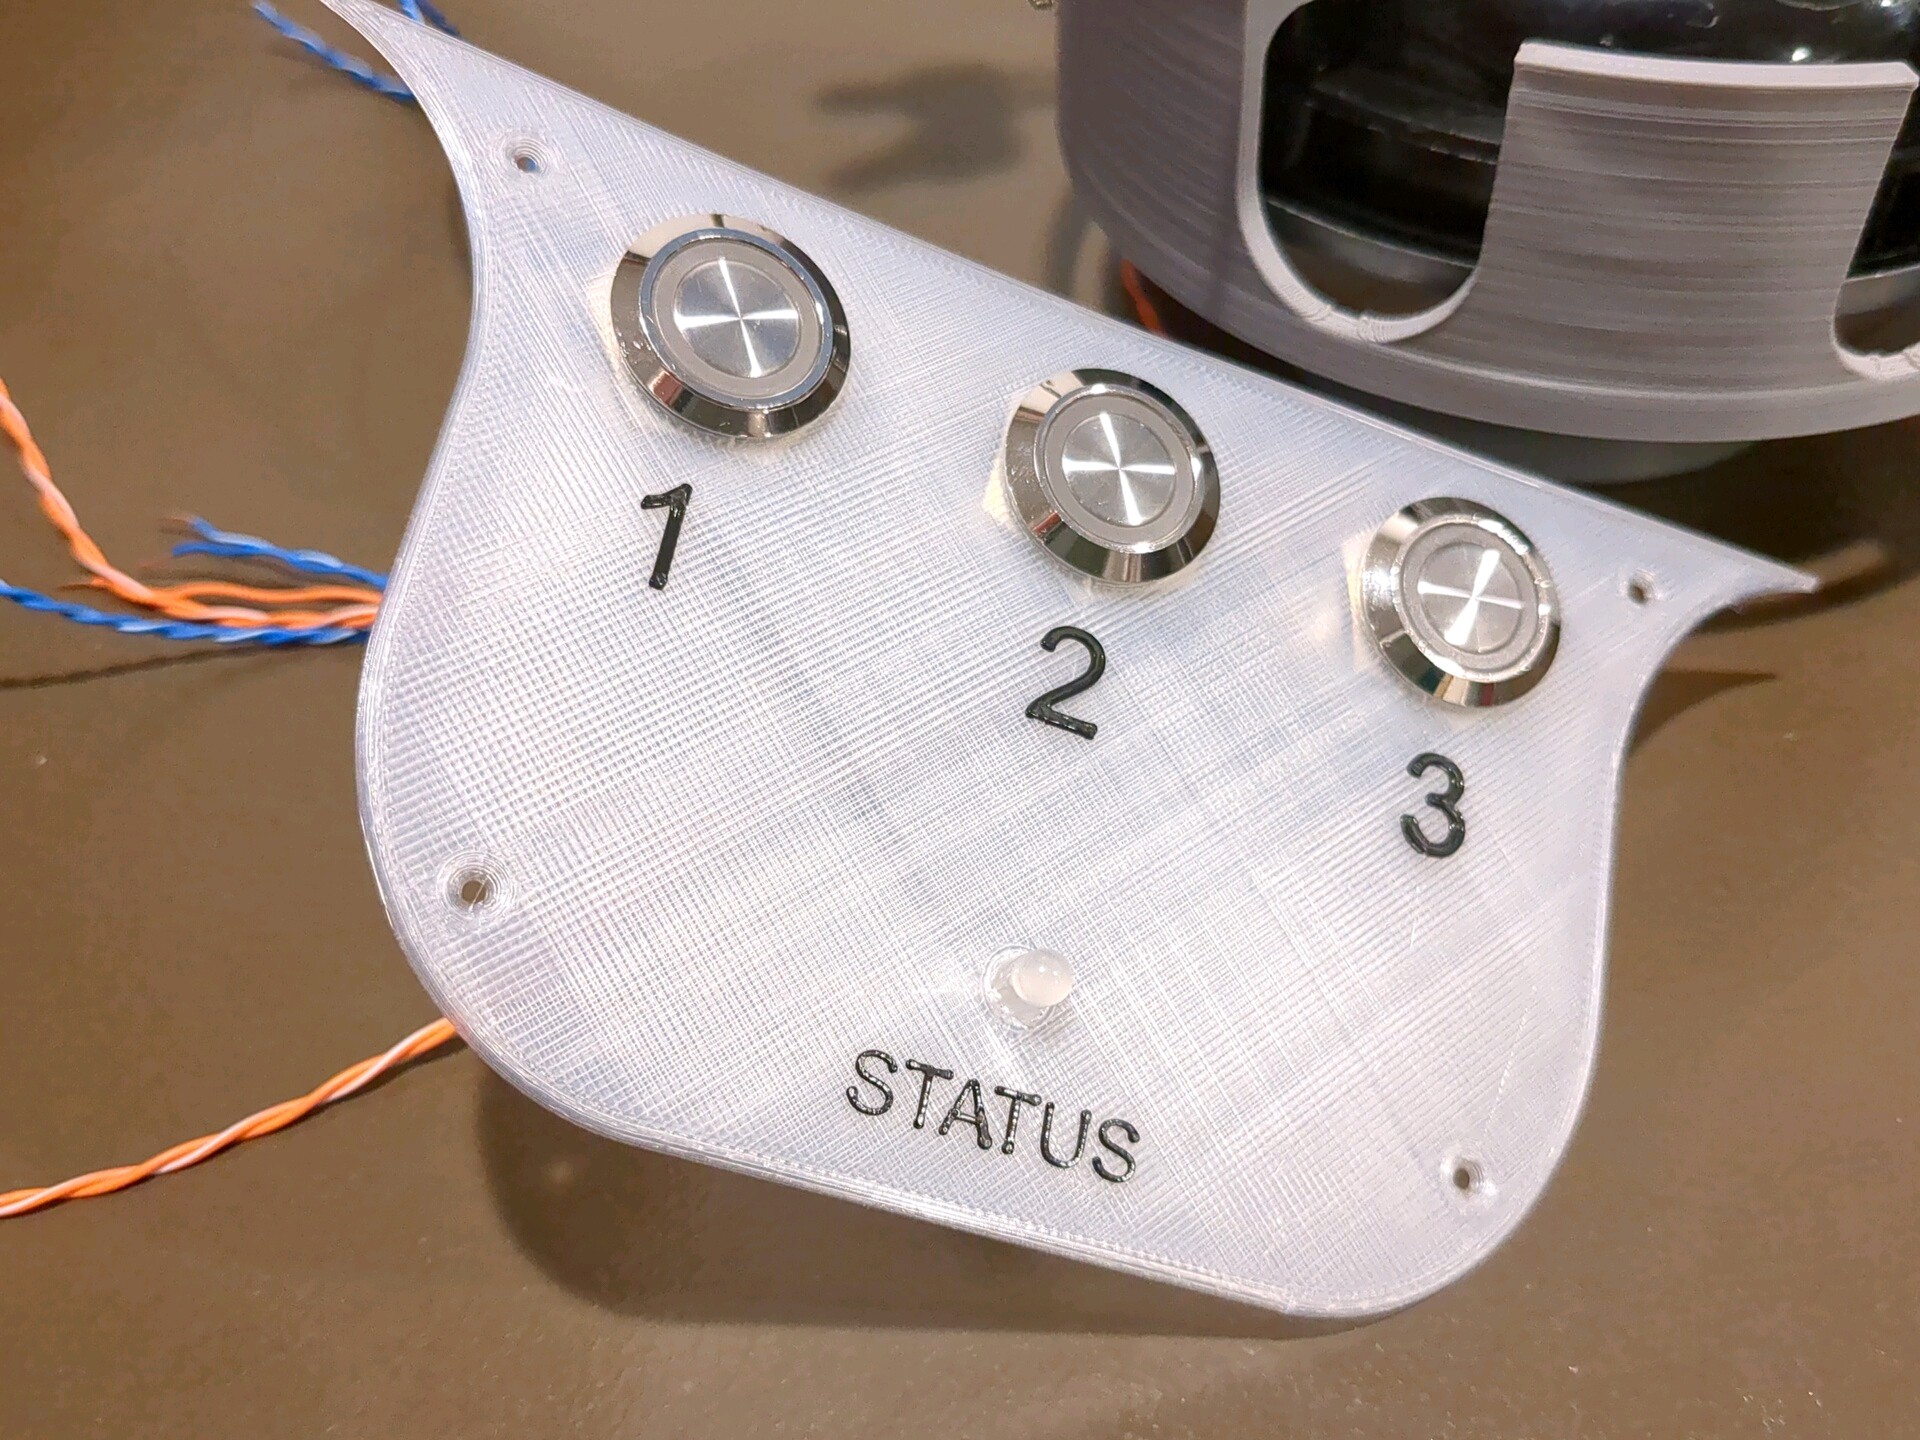
In the meantime, I went ahead and printed the control panel piece. I opted to do so with translucent filament as the PCB will be underneath it: I'll use the integrated LED on the ESP32 to give me the status of the WiFi connection and it's also the part of the internals I wouldn't mind showing off a little. You can also see in the background that I printed a test piece for the fan/heater mount; glad I did this as I ended up tweaking it a little to make sure it fits well in the final print.
![]()
-
'Code' Basically Done
08/21/2022 at 15:35 • 0 commentsFrom the beginning, I had decided I was going to use ESPHome to control everything so I could have a pretty front-end and easily log data. Normally when I've done this, I've left the actual control to Home Assistant, but for this project I wanted all of the 'smarts' local. This is both because the automation is more involved and controlling mains power items (like a heater) and I explicitly want to be able to use it away from WiFi.
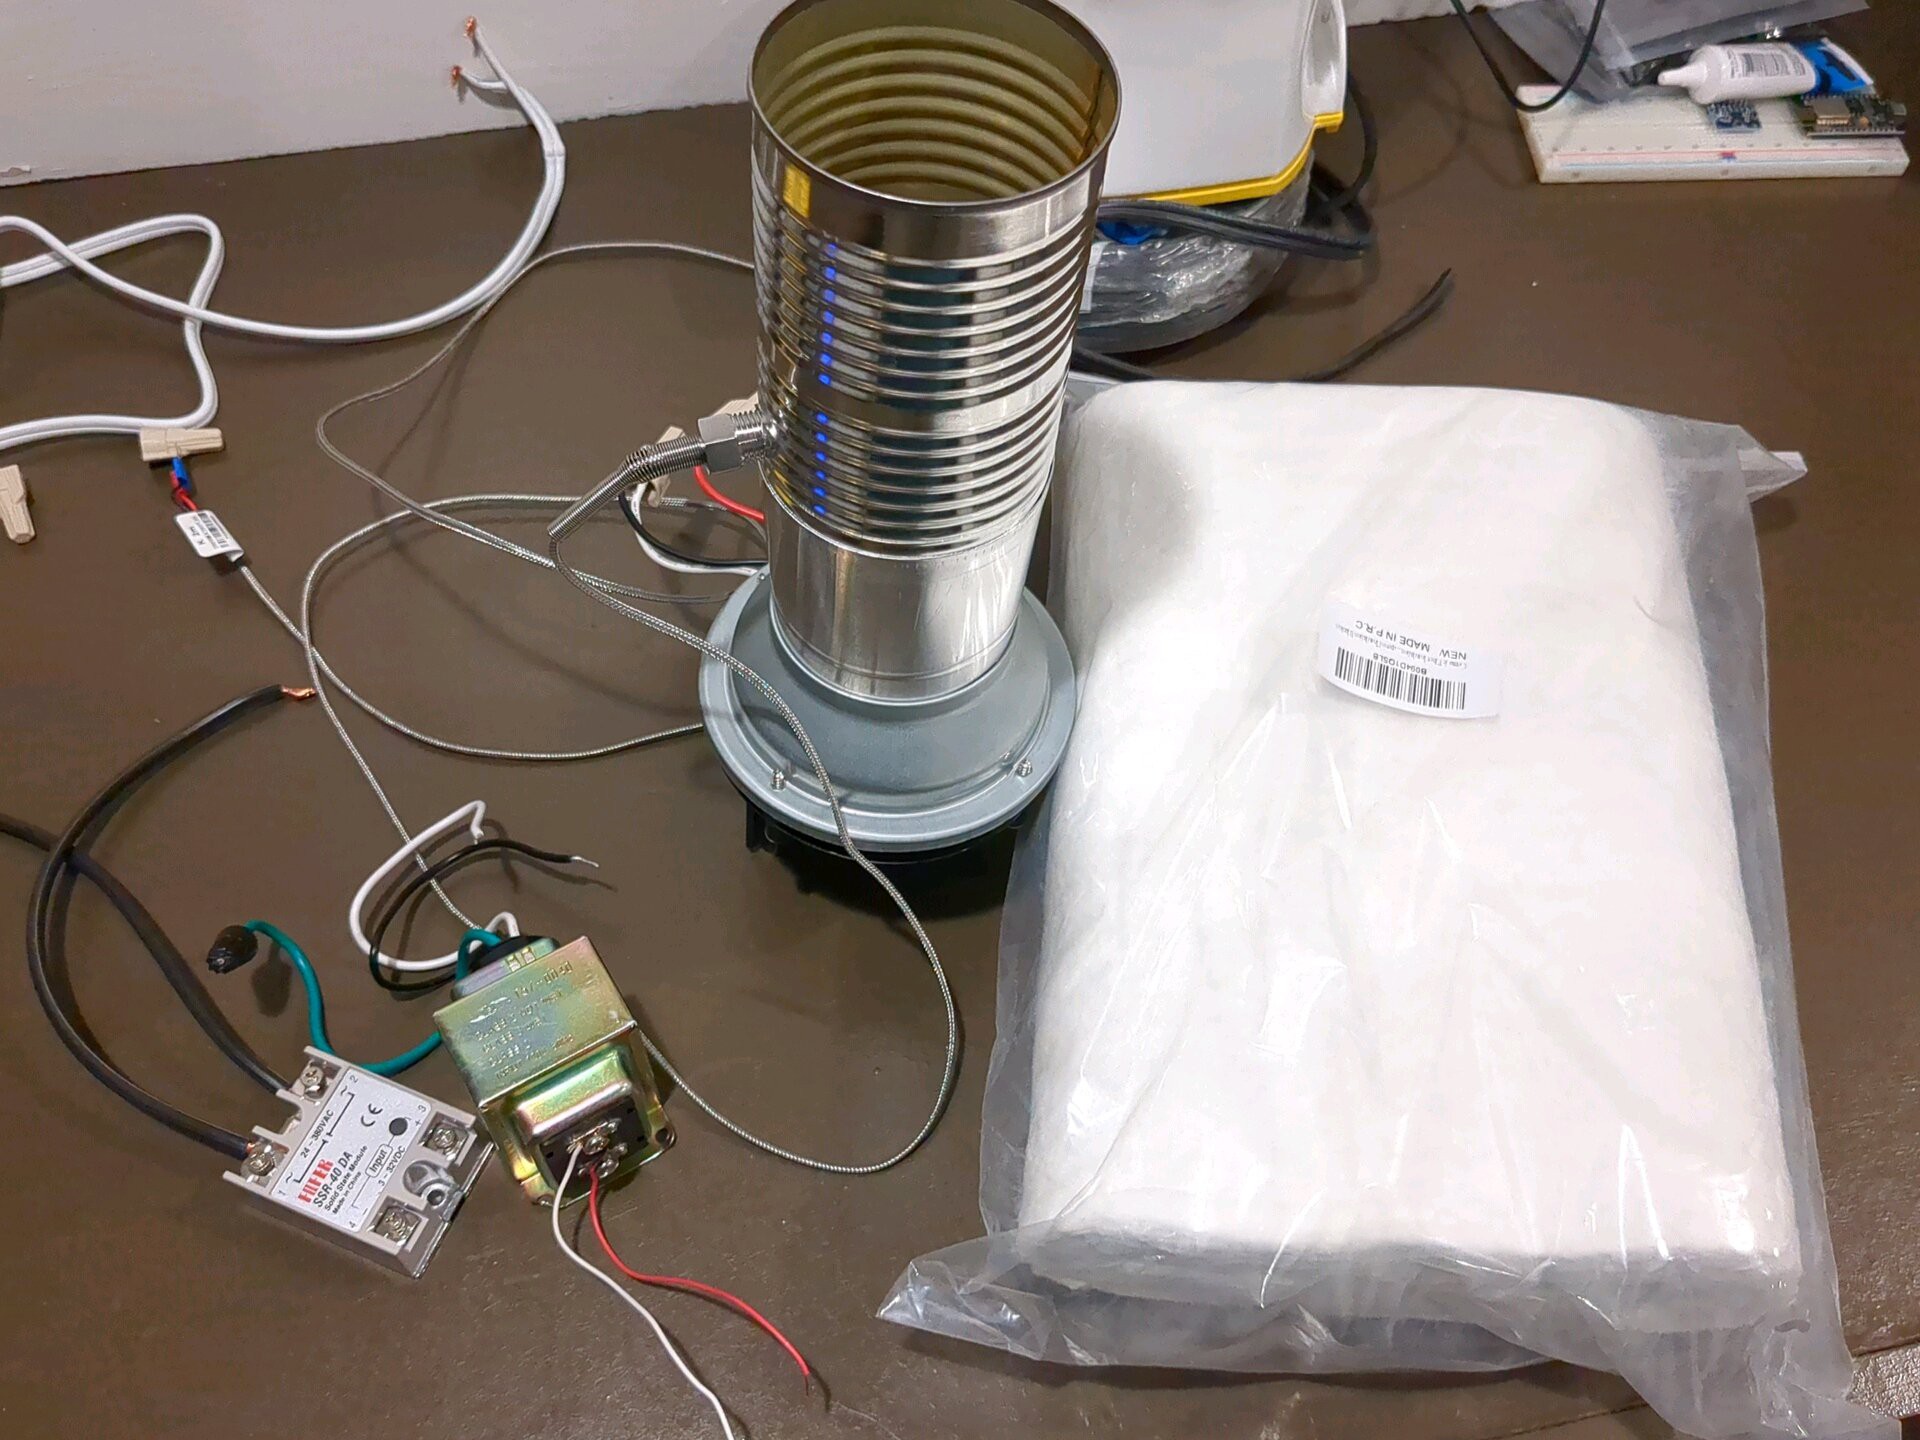
I spent a lot more time than I'd care to admit trying to figure out how to write the code locally in ESPHome. I think I just really overthought things as in the end, it ended up being pretty easy (minus the maddening formatting issues of YAML). I got the general outline of a roast profile setup, with buttons and lights to indicate at what stage things are at. I also added some safety features/checks to shut the whole thing down if something unsafe occurs, such as too high of a temperature or the heater being on but not the fan.
While I continue to wait for the PCBs to arrive, all that is left is to make a case for the whole thing. Shouldn't be complicated, but between the transformer, SSR, PCB and the actual roaster there's a decent bit of stuff I need to find a place for while keeping it compact and safe.
![]()
I also got some high-temp insulation to wrap around the metal bits. Considered just leaving it exposed, but felt like having a bunch of metal and high temps readily accessible is probably a bad idea. -
PCB Ordered!
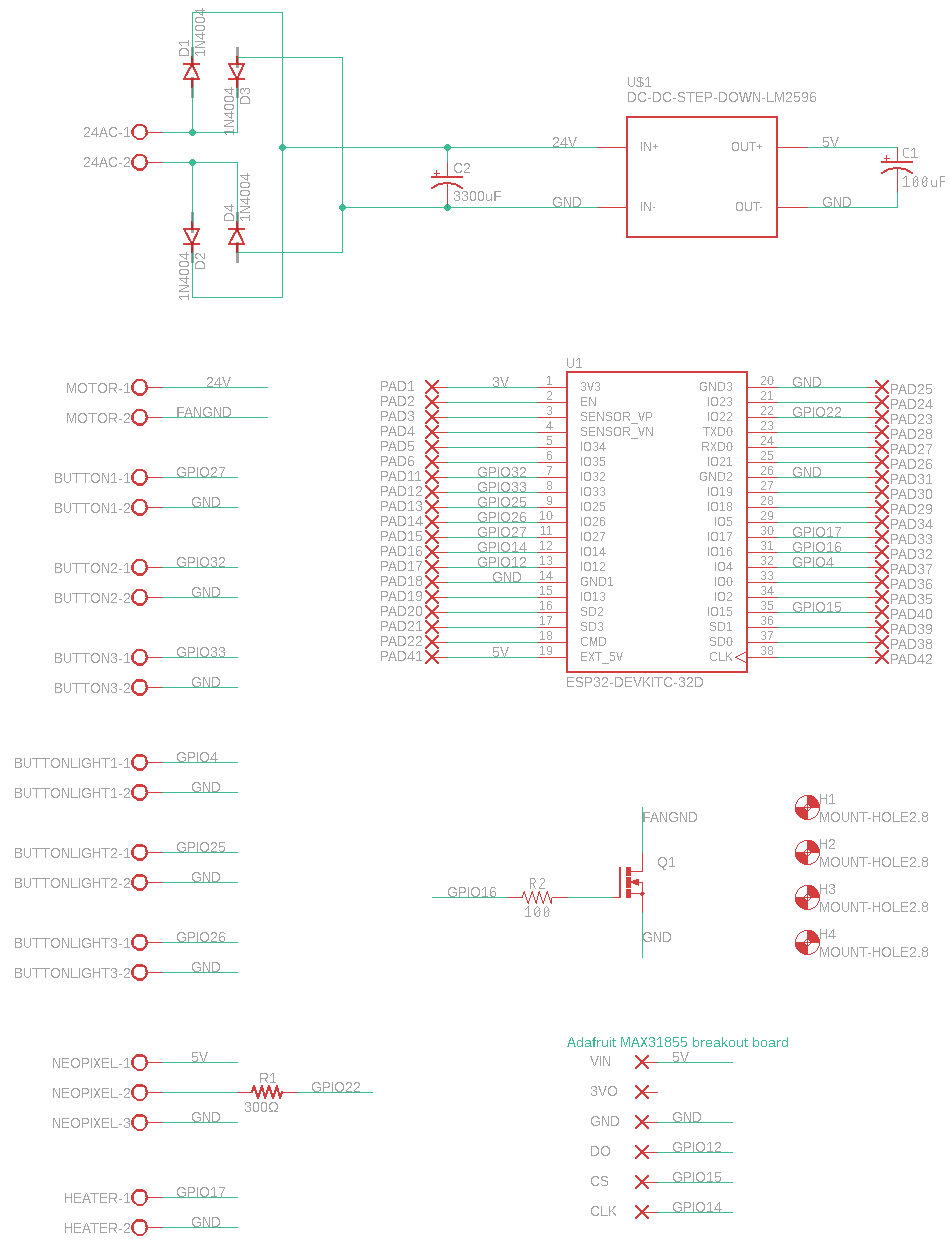
08/17/2022 at 15:59 • 0 commentsAfter tearing apart a popcorn popper and in general, 'making it work the way I want' with an ESP32, I was able to add my other 'wants' such as some buttons and lights and put together a schematic in Eagle.
![]()
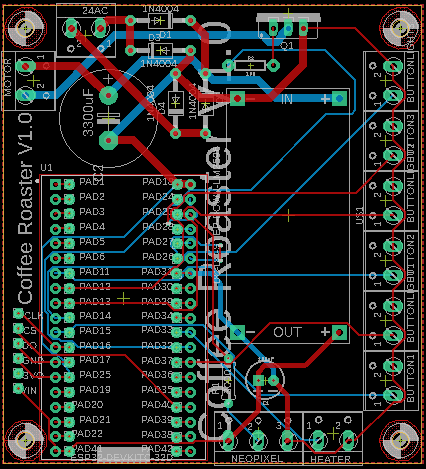
A few hours later and I had a PCB.
![]()
Now I just have to wait for it to arrive in a few weeks. In the meantime, I've got plenty to do: both the 3D printed enclosure to clean everything up needs to get designed and I need to write the actual code for the roasting process. This last part is dead-simple in practice, but since I'm making myself use ESPHome to control the ESP32 I think it will be a little more involved (I've never used ESPHome for anything other than making simple sensors, etc. in Home Assistant). It LOOKS like I can use a 'Generic Custom Component' to essentially just write some code like it's a normal Arduino project, but we'll see if this is actually the case.
Automated Coffee Bean Roaster
Roasting coffee beans at the push of a button