Close
0%
0%

Jetson tracking cam

Failed attempt at camera tracking on the jetson nano

Similar projects worth following

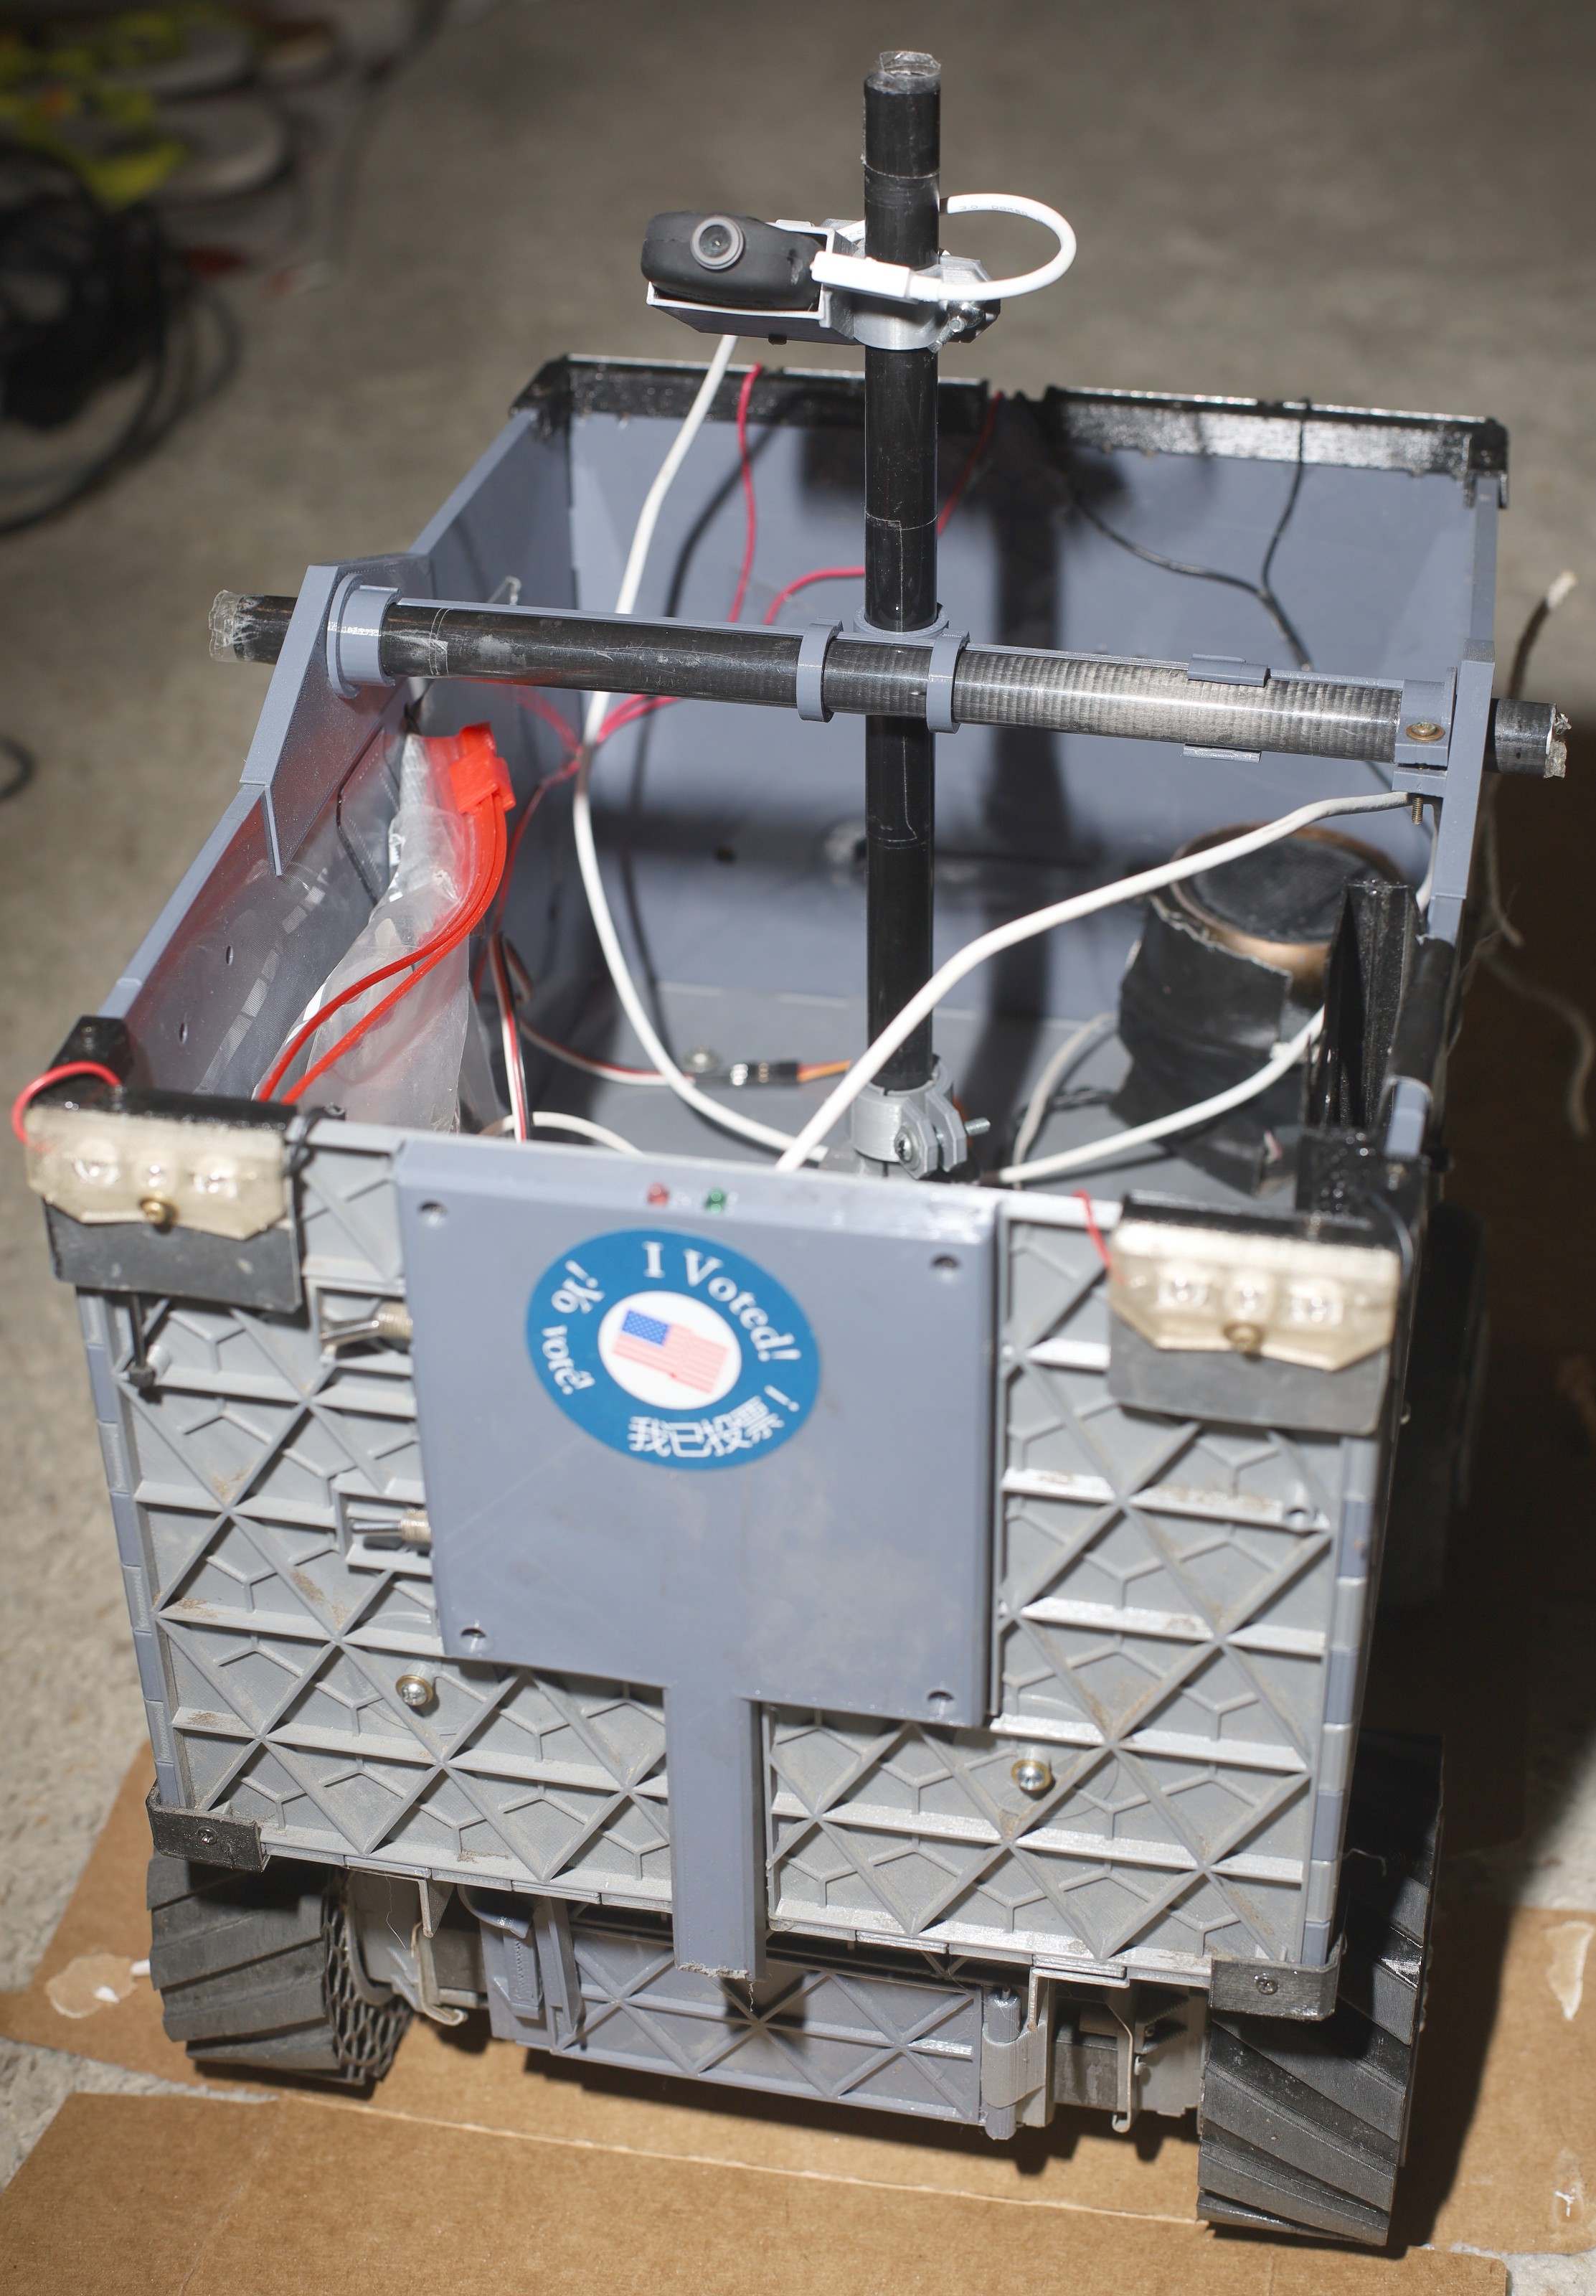
Continuation of a previous effort to track animals from the truck.

https://hackaday.io/project/183329-tracking-animals-on-arm-processors

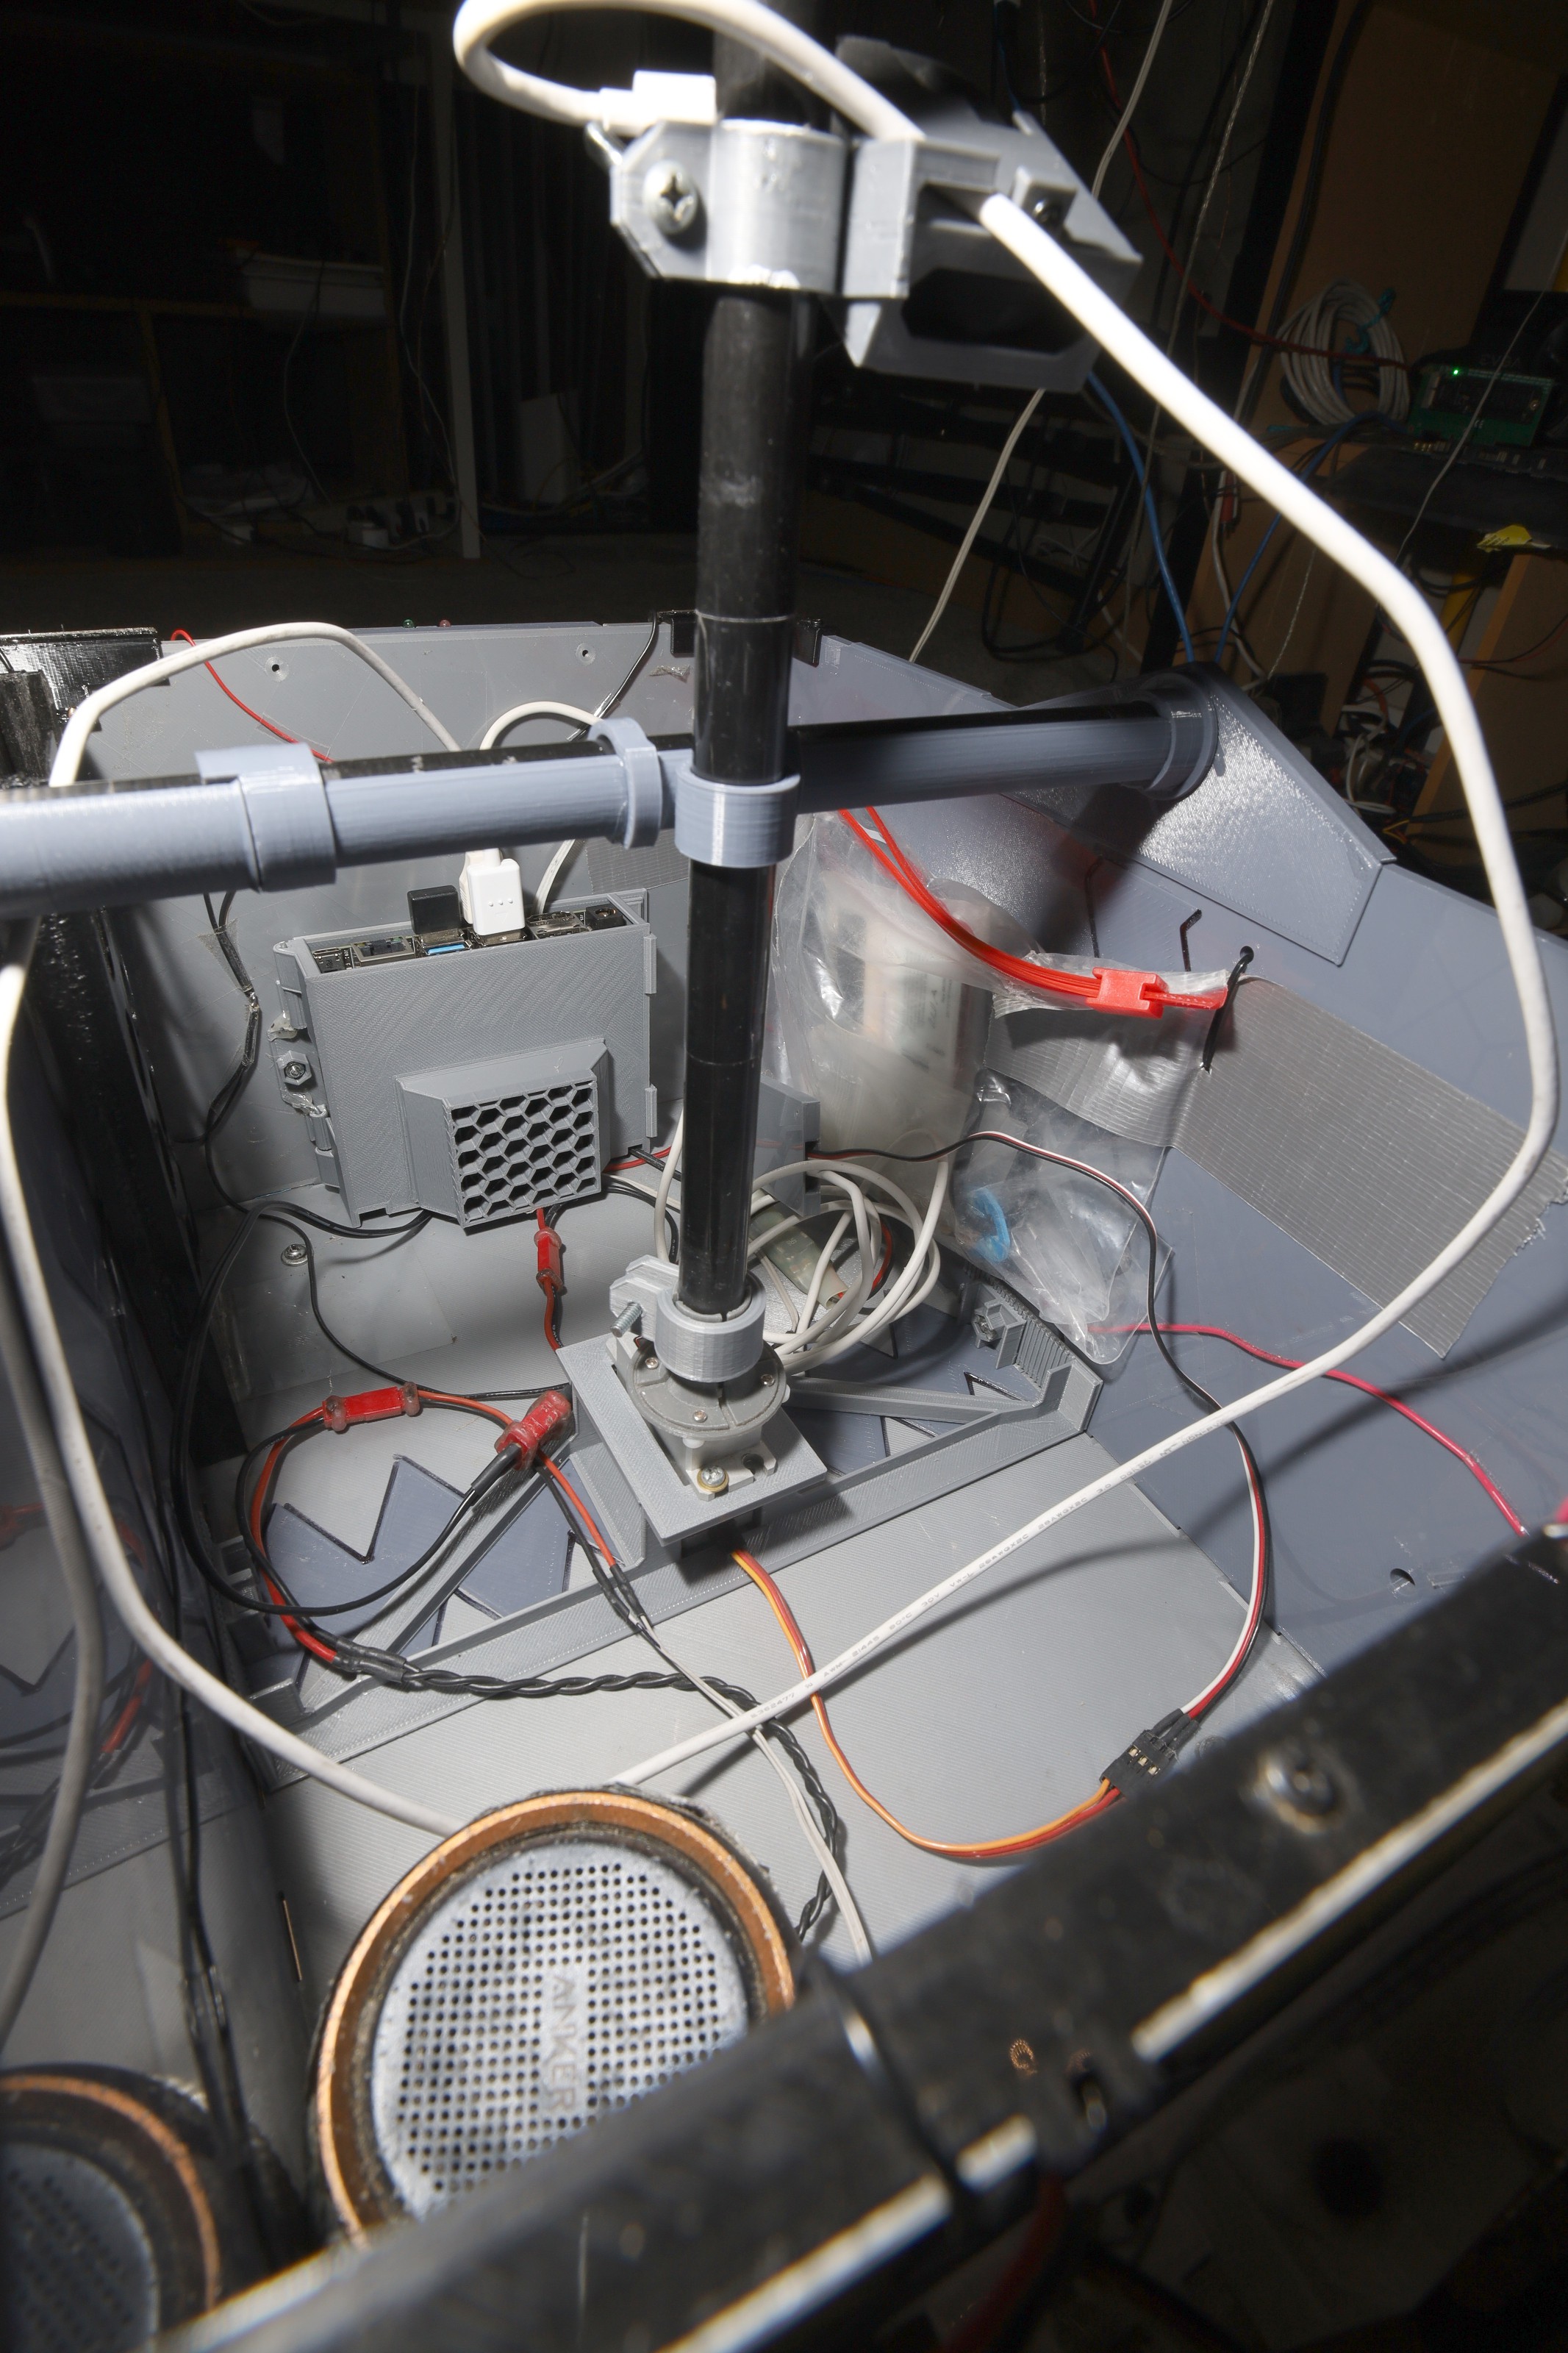
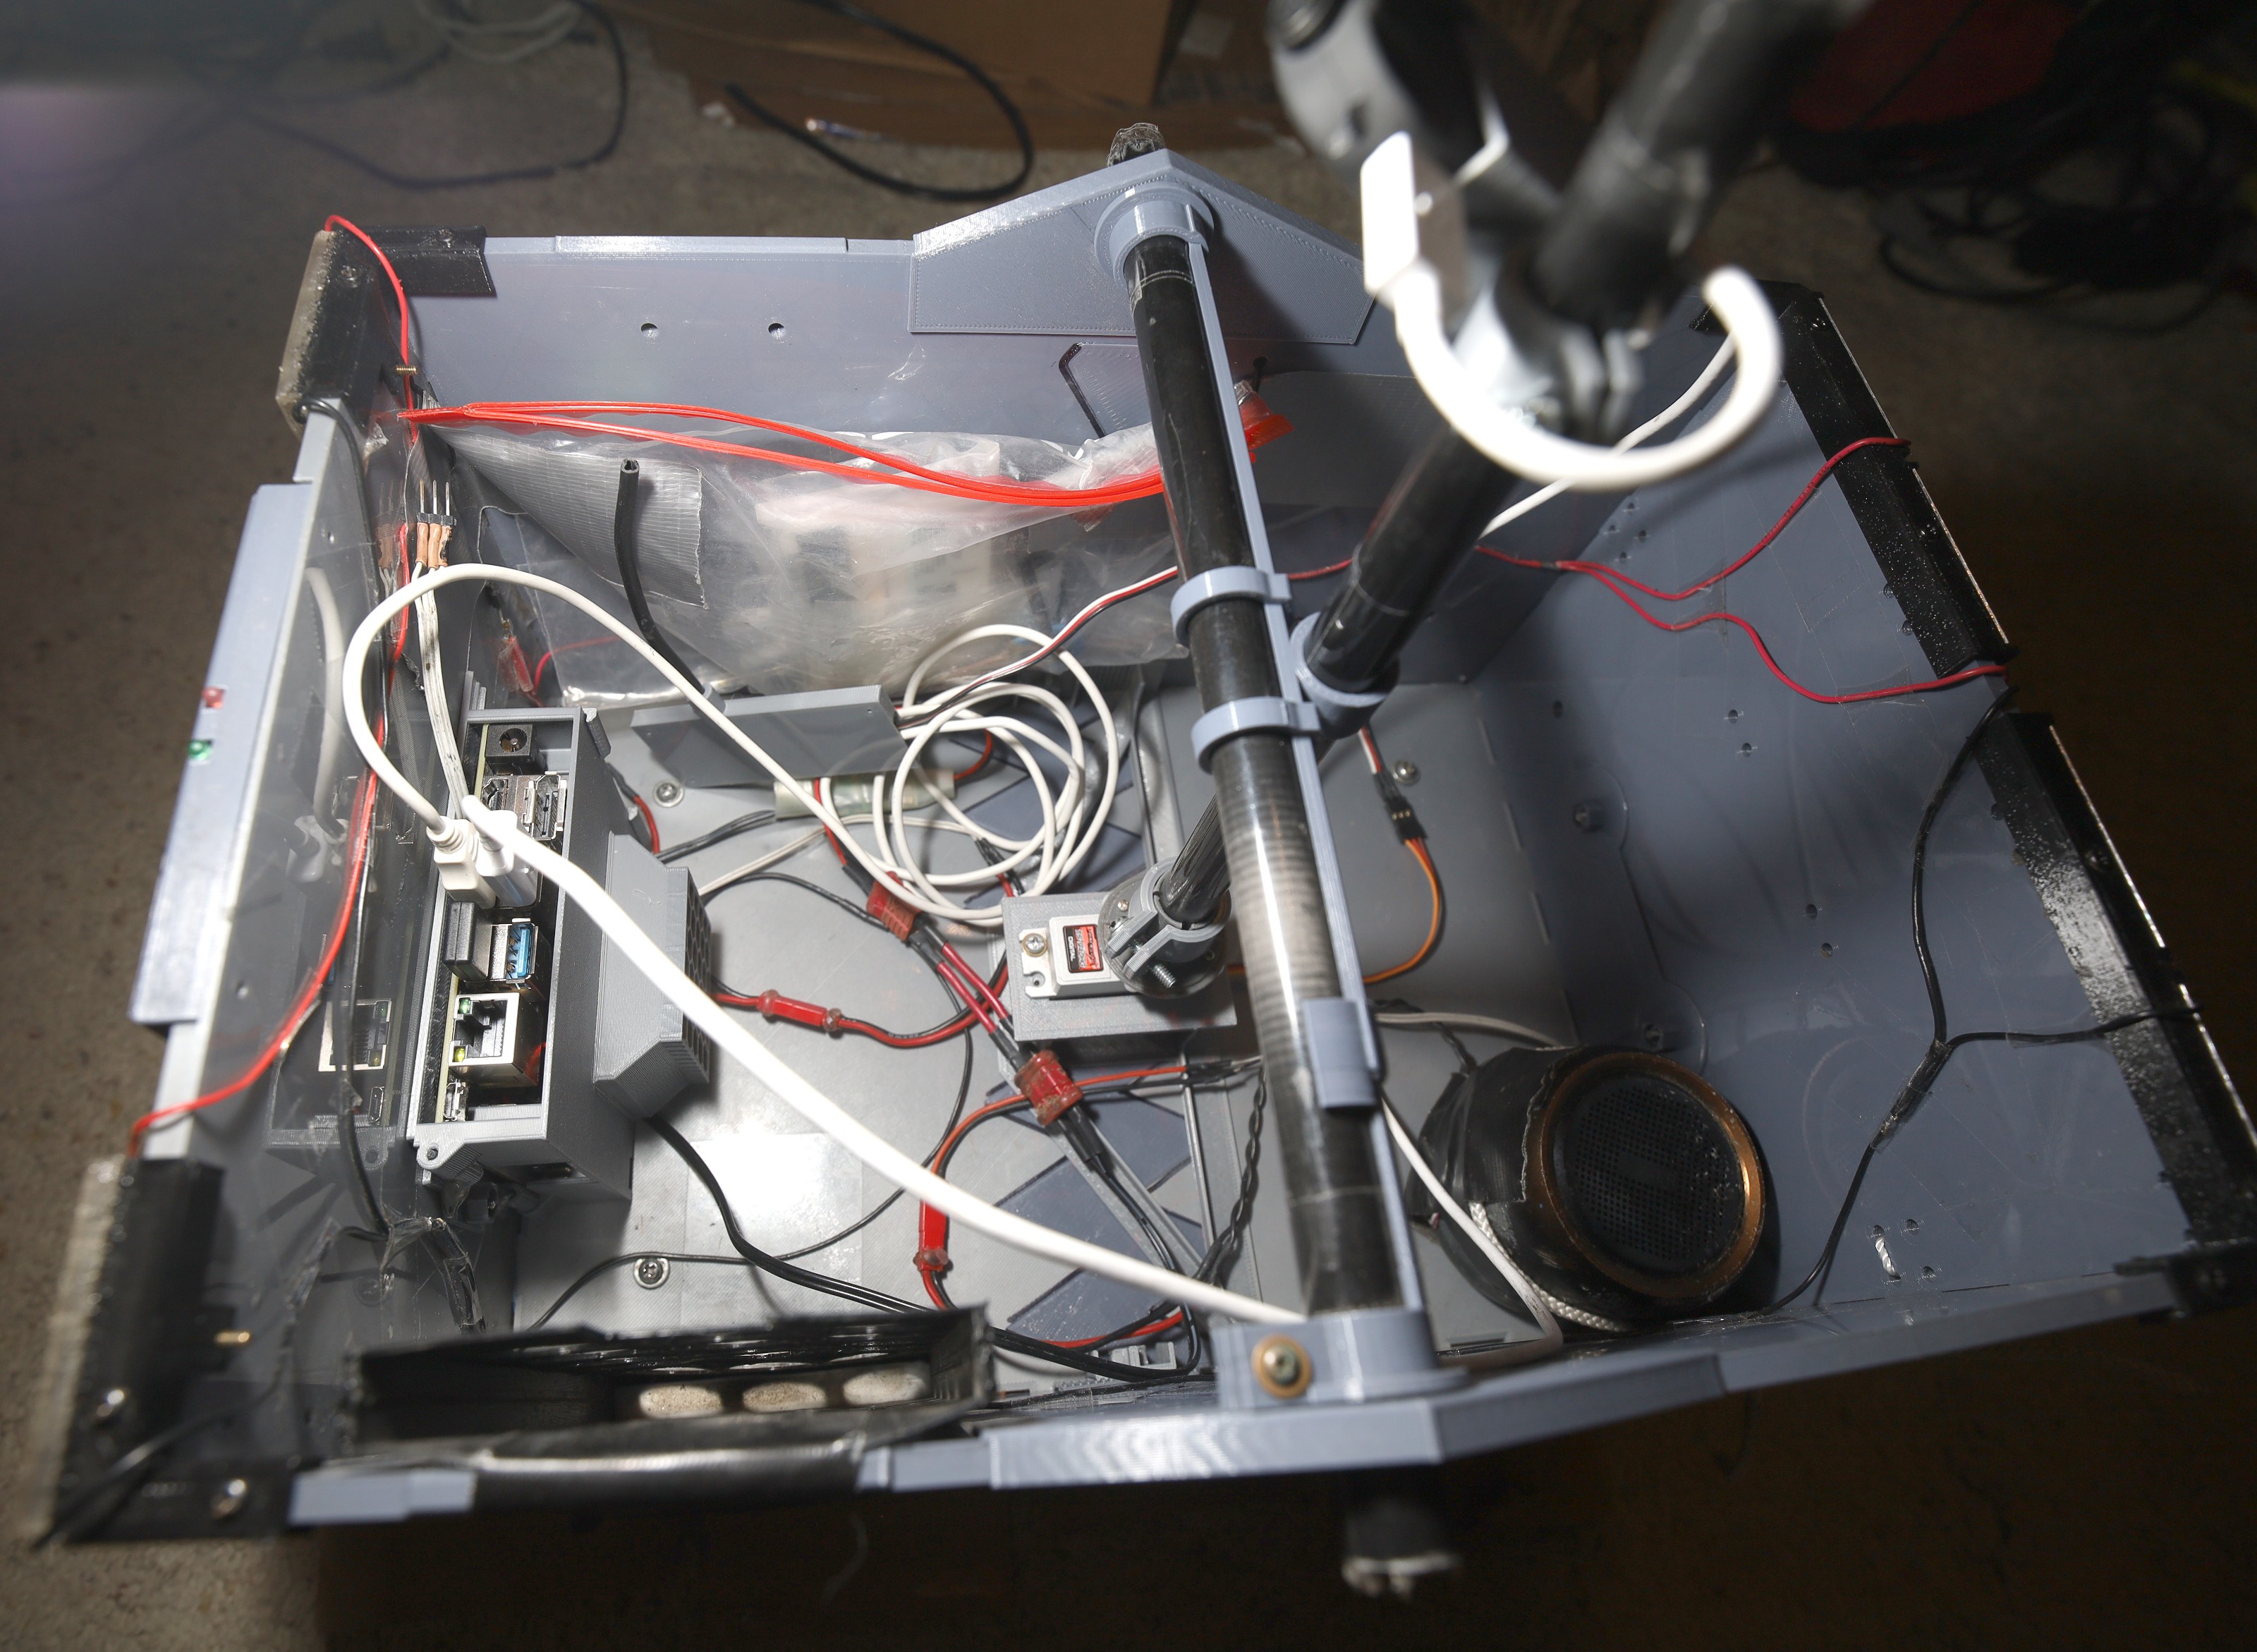
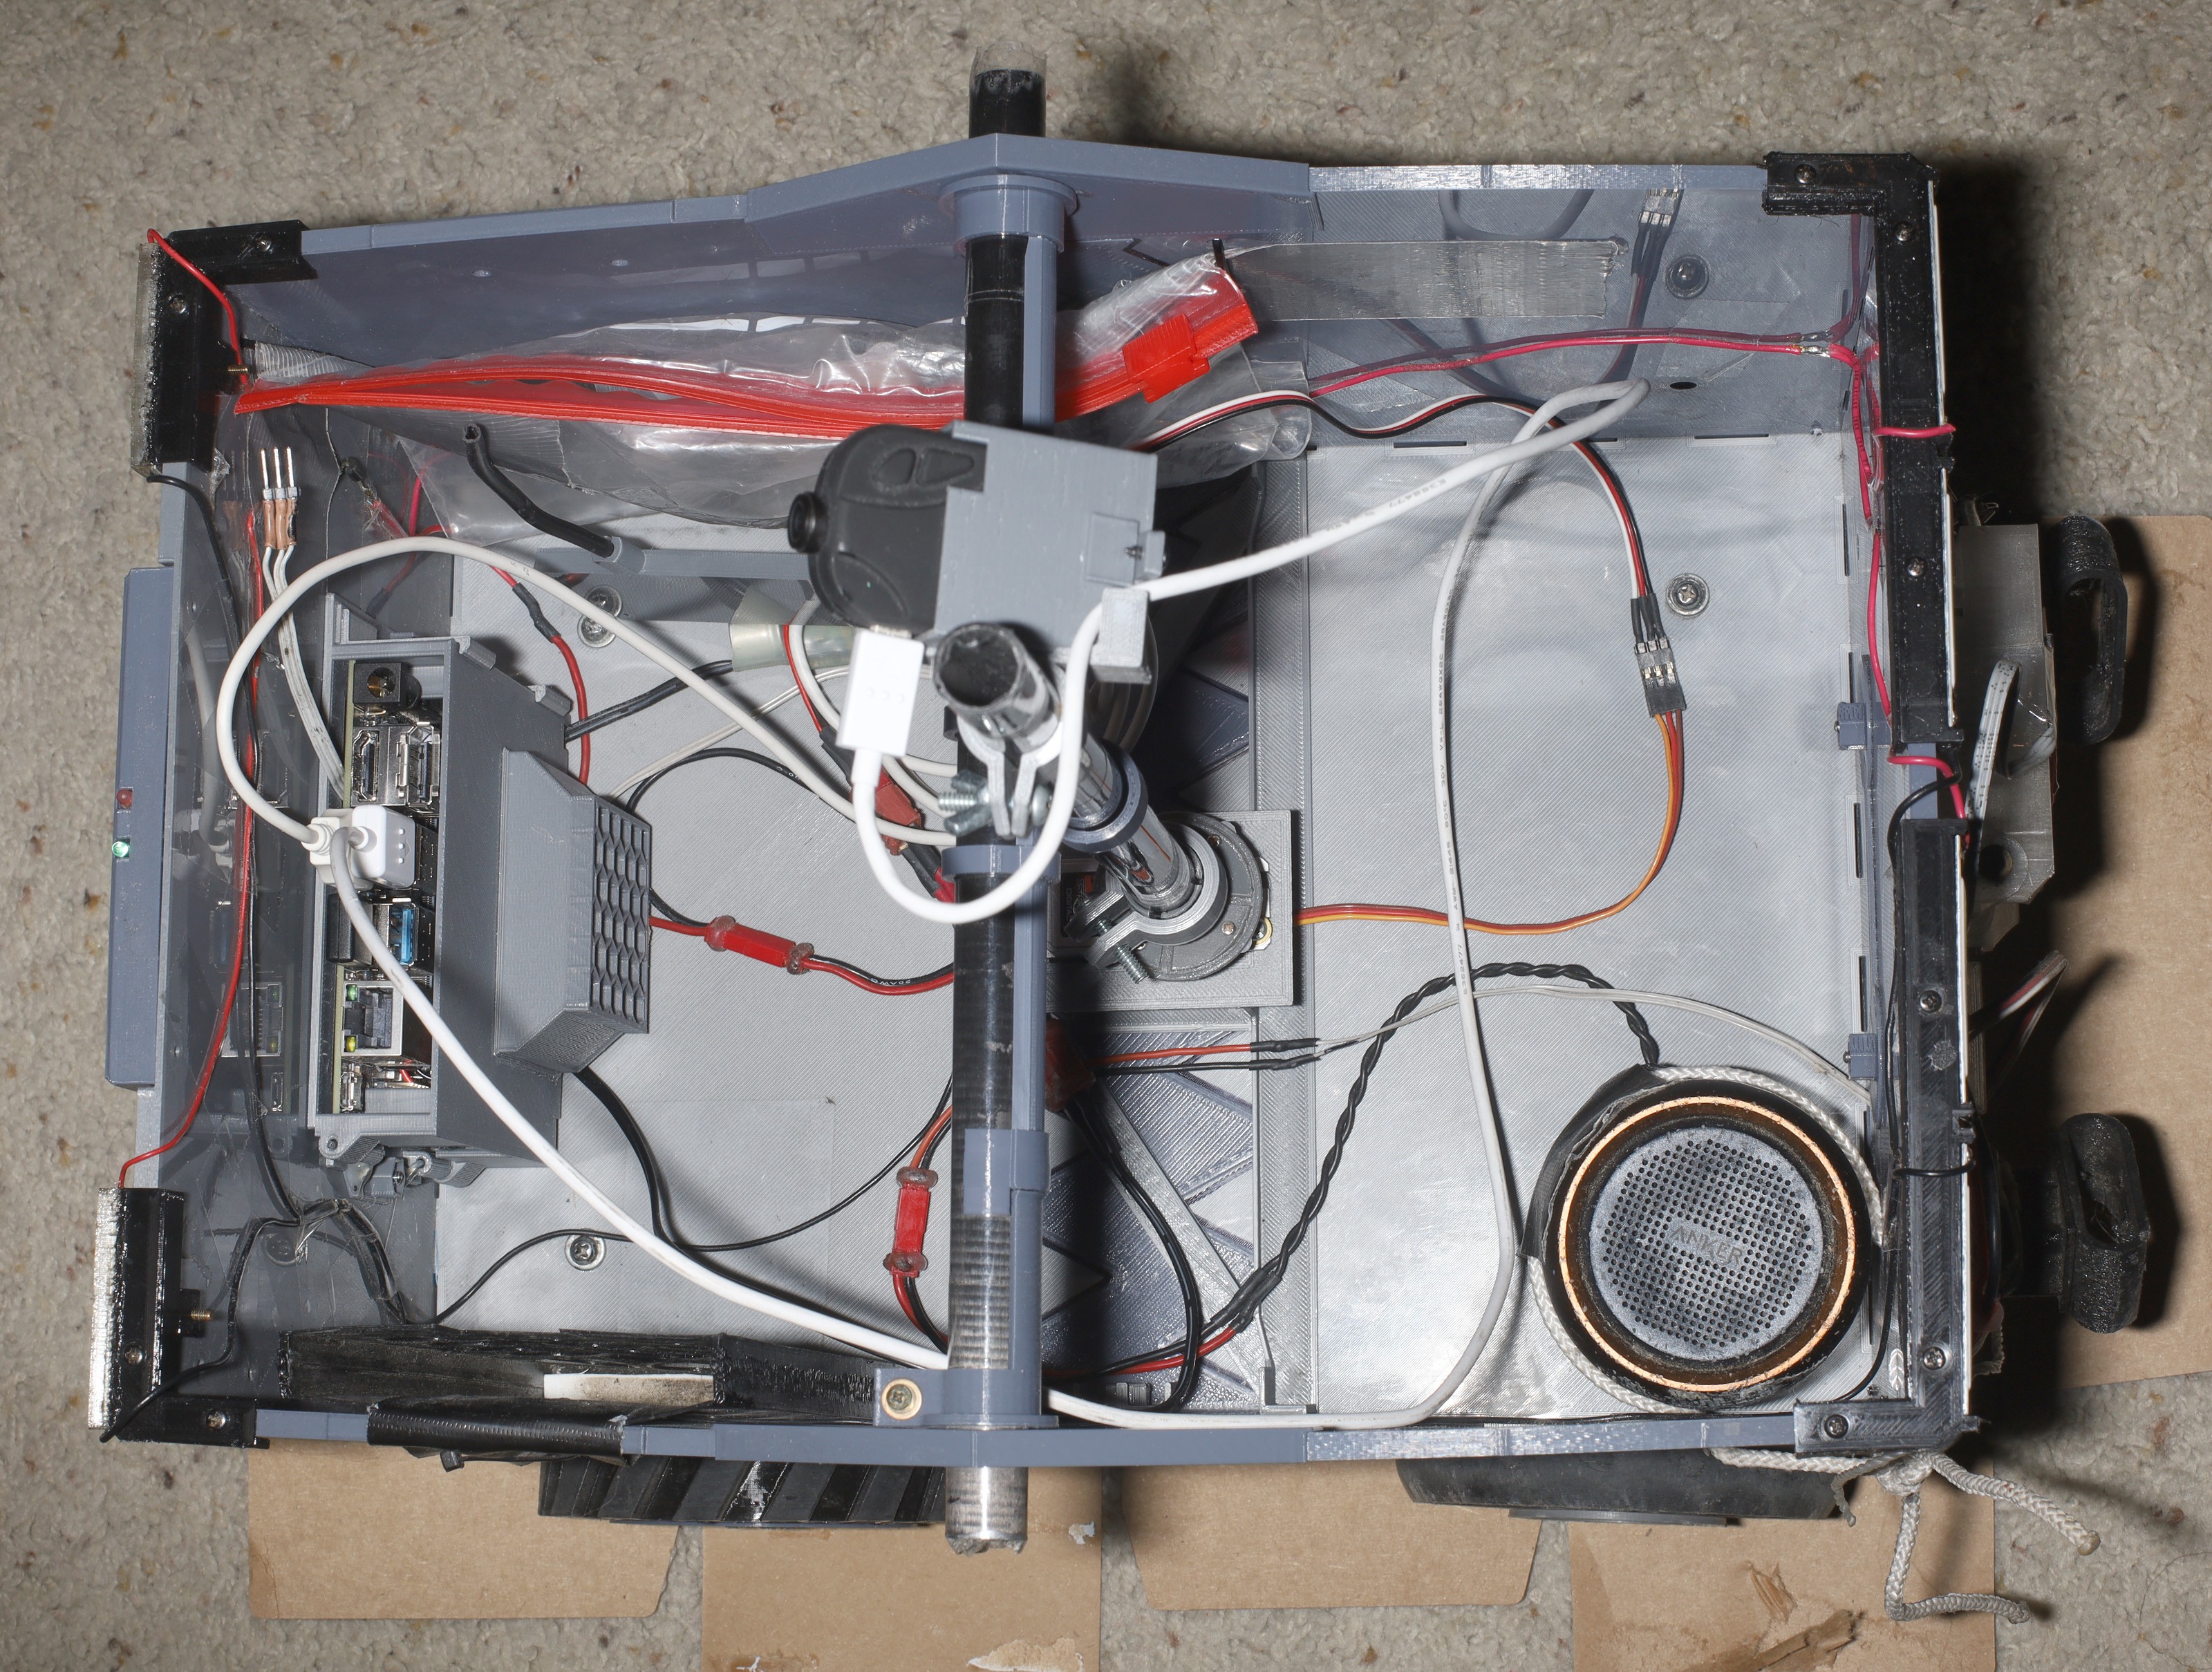
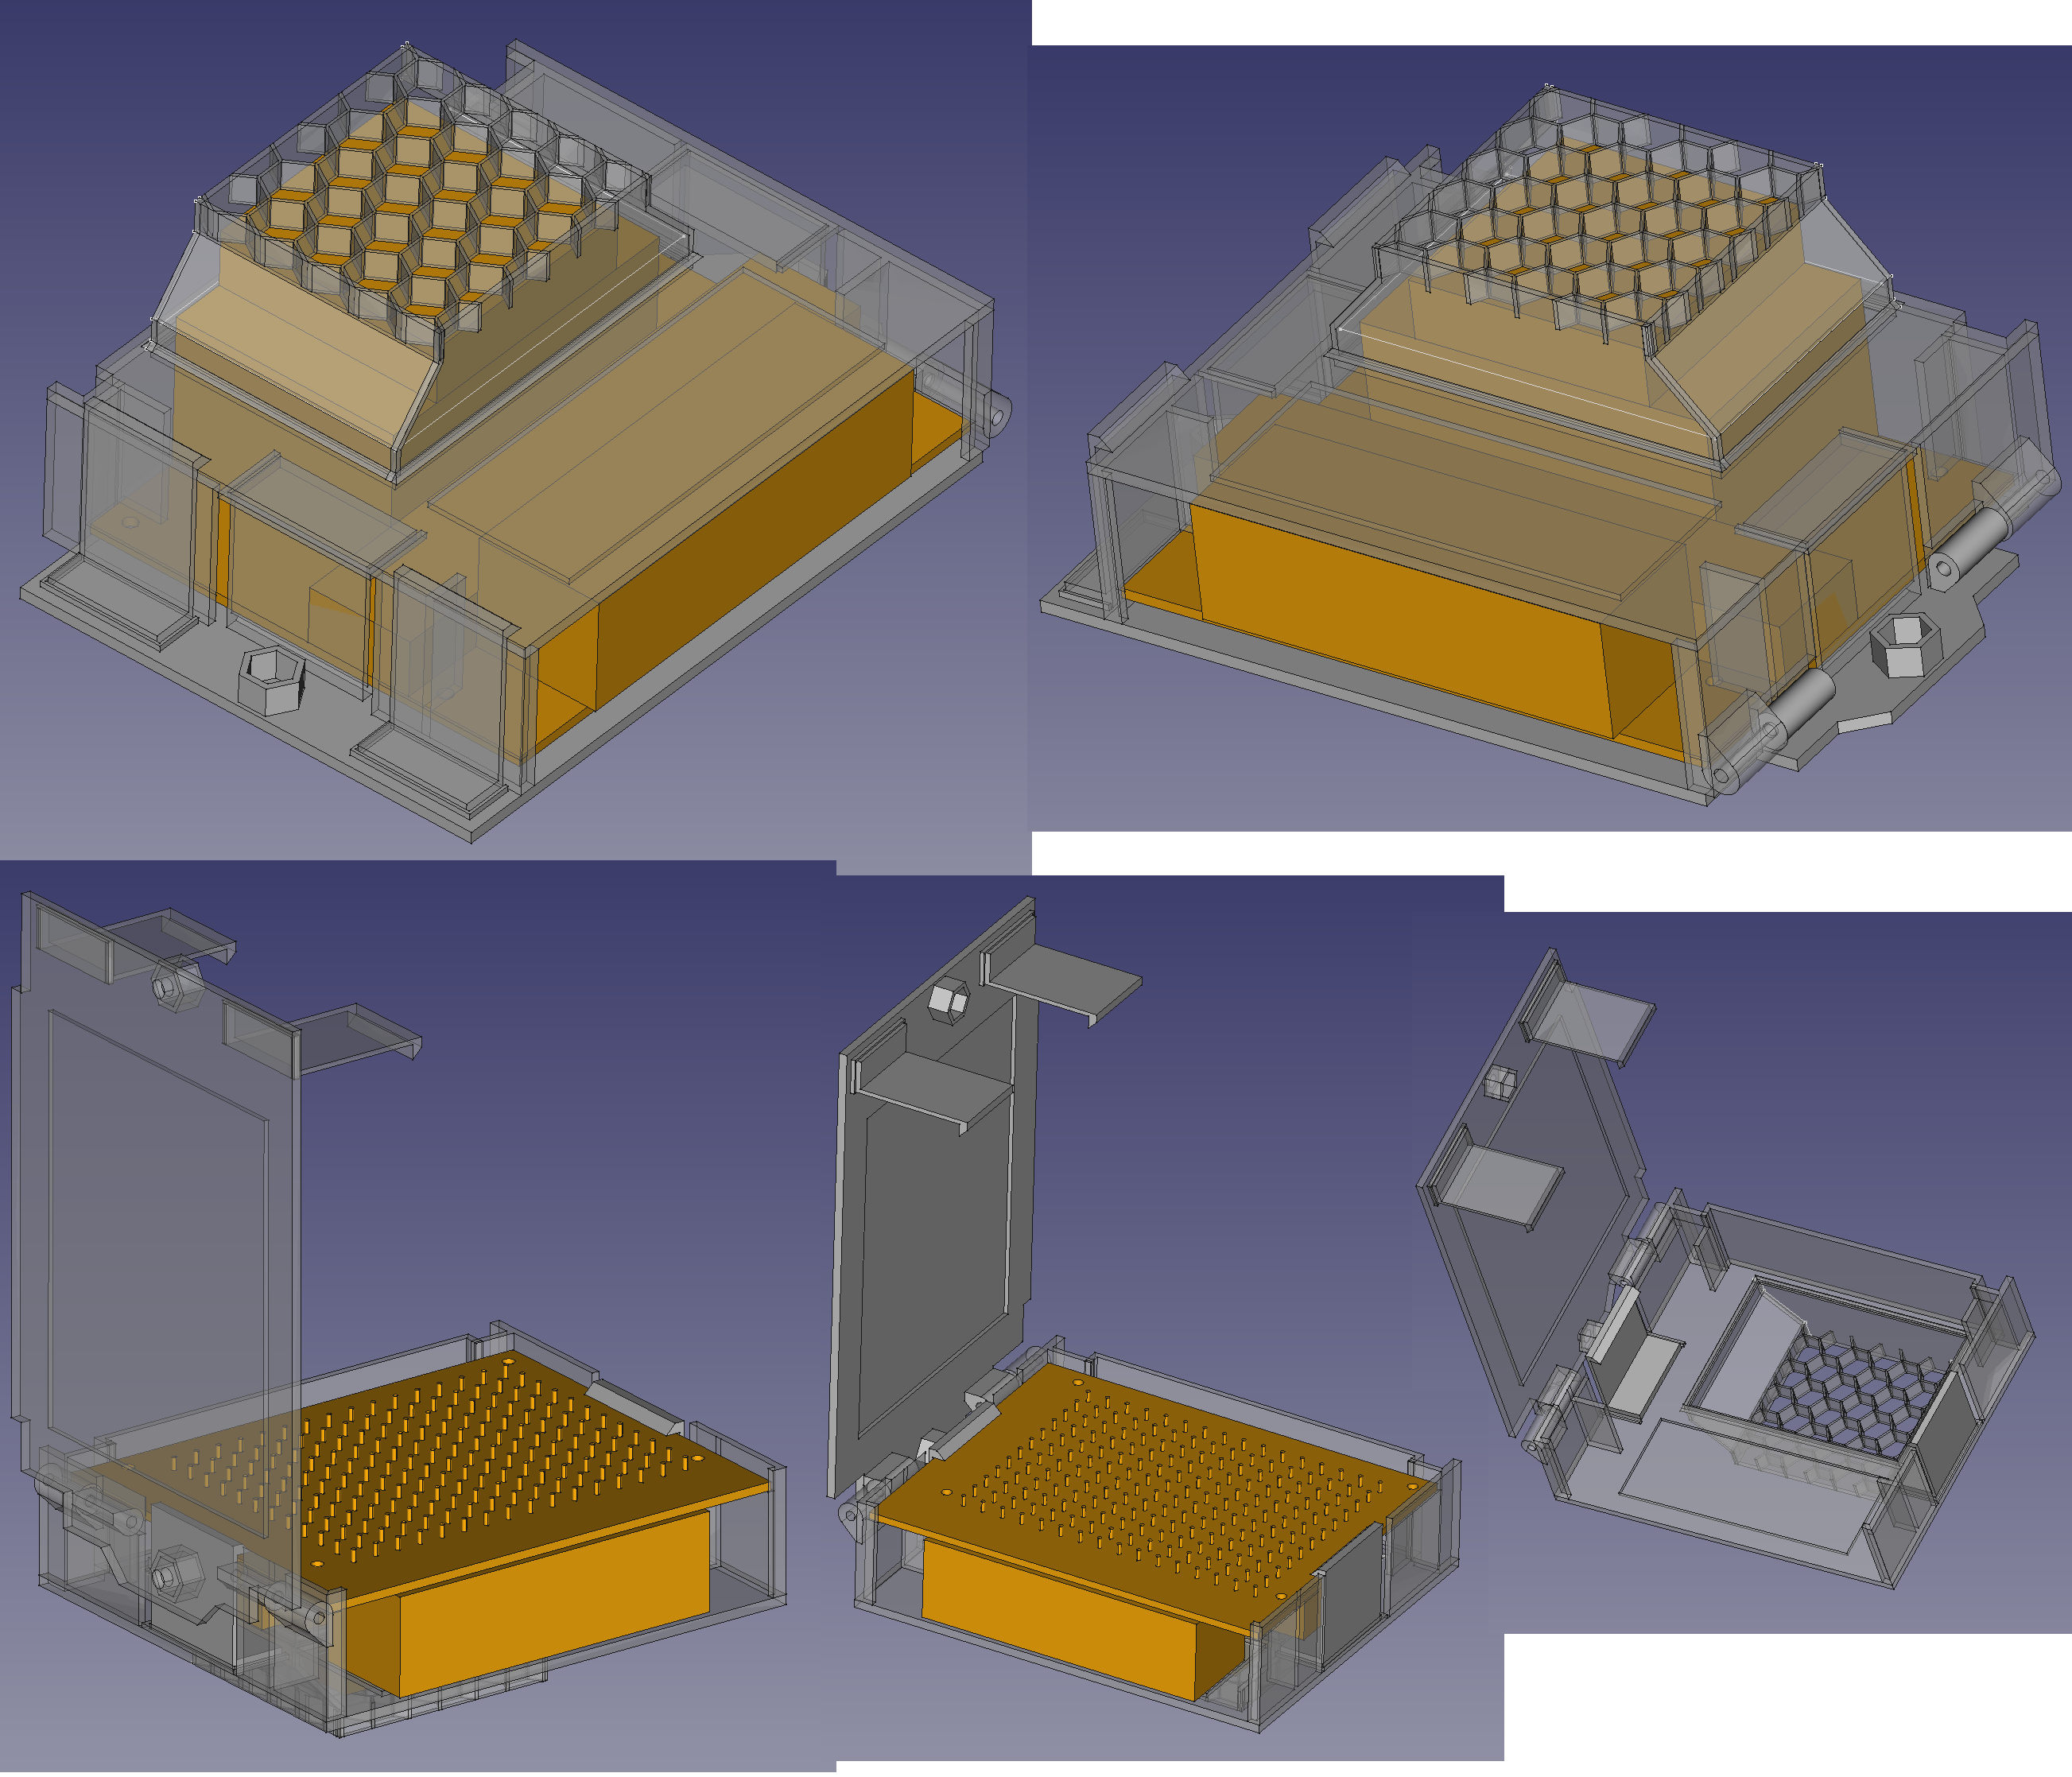
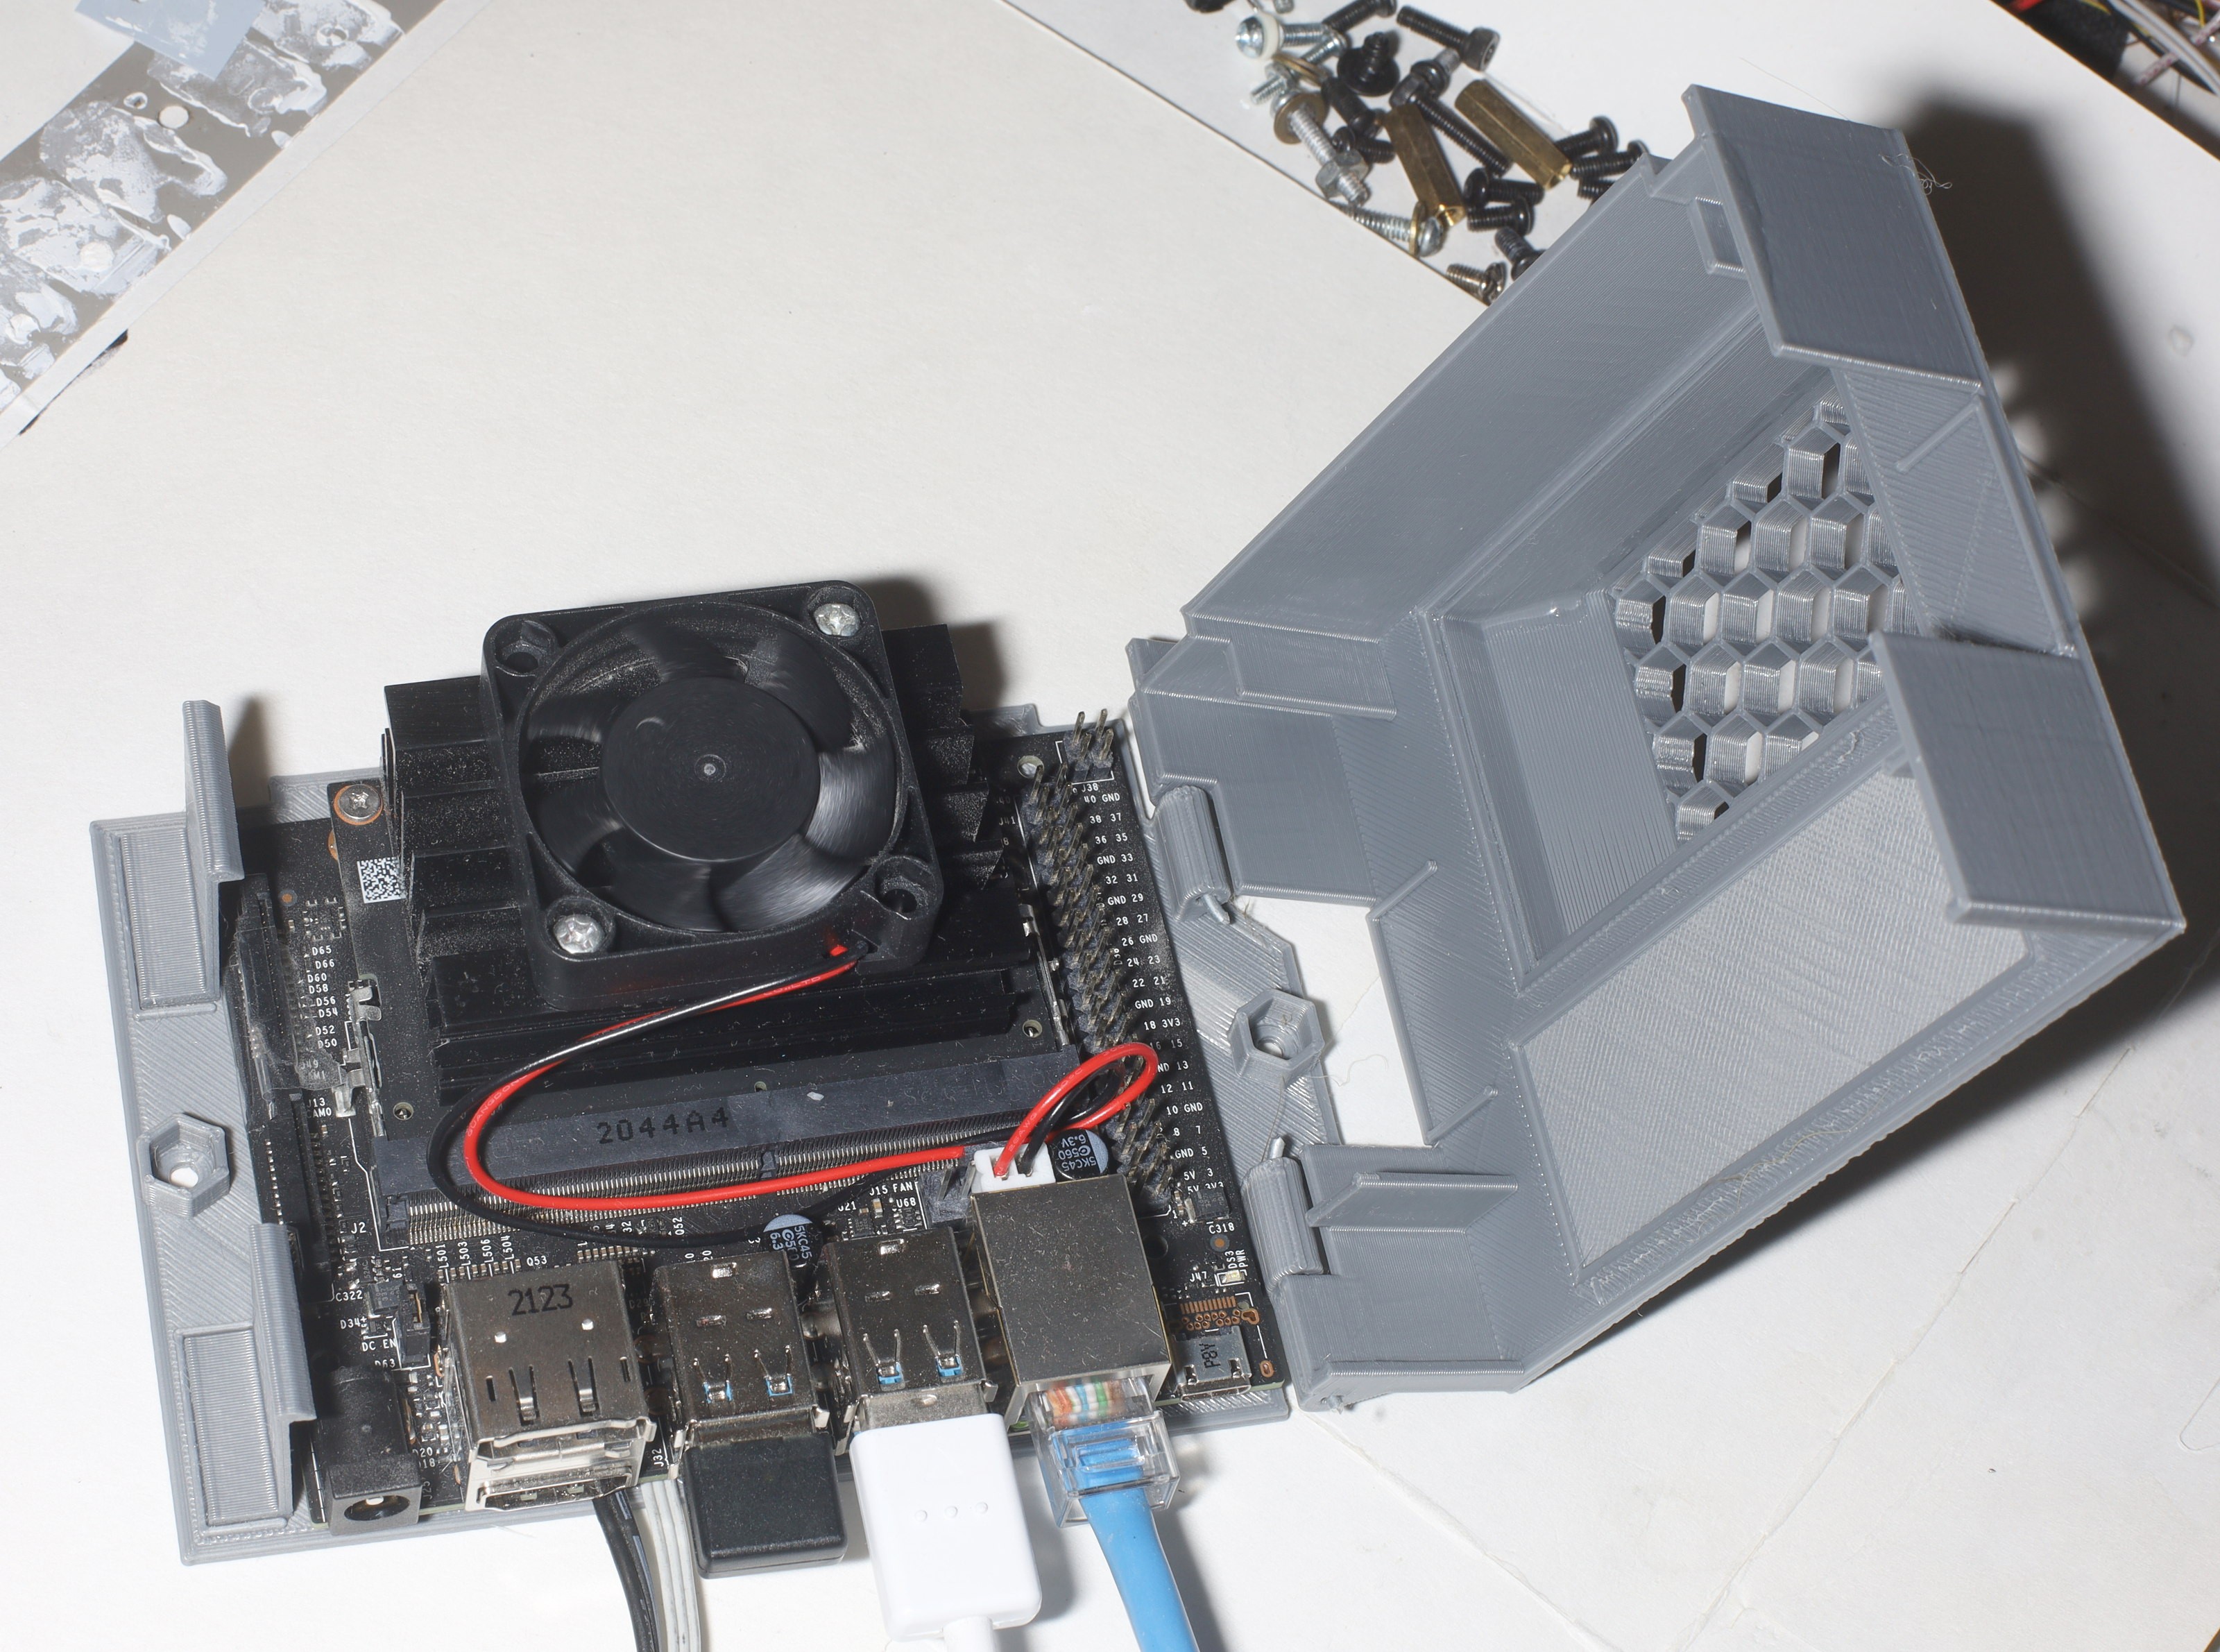
This time, a full jetson nano is used. 

Key differences between this & https://hackaday.io/project/162944-auto-tracking-camera

It has to be more portable by not supplying its own power.

It controls pan only.

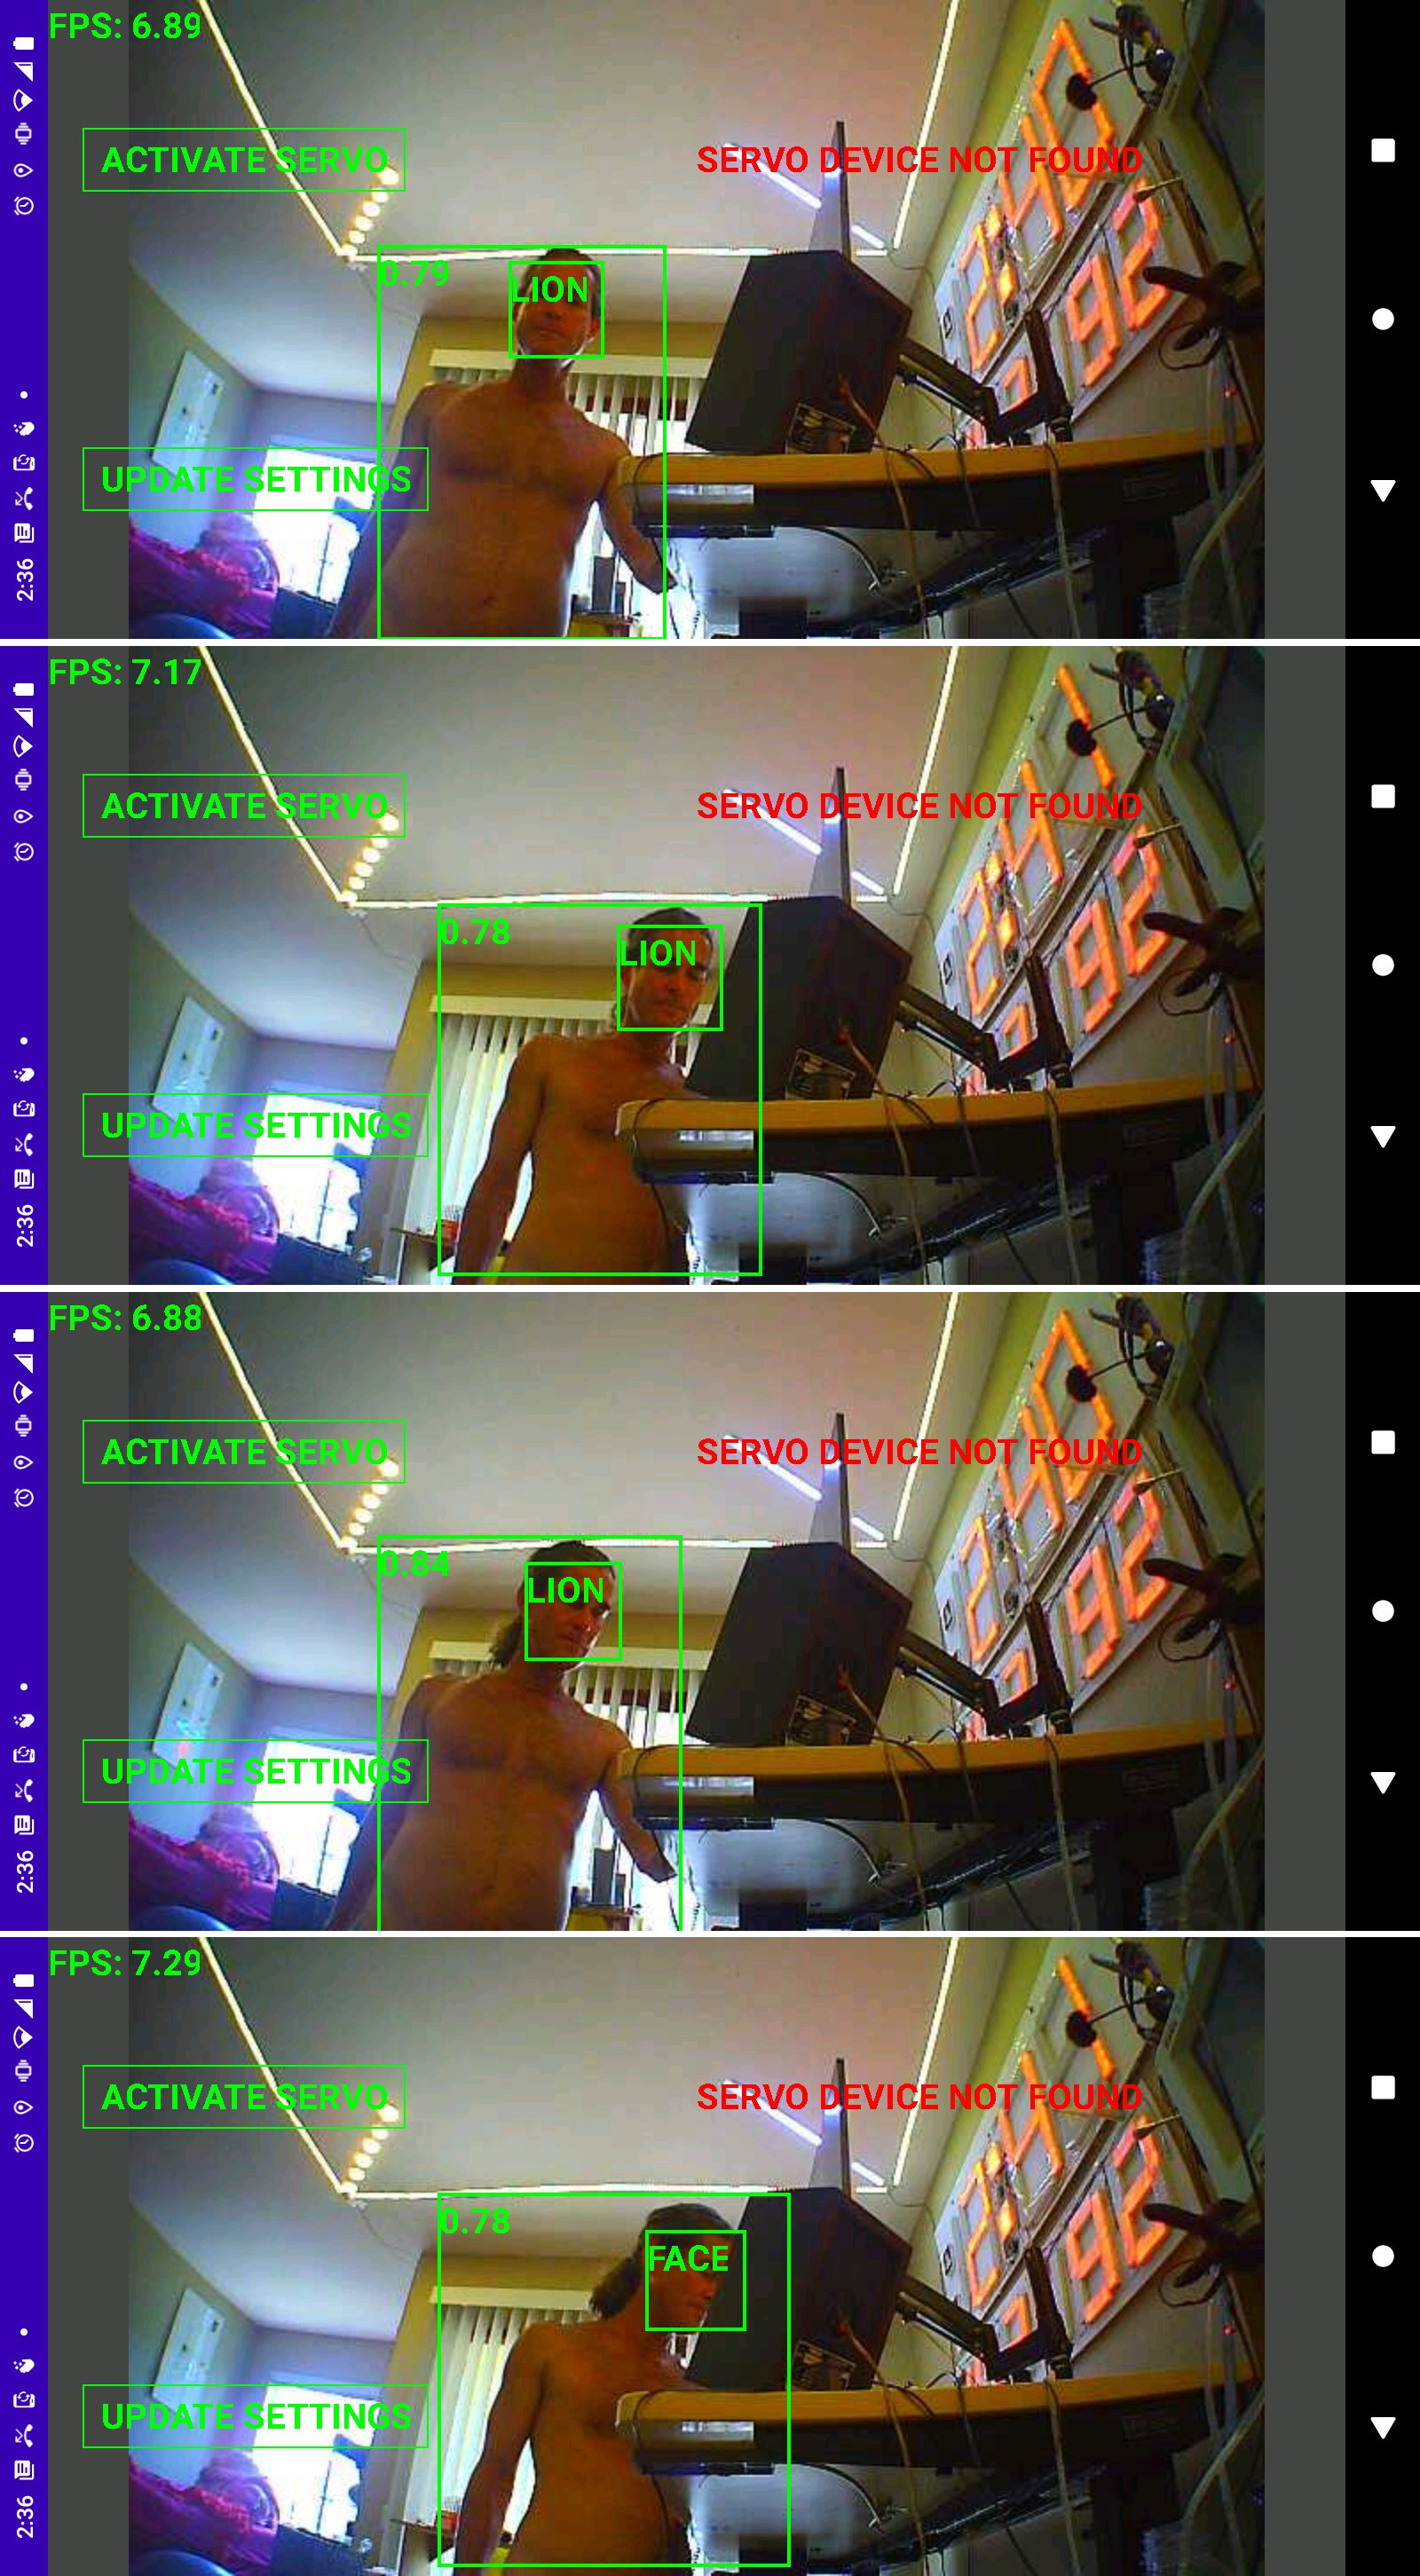
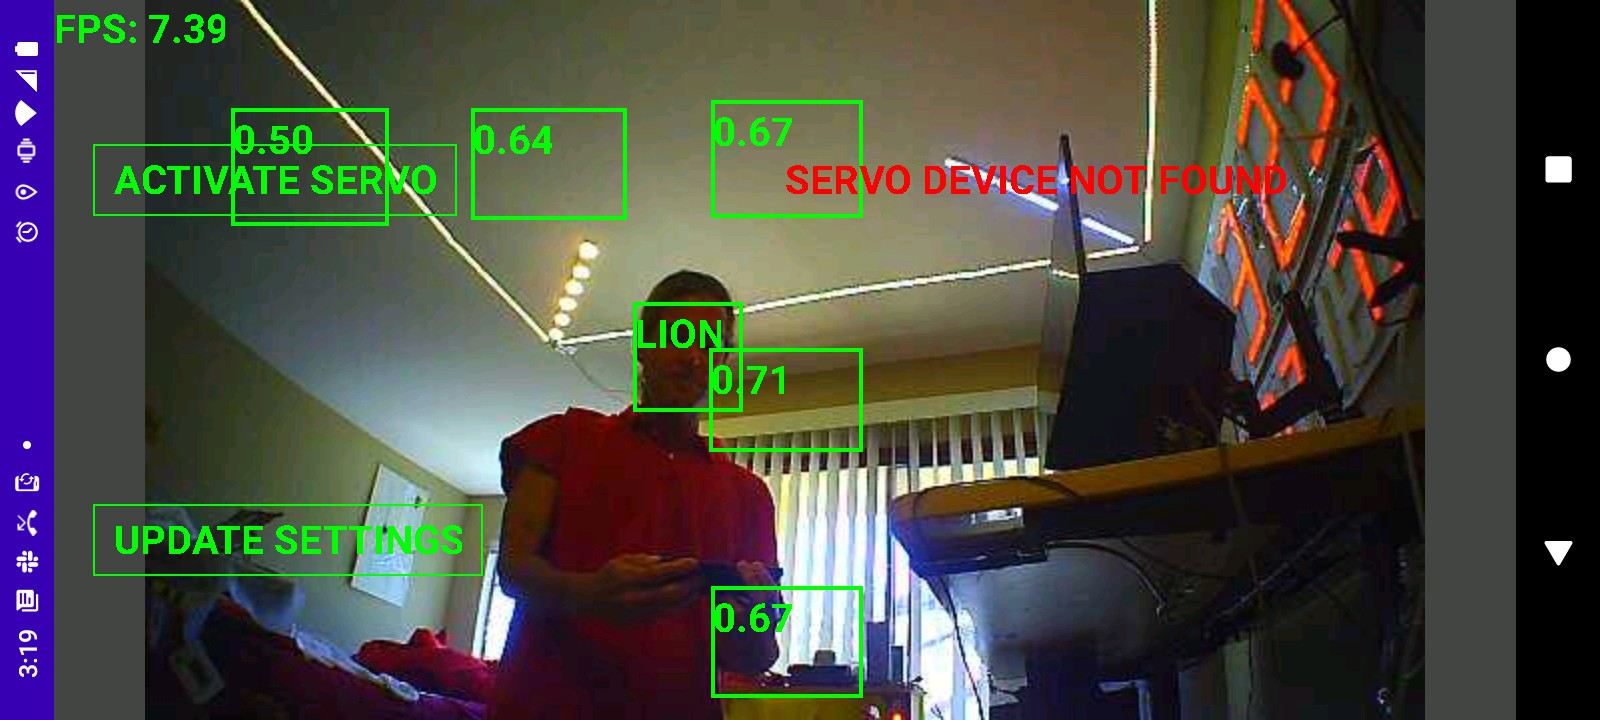
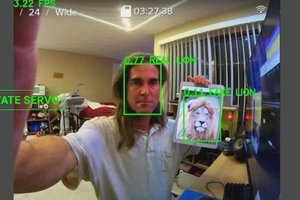
It has to differentiate 1 animal from many other animals.  This is being attempted by combining face recognition with body detection.

An offline video cropper using a 360 cam would be simpler but wouldn't match the picture quality of a full frame camera.

  • Raspberry pi 5 vs jetson nano

    lion mclionhead04/04/2024 at 19:11 0 comments

    There are still too many cases of tensorrt detecting only the background & not the lion so there would be no way to deglitch that.  Sometimes the lion hits are out of frame & sometimes the glitch hits are out of frame so testing for out of bounds coordinates wouldn't work.

    model_inspect.py as a frame server started to appeal.  It takes 3-4 minutes to start & requires a swap space but it goes at 12.5fps.  inspector.py using a frozen model goes at 10.5fps.  Not sure why there is such a difference between inspector.py + frozen model & model_inspect.py + checkpoint.  It would be quite tedious to debug model_inspect.py.

    After 4 years out of production, the raspberry pi series resumed production in 2024 with the 5.  At this point, a raspberry pi 5 would be vastly faster than the jetson nano as a tracking cam, start faster, take less space, use less power. 

    https://www.raspberrypi.com/news/benchmarking-raspberry-pi-5/

    They show neural network benchmarks going at least 3x faster than the raspberry pi 4, so at least 24fps would be achieved.  The jetson only hit 20fps with tensorrt efficientdet.  Having invested most of 1.5 years on the jetson nano, it was time to move on.

  • Revisiting efficientdet-lite0 on tensorrt

    lion mclionhead11/27/2023 at 02:17 0 comments

    It was long believed if model_inspect.py could just test the tensorrt engine, it might narrow down the problem to the input format.  Lately started thinking if it could work at all in model_inspect.py with the tensorrt engine, all the inferrence should stay in python & the rest of the program should communicate with shared memory.   Python has a shared memory library.

    Reviewing model_inspect.py again, all it does it ingest the efficientdet graph & the protobuf files, compile the tensorrt engine on the fly, & benchmark it.  The compilation always failed.  The way a tensorrt engine is loaded from a file in python is the same way it's done in C++ so it's not going to matter.  The problem is the way it's being trained doesn't agree with an operator in tensorrt.

    https://github.com/NobuoTsukamoto/benchmarks/blob/main/tensorrt/jetson/detection/README.md

    The thing about these benchmarks is they were all done on the pretrained efficientdet checkpoint.  It's unlikely anyone has ever gotten a home trained efficientdet to work on jetson nano tensorrt.

    Given the difficulty with body_25 detecting trees, it might be worth using efficientdet on libcudnn.  It might be possible to run a chroma key on the CPU while efficientdet runs on the GPU.  The problem with that is it takes a swap space just to run efficientdet in libcudnn.  There's not enough memory to do anything else.

    The cheapest improvement might be a bare jetson orin module & plugging it into the nano dock.  Helas, the docks are not compatible.  The orin's M2 slot is on the opposite side.  It doesn't have HDMI.  Bolting on 360 cam & doing the tracking offline is going to be vastly cheaper than an orin, but it has to be lower & it needs a lens protector in frame.  The weight of 360 cams & the protection for the lenses has always been the limiting factor with those.

    The raspberry pi 5 8GB recently started being in stock.  That would probably run efficientdet-lite0 just as fast as the jetson nano.

    -------------------------------------------------------------------------------------------------------------------------------------------------

    Efforts turned to making model_inspect.py some kind of image server & just feeding it frames through a socket.  model_inspect.py has an option to export a saved model. Maybe that would start it faster & use less memory.

    root@antiope:/root/automl/efficientdet% OPENBLAS_CORETYPE=CORTEXA57 python3 model_inspect.py --runmode=saved_model --model_name=efficientdet-lite0 --ckpt_path=../../efficientlion-lite0.1/ --hparams=../../efficientlion-lite0.1/config.yaml --saved_model_dir=../../efficientlion-lite0.saved

    Then perform inference using the saved model

    root@antiope:/root/automl/efficientdet% OPENBLAS_CORETYPE=CORTEXA57 python3 model_inspect.py --runmode=saved_model_infer --saved_model_dir=../../efficientlion-lite0.saved --input_image=../../truckcam/lion320.jpg --output_image_dir=.

    Helas, no difference in loading time or memory.  It takes 3 minutes to start, which isn't practical in the field.  Suspect most of that is spent swapping to a USB flash.  The tensorRT version of efficientdet takes 20 seconds to load.

    There is another inference program which uses a frozen model:

    root@antiope:/root/automl/efficientdet/tf2% time OPENBLAS_CORETYPE=CORTEXA57 python3 inspector.py --mode=infer --model_name=efficientdet-lite0 --saved_model_dir=/root/efficientlion-lite0.out/efficientdet-lite0_frozen.pb --input_image=/root/truckcam/lion320c.jpg --output_image_dir=.

    This takes 43 seconds to start & burns 2 gigs of RAM but the frame rate was only 10.5fps. body_25 on tensorrt did 6.5fps & efficientdet_lite0 on the raspberry pi 4 did 8.8fps.  It could possibly do chroma keying in the CPU while efficientdet ran in the GPU.

    ------------------------------------------------------------------------------------------------------------------------------------------------------...

    Read more »

  • Jetson body25 test

    lion mclionhead09/27/2023 at 07:39 0 comments

    11 years of writing phone apps have convinced lions the best way to configure a phone app is a text file in a text editor.

    So the tracking program being dual purpose required a configuration bit, if truck is 0 it reads configuration from the GUI.  If truck is 1, it reads configuration from the text file.  It seems easiest, since the 2 axis configuration depends on visual feedback on the GUI as the user manually moves the servos.  The 1 axis configuration doesn't need any GUI feedback.

    ------------------------------------------------------------------------------------------------------------------------

    Another test run detected more trees than lion.  The COCO dataset all the pretrained models use seems to have animals who look like trees.  Tracking always stopped short of the subject, possibly because the body_25 hit box is too wide. 

    Most tracked footage would be better off in manual mode.  Tracking is only needed when the truck turns & when the lion moves relative to the truck.  Most of the time, lions are in a fixed position relative to the truck. 

    Other than the auto tracker issue, the other problems were the camera remote needing a power switch protector, the camera receiver's long standing frequency hopping bug getting really debilitating when using motion control.  Maybe it's worth putting in another switch or button to select motion control or manual control.

     -------------------------------------------------------------------------------------------------------------------------------

    The idea occurred of creating a separate color histogram for each body part & using the histograms of all the body parts to recognize a lion in a crowd.  Multiple body parts could enhance the detection.  There isn't going to be anything more reliable than color histograms & identification of any kind might just require wearing differentiating colors.  It might be better off using a contour model.

    When only 1 animal is visible, it could constantly update its histogram table.

    Testing it is the real problem.  Lions just aren't around crowds except very rare cases. They could deliberately walk around the shopping mall just for testing.

    There was a new development in the announcement of a future raspberry pi 5.  This one goes at 2.4Ghz, thus taking efficientdet-lite to 11fps & increasing the reserve for chroma keying.  The jetson's power consumption & size have been disappointing.  TensorRT has proven to be a waste of time.

  • Body_25 as a pure animal detector

    lion mclionhead09/07/2023 at 05:03 0 comments

    Shuffling source code back & forth for no reason, it became clear that when using body_25, the

    https://hackaday.io/project/162944-auto-tracking-camera

    2 axis tracker should just have a switch.  It should flip between 1 & 2 axes.  This would have to be set at startup & change a bunch of bits: 1 or 2 animals, 2 180 servos or 1 360 servo, webcam or HDMI converter.  It seems best done through the phone configuration file & a reboot.

    Body_25 gave slightly inferior test results than efficientdet, as a pure animal detector.  The mane limitation is gives slightly more false negatives.

    There might be some marginal improvement in using a jetson nano without face recognition rather than a raspberry pi without facial recognition, since it does a full frame at 7fps instead of 1/3 frame.  Differentiation of animals remaned unsolved.  A head detector rather than a face detector is what's needed.  There is no head equivalent of facenet.  If lions had the brain power to make a ground up model like that, a better jetson could be justified.

    A head detector would be the ultimate animal tracker.

    ---------------------------------------------------------------------------------------------------------------

    Unfortunately, the fiddly ADC values from the paw controller are used throughout the vision system. 

    Refactored the truckcam radio system to try to make the ADC values more sensible.  It needs ADC values for deadband, auto centering & timelapse mode.

    Verified the transmitter burns 50-100mA.  Helas, not enough space was modeled in the enclosure to fit a newer, longer battery.

    The mane problem is the keychain cam being a lot more fiddly on the jetson than it was on the raspberry pi.

     Took out the battery to get it to always start in the same state.  The battery was still fully charged after 10 years.  After much expansion of the status reporting, it got to where a user with a lot of practice could start it up with repeated pressing of the power button.  Key needs are a status code instead of error bits.  The status code should be updated once after running through each initialization attempt.

    The good news is the power button can be used to turn off body_25 & save 5W without shutting down the jetson.  It still burns 5W when idle though.  The fully body_25 tracking system burns 11W.

    It also sometimes starts at 1fps, then goes to 7fps after a few minutes.

    Wifi doesn't always start on the jetson.  Configuration definitely requires ssh from a phone.  The phone can't connect to anything on wifi if mobile data is enabled.  It gives itself a 192.0.0.0 address while the jetson is a 10.0.10.0 address.

    Initialization is so fiddly, the 2 axis & 1 axis trackers should all use the 2 axis codebase instead of separate codebases.

    All the subsystems required for tracking still don't cover the mechanical changes.

    The latest thinking was to bolt the jetson on the truck.  If it gets run over, it's a $150 paperweight & lions won't be inclined to burn $500 on a higher end model.  There's still a chance of letting it flop around in a padded enclosure.  It's a lot bigger than the raspberry pi.  Nothing is stopping a string from reinforcing the handle & it might be necessary for the 'pro.

    The 1st test was for tracking robustness without the 'pro.  The limitations of USB wifi & phone app restrictions make screencaps no longer a viable way of debugging the tracker.  There are definitely problems with task switching the app & frames getting split.

    Still prone to detecting trees like efficientdet.  Generally less false positives & more robust than efficientdet.  Had no cases of it actually chasing the wrong subject like efficientdet had.  It suffers from false negatives the same way face detection did.  Being able to scan a full frame at a time is definitely helping....

    Read more »

  • Death of efficientdet lite

    lion mclionhead07/27/2023 at 21:45 0 comments

    It became clear the jetson isn't viable unless it matches the frame rate & robustness of the raspberry pi.  After the experiments with SSD mobilenet, trt_pose, body_25, efficientdet remanes the only model which can do the job.  The problem is debugging intermediate layers of the tensorrt engine.  The leading method is declaring the layers as outputs in model_inspect.py so the change applies to the working model_inspect inference & the broken tensorrt inference.

    This began with a ground up retraining of efficientdet with a fresh dataset.

    root@gpu:~/nn/yolov5# python3 label.py

    root@gpu:~/nn/automl-master/efficientdet# PYTHONPATH=. python3 dataset/create_coco_tfrecord.py --image_dir=../../train_lion --object_annotations_file=../../train_lion/instances_train.json --output_file_prefix=../../train_lion/pascal --num_shards=10

    root@gpu:~/nn/automl-master/efficientdet# python3 main.py --mode=train --train_file_pattern=../../train_lion/pascal*.tfrecord --model_name=efficientdet-lite0 --model_dir=../../efficientlion-lite0 --train_batch_size=1 --num_examples_per_epoch=1000 --num_epochs=100 --hparams=config.yaml

    Noted the graphsurgeon hack

    https://hackaday.io/project/190480-jetson-tracking-cam/log/221260-more-efficientdet-attempts

     to convert int64 weights to int32 caused a bunch of invalid dimensions.

    StatefulPartitionedCall/concat_1 (Concat)
        Inputs: [
            Variable (StatefulPartitionedCall/Reshape_1:0): (shape=[61851824029695], dtype=float32)
            Variable (StatefulPartitionedCall/Reshape_3:0): (shape=[15466177232895], dtype=float32)
            Variable (StatefulPartitionedCall/Reshape_5:0): (shape=[3869765533695], dtype=float32)
            Variable (StatefulPartitionedCall/Reshape_7:0): (shape=[970662608895], dtype=float32)
            Variable (StatefulPartitionedCall/Reshape_9:0): (shape=[352187318271], dtype=float32)
        ]
        Outputs: [
            Variable (StatefulPartitionedCall/concat_1:0): (shape=None, dtype=float32)
        ]
    

    The correct output was:

    StatefulPartitionedCall/concat_1 (Concat)
            Inputs: [
                    Variable (StatefulPartitionedCall/Reshape_1:0): (shape=[None, 14400, 4], dtype=float32)
                    Variable (StatefulPartitionedCall/Reshape_3:0): (shape=[None, 3600, 4], dtype=float32)
                    Variable (StatefulPartitionedCall/Reshape_5:0): (shape=[None, 900, 4], dtype=float32)
                    Variable (StatefulPartitionedCall/Reshape_7:0): (shape=[None, 225, 4], dtype=float32)
                    Variable (StatefulPartitionedCall/Reshape_9:0): (shape=[None, 81, 4], dtype=float32)
            ]
            Outputs: [
                    Variable (StatefulPartitionedCall/concat_1:0): (shape=[None, 19206, 4], dtype=float32)
            ]
    

    That didn't fix the output of course.

    ------------------------------------------------------------------------------------------------------------------------

    There are no tools for visualizing a tensorrt engine. 

    There is a way to visualize the frozen model on tensorboard.  After a bunch of hacky, undocumented commands

    OPENBLAS_CORETYPE=CORTEX57 python3 /usr/local/lib/python3.6/dist-packages/tensorflow/python/tools/import_pb_to_tensorboard.py --model_dir ~/efficientlion-lite0.out --log_dir log

    OPENBLAS_CORETYPE=CORTEX57 tensorboard --logdir=log --bind_all


    It shows a pretty useless string of disconnected nodes.

    You're supposed to recursively double click on nodes to get the operators.

    There's a minimal search function.  It merely confirmed the 2 models have the same structure, as graphsurgeon already showed.  The problem was the weights.

    So a simple weight dumper truckcam/dumpweights.py showed pretrained efficientdet-lite0 to have some weights which were a lot bigger than efficientlion-lite0 but both models were otherwise in equivalent ranges.  There were no Nan's. It was previously shown that fp32 & fp16 failed equally in tensorrt. It couldn't be the conversion of the weights to fp16.

    ------------------------------------------------------------------------------

    The input was the only possible failure point seen. The best chance of success...

    Read more »

  • SSD mobilenet V2

    lion mclionhead07/21/2023 at 19:01 0 comments

    Custom efficientdet was officially busted on the jetson nano & it was time to try other models.  The attraction to efficientdet might have been the speed of the .tflite model on the raspberry pi, the ease of training it with modelmaker.py & that it was just a hair away from working on the jetson, but it just couldn't get past the final step.

    The original jetbot demo used ssd mobilenet v2.  That was the cutoff point for the jetson nano.  SSD mobilenet seems to be enjoying more recent coverage on the gootubes than efficientdet because no-one can afford anything newer.  Dusty guy showed it going at 22fps.  The benchmarks are all over the place.

    It depends on data type, data set, & back end.  Everything at a given frame rate & resolution seems to be equivalent.

    Dusty guy created some documentation about training ssd mobilenet for the jetson nano.

    https://github.com/dusty-nv/jetson-inference/blob/master/docs/pytorch-ssd.md

    He continued to document a variety of different models on the newer jetson products until 2021.

    https://github.com/dusty-nv/jetson-inference/tree/master

    They disabled video commenting right after the lion kingdom tuned in.  The woodgrain room is in Pennsylvania.  Feels like the jetson line is generally on its way out because newer single board computers are catching up.  The jetson nano is 1.5x faster in FP32, 3x faster in FP16, than a raspberry pi 4 in INT8.

     Sticking to just jetson nano models shown in the video series seems to be the key to success.  There's no mention of efficientdet anywhere.  Noted he trained ssd mobilenet on the jetson orin itself.  That would be a rough go on the nano.  Gave efficientdet training a go on the jetson.

    root@antiope:~/automl/efficientdet% OPENBLAS_CORETYPE=CORTEXA57 python3 main.py --mode=train --train_file_pattern=../../train_lion/pascal*.tfrecord --model_name=efficientdet-lite0 --model_dir=../../efficientlion-lite0.jetson --ckpt=../../efficientdet-lite0 --train_batch_size=1 --num_examples_per_epoch=1000 --hparams=config.yaml

    It needed a commented out deterministic option, but ran at 1 epoch every 15 minutes.  It would take 3 days for 300 epochs or 17 hours for 66 epochs.  The GTX 970M ran at 2 minutes per epoch. Giving it a trained starting checkpoint is essential to reduce the number of epochs, but it has to be the same number of classes or it crashes. The swap space thrashes like mad during this process.

    After 80 epochs, the result was exactly the same failed hit on tensorrt & good hit on model_inspect.py, so scratch the training computer as the reason.

    --------------------------------------------------------------------------------------------

    https://github.com/dusty-nv/jetson-inference/blob/master/docs/pytorch-ssd.md

    SSD mobilenet has a new dance for the training set. The annotations have to be in files called sub-train-annotations-bbox.csv, sub-test-annotations-bbox.csv The jpg images have to be in subdirectories called train & test. As an extra twist, train_ssd.py flipped the validation & test filenames.

    Label.py needs train_lion/train,  train_lion/test directories

    Then it needs CSV_ANNOTATION = True

    Then there's a command for training

    python3 train_ssd.py --data=../train_lion/ --model-dir=models/lion --batch-size=1 --epochs=300

    This one doesn't have an easy way of disabling the val step. It needs vals to show what epoch was the best.  At least it's fast in the GTX 970.  Then the ONNX conversion is fast.


    python3 onnx_export.py --model-dir=models/lion

    This picks the lowest loss epoch which ended up being 82.


    time /usr/src/tensorrt/bin/trtexec --fp16 --workspace=2048 --onnx=/root/ssd-mobilenet.onnx --saveEngine=/root/ssd-mobilenet.engine

    The input resolution is only 300x300. Helas, inference in C++ is an involved process described in

    https://github.com/dusty-nv/jetson-inference/blob/master/c/detectNet.cpp
    https://github.com/dusty-nv/jetson-inference/blob/master/examples/detectnet/detectnet.cpp...

    Read more »

  • More efficientdet attempts

    lion mclionhead07/16/2023 at 21:47 0 comments

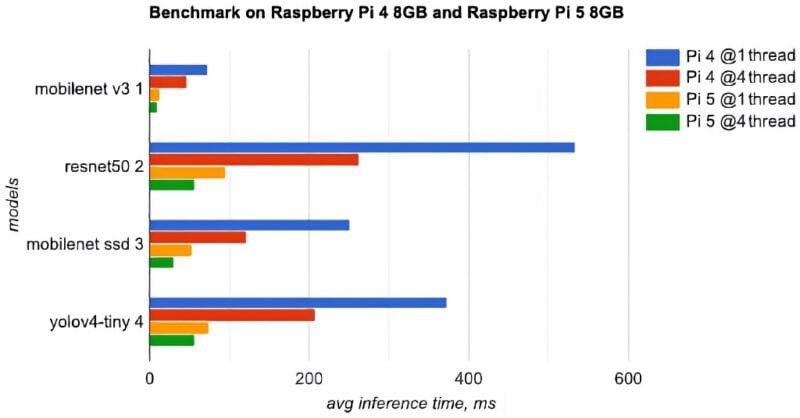
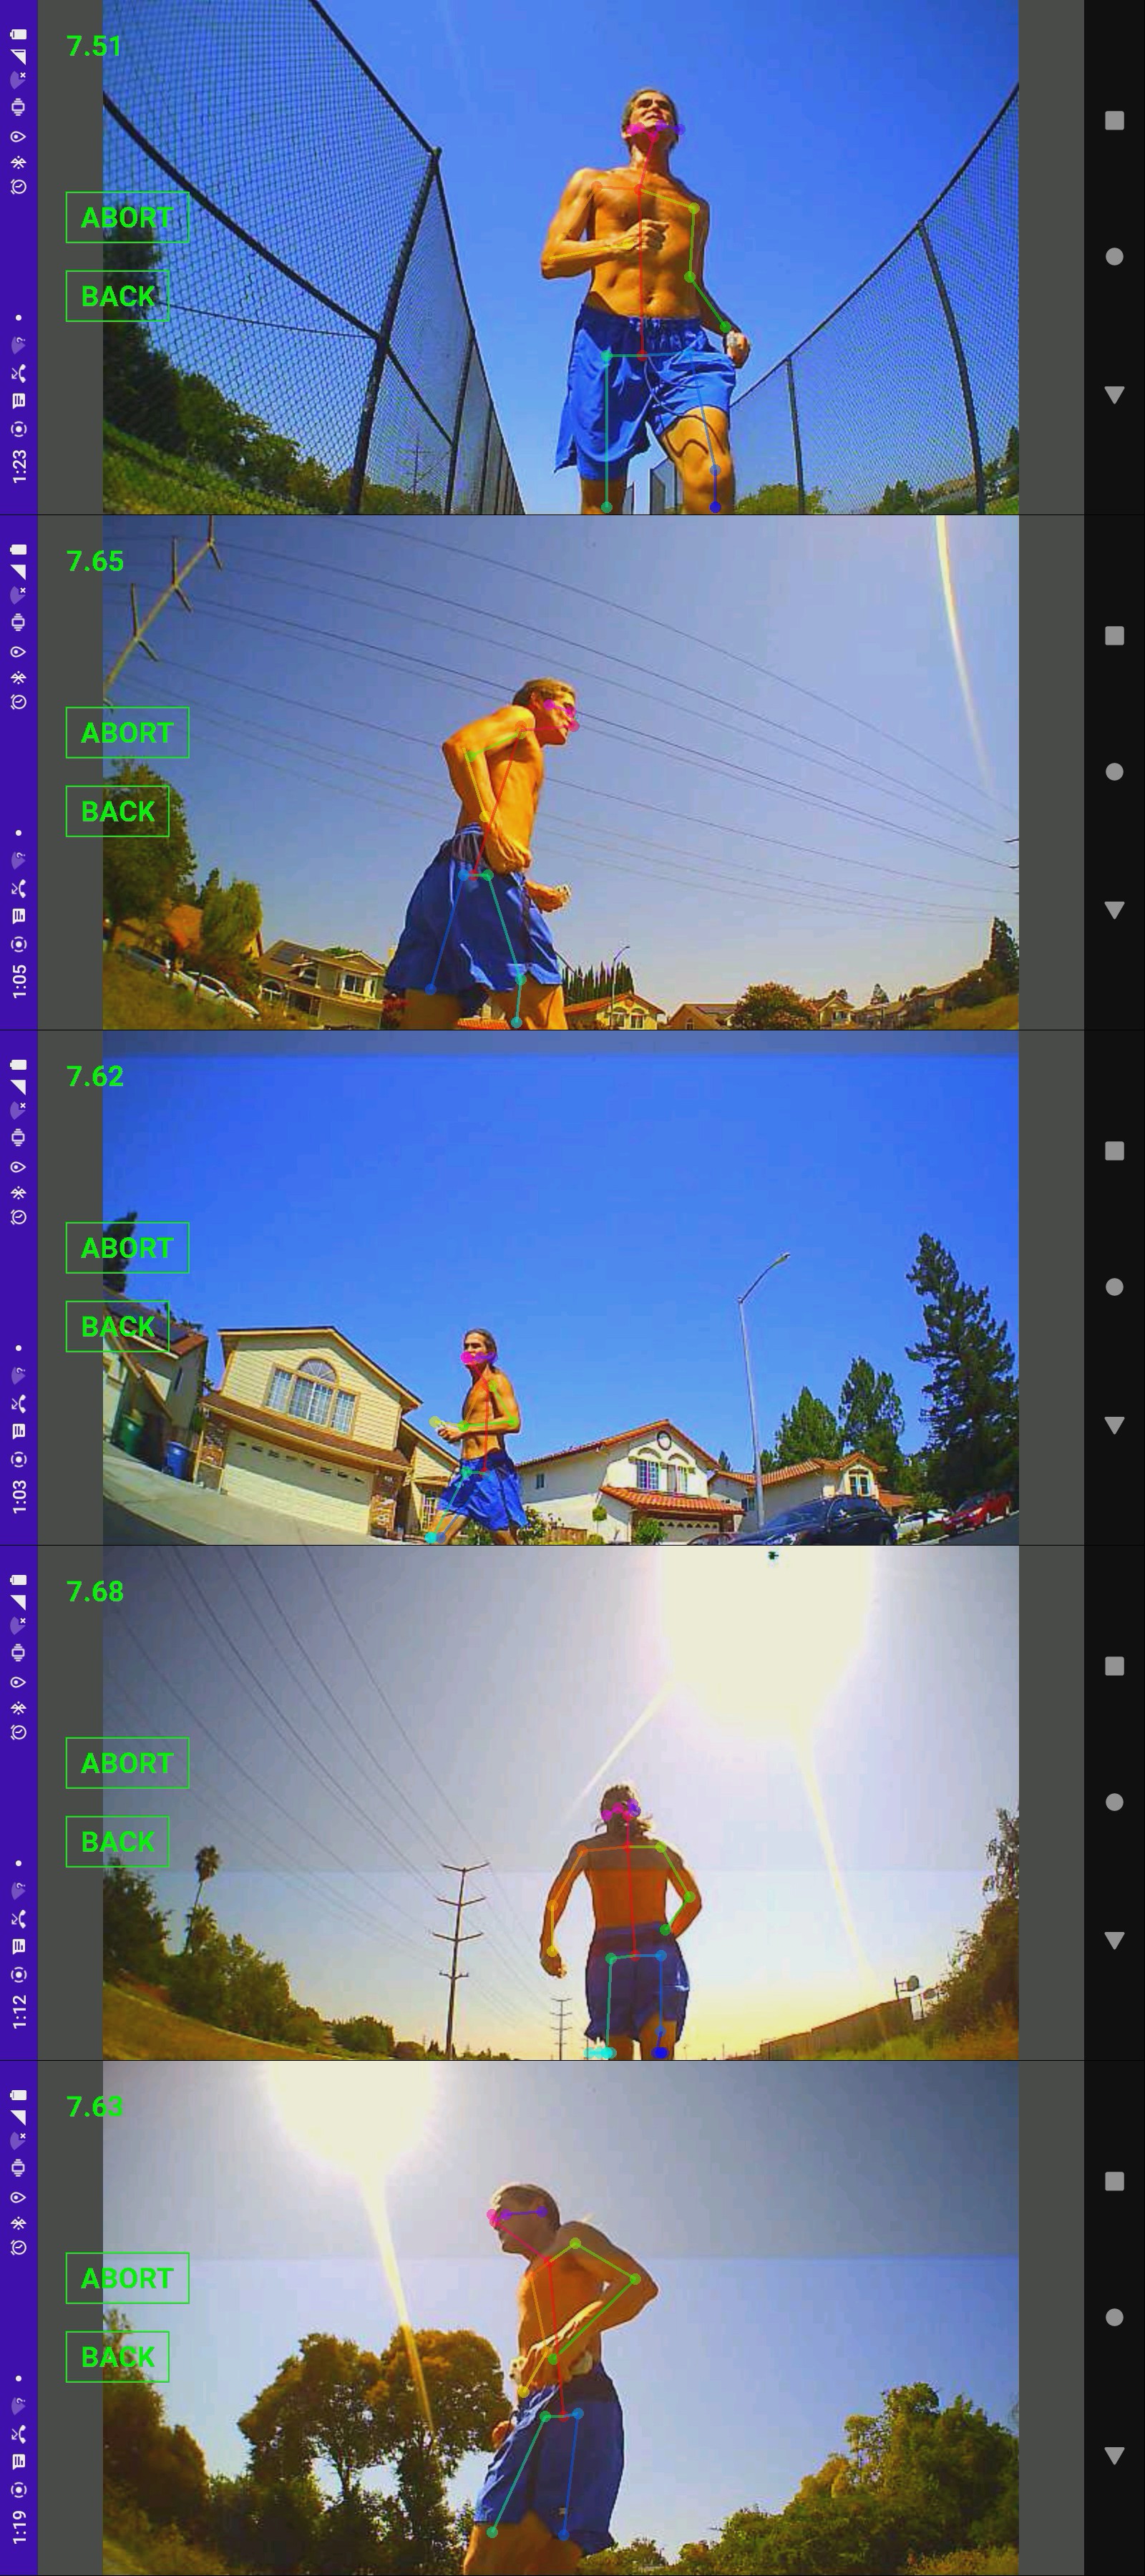
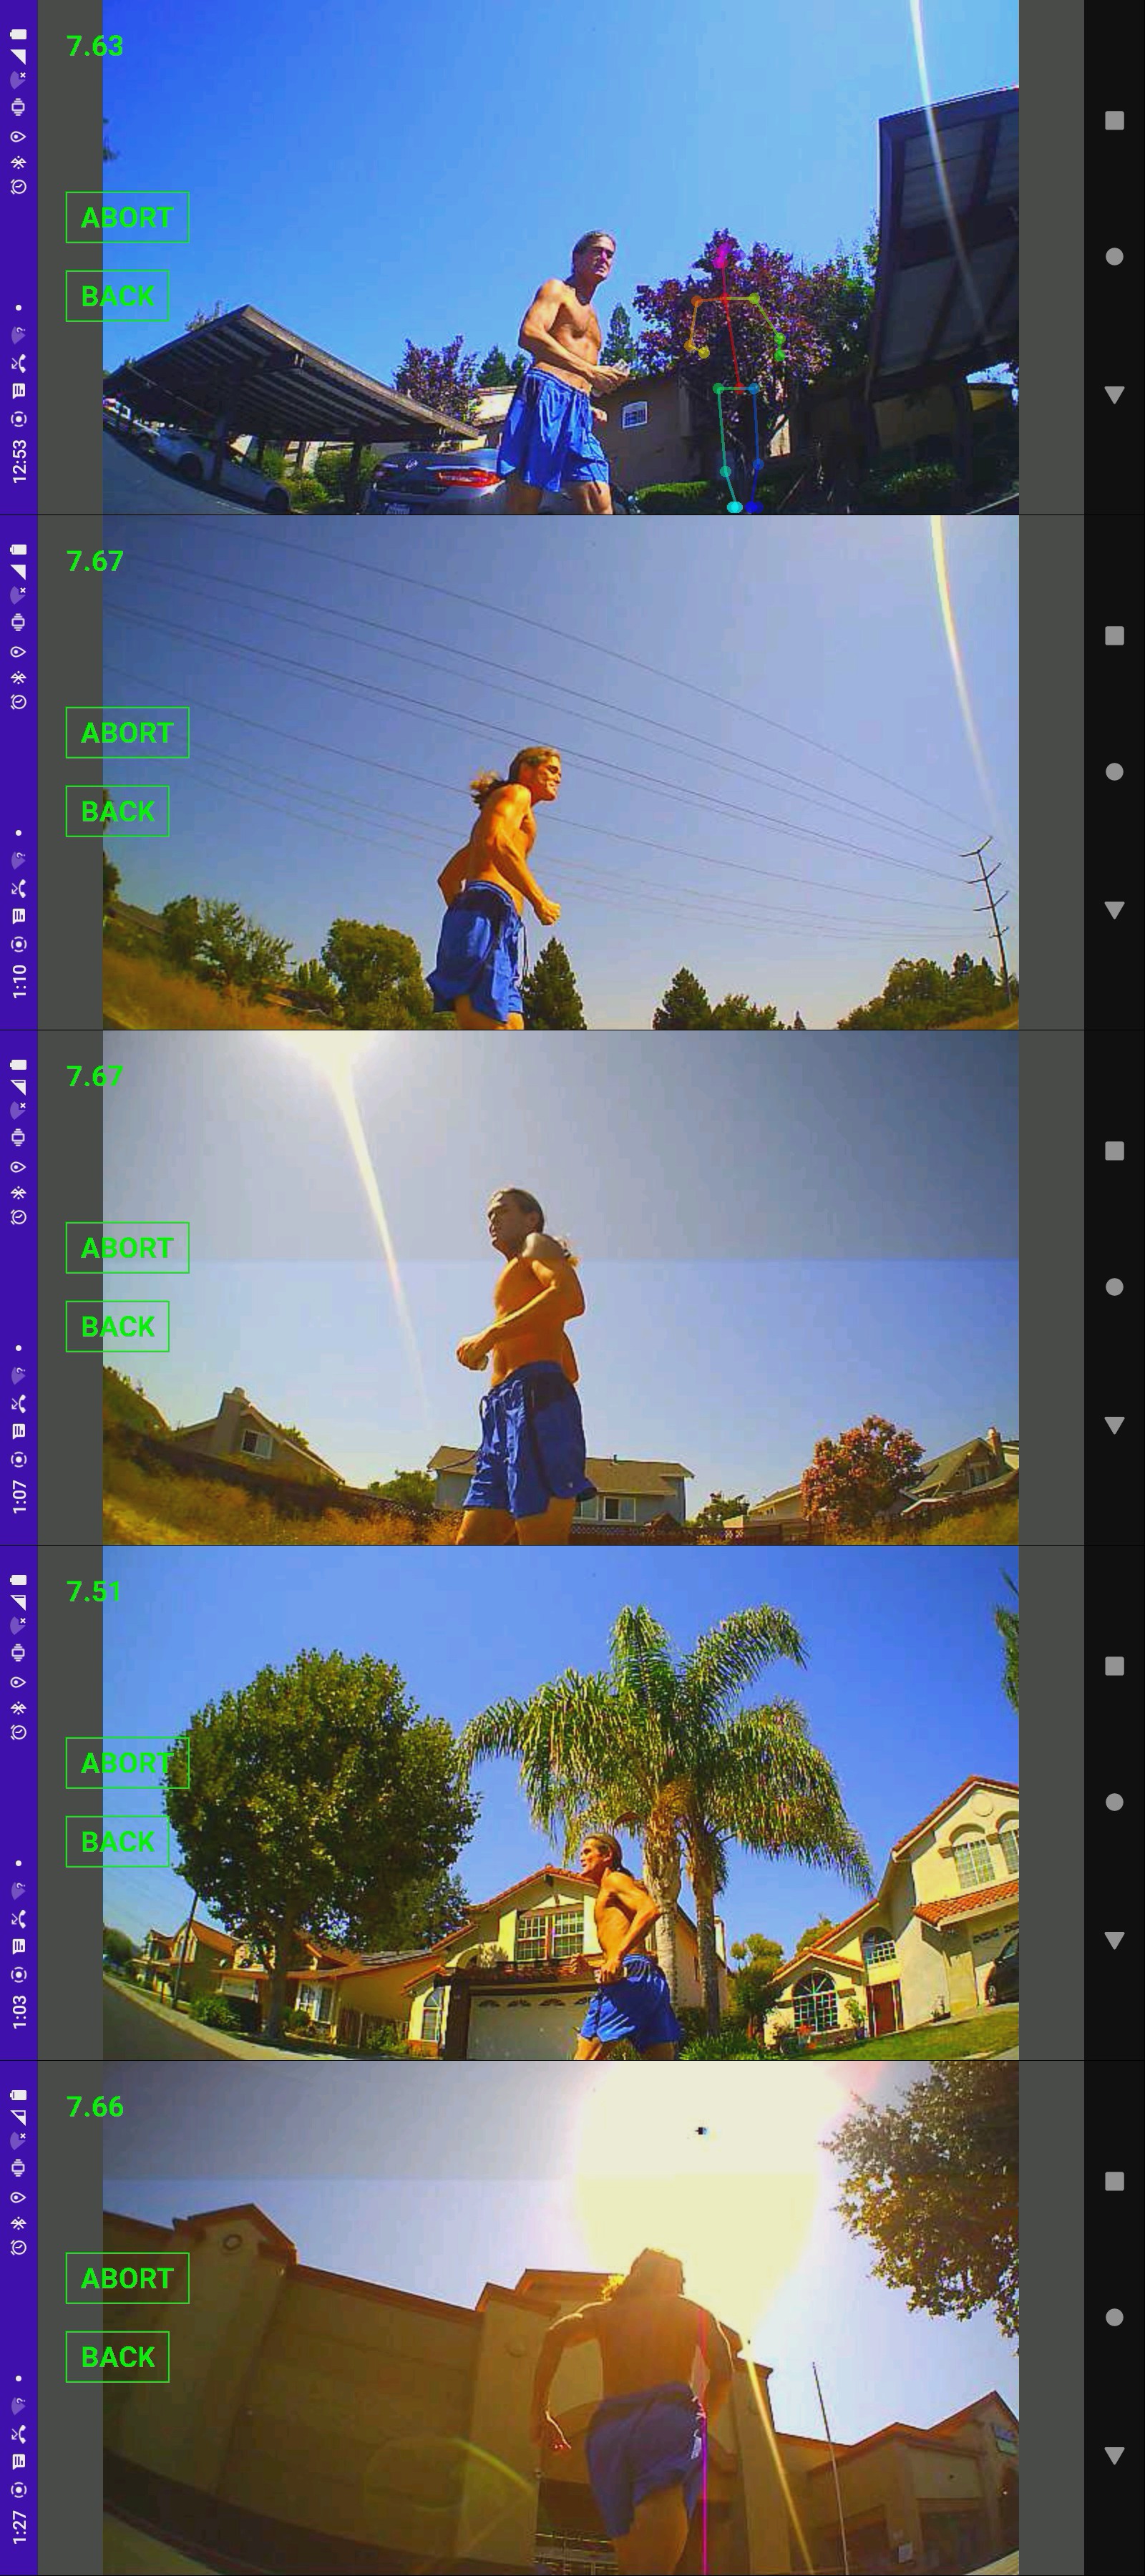
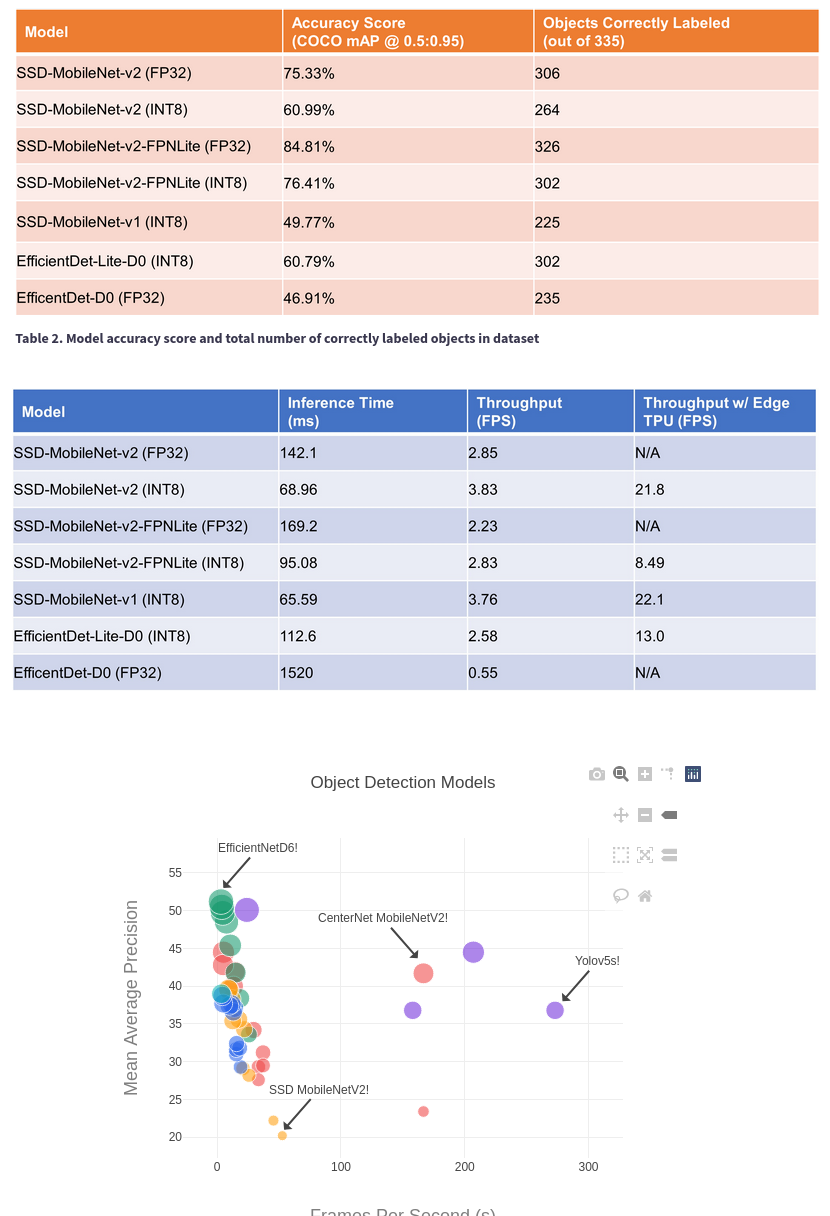
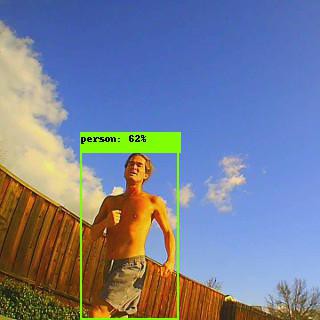
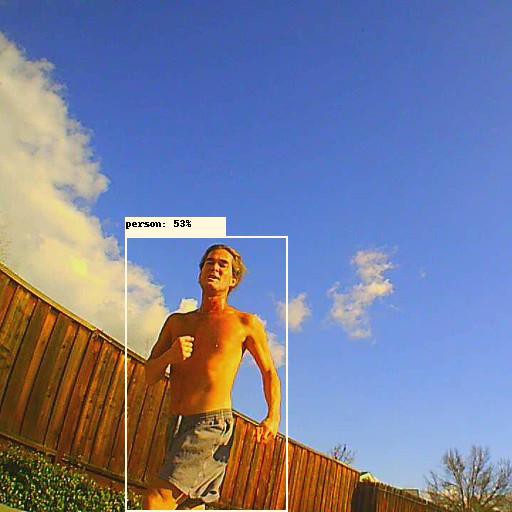
    More testing with pretrained efficientdet-lite0.  It's already known that this model hits trees & light posts.
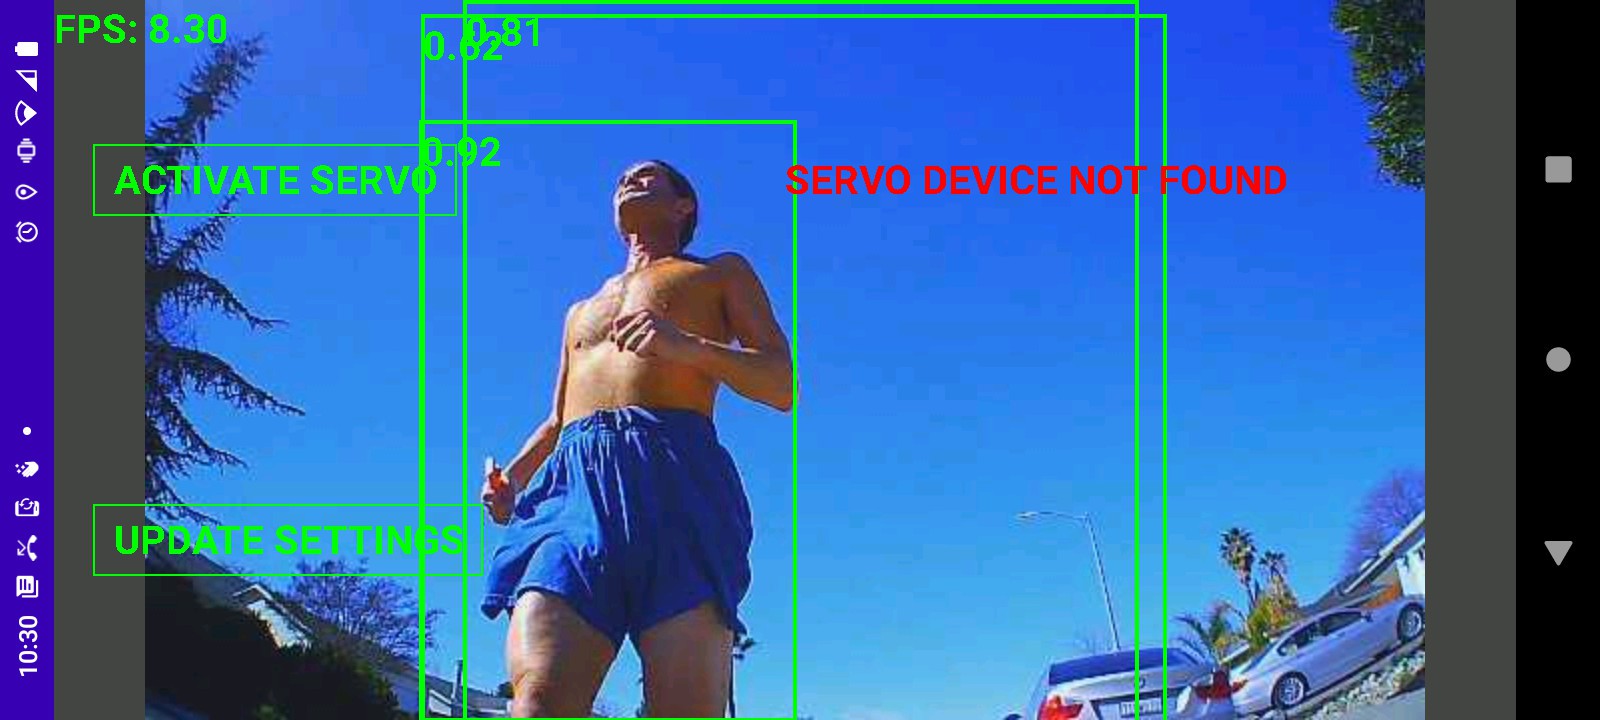
    Finally made a script to go from checkpoint to trt engine in truckcam/det2trt.sh
    It takes 46 minutes on the jetson, but there's no way to cross compile a trt engine.

    Decided to try just 1 epoch of training. 

    root@gpu:/root/nn/automl-master/efficientdet% python3 main.py --mode=train --train_file_pattern=../../train_lion/pascal*.tfrecord --model_name=efficientdet-lite0 --ckpt=../../efficientdet-lite0 --model_dir=../../efficientlion-lite0 --train_batch_size=1 --num_examples_per_epoch=1000 --num_epochs=1 --hparams=config.yaml


    A most unexpected result where the original efficientdet-lite0 hit was still hitting while 2 more hits appeared, corresponding to the failed efficientlion-lite0.  Ran the checkpoint with model_inspect.py 

    root@antiope:/root/automl/efficientdet% OPENBLAS_CORETYPE=CORTEXA57 python3 model_inspect.py --runmode=infer --model_name=efficientdet-lite0 --ckpt_path=../../efficientlion-lite0.1/ --hparams=../../efficientlion-lite0.1/config.yaml --input_image=../../truckcam/lion320.jpg --output_image_dir=.

    This was the 1st time model_inspect.py showed the same evolution of failures as tensorrt.  There's an evolution of the weights where they 1st deviate & eventually converge on the new data set.

    Passing an efficientdet-lite0 checkpoint as the starting checkpoint shouldn't work because the num_classes changed. The next idea was training with the same num_classes so the onnx files would be easier to compare. 

    Right away, the pretrained efficientdet-lite0 had 90 classes instead of any previous number.  The efficientdet-lite0 example was trained on the COCO dataset, but they didn't provide the config.yaml or dataset for that training.

    python3 main.py --mode=train --train_file_pattern=../../train_lion/pascal*.tfrecord --model_name=efficientdet-lite0 --ckpt=../../efficientdet-lite0 --model_dir=../../efficientlion-lite0.21 --train_batch_size=1 --num_examples_per_epoch=1000 --hparams=config.yaml

    config.yaml:

    num_classes: 90
    num_epochs: 300


    The 2 models now had the same dimensions, same number of symbols, but just different symbol names.

    Epoch 1 was less degraded, but epoch 33 was as bad as every other conversion on tensorrt

    -----------------------------------------------

    Mean subtracting the input images improved the results but dividing by stddev_rgb degraded results in truckcam.  Noted it was mean subtracting & stddev dividing in model_inspect.py but this wasn't the reason it worked.

    ---------------------------------

    Another change was in TensorRT/samples/python/efficientdet/create_onnx.py

    # tensorrt doesn't support
    #            shape_corrected = np.asarray([-1, volume, shape_out[2]], dtype=np.int64)
                shape_corrected = np.asarray([-1, volume, shape_out[2]], dtype=np.int32)
    

    This got rid of the dreaded Your ONNX model has been generated with INT64 weights, while TensorRT does not natively support INT64

    Sadly this was not the cause of the malfunction.

    --------------------------------------------

    Gave tf2onnx another try instead of TensorRT/samples/python/efficientdet/create_onnx.py.

    python3 -m tf2onnx.convert --saved-model=efficientlion-lite0.out/ --output=efficientlion-lite0.out/efficientlion-lite0.onnx --opset=11

    The lion kingdom's x86 box got trashed by a failed pip install.  It now failed with the dreaded

    AttributeError: module 'numpy' has no attribute 'object'.

    or

    KeyError: dtype('O')

    A 20 minute conversion on the jetson yielded

    Unsupported ONNX data type: UINT8 (2)

    or

    Assertion weights.type() == DataType::kINT32 failed.

    tf2onnx seems to use too many data types unsupported by tensorrt.  That's why there's an onnx converter in  TensorRT/samples/python/efficientdet.  You can sort of replace the data types with graphsurgeon.

    graph = gs.import_onnx(onnx.load(IN_MODEL))
    
    
    # convert...
    Read more »

  • Jetson enclosure

    lion mclionhead07/11/2023 at 23:12 0 comments

    The enclosure was making better progress than the neural network. 

    It evolved into this double clamp thing where 1 set of clamps holds the jetson in while another set holds the lid closed.  There could be 1 more evolution where the lid holds the jetson in on its own.  It would require some kind of compressible foam or rubber but it would be tighter.  It wouldn't save any space.  It could be done without compressible material & just standoffs which were glued in last.  The clips being removable make it easy to test both ideas.

    This design worked without any inner clips.  The jetson wobbles slightly on 1 side.  It just needs a blob of hot snot or rubber thing as a standoff on 1 side.  The other side is pressed against the power cable.  There's enough room inside for the buck converter, but it blocks the airflow.  A hole in back could allow the power cable to go out that way & the buck converter to wrap around the back.  The hinge wires could use PLA welds.

    The air manages to snake around to the side holes.  It would be best to have the hinges in the middle & openings in the back.  The hinge side could have wide hex grids for more air flow.  The clip side could have 1 clip in the middle & wide hex grids where the 2 clips are.  There's enough room under the jetson for the clip to go there.  This would take more space than the existing side panels.

    The existing holes could be widened.  A hex grid under the heat sink instead of solid plastic could get rid of the empty space.  Another hex grid on top of the USB ports would look cool.


    The next move was to try inference on x86 with automl-master/efficientdet/model_inspect.py

    python3 model_inspect.py --runmode=infer --model_name=efficientdet-lite0 --ckpt_path=../../efficientdet-lite0-voc/ --hparams=voc_config.yaml --input_image=320.jpg --output_image_dir=.

    python3 model_inspect.py --runmode=infer --model_name=efficientdet-lite0 --ckpt_path=../../efficientlion-lite0/ --hparams=../../efficientlion-lite0/config.yaml --input_image=test.jpg --output_image_dir=.

    python3 model_inspect.py --runmode=infer --model_name=efficientdet-lite0 --ckpt_path=../../efficientdet-lite0/ --hparams=../../efficientdet-lite0/config.yaml --input_image=320.jpg --output_image_dir=.

    Used a 320x320 input image.  None of the home trained models detected anything.  Only the pretrained efficientdet-lite0 detected anything.

    Another test with the balky efficientdet-d0 model & train_and_eval mode.

    python3 main.py --mode=train_and_eval --train_file_pattern=tfrecord/pascal*.tfrecord --val_file_pattern=tfrecord/pascal*.tfrecord --model_name=efficientdet-d0 --model_dir=../../efficientdet-d0 --ckpt=efficientdet-d0 --train_batch_size=1 --eval_batch_size=1 --num_examples_per_epoch=5717 --num_epochs=50 --hparams=voc_config.yaml

    python3 model_inspect.py --runmode=infer --model_name=efficientdet-d0 --ckpt_path=../../efficientdet-d0/ --hparams=../../efficientdet-d0/config.yaml --input_image=lion512.jpg --output_image_dir=.


    Lower confidence but it detected something. Create the val dataset for a lion.

    PYTHONPATH=. python3 dataset/create_coco_tfrecord.py --image_dir=../../val_lion --object_annotations_file=../../val_lion/instances_val.json --output_file_prefix=../../val_lion/pascal --num_shards=10

    Then use the pretrained efficientdet-lite0 as a starting checkpoint.


    https://storage.googleapis.com/cloud-tpu-checkpoints/efficientdet/coco/efficientdet-lite0.tgz

    Another training command for efficientlion-lite0

    python3 main.py --mode=train_and_eval --train_file_pattern=../../train_lion/pascal*.tfrecord --val_file_pattern=../../val_lion/pascal*.tfrecord --model_name=efficientdet-lite0 --model_dir=../../efficientlion-lite0 --ckpt=../../efficientdet-lite0 --train_batch_size=1 --eval_batch_size=1 --num_examples_per_epoch=1000...

    Read more »

  • Efficientdet dataset hack

    lion mclionhead07/07/2023 at 23:40 0 comments

    It's been 6 months with the jetson, with only the openpose based 2D tracker & the face recognizer to show for it.  1 problem is it takes eternity to train a model at 17 hours.  The conversion to tensorrt takes another 2 hours, just to discover what doesn't work.

    It reminds lions of a time when encoding a minute of video into MPEG-1 took 24 hours so no-one bothered.  The difference is training a network is worth it.

    The jetson nano predated efficientdet by a few years. The jetbot demo used ssd_mobilenet_v2.  That might explain the lack of any ports of efficientdet.

    The detection failures were narrowed down to num_detections being 0, which can be tested after only 10 epochs.

    Trying num_classes=2 didn't work either.  1 hit said 1 class was the background so the minimum number was 2.  A higher than necessary number might dilute the network but it should eliminate it as a factor.

    num_detections is always 100 with the pretrained network & always 0 with the lion network.  The 100 comes from tflite_max_detections in the hparams argument.  The default hparams are in hparams_config.py.  hparams_config.py contains names & resolutions of all the efficientdets.

    Another hit left out all the val images, starting checkpoint & threw in a label_map:

    time python3 main.py \
    --mode=train \
    --train_file_pattern='../../train_lion/*.tfrecord' \
    --model_name=efficientdet-lite0  \
    --model_dir=../../efficientlion-lite0/ \
    --train_batch_size=1  \
    --num_examples_per_epoch=1000 \
    --hparams=config.yaml \
    --num_epochs=300
    

    config.yaml:

    num_classes: 2
    label_map: {1: lion}
    

    automl/efficientdet/tf2/:

    time OPENBLAS_CORETYPE=CORTEXA57 PYTHONPATH=.:.. python3 inspector.py --mode=export --model_name=efficientdet-lite0 --model_dir=../../../efficientlion-lite0/ --saved_model_dir=../../../efficientlion-lite0.out --hparams=../../../efficientlion-lite0/config.yaml

    TensorRT/samples/python/efficientdet:

    time OPENBLAS_CORETYPE=CORTEXA57 python3 create_onnx.py --input_size="320,320" --saved_model=/root/efficientlion-lite0.out --onnx=/root/efficientlion-lite0.out/efficientlion-lite0.onnx

    time /usr/src/tensorrt/bin/trtexec --fp16 --workspace=2048 --onnx=/root/efficientlion-lite0.out/efficientlion-lite0.onnx --saveEngine=/root/efficientlion-lite0.out/efficientlion-lite0.engine

    That got it down to 10 hours & 0 detections.  Verified the pretrained efficientdet-lite0 got num_detections=100.

    https://storage.googleapis.com/cloud-tpu-checkpoints/efficientdet/coco/efficientdet-lite0.tgz

    That showed the inspector, onnx conversion, & tensorrt conversion worked.  Just the training was broken.

    A few epochs of training with section 9 of the README & the original VOC dataset

    https://github.com/google/automl/blob/master/efficientdet/README.md

    yielded a model with num_detections 100, so that narrowed it down to the dataset.  The voc dataset had num_classes 1 higher than the number of labels. A look with the hex editor showed the tfrecord files for lions* had no bbox or class entries.

    The create_coco_tfrecord.py command line was wrong. This one had no examples.

    in automl-master/efficientdet

    PYTHONPATH=. python3 dataset/create_coco_tfrecord.py --image_dir=../../train_lion --object_annotations_file=../../train_lion/instances_train.json --output_file_prefix=../../train_lion/pascal --num_shards=10

    That finally got num_detections 100 from the lion dataset, with 2 classes.  Sadly, the hits were all garbage after 300 epochs.

    Pretrained efficientdet-lite0 wasn't doing much better.  It gave bogus hits of another kind.

    So there might be a break after the training.  A noble cause would be getting the pretrained version to work before training a new one.  The gootube video still showed it hitting valid boxes.

  • Efficientdet with no detections

    lion mclionhead07/01/2023 at 23:17 0 comments

    After copying the example C++ version

    https://github.com/NobuoTsukamoto/tensorrt-examples/blob/main/cpp/efficientdet/object_detector.cpp

    lite4 went at a miserable 2.5fps.  Lite4 + face detection went at 2fps.  Lite4 + face detection only used 2GB of RAM.

    Buried in the readme was a benchmark table confirming 2fps for this model.

    https://github.com/NobuoTsukamoto/benchmarks/blob/main/tensorrt/jetson/detection/README.md

    It wasn't very obvious because his video showed a full framerate.  The inference must have been done offline.

    It did show 320x320 lite0 hitting 20fps so it was back to a windowed lite0.


    truckcam/label.py was rerun with 1280x720 output.

    Then convert to tfrecords in automl-master/efficientdet

    PYTHONPATH=. python3 dataset/create_coco_tfrecord.py --image_dir=../../train_lion --image_info_file=../../train_lion/instances_train.json --output_file_prefix=../../train_lion/pascal --num_shards=10

    PYTHONPATH=. python3 dataset/create_coco_tfrecord.py --image_dir=../../val_lion --image_info_file=../../val_lion/instances_val.json --output_file_prefix=../../val_lion/pascal --num_shards=10

    Then download a new starting checkpoint

    https://storage.googleapis.com/cloud-tpu-checkpoints/efficientnet/ckptsaug/efficientnet-b0.tar.gz

    Make a new output directory

    mkdir ../../efficientlion-lite0

    Then make a new training command for lite0

    time python3 main.py \
    --mode=train_and_eval \
    --train_file_pattern='../../train_lion/pascal-00000-of-00010.tfrecord' \
    --val_file_pattern='../../val_lion/pascal-00000-of-00010.tfrecord' \
    --model_name=efficientdet-lite0  \
    --model_dir=../../efficientlion-lite0/ \
    --backbone_ckpt=efficientnet-b0  \
    --train_batch_size=1  \
    --eval_batch_size=1 \
    --eval_samples=100 \
    --num_examples_per_epoch=1000 \
    --hparams="num_classes=1,moving_average_decay=0,mixed_precision=true" \
    --num_epochs=300
    

    Create the efficientlion-lite0.yaml file in ../../efficientlion-lite0/

    ---
    image_size: 320x320
    num_classes: 1 
    moving_average_decay: 0
    nms_configs: 
         method: hard
         iou_thresh: 0.35
         score_thresh: 0.
         sigma: 0.0
         pyfunc: False
         max_nms_inputs: 0
         max_output_size: 100
    

    Inside automl/efficientdet/tf2/ run

    PYTHONPATH=.:.. python3 inspector.py --mode=export --model_name=efficientdet-lite0 --model_dir=../../../efficientlion-lite0/ --saved_model_dir=../../../efficientlion-lite0.out --hparams=../../../efficientlion-lite0/efficientlion-lite0.yaml

    In TensorRT/samples/python/efficientdet run

    time OPENBLAS_CORETYPE=CORTEXA57 python3 create_onnx.py --input_size="320,320" --saved_model=/root/efficientlion-lite0.out --onnx=/root/efficientlion-lite0.out/efficientlion-lite0.onnx

    /usr/src/tensorrt/bin/trtexec --fp16 --workspace=2048 --onnx=/root/efficientlion-lite0.out/efficientlion-lite0.onnx --saveEngine=/root/efficientlion-lite0.out/efficientlion-lite0.engine

    The original windowing algorithm scanned 1 cropped section per frame & hit 7fps on the raspberry pi.  It had enough brains so the window followed the 1st body it detected.  If it didn't detect a body, it cycled window positions.

    The only evolution with the jetson is going to be face recognition on the full frame. If it matches a face, that always positions the body tracking window.  If it detects a body with no current face, go for the body closest to the last face match.  If it detects bodies with no previous face, position the tracking window on the largest body in the window.  Only if there's no face & no body does it cycle window positions.  The hope is 2 models give it a higher chance of getting the right hit.

    Efficientdet-lite0 window + face detection ran at 7fps.  Efficientdet-lite0 ran at 19fps on its own.  Sadly, the custom trained model didn't detect anything while a stock efficientdet-d0 worked.  Stock efficientdet-d0 was just as bad as lions remember.  Retraining with 1 category was the key but lions believed changing the number of...

    Read more »

View all 18 project logs

Enjoy this project?

Share

Discussions

Similar Projects

Does this project spark your interest?

Become a member to follow this project and never miss any updates